Mysql8.0主从复制搭建,shardingsphere+springboot+mybatis读写分离
1、安装mysql8.0
- 首先需要在192.167.3.171上安装JDK。
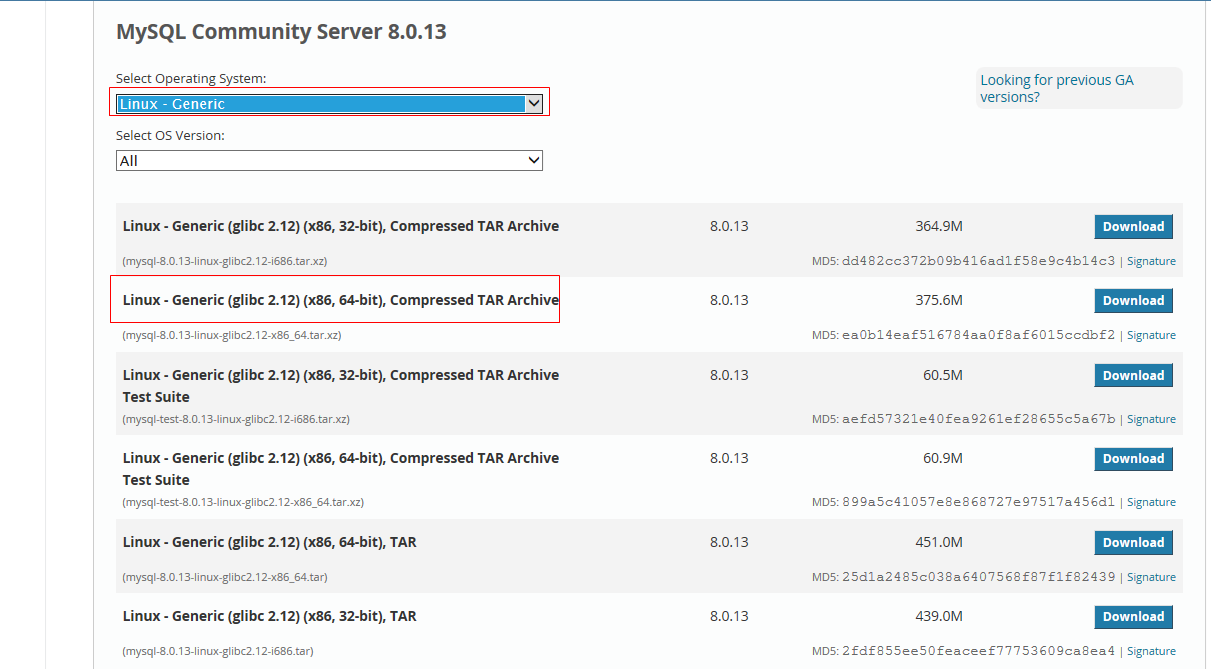
- 下载mysql安装包,https://dev.mysql.com/downloads/,找到以下页面下载。

- 下载后放到linux系统中
- 官网说需要先查看本机是否已安装mysql,删除mysql这里不介绍。
- yum install libaio yum install openssl,安装mysql所需的软件包:libaiohe openssl。
- tar -xvf mysql-8.0.13-linux-glibc2.12-x86_64.tar.xz,解压。
- mv mysql-8.0.13-linux-glibc2.12-x86_64 /usr/local/mysql,将解压文件移动到local下。
- groupadd mysql
- useradd -r -g mysql -s /bin/false mysql
- cd /usr/local/mysql
- mkdir mysql-files
- chown mysql:mysql mysql-files
- chmod 750 mysql-files
bin/mysqld --initialize --user=mysql,初始化数据库,注意此处随机生成的密码,第一次登陆mysql的时候要使用。
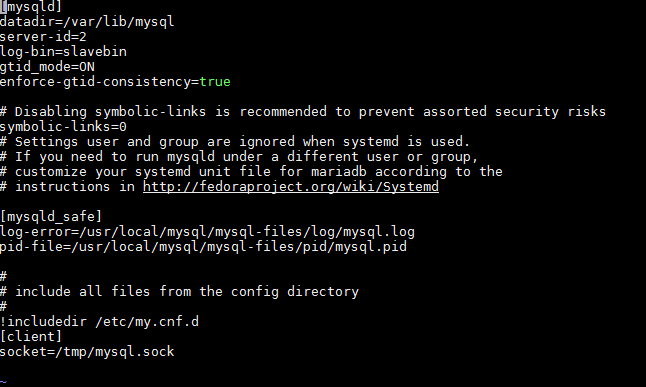
bin/mysql_ssl_rsa_setup,安装ssl。cp support-files/mysql.server /etc/init.d/mysql.server将服务文件复制到开机启动目录,实现服务开机自启动。bin/mysqld_safe --user=mysql &开启服务,&是后台运行的意思,执行命令之后,终端会卡在一个位置,再按一下Enter即可。如果上面命令报错,什么log,pid文件未找到之类的,就需要执行下面方法。由于mysql服务启动时,会去读取/etc/my.cnf文件中的配置内容,我们打开文件来看,文件内容如下(我已修改):

- 注意,[mysqld]或[mysqld_safe]下配置了socket路径时,会以此为准,而本地登陆mysql的时候,如果不用 -S指定mysql.sock文件位置,会报错,不能找到/tmp/mysql.sock。所以我们只在[client]里面配置。

原来的内容地址就是启动mysql服务时报错的路径,我们可以知道,文件不存在问题导致启动失败。这时,就需要新建文件,并设置文件权限了。我这里修改了红框内的路径,具体命令如下:
- cd /usr/local/mysql/mysql-files
- mkdir log ; mkdir pid
- touch log/mysql.log ; touch pid/mysql.pid
- cd /usr/local/mysql
- chown -R mysql:mysql mysql-files
- chmod -R 750 mysql-files
- 然后再次执行:
bin/mysqld_safe --user=mysql & bin/mysql -uroot -p登陆mysql,回车后粘贴之前初始密码。ALTER USER 'root'@'localhost' IDENTIFIED BY 'ibethfy;- flush privileges
- 执行完成后,我又想使用navicat登陆,那好,试试呗,navicat连接直接报找不到服务,2003 cannot。。。。。,行嘛,排除原因,总结如下:
1、建立供外部连接的mysql用户。
- mysql -uroot -pibethfy
- create user 'ibethfy'@'%' identified by 'ibethfy';
- grant all on *.* to 'ibethfy'@'%'; 注意,mysql8的grant语句和之前版本有差别。
- flush privileges;
2、防火墙关了,我用的centos。
- firewall-cmd --state 查看防火墙状态,发现时running;
- systemctl stop firewalld.service 关闭防火墙
- firewall-cmd --state 再次查看,发现not running;
然后再用navicat连接,好嘛,又报错,caching-sha2-password,看来一下,应该是mysql的加密策略变了,navicat版本没跟上呗,那行,执行下面命令,然后再连接,没问题了!
- mysql -uroot -pibethfy
- alter user 'ibethfy'@'%' identified by 'ibethfy' password expire never;
- alter user 'ibethfy'@'%' identified with mysql_native_password by 'ibethfy';
- flush privileges;
- ps -ef |grep mysql,可以看到mysql服务有两个,mysqld_safe和mysqld。说明启动成功了。
- 大家在linux装mysql8.0的时候,如果按照步骤来,还出现问题,就分析一下,主要导致的一些原因就是权限问题和文件问题,依次解决一下再试试。
2、mysql主从安装
- 分别按以上方发安装两个mysql服务,分别为192.167.3.171(主),192.167.3.172(从)。
- 配置主服务
- my.conf 文件修改。添加log-bin与server-id,具体配置和上面一致。
- 重启mysql,service mysql restart;也可用mysqladmin -uroot -pibethfy shutdown;mysqld_safe --user=mysql &;如果没有找到服务,直接用ps -ef|grep mysql,找到对应进程,kill -9强行终止后(不建议),使用mysqld_safe --user=mysql & 重启。
- 登陆mysql,赋予外部连接的ibethfy用户权限并刷新。grant replication slave on *.* to 'ibethfy'@'%'; flush privileges;
- 查看主服务信息,从服务配置时需要用到,show master status;

- 修改从mysql服务配置
- 修改my.cnf,vi /etc/my.cnf
- 配置从服务,先登陆后,执行 CHANGE MASTER TO MASTER_HOST='192.167.3.171', MASTER_USER='ibethfy', MASTER_PASSWORD=ibethfy',MASTER_LOG_FILE='binlog.000010', MASTER_LOG_POS=1179;
- start slave;
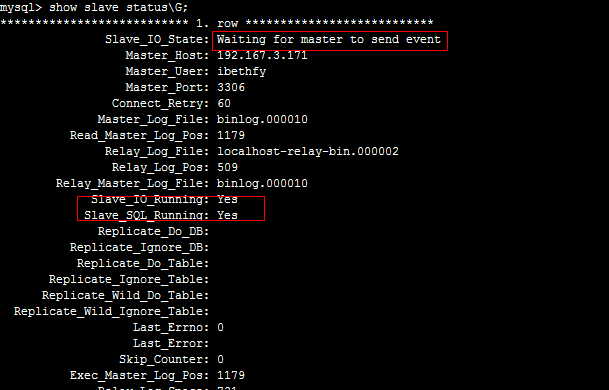
- show slave status\G;查看从服务状态,如果内容中有Last_IO_Error: Fatal error: The slave I/O thread stops because master and slave have equal MySQL server ids; these ids must be different for replication to work (or the –replicate-same-server-id option must be used on slave but this does not always make sense; please check the manual before using it);错误,需要执行下面语句:
- show variables like 'server_id';可以看见server_id=1,这里与主服务id相同,则执行,set global server_id=2;与my.cnf内容相同即可。
- 重新启动start slave;
- 如果得到以下信息,则提示主从复制配置成功。
- 如果启动slave报错,什么文件未删除之类的,可以执行reset slave,然后重新执行上面步骤。
- 现在可以测试了,在主服务建一个database,从服务可以看见,代表配置成功。
3、springboot+mybatis+shardingsphere搭建主从分离
- 使用idea创建springboot工程
- pom.xml依赖jar配置,具体配置如下
<?xml version="1.0" encoding="UTF-8"?>
<project xmlns="http://maven.apache.org/POM/4.0.0" xmlns:xsi="http://www.w3.org/2001/XMLSchema-instance"
xsi:schemaLocation="http://maven.apache.org/POM/4.0.0 http://maven.apache.org/xsd/maven-4.0.0.xsd">
<modelVersion>4.0.0</modelVersion>
<parent>
<groupId>org.springframework.boot</groupId>
<artifactId>spring-boot-starter-parent</artifactId>
<version>2.1.2.RELEASE</version>
<relativePath/> <!-- lookup parent from repository -->
</parent>
<groupId>com.example</groupId>
<artifactId>demo</artifactId>
<version>0.0.1-SNAPSHOT</version>
<name>SharingJDBCDemo</name>
<description>Demo project for Spring Boot</description> <properties>
<java.version>1.8</java.version>
</properties> <dependencies>
<dependency>
<groupId>org.springframework.boot</groupId>
<artifactId>spring-boot-starter-web</artifactId>
</dependency>
<!-- mybatis 依赖jar包-->
<dependency>
<groupId>org.mybatis.spring.boot</groupId>
<artifactId>mybatis-spring-boot-starter</artifactId>
<version>2.0.0</version>
</dependency> <dependency>
<groupId>mysql</groupId>
<artifactId>mysql-connector-java</artifactId>
<scope>runtime</scope>
</dependency>
<dependency>
<groupId>org.springframework.boot</groupId>
<artifactId>spring-boot-starter-test</artifactId>
<scope>test</scope>
</dependency>
<!--shardingsphere的springboot依赖jar-->
<dependency>
<groupId>io.shardingsphere</groupId>
<artifactId>sharding-jdbc-spring-boot-starter</artifactId>
<version>3.0.0</version>
</dependency>
<!--mybatis的自动生成器配置-->
<dependency>
<groupId>org.mybatis.generator</groupId>
<artifactId>mybatis-generator-core</artifactId>
<version>1.3.5</version>
</dependency>
</dependencies> <build>
<plugins>
<plugin>
<groupId>org.springframework.boot</groupId>
<artifactId>spring-boot-maven-plugin</artifactId>
</plugin>
<plugin>
<groupId>org.mybatis.generator</groupId>
<artifactId>mybatis-generator-maven-plugin</artifactId>
<version>1.3.5</version>
<configuration>
<!--配置文件的位置-->
<configurationFile>src/main/resources/generateMybatis.xml
</configurationFile>
<overwrite>true</overwrite>
<verbose>true</verbose>
</configuration>
</plugin>
</plugins>
</build> </project> - application.yml配置,具体如下
server:

  port: 8888

spring:

  application:

    name: SharingJdbc

mybatis:

  type-aliases-package: com.example.demo.entity

  mapper-locations: classpath:mapper/*.xml

sharding:

  jdbc:

    datasource:

      names: master1,slave1

      master1:

        type: com.zaxxer.hikari.HikariDataSource

        driver-class-name: com.mysql.cj.jdbc.Driver

        jdbc-url: jdbc:mysql://192.167.3.171:3306/ibethfy?useSSL=false&useUnicode=true&characterEncoding=utf8&autoReconnect=true

        username: ibethfy

        password: ibethfy

        maxPoolSize: 20

      slave1:

        type: com.zaxxer.hikari.HikariDataSource

        driver-class-name: com.mysql.cj.jdbc.Driver

        jdbc-url: jdbc:mysql://192.167.3.172:3306/ibethfy?useSSL=false&useUnicode=true&characterEncoding=utf8&autoReconnect=true

        username: ibethfy

        password: ibethfy

        maxPoolSize: 20

    config:

      masterslave:

        load-balance-algorithm-type: round_robin

        name: db_m1_s1

        master-data-source-name: master1

        slave-data-source-names: slave1

      sharding:

        props:

          sql:

show: true - mybatis自动生成器配置
<?xml version="1.0" encoding="UTF-8"?>

<!DOCTYPE generatorConfiguration

        PUBLIC "-//mybatis.org//DTD MyBatis Generator Configuration 1.0//EN"

        "http://mybatis.org/dtd/mybatis-generator-config_1_0.dtd">

<generatorConfiguration>

    <!--配置连接器jar地址-->

    <classPathEntry

            location="C:\Users\c17763\.m2\repository\mysql\mysql-connector-java\8.0.13\mysql-connector-java-8.0.13.jar"/>

    <context id="my" targetRuntime="MyBatis3" defaultModelType="flat">

        <commentGenerator>

            <property name="suppressDate" value="false"/>

            <property name="suppressAllComments" value="true"/>

        </commentGenerator>

        <!--连接驱动配置-->

        <jdbcConnection driverClass="com.mysql.cj.jdbc.Driver"

                        connectionURL="jdbc:mysql://192.167.3.171:3306/ibethfy?useUnicode=true" userId="ibethfy"

                        password="ibethfy"/>

        <!--生成的entity实体类路径-->

        <javaModelGenerator targetPackage="com.example.demo.entity"

                            targetProject="E:\test\SharingJDBCDemo\src\main\java">

            <property name="enableSubPackages" value="true"/>

            <property name="trimStrings" value="true"/>

        </javaModelGenerator>

        <!--mapper.xml文件路径-->

        <sqlMapGenerator targetPackage="\resources\mapper"

                         targetProject="E:\test\SharingJDBCDemo\src\main">

            <property name="enableSubPackages" value="true"/>

        </sqlMapGenerator>

        <!--mapper接口类生成的路径-->

        <javaClientGenerator targetPackage="com.example.demo.mapper"

                             targetProject="E:\test\SharingJDBCDemo\src\main\java" type="XMLMAPPER">

            <property name="enableSubPackages" value="true"/>

        </javaClientGenerator>

        <!--<table tableName="T_FEE_AGTBILL" domainObjectName="FeeAgentBill"

               enableCountByExample="false" enableUpdateByExample="false"

               enableDeleteByExample="false" enableSelectByExample="false"

               selectByExampleQueryId="false"/>-->

        <!--需要生成的table,tableName是表名,domainObjectName是生成的实体类名-->

        <table tableName="people" domainObjectName="People"

               enableCountByExample="false" enableUpdateByExample="false"

               enableDeleteByExample="false" enableSelectByExample="false"

               selectByExampleQueryId="false">

        </table>

    </context>
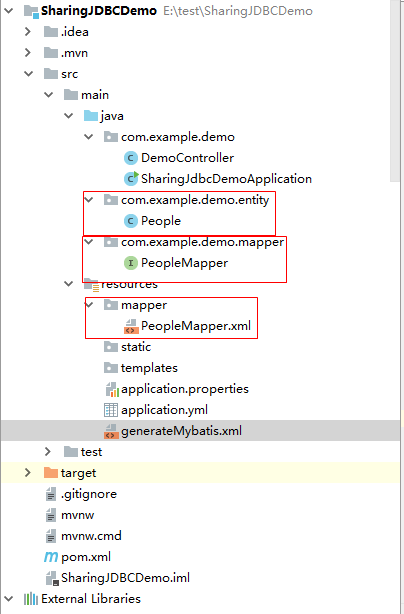
</generatorConfiguration> - 项目demo结构图,比较简单,只实现功能
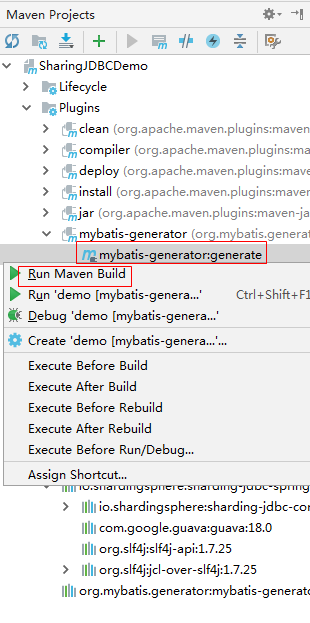
- 自动生成器执行方法,打开maven project,点击运行,具体参考下图
SharingJdbcDemoApplication,配置mapper扫描路径,也可直接在mapper类上增加@Mapper.
package com.example.demo; import org.mybatis.spring.annotation.MapperScan;
import org.springframework.boot.SpringApplication;
import org.springframework.boot.autoconfigure.SpringBootApplication; @SpringBootApplication
@MapperScan("com.example.demo.mapper")
public class SharingJdbcDemoApplication { public static void main(String[] args) {
SpringApplication.run(SharingJdbcDemoApplication.class, args);
} }- DemoController类
package com.example.demo;

        import com.example.demo.entity.People;

        import com.example.demo.mapper.PeopleMapper;

        import org.springframework.beans.factory.annotation.Autowired;

        import org.springframework.web.bind.annotation.PathVariable;

        import org.springframework.web.bind.annotation.RequestMapping;

        import org.springframework.web.bind.annotation.RestController;

        import java.util.List;

@RestController

public class DemoController {

    @Autowired

    PeopleMapper peopleMapper;

    @RequestMapping("/{id}")

    public People getPeople(@PathVariable(value = "id") int id)

    {

        return peopleMapper.selectByPrimaryKey(id);

    }

    @RequestMapping("/insert/{name}")

    public void insert(@PathVariable(value = "name") String name)

    {

        People p  = new People();

        p.setName(name);

        peopleMapper.insert(p);

    }

} - 启动工程后,即可测试读写分离。关于如何查看读写分离效果,可以开启mysql的查询日志,开启方法如下
- 登陆mysql,执行语句查询日志记录开启情况:show variables like "%general%";
- +------------------+------------------------------+
| Variable_name | Value |
+------------------+------------------------------+
| general_log | OFF |
| general_log_file | /var/lib/mysql/localhost.log |
+------------------+------------------------------+ - set global general_log = "ON";开启日志记录,可以在/var/lib/mysql中查看日志。
- 测试:访问http://localhost:8888/1,查询数据,在日志中,可以看到,172从服务日志记录查询语句,171没有日志。
- 测试:访问http://localhost:8888/insert/ibethfy,插入语句,可以看到171主服务有日志,172从服务没有日志。
- 注意:io.shardingsphere用3.0.0版本即可,3.1.0引入maven会报关联错误。
- 之前想使用mycat实现读写分离等,结果发现mycat只支持mysql5版本,其余版本未在其支持列表,并且mycat很久没更新啦!我自己试了很久都没搭建好mycat的环境,哎!
- 好啦,基本的都搞完了,之后实施shardingsphere的分库分表!
Mysql8.0主从复制搭建,shardingsphere+springboot+mybatis读写分离的更多相关文章
- MySQL8.0.12 安装及配置、读写分离,主从复制
一.安装 1.从网上下载MySQL8.0.12版本,下载地址:https://dev.mysql.com/downloads/mysql/ 2. 下载完成后解压 我解压的路径是:D:\Java\mys ...
- SpringBoot Mybatis 读写分离配置(山东数漫江湖)
为什么需要读写分离 当项目越来越大和并发越来大的情况下,单个数据库服务器的压力肯定也是越来越大,最终演变成数据库成为性能的瓶颈,而且当数据越来越多时,查询也更加耗费时间,当然数据库数据过大时,可以采用 ...
- Sharding+SpringBoot+Mybatis 读写分离
基于Sharding JDBC的读写分离 1.引入pom.xml <dependencies> <!-- mybatis --> <dependency> < ...
- 搭建基于springboot轻量级读写分离开发框架
何为读写分离 读写分离是指对资源的修改和读取进行分离,能解决很多数据库瓶颈,以及代码混乱难以维护等相关的问题,使系统有更好的扩展性,维护性和可用性. 一般会分三个步骤来实现: 一. 主从数据库搭建 信 ...
- mysql8.0.主从复制搭建
搭建主从数据库 一.准备两台以上对的数据库 数据库1(主服务器):192.168.2.2 数据库2(从服务器):192.168.2.4 1.1 配置主服务器 .在 /et ...
- 搭建基于MySQL的读写分离工具Amoeba
搭建基于MySQL的读写分离工具Amoeba: Amoeba工具是实现MySQL数据库读写分离的一个工具,前提是基于MySQL主从复制来实现的: 实验环境(虚拟机): 主机 角色 10.10.10.2 ...
- MySQL主从复制配置指导及PHP读写分离源码分析
开发环境 master环境:ubuntu16.04.5LTS/i5/8G/500G/64位/mysql5.7.23/php7/apache2 slave环境:kvm虚拟机/ubuntu14.04.01 ...
- Dubbo入门到精通学习笔记(二十):MyCat在MySQL主从复制的基础上实现读写分离、MyCat 集群部署(HAProxy + MyCat)、MyCat 高可用负载均衡集群Keepalived
文章目录 MyCat在MySQL主从复制的基础上实现读写分离 一.环境 二.依赖课程 三.MyCat 介绍 ( MyCat 官网:http://mycat.org.cn/ ) 四.MyCat 的安装 ...
- Mycat搭建负载均衡,读写分离的Mysql集群
Mycat搭建负载均衡,读写分离的Mysql集群 准备环境 1.mysql-5.7.24-linux-glibc2.12-x86_64.tar.gz 2.Mycat-server-1.6.7.4-te ...
随机推荐
- SpringBoot(十二):SpringBoot整合Mybatis-Plus
本节版本虽然只用到了基本特性,但可以满足大部分的增删改查. 一.环境准备SpringBoot 1.5.10.RELEASEMybatis-Plus 2.1.9Mybatis-Plus 官方地址:htt ...
- 记录:c#实现微信,支付宝扫码支付(一)
因为公司系统业务需要,这几天了解了一下微信和支付宝扫码支付的接口,并用c#实现了微信和支付宝扫码支付的功能. 微信支付分为6种支付模式:1.付款码支付,2.native支付,3.jsapi支付,4.a ...
- 【转载】Android N 完全不同以往的四个新特性
Google最近发布了Android的下一个版本,Android N的开发者预览版.此次预览版,可以让我们开发者在正式发布之前就测试代码,包括一些新的API,甚至于也可以提前反馈那些对于我们来说有些困 ...
- ckeditor5 使用第一天 下载并加载居中,居左,居右功能
官方网站地址https://ckeditor.com/,下载zip包或者从git上下载, 下载完成后解压文件,将文件复制到项目中 , 引用ckeditor.js,zh-cn.js路径到项目中, 初始化 ...
- 11.JavaCC官方入门指南-例6
例6:计算器--添加括号.一元运算符和历史记录 1.calculator3.jj 我们只需要再添加一些特色,就可以得到一个可用的四则运算计算器.在这一版的修改中 ,我们将使得程序可以接收括号.负值 ...
- gcc-stack-protector机制【转】
转自:https://blog.csdn.net/lhl_blog/article/details/70193865 版权声明:本文为博主原创文章,遵循 CC 4.0 BY-SA 版权协议,转载请附上 ...
- 个人的一点小愚见,java有什么优点和缺点
java是一种面向对象的编程语言,优点是可移植性比较高,最初设计时就是本着一次编写到处执行设计的.可以开发各种应用程序和游戏,不过速度没有c++快,所以一般是不用java来编写应用程序和电脑游戏. j ...
- redis在centos7下安装(源码编译)
下载 地址:http://www.redis.cn/download.html 下载稳定版本 把安装包上传到服务器 linux下安装 解压 进入解压后的目录,编译 创建目录,安装并指定目录 修改配置 ...
- hebust-fengyu
三人行必有我师焉,择其善者而从之,其不善者而改之. 入则无法家拂士,出则无敌国外患者,国恒亡,然后知生于忧患而死于安乐也. 狡兔死走狗烹,飞鸟尽良弓藏,敌国尽谋臣亡 今齐地方千里,百二十城,宫妇左右莫 ...
- 趣谈Linux操作系统学习笔记:第二十八讲
一.引子 磁盘→盘片→磁道→扇区(每个 512 字节) ext* 定义文件系统的格式 二.inode 与块的存储 1.块 2.不用给他分配一块连续的空间 我们可以分散成一个个小块进行存放 1.优点 2 ...