
OpenCV学习(30) 轮廓defects
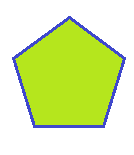
上一篇教程中,我们学习了如何计算轮廓的凸包,其实对一个轮廓而言,可能它的凸包和它本身是重合的,也有可能不是重合的。比如下面左边图像的轮廓本身就是凸包,而右边图像的轮廓则不是。我们可以通过函数bool isContourConvex(InputArray contour),来判定一个轮廓是否是凸包,是的话返回true,否则false[注意测试的轮廓必须是简单轮廓,没有自交叉之类的]。

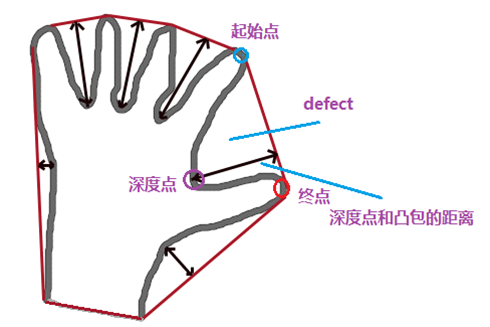
对一个非凸包的轮廓而言,它包括一系列的凹陷区域,这些区域称作defect,比如下面手轮廓中,包括6个defect区域。在OpenCV中,我们用下面的结构来定义defect。
struct CvConvexityDefect { CvPoint* start; // 轮廓中defect的起点 CvPoint* end; // 轮廓中defect的终点 CvPoint* depth_point; // defect中到凸包最远的点 float depth; // 最远点和凸包之间的距离};
在OpenCV中,我们通过函数
void convexityDefects(InputArray contour, InputArray convexhull, OutputArray convexityDefects)
得到轮廓的凸包,其中第一个参数和第二个参数是轮廓以及轮廓对应的凸包,注意凸包应该使用vector<int>这样的索引方式表示。第三个参数为返回的defect点集。
下面我们看下检测轮廓defects的代码:
#include "opencv2/highgui/highgui.hpp"
#include "opencv2/imgproc/imgproc.hpp"
#include <iostream>
#include <stdio.h>
#include <stdlib.h>

using namespace cv;
using namespace std;

Mat src; Mat src_gray;
RNG rng(12345);

int main( int argc, char** argv )
{
    //装入图像
    src = imread("../hand1.jpg", 1 );

    //转化为灰度图像
    cvtColor( src, src_gray, CV_BGR2GRAY );
    //blur( src_gray, src_gray, Size(3,3) );
    namedWindow( "image");
    imshow( "image", src_gray );

    Mat threshold_output;
    vector<vector<Point> > contours;
    vector<Vec4i> hierarchy;

    //得到二值图
    threshold( src_gray, threshold_output, 200, 255, THRESH_BINARY );

    //查找轮廓
    findContours( threshold_output, contours, hierarchy, CV_RETR_TREE, CV_CHAIN_APPROX_SIMPLE, Point(0, 0) );
    printf("轮廓数目:%d\n", contours.size());
    /// Find the convex hull object for each contour
    vector<vector<Point> >hull( contours.size() );
    for( int i = 0; i < contours.size(); i++ )
    {  convexHull( Mat(contours[i]), hull[i], false ); }

    /// Draw contours + hull results
    Mat drawing = Mat::zeros( threshold_output.size(), CV_8UC3 );
    int area = 0; //轮廓索引
    int k = 0;
    int i;
    for(i = 0; i< contours.size(); i++ )
    {
        Scalar color1 = Scalar( rng.uniform(0, 255), rng.uniform(0,255), rng.uniform(0,255) );
        drawContours( drawing, contours, i, color1, 1, 8, vector<Vec4i>(), 0, Point() );
        Scalar color2 = Scalar( rng.uniform(0, 255), rng.uniform(0,255), rng.uniform(0,255) );
        drawContours( drawing, hull, i, color2, 1, 8, vector<Vec4i>(), 0, Point() );
        int tt = contourArea(contours[i]);
        printf("轮廓面积%d = %d\n", i, tt);
        if( tt > area)
        {
            area = contourArea(contours[i]);
            k = i;
        }

    }

    vector<Point> hull1;
    hull1 = hull[1];
    for(i = 0; i< hull1.size(); i++ )
    {
        printf("point %d, %d, %d\n", i, hull1[i].x, hull1[i].y);
        circle(drawing, hull1[i], 6, Scalar(255,0,0), 3, CV_AA);
    }

    int j;
    for(j=0; j< contours.size(); j++)
    {
        //如果没有defects或者轮廓小于三个点,则continue
        if( isContourConvex(contours[j])|| contours[j].size()<3) continue;

        vector<int> convexHull_IntIdx;
        vector<Vec4i> defects;
        if (contours[j].size() >3 )
        {
            convexHull(contours[j], convexHull_IntIdx, true);
            convexityDefects(contours[j], convexHull_IntIdx, defects);
        }

        for(i=0;i < defects.size();++i)
        {
            Matx<int,4,1> defectVector = defects[i];
            vector<Point> contours1 =contours[j];
            Point point1 = contours1[defectVector.val[0]];//开始点
            Point point2 = contours1[defectVector.val[1]];//结束点
            Point point3 = contours1[defectVector.val[2]];//深度点
            float dist = defectVector.val[3];
            printf("dist: %f \n", dist);
            //if ( defectVector.val[3] <= 1000 ) { continue; } // skip defects that are shorter than 100 pixel
            circle(drawing, point1, 3, Scalar(255,255,0), 2, CV_AA);
            circle(drawing, point2, 8, Scalar(0,255,0), 2, CV_AA);
            circle(drawing, point3, 3, Scalar(0,255,255), 2, CV_AA);

        }
    }
    /// Show in a window
    namedWindow( "Hull demo");
    imshow( "Hull demo", drawing );

    waitKey(0);
    return(0);
}
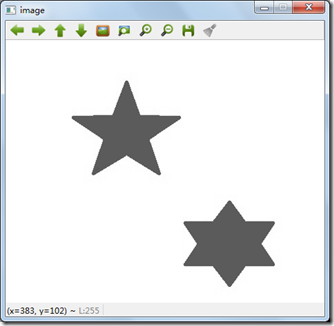
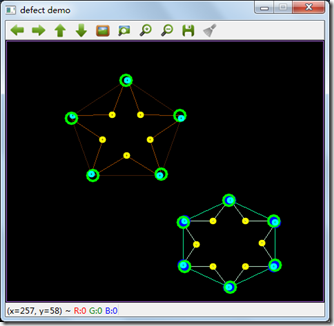
程序执行之后界面如下,注意左下有图中
程序代码:工程FirstOpenCV25
OpenCV学习(30) 轮廓defects的更多相关文章
- OpenCV学习(28) 轮廓
OpenCV中可以方便的在一副图像中检测到轮廓,并把这些轮廓画出来.主要用到两个函数:一个是findContours( img, contours0, hierarchy, RETR_TREE, CH ...
- OpenCV学习(33) 轮廓的特征矩Moment
在OpenCV中,可以很方便的计算多边形区域的3阶特征矩,opencv中的矩主要包括以下几种:空间矩,中心矩和中心归一化矩. class Moments { public: ...... // 空间矩 ...
- OpenCV学习(31) 基于defects的简单手势
前几年在做毕业设计时候曾用opencv1.0中defects做过简单的手势识别,这几天看OpenCV2.46中的轮廓函数,发现和以前差别挺大,函数调用完全不一样,重新实现了简单手势的代码. 1.首先用 ...
- opencv学习笔记(二)寻找轮廓
opencv学习笔记(二)寻找轮廓 opencv中使用findContours函数来查找轮廓,这个函数的原型为: void findContours(InputOutputArray image, O ...
- OpenCV 学习笔记03 边界框、最小矩形区域和最小闭圆的轮廓
本节代码使用的opencv-python 4.0.1,numpy 1.15.4 + mkl 使用图片为 Mjolnir_Round_Car_Magnet_300x300.jpg 代码如下: impor ...
- OpenCV学习笔记(27)KAZE 算法原理与源码分析(一)非线性扩散滤波
http://blog.csdn.net/chenyusiyuan/article/details/8710462 OpenCV学习笔记(27)KAZE 算法原理与源码分析(一)非线性扩散滤波 201 ...
- OpenCV 学习笔记 07 目标检测与识别
目标检测与识别是计算机视觉中最常见的挑战之一.属于高级主题. 本章节将扩展目标检测的概念,首先探讨人脸识别技术,然后将该技术应用到显示生活中的各种目标检测. 1 目标检测与识别技术 为了与OpenCV ...
- OpenCV 学习笔记03 凸包convexHull、道格拉斯-普克算法Douglas-Peucker algorithm、approxPloyDP 函数
凸形状内部的任意两点的连线都应该在形状里面. 1 道格拉斯-普克算法 Douglas-Peucker algorithm 这个算法在其他文章中讲述的非常详细,此处就详细撰述. 下图是引用维基百科的.ε ...
- OpenCV 学习笔记03 boundingRect、minAreaRect、minEnclosingCircle、boxPoints、int0、circle、rectangle函数的用法
函数中的代码是部分代码,详细代码在最后 1 cv2.boundingRect 作用:矩形边框(boundingRect),用于计算图像一系列点的外部矩形边界. cv2.boundingRect(arr ...
随机推荐
- win划分磁盘
我的电脑-->管理 磁盘管理: 右键压缩卷 输入压缩空间量,进行压缩 右键未分配的磁盘-->新建逻辑卷 选取需要的格式
- 【记录】【持续更新】mybatis使用记录
1.> < 等符号在mybatis中的sql语句需要转义 > : > < : < 2.mybatis动态选择 <choose> <when te ...
- 【mysql】当where后接字符串,查询时会发生什么?
好久没有研究一个“深层次”的问题了. 首先来看我们为什么要讨论这个问题~ 首先这是一个正常的数据库查询,我们可以看到在ruizhi数据库里的chouka表内,所有数据如图. 现在,我们运行查询: se ...
- HDU - 5999 The Third Cup is Free 贪心 简单题
The Third Cup is Free Time Limit: 12000/6000 MS (Java/Others) Memory Limit: 32768/32768 K (Java/O ...
- NPE是什么
在编程中出现的空指针异常 Map类集合K/V能不能存储null值的情况,如下表格: remove元素要使用Iterator方式,如果并发操作,需要对Iterator对象加锁. Arrays.asLis ...
- TCP流嗅探和连接跟踪工具tcpick
TCP流嗅探和连接跟踪工具tcpick 由于网络通信协议众多,TCP连接状态众多,所以TCP分析较为复杂.Kali Linux提供一款专用工具tcpick.该工具支持在线实时嗅探和离线文件嗅探.它 ...
- centos+uwsgi+nginx+python+django服务器安装配置
1.ssh登录后使用fdisk –l查看需要格式化硬盘的名称: 2.运行fdisk /dev/vdb,对数据盘进行分区,按照提示,依次输入n,p,1,两次回车,wq,分区开始.(注意数据盘的名称,和阿 ...
- SmartGit 授权文件 Free Trial License to Non-Commercial
To alter the license. First, go to Windows: %APPDATA%\syntevo\SmartGit\ OS X: ~/Library/Preferenc ...
- Oracle sql语句中(+)作用
select * from operator_info o, group_info g where o.group_id = g.group_id(+); 理解: + 表示补充,即哪个表有加号 ...
- git push时提示"Everything up-to-date"
从github上git clone下的项目,添加或修改文件后,git push时出现"Everything up-to-date" , 即“一切都是最新的'. 通过 git s ...