SSM项目实战 之 权限管理系统
- SSM权限管理系统
- 项目搭建
- 主页搭建
- 员工列表
- 添加权限
- 权限控制
- 菜单权限管理
- 系统日志
- Excel导入导出
SSM权限管理系统
项目搭建
1.创建Maven-webapp工程
2.SSM框架集成
2.1添加依赖,即pom.xml文件
<?xml version="1.0" encoding="UTF-8"?>

<project xmlns="http://maven.apache.org/POM/4.0.0" xmlns:xsi="http://www.w3.org/2001/XMLSchema-instance"

  xsi:schemaLocation="http://maven.apache.org/POM/4.0.0 http://maven.apache.org/xsd/maven-4.0.0.xsd">

  <modelVersion>4.0.0</modelVersion>

  <groupId>com.itlike</groupId>

  <artifactId>PromissionPro</artifactId>

  <version>1.0</version>

  <packaging>war</packaging>

  <name>PromissionPro Maven Webapp</name>

  <!-- FIXME change it to the project's website -->

  <url>http://www.example.com</url>

  <properties>

    <project.build.sourceEncoding>UTF-8</project.build.sourceEncoding>

    <maven.compiler.source>1.8</maven.compiler.source>

    <maven.compiler.target>1.8</maven.compiler.target>

    <!--定义版本号   ${org.springframework.version}-->

    <org.springframework.version>5.0.7.RELEASE</org.springframework.version>

    <org.mybatis.version>3.4.6</org.mybatis.version>

  </properties>

  <dependencies>

    <!--单元测试-->

    <dependency>

      <groupId>junit</groupId>

      <artifactId>junit</artifactId>

      <version>4.12</version>

      <scope>test</scope>

    </dependency>

    <!--lombok-->

    <dependency>

      <groupId>org.projectlombok</groupId>

      <artifactId>lombok</artifactId>

      <version>1.16.6</version>

    </dependency>

    <!-- servlet-api -->

    <dependency>

      <groupId>javax.servlet</groupId>

      <artifactId>servlet-api</artifactId>

      <version>2.5</version>

      <scope>provided</scope>

    </dependency>

    <!--mysql驱动-->

    <dependency>

      <groupId>mysql</groupId>

      <artifactId>mysql-connector-java</artifactId>

      <version>5.1.21</version>

    </dependency>

    <!-- druid -->

    <dependency>

      <groupId>com.alibaba</groupId>

      <artifactId>druid</artifactId>

      <version>1.0.14</version>

    </dependency>

    <!-- common-lang -->

    <dependency>

      <groupId>commons-lang</groupId>

      <artifactId>commons-lang</artifactId>

      <version>2.6</version>

    </dependency>

    <!--spring-test-->

    <dependency>

      <groupId>org.springframework</groupId>

      <artifactId>spring-test</artifactId>

      <version>${org.springframework.version}</version>

      <scope>test</scope>

    </dependency>

    <!--spring-core-->

    <dependency>

      <groupId>org.springframework</groupId>

      <artifactId>spring-core</artifactId>

      <version>${org.springframework.version}</version>

    </dependency>

    <!--spring-context-->

    <dependency>

      <groupId>org.springframework</groupId>

      <artifactId>spring-context</artifactId>

      <version>${org.springframework.version}</version>

    </dependency>

    <!--spring-context-support-->

    <dependency>

      <groupId>org.springframework</groupId>

      <artifactId>spring-context-support</artifactId>

      <version>${org.springframework.version}</version>

    </dependency>

    <!--spring-expression-->

    <dependency>

      <groupId>org.springframework</groupId>

      <artifactId>spring-expression</artifactId>

      <version>${org.springframework.version}</version>

    </dependency>

    <!--spring-jdbc-->

    <dependency>

      <groupId>org.springframework</groupId>

      <artifactId>spring-jdbc</artifactId>

      <version>${org.springframework.version}</version>

    </dependency>

    <!--spring-tx-->

    <dependency>

      <groupId>org.springframework</groupId>

      <artifactId>spring-tx</artifactId>

      <version>${org.springframework.version}</version>

    </dependency>

    <!--spring-web-->

    <dependency>

      <groupId>org.springframework</groupId>

      <artifactId>spring-web</artifactId>

      <version>${org.springframework.version}</version>

    </dependency>

    <!--spring-aop-->

    <dependency>

      <groupId>org.springframework</groupId>

      <artifactId>spring-aop</artifactId>

      <version>${org.springframework.version}</version>

    </dependency>

    <!--spring-webmvc-->

    <dependency>

      <groupId>org.springframework</groupId>

      <artifactId>spring-webmvc</artifactId>

      <version>${org.springframework.version}</version>

    </dependency>

    <!-- aspectj -->

    <dependency>

      <groupId>org.aspectj</groupId>

      <artifactId>aspectjrt</artifactId>

      <version>1.7.4</version>

    </dependency>

    <!--aspectj weaver-->

    <dependency>

      <groupId>org.aspectj</groupId>

      <artifactId>aspectjweaver</artifactId>

      <version>1.7.4</version>

    </dependency>

    <!-- cglib -->

    <dependency>

      <groupId>cglib</groupId>

      <artifactId>cglib</artifactId>

      <version>3.1</version>

    </dependency>

    <!-- mybatis -->

    <dependency>

      <groupId>org.mybatis</groupId>

      <artifactId>mybatis</artifactId>

      <version>${org.mybatis.version}</version>

    </dependency>

    <!--mybatis-spring-->

    <dependency>

      <groupId>org.mybatis</groupId>

      <artifactId>mybatis-spring</artifactId>

      <version>1.3.0</version>

    </dependency>

    <!-- jackson-core -->

    <dependency>

      <groupId>com.fasterxml.jackson.core</groupId>

      <artifactId>jackson-core</artifactId>

      <version>2.9.4</version>

    </dependency>

    <!--jackson-databind-->

    <dependency>

      <groupId>com.fasterxml.jackson.core</groupId>

      <artifactId>jackson-databind</artifactId>

      <version>2.9.4</version>

    </dependency>

    <!--jackson-annotations-->

    <dependency>

      <groupId>com.fasterxml.jackson.core</groupId>

      <artifactId>jackson-annotations</artifactId>

      <version>2.9.4</version>

    </dependency>

    <!--slf4j-api-->

    <dependency>

      <groupId>org.slf4j</groupId>

      <artifactId>slf4j-api</artifactId>

      <version>1.7.6</version>

    </dependency>

    <!--slf4j-log4j12-->

    <dependency>

      <groupId>org.slf4j</groupId>

      <artifactId>slf4j-log4j12</artifactId>

      <version>1.7.6</version>

    </dependency>

    <!--log4j-->

    <dependency>

      <groupId>log4j</groupId>

      <artifactId>log4j</artifactId>

      <version>1.2.17</version>

    </dependency>

    <!--commons-fileupload-->

    <dependency>

      <groupId>commons-fileupload</groupId>

      <artifactId>commons-fileupload</artifactId>

      <version>1.3.1</version>

    </dependency>

    <!-- jstl -->

    <dependency>

      <groupId>jstl</groupId>

      <artifactId>jstl</artifactId>

      <version>1.2</version>

    </dependency>

    <!-- standard -->

    <dependency>

      <groupId>taglibs</groupId>

      <artifactId>standard</artifactId>

      <version>1.1.2</version>

    </dependency>

    <!--pagehelper-->

    <dependency>

      <groupId>com.github.pagehelper</groupId>

      <artifactId>pagehelper</artifactId>

      <version>4.1.4</version>

    </dependency>

    <!--shiro-->

    <dependency>

      <groupId>commons-logging</groupId>

      <artifactId>commons-logging</artifactId>

      <version>1.2</version>

    </dependency>

    <dependency>

      <groupId>org.slf4j</groupId>

      <artifactId>slf4j-nop</artifactId>

      <version>1.7.24</version>

    </dependency>

    <dependency>

      <groupId>commons-collections</groupId>

      <artifactId>commons-collections</artifactId>

      <version>3.2.1</version>

    </dependency>

    <dependency>

      <groupId>org.apache.shiro</groupId>

      <artifactId>shiro-core</artifactId>

      <version>1.4.0</version>

    </dependency>

    <dependency>

      <groupId>org.apache.shiro</groupId>

      <artifactId>shiro-web</artifactId>

      <version>1.4.0</version>

    </dependency>

    <dependency>

      <groupId>org.apache.shiro</groupId>

      <artifactId>shiro-ehcache</artifactId>

      <version>1.4.0</version>

    </dependency>

    <dependency>

      <groupId>org.apache.shiro</groupId>

      <artifactId>shiro-spring</artifactId>

      <version>1.4.0</version>

    </dependency>

    <dependency>

      <groupId>org.apache.poi</groupId>

      <artifactId>poi</artifactId>

      <version>4.0.1</version>

    </dependency>

  </dependencies>

  <build>

    <finalName>PromissionPro</finalName>

    <plugins>

      <plugin>

        <groupId>org.mybatis.generator</groupId>

        <artifactId>mybatis-generator-maven-plugin</artifactId>

        <version>1.3.2</version>

        <configuration>

          <verbose>true</verbose>

          <overwrite>false</overwrite>

        </configuration>

        <dependencies>

          <dependency>

            <groupId>mysql</groupId>

            <artifactId>mysql-connector-java</artifactId>

            <version>5.1.21</version>

          </dependency>

        </dependencies>

      </plugin>

    </plugins>

    <pluginManagement><!-- lock down plugins versions to avoid using Maven defaults (may be moved to parent pom) -->

      <plugins>

        <plugin>

          <artifactId>maven-clean-plugin</artifactId>

          <version>3.1.0</version>

        </plugin>

        <!-- see http://maven.apache.org/ref/current/maven-core/default-bindings.html#Plugin_bindings_for_war_packaging -->

        <plugin>

          <artifactId>maven-resources-plugin</artifactId>

          <version>3.0.2</version>

        </plugin>

        <plugin>

          <artifactId>maven-compiler-plugin</artifactId>

          <version>3.8.0</version>

        </plugin>

        <plugin>

          <artifactId>maven-surefire-plugin</artifactId>

          <version>2.22.1</version>

        </plugin>

        <plugin>

          <artifactId>maven-war-plugin</artifactId>

          <version>3.2.2</version>

        </plugin>

        <plugin>

          <artifactId>maven-install-plugin</artifactId>

          <version>2.5.2</version>

        </plugin>

        <plugin>

          <artifactId>maven-deploy-plugin</artifactId>

          <version>2.8.2</version>

        </plugin>

      </plugins>

    </pluginManagement>

  </build>

</project>
2.2添加配置文件
db.properties
jdbc.driver=com.mysql.jdbc.Driver

jdbc.url=jdbc:mysql://localhost:3306/promission?characterEncoding=utf-8

jdbc.username=root

jdbc.password=1234
applicationContext.xml
<?xml version="1.0" encoding="UTF-8"?>

<beans xmlns="http://www.springframework.org/schema/beans"

       xmlns:xsi="http://www.w3.org/2001/XMLSchema-instance"

       xmlns:context="http://www.springframework.org/schema/context"

       xmlns:aop="http://www.springframework.org/schema/aop"

       xmlns:tx="http://www.springframework.org/schema/tx"

       xsi:schemaLocation="http://www.springframework.org/schema/beans

        http://www.springframework.org/schema/beans/spring-beans.xsd

        http://www.springframework.org/schema/context

        http://www.springframework.org/schema/context/spring-context.xsd

    http://www.springframework.org/schema/aop

    http://www.springframework.org/schema/aop/spring-aop.xsd

     http://www.springframework.org/schema/tx

        http://www.springframework.org/schema/tx/spring-tx.xsd

">

    <!--注解扫描-->

    <context:component-scan base-package="com.itlike"/>

    <!--导入mybatis-->

    <import resource="classpath:application-mybatis.xml"/>

    <!--导入springMVC-->

    <import resource="classpath:application-mvc.xml"/>

    <!--导入shiro-->

    <import resource="classpath:application-shiro.xml"/>

    <!-- aop配置 日志配置 -->

    <bean id="SystemAspect" class="com.itlike.aspect.SystemAspect"></bean>

    <aop:config>

        <aop:pointcut expression="execution(* com.itlike.service.*.*(..))" id="servicePoint" />

        <aop:aspect ref="SystemAspect">

            <aop:after method="writeLog" pointcut-ref="servicePoint"/>

        </aop:aspect>

    </aop:config>

</beans>
application-mvc.xml
<?xml version="1.0" encoding="UTF-8" ?>

<beans xmlns="http://www.springframework.org/schema/beans"

       xmlns:xsi="http://www.w3.org/2001/XMLSchema-instance"

       xmlns:context="http://www.springframework.org/schema/context"

       xmlns:mvc="http://www.springframework.org/schema/mvc"

       xsi:schemaLocation="http://www.springframework.org/schema/beans

	http://www.springframework.org/schema/beans/spring-beans.xsd

	http://www.springframework.org/schema/context

	http://www.springframework.org/schema/context/spring-context.xsd

	http://www.springframework.org/schema/mvc

    http://www.springframework.org/schema/mvc/spring-mvc-4.0.xsd

	">

    <mvc:annotation-driven />

    <!--静态资源处理 -->

    <mvc:default-servlet-handler/>

    <!--视图解析器 -->

    <bean class="org.springframework.web.servlet.view.InternalResourceViewResolver">

        <property name="prefix" value="/WEB-INF/views/"/>

        <property name="suffix" value=".jsp" />

    </bean>

    <!--配置拦截器-->

    <mvc:interceptors>

        <mvc:interceptor>

            <mvc:mapping path="/*"/>

            <bean class="com.itlike.interceptor.RequestInterceptor"></bean>

        </mvc:interceptor>

    </mvc:interceptors>

    <!--配置文件上传解析器-->

    <bean id="multipartResolver" class="org.springframework.web.multipart.commons.CommonsMultipartResolver">

        <property name="maxUploadSize">

            <value>1040000</value>

        </property>

    </bean>

</beans>
application-mybatis.xml
<?xml version="1.0" encoding="UTF-8"?>

<beans xmlns="http://www.springframework.org/schema/beans"

       xmlns:xsi="http://www.w3.org/2001/XMLSchema-instance"

       xmlns:context="http://www.springframework.org/schema/context"

       xmlns:aop="http://www.springframework.org/schema/aop"

       xmlns:tx="http://www.springframework.org/schema/tx"

       xsi:schemaLocation="http://www.springframework.org/schema/beans

        http://www.springframework.org/schema/beans/spring-beans.xsd

        http://www.springframework.org/schema/context

        http://www.springframework.org/schema/context/spring-context.xsd

    http://www.springframework.org/schema/aop

    http://www.springframework.org/schema/aop/spring-aop.xsd

     http://www.springframework.org/schema/tx

        http://www.springframework.org/schema/tx/spring-tx.xsd

">

    <!--spring-Mybatis整合-->

    <!--加载数据库属性文件-->

    <context:property-placeholder location="classpath:db.properties"/>

    <!--连接池-->

    <bean id="dataSource" class="com.alibaba.druid.pool.DruidDataSource"

          init-method="init"

          destroy-method="close">

        <property name="initialSize" value="5"/>

        <property name="driverClassName" value="${jdbc.driver}" />

        <!--属性文件当中的名称不能和name名称一样-->

        <property name="url" value="${jdbc.url}" />

        <property name="username" value="${jdbc.username}" />

        <property name="password" value="${jdbc.password}" />

    </bean>

    <!-- 配置事务管理器 -->

    <bean id="transactionManager"

          class="org.springframework.jdbc.datasource.DataSourceTransactionManager">

        <!-- 数据源 -->

        <property name="dataSource" ref="dataSource" />

    </bean>

    <!-- 开启注解事务 -->

    <tx:annotation-driven transaction-manager="transactionManager"/>

    <!-- Mybatis的工厂 -->

    <bean id="sqlSessionFactoryBean" class="org.mybatis.spring.SqlSessionFactoryBean">

        <property name="dataSource" ref="dataSource"/>

        <!-- 核心配置文件的位置 -->

        <property name="configLocation" value="classpath:sqlMapConfig.xml"/>

        <!--配置mapper映射文件的路径-->

        <property name="mapperLocations" value="classpath:com.itlike.mapper/*Mapper.xml"/>

    </bean>

    <!-- 配置Mapper接口扫描 -->

    <bean class="org.mybatis.spring.mapper.MapperScannerConfigurer" >

        <!-- 配置Mapper扫描包 -->

        <property name="basePackage" value="com.itlike.mapper" />

    </bean>

</beans>
2.3配置web.xml
<web-app xmlns="http://java.sun.com/xml/ns/javaee"

         xmlns:xsi="http://www.w3.org/2001/XMLSchema-instance"

         xsi:schemaLocation="http://java.sun.com/xml/ns/javaee

                      http://java.sun.com/xml/ns/javaee/web-app_3_0.xsd"

         version="3.0"

         metadata-complete="false">

  <absolute-ordering/>

  <display-name>web</display-name>

  <welcome-file-list>

    <welcome-file>index.html</welcome-file>

    <welcome-file>index.htm</welcome-file>

    <welcome-file>index.jsp</welcome-file>

  </welcome-file-list>

  <!-- 拦截到所有请求,使用spring一个bean来进行处理 -->

  <filter>

    <filter-name>shiroFilter</filter-name>

    <filter-class>org.springframework.web.filter.DelegatingFilterProxy</filter-class>

    <!-- 是否filter中的init和 destroy-->

    <init-param>

      <param-name>targetFilterLifecycle</param-name>

      <param-value>true</param-value>

    </init-param>

  </filter>

  <filter-mapping>

    <filter-name>shiroFilter</filter-name>

    <url-pattern>/*</url-pattern>

  </filter-mapping>

  <!--配置前端控制器-->

  <servlet>

    <servlet-name>SpringMVC</servlet-name>

    <servlet-class>org.springframework.web.servlet.DispatcherServlet</servlet-class>

    <init-param>

      <param-name>contextConfigLocation</param-name>

      <!--加载的主配置文件-->

      <param-value>classpath:applicationContext.xml</param-value>

    </init-param>

    <!-- 项目启动就加载框架 -->

    <load-on-startup>1</load-on-startup>

  </servlet>

  <servlet-mapping>

    <servlet-name>SpringMVC</servlet-name>

    <url-pattern>/</url-pattern>

  </servlet-mapping>

  <!-- 编码过滤器 -->

  <filter>

    <filter-name>CharacterEncoding</filter-name>

    <filter-class>org.springframework.web.filter.CharacterEncodingFilter</filter-class>

    <init-param>

      <param-name>encoding</param-name>

      <param-value>utf-8</param-value>

    </init-param>

  </filter>

  <filter-mapping>

    <filter-name>CharacterEncoding</filter-name>

    <url-pattern>/*</url-pattern>

  </filter-mapping>

</web-app>
3.添加代码生成器
添加代码生成器插件pom依赖
<plugin>

	<groupId>org.mybatis.generator</groupId>

	<artifactId>mybatis-generator-maven-plugin</artifactId>

	<version>1.3.2</version>

	<configuration>

	  <verbose>true</verbose>

	  <overwrite>false</overwrite>

	</configuration>

	<dependencies>

	  <dependency>

		<groupId>mysql</groupId>

		<artifactId>mysql-connector-java</artifactId>

		<version>5.1.21</version>

	  </dependency>

	</dependencies>

</plugin>
添加代码生成器配置文件,即generatorConfig.xml
<?xml version="1.0" encoding="UTF-8"?>

<!DOCTYPE generatorConfiguration

  PUBLIC "-//mybatis.org//DTD MyBatis Generator Configuration 1.0//EN"

"http://mybatis.org/dtd/mybatis-generator-config_1_0.dtd">

<!-- 配置生成器 -->

<generatorConfiguration>

	<context id="mysql" defaultModelType="hierarchical"

		targetRuntime="MyBatis3Simple">

		<!-- 自动识别数据库关键字,

		默认false,如果设置为true,

		根据SqlReservedWords中定义的关键字列表;

		一般保留默认值,

		遇到数据库关键字(Java关键字),

		使用columnOverride覆盖 -->

		<property name="autoDelimitKeywords" value="false" />

		<!-- 生成的Java文件的编码 -->

		<property name="javaFileEncoding" value="UTF-8" />

		<!-- 格式化java代码 -->

		<property name="javaFormatter"

			value="org.mybatis.generator.api.dom.DefaultJavaFormatter" />

		<!-- 格式化XML代码 -->

		<property name="xmlFormatter"

			value="org.mybatis.generator.api.dom.DefaultXmlFormatter" />

		<!-- beginningDelimiter和endingDelimiter:指明数据库的用于标记数据库对象名的符号,

		比如ORACLE就是双引号,MYSQL默认是`反引号; -->

		<property name="beginningDelimiter" value="`" />

		<property name="endingDelimiter" value="`" />

		<!--阻止生成日期和注释-->

		<commentGenerator>

			<property name="suppressDate" value="true" />

			<property name="suppressAllComments" value="true" />

		</commentGenerator>

		<!-- 数据库连接信息 -->

		<jdbcConnection driverClass="com.mysql.jdbc.Driver"

			connectionURL="jdbc:mysql:///employee" userId="root" password="123456">

		</jdbcConnection>

		<!-- java类型处理器 用于处理数据库中的类型到Java中的类型,

			 默认使用JavaTypeResolverDefaultImpl;

			 注意一点,默认会先尝试使用Integer,Long,Short等来对应DECIMAL和

			NUMERIC数据类型; -->

		<javaTypeResolver

			type="org.mybatis.generator.internal.types.JavaTypeResolverDefaultImpl">

			<!-- true:使用BigDecimal对应DECIMAL和 NUMERIC数据类型 f

				 alse:默认, scale>0;length>18:使用BigDecimal;

				scale=0;length[10,18]:使用Long; scale=0;length[5,9]:

				使用Integer; scale=0;length<5:使用Short; -->

			<property name="forceBigDecimals" value="false" />

		</javaTypeResolver>

		<!--

		配置domain生成策略

        targetProject:把自动生成的domian放在哪个工程里面

        targetPackage:哪个包下

		-->

		<javaModelGenerator targetPackage="com.itlike.domain"

			targetProject="src/main/java">

			<!-- for MyBatis3/MyBatis3Simple

			自动为每一个生成的类创建一个构造方法,

			构造方法包含了所有的field;而不是使用setter; -->

			<property name="constructorBased" value="false" />

			<!-- for MyBatis3 / MyBatis3Simple

			是否创建一个不可变的类,如果为true,

			那么MBG会创建一个没有setter方法的类,

			取而代之的是类似constructorBased的类 -->

			<property name="immutable" value="false" />

			<!-- 设置是否在getter方法中,

			对String类型字段调用trim()方法 -->

			<property name="trimStrings" value="true" />

		</javaModelGenerator>

		<!--

            配置mapper.xml的生成策略

            targetPackage:把自动生成的mapper放在哪个工程里面

            targetProject:哪个包下

        -->

		<sqlMapGenerator targetPackage="com.itlike.mapper"

			targetProject="src/main/java">

			<!-- 在targetPackage的基础上,

			根据数据库的schema再生成一层package,

			最终生成的类放在这个package下,默认为false -->

			<property name="enableSubPackages" value="true" />

		</sqlMapGenerator>

		<!--

           mapper接口生成策略

        -->

		<javaClientGenerator targetPackage="com.itlike.mapper"

			type="XMLMAPPER" targetProject="src/main/java">

			<property name="enableSubPackages" value="true" />

		</javaClientGenerator>

		<table tableName="employee"></table>

	</context>

</generatorConfiguration>
创建员工表sql语句
CREATE TABLE `employee` (

  `id` bigint(20) NOT NULL,

  `username` varchar(50) DEFAULT NULL,

  `password` varchar(100) DEFAULT NULL,

  `realname` varchar(50) DEFAULT NULL,

  `tel` varchar(50) DEFAULT NULL,

  `email` varchar(50) DEFAULT NULL,

  `inputtime` datetime DEFAULT NULL,

  `state` tinyint(1) DEFAULT NULL,

  `admin` tinyint(1) DEFAULT NULL,

  PRIMARY KEY (`id`)

) ENGINE=InnoDB DEFAULT CHARSET=utf8;
生成员工mapper,双击maven插件

主页搭建
EasyUI主页
1.在目录当中引入EasyUI相关JS与css

2.在首页当中引入所需要的js与css
<link rel="stylesheet" type="text/css" href="${pageContext.request.contextPath}/static/plugins/easyui/uimaker/easyui.css">

<link rel="stylesheet" type="text/css" href="${pageContext.request.contextPath}/static/plugins/easyui/uimaker/icon.css">

<script type="text/javascript" src="${pageContext.request.contextPath}/static/plugins/easyui/jquery.min.js"></script>

<script type="text/javascript" src="${pageContext.request.contextPath}/static/plugins/easyui/jquery.easyui.min.js"></script>

<script type="text/javascript" src="${pageContext.request.contextPath}/static/plugins/easyui/easyui-lang-zh_CN.js"></script>

<script type="text/javascript" src="${pageContext.request.contextPath}/static/js/index.js"></script>
3.编写body首页框架格式
<body class="easyui-layout">

	<div data-options="region:'north'" style="height:100px; background: #ec4e00; padding: 20px 20px">

		<img src="main_logo.png" alt="">

	</div>

	<div data-options="region:'south'" style="height:50px; border-bottom: 3px solid #ec4e00">

		<p align="center" style="font-size: 14px">撩课学院</p>

	</div>

	<div data-options="region:'west',split:true" style="width:300px;">

		<div id="aa" class="easyui-accordion" data-options="fit:true">

			<div title="菜单" data-options="iconCls:'icon-save',selected:true" style="overflow:auto;padding:10px;">

				<!--tree-->

				<ul id="tree"></ul>

			</div>

			<div title="公告" data-options="iconCls:'icon-reload'" style="padding:10px;">

			</div>

		</div>

	</div>

	<div data-options="region:'center'" style="background:#eee;">

		<!--标签-->

		<div id="tabs" style="overflow: hidden" >

		</div>

	</div>

</body>
4.创建首页index.js引入
$(function () {

	$("#tabs").tabs({

		fit:true

	})

	$('#tree').tree({

		url:'/getTreeData',

		lines:true,

		onSelect: function(node){

			/*在添加之前, 做判断  判断这个标签是否存在 */

			var exists =   $("#tabs").tabs("exists",node.text);

			if(exists){

				/*存在,就让它选中*/

				$("#tabs").tabs("select",node.text);

			}else {

				if (node.url !=''&& node.url !=null){

					/*如果不存在 ,添加新标签*/

					$("#tabs").tabs("add",{

						title:node.text,

						/*href:node.attributes.url,*/  /*href  引入的是body当中*/

						content:"<iframe src="+node.url+" frameborder='0' width='100%' height='100%'></iframe>",

						closable:true

					})

				}

			}

		},

		onLoadSuccess: function (node, data) {

			console.log(data[0].children[0].id);

			if (data.length > 0) {

				//找到第一个元素

				var n = $('#tree').tree('find', data[0].children[0].id);

				//调用选中事件

				$('#tree').tree('select', n.target);

			}

		}

	});

});
员工列表
1.在tree当中指定跳转的地址--暂时用tree.json文件代替
[

  {

    "id": 1,

    "text": "系统管理",

    "children": [

      {

        "id":2,

        "text": "员工管理",

         "url": "/employee"

      },

      {

        "id":3,

        "text": "角色权限管理",

          "url": "/role"

      },

      {

        "id":4,

        "text": "菜单管理",

        "url": "/menu"

      }

    ]

  }

]
**index.js**
$(function () {

    $("#tabs").tabs({

        fit:true

    })

    $('#tree').tree({

        url:"static/tree.json",

        lines:true,

        onSelect: function(node){

            /*在添加之前, 做判断  判断这个标签是否存在 */

            var exists =   $("#tabs").tabs("exists",node.text);

            if(exists){

                /*存在,就让它选中*/

                $("#tabs").tabs("select",node.text);

            }else {

                if (node.url !=''&& node.url !=null){

                    /*如果不存在 ,添加新标签*/

                    $("#tabs").tabs("add",{

                        title:node.text,

                        /*href:node.attributes.url,*/  /*href  引入的是body当中*/

                        content:"<iframe src="+node.url+" frameborder='0' width='100%' height='100%'></iframe>",

                        closable:true

                    })

                }

            }

        }

    });

});
2.创建页面跳转控制器,接收请求跳转到Employee页面
@Controller

public class PageLocation {

    @RequestMapping("/employee")

    public String employee(){

        return "employee";

    }

	@RequestMapping("/department")

    public String department(){

        return "department";

    }

}
3.在Employee页面中引入公共的EasyUI相关js编写数据表格
<script type="text/javascript" src="${pageContext.request.contextPath}/static/js/employee.js"></script>
4.创建Employee.js引入设置-数据表格
数据加载
**employee.js**
$(function () {

    /*员式数据列表*/

    $("#dg").datagrid({

        url:"/employeeList",

        columns:[[

            {field:'username',title:'姓名',width:100,align:'center'},

            {field:'inputtime',title:'入职时间',width:100,align:'center'},

            {field:'tel',title:'电话',width:100,align:'center'},

            {field:'email',title:'邮箱',width:100,align:'center'},

            {field:'department',title:'部门',width:100,align:'center',formatter: function(value,row,index){

                if (value){

                    return value.name;

                }

            }},

            {field:'state',title:'状态',width:100,align:'center',formatter: function(value,row,index){

                    if(row.state){

                        return "在职";

                    }else {

                        return "<font style='color: red'>离职</font>"

                    }

                }},

            {field:'admin',title:'管理员',width:100,align:'center',formatter: function(value,row,index){

                    if(row.admin){

                        return "是";

                    }else {

                        return "否"

                    }

                }},

        ]],

        fit:true,

        fitColumns:true,

        rownumbers:true,

        pagination:true,

        singleSelect:true,

        striped:true,

        toolbar:"#tb",

        onClickRow:function (rowIndex,rowData) {

            /*判断当前行是否是离职状态*/

            if(!rowData.state){

                /*离职,把离职按钮禁用*/

                $("#delete").linkbutton("disable");

            }else {

                /*离职,把离职按钮启用*/

                $("#delete").linkbutton("enable");

            }

        }

    });

})
控制层
@Controller

public class EmployeeController {

    /*注入业务层*/

    @Autowired

    private EmployeeService employeeService;

    @RequestMapping("/employee")

    public String employee(){

        return "employee";

    }

    @RequestMapping("/employeeList")

    @ResponseBody

    public PageListRes employeeList(QueryVo vo){

        System.out.println(vo);

        /*调用业务层查询员工*/

        PageListRes pageListRes = employeeService.getEmployee(vo);

        return pageListRes;

    }

})
业务层
@Service

@Transactional

public class EmployeeServiceImpl implements EmployeeService {

    @Autowired

    private EmployeeMapper employeeMapper;

    @Override

    public PageListRes getEmployee(QueryVo vo) {

        /*调用mapper 查询员工 */

        Page<Object> page = PageHelper.startPage(vo.getPage(), vo.getRows());

        List<Employee> employees = employeeMapper.selectAll(vo);

        /*封装成pageList*/

        PageListRes pageListRes = new PageListRes();

        pageListRes.setTotal(page.getTotal());

        pageListRes.setRows(employees);

        return pageListRes;

    }

})
日期格式化
@JsonFormat(pattern = "yyyy-MM-dd", timezone = "GMT+8")

@DateTimeFormat(pattern = "yyyy-MM-dd")

private Date inputtime;
格式化状态和管理员
5.创建部门表
建表语句
CREATE TABLE `department` (

	`id` bigint(20) NOT NULL,

	`name` varchar(10) DEFAULT NULL COMMENT '部门名称 ',

	`sn` varchar(20) DEFAULT NULL COMMENT '部门编号',

	`manager_id` bigint(20) DEFAULT NULL,

	`parent_id` bigint(20) DEFAULT NULL,

	`state` tinyint(1) DEFAULT NULL,

	PRIMARY KEY (`id`),

	KEY `manager_id` (`manager_id`),

	KEY `parent_id` (`parent_id`),

	CONSTRAINT `department_ibfk_1` FOREIGN KEY (`manager_id`) REFERENCES `employee` (`id`),

	CONSTRAINT `department_ibfk_2` FOREIGN KEY (`parent_id`) REFERENCES `department` (`id`)

) ENGINE=InnoDB DEFAULT CHARSET=utf8;
employee表添加字段dept_id
在代码生成器当中生成相关domain和mapper
修改employee的domian
@Setter@Getter@ToString

public class Employee {

    private Long id;

    private String username;

    private String password;

    @JsonFormat(pattern = "yyyy-MM-dd", timezone = "GMT+8")

    @DateTimeFormat(pattern = "yyyy-MM-dd")

    private Date inputtime;

    private String tel;

    private String email;

    private Boolean state;

    private Boolean admin;

    private Department department;

}
6.查询部门
EmployeeMapper.xml
<?xml version="1.0" encoding="UTF-8" ?>

<!DOCTYPE mapper PUBLIC "-//mybatis.org//DTD Mapper 3.0//EN" "http://mybatis.org/dtd/mybatis-3-mapper.dtd" >

<mapper namespace="com.itlike.mapper.EmployeeMapper" >

  <resultMap id="BaseResultMap" type="com.itlike.domain.Employee" >

    <id column="id" property="id" jdbcType="BIGINT" />

    <result column="username" property="username" jdbcType="VARCHAR" />

    <result column="inputtime" property="inputtime" jdbcType="TIMESTAMP" />

    <result column="tel" property="tel" jdbcType="VARCHAR" />

    <result column="email" property="email" jdbcType="VARCHAR" />

    <result column="state" property="state" jdbcType="BIT" />

    <result column="admin" property="admin" jdbcType="BIT" />

   <association property="department" javaType="com.itlike.domain.Department" columnPrefix="d_">

     <result property="id" column="id"/>

     <result property="name" column="name"/>

   </association>

  </resultMap>

  <!--员工关联部门查询-->

  <select id="selectAll" resultMap="BaseResultMap" >

    select

    e.id,

    e.username,

    e.inputtime,

    e.tel,

    e.email,

    e.state,

    e.admin,

    d.id as d_id,

    d.`name` as d_name

    from employee as e

    LEFT JOIN department as d

    ON e.dep_id = d.id

    <include refid="where_sql"/>

    order by e.id desc

  </select>

</mapper>
$(function () {

    /*员式数据列表*/

    $("#dg").datagrid({

        url:"/employeeList",

        columns:[[

            {field:'username',title:'姓名',width:100,align:'center'},

            {field:'inputtime',title:'入职时间',width:100,align:'center'},

            {field:'tel',title:'电话',width:100,align:'center'},

            {field:'email',title:'邮箱',width:100,align:'center'},

            {field:'department',title:'部门',width:100,align:'center',formatter: function(value,row,index){

                if (value){

                    return value.name;

                }

            }},

            {field:'state',title:'状态',width:100,align:'center',formatter: function(value,row,index){

                    if(row.state){

                        return "在职";

                    }else {

                        return "<font style='color: red'>离职</font>"

                    }

                }},

            {field:'admin',title:'管理员',width:100,align:'center',formatter: function(value,row,index){

                    if(row.admin){

                        return "是";

                    }else {

                        return "否"

                    }

                }},

        ]]

    });

})
7.列表添加工具栏目
1.添加标签
<div id="tb">

    <a href="#" class="easyui-linkbutton" data-options="iconCls:'icon-add',plain:true" id="add">添加</a>

    <a href="#" class="easyui-linkbutton" data-options="iconCls:'icon-edit',plain:true" id="edit">编辑</a>

    <a href="#" class="easyui-linkbutton" data-options="iconCls:'icon-remove',plain:true" id="delete">删除</a>

    <a href="#" class="easyui-linkbutton" data-options="iconCls:'icon-reload',plain:true" id="reload">刷新</a>

</div>
2.处理Js
toolbar: '#tb',
8.添加对话框弹出
对话框标签
<table align="center" style="border-spacing: 0px 10px">

	<tr>

		<td>用户名:</td>

		<td><input type="text" class="easyui-validatebox" data-options="required:true"></td>

	</tr>

	<tr>

		<td>真实姓名:</td>

		<td><input type="text" class="easyui-validatebox" data-options="required:true"></td>

	</tr>

	<tr>

		<td>手机:</td>

		<td><input type="text" class="easyui-validatebox" data-options="required:true"></td>

	</tr>

	<tr>

		<td>邮箱:</td>

		<td><input type="text" class="easyui-validatebox" data-options="required:true,validType:'email'" ></td>

	</tr>

	<tr>

		<td>入职日期:</td>

		<td><input type="text" class="easyui-datebox" required="required"></td>

	</tr>

	<tr>

		<td>部门:</td>

		<td><select id="department"></select></td>

	</tr>

	<tr>

		<td>是否管理员:</td>

		<td><select id="state"></select></td>

	</tr>

</table>
部门列表展示
/*部门选择 下拉列表*/

$("#department").combobox({

    width:150,

    panelHeight:'auto',

    editable:false,

    url:'departList',

    textField:'name',

    valueField:'id',

    onLoadSuccess:function () { /*数据加载完毕之后回调*/

        $("#department").each(function(i){

            var span = $(this).siblings("span")[i];

            var targetInput = $(span).find("input:first");

            if(targetInput){

                $(targetInput).attr("placeholder", $(this).attr("placeholder"));

            }

        });

    }

});
设置placehode
$("#department").each(function(i){

	var span = $(this).siblings("span")[i];

	var targetInput = $(span).find("input:first");

	if(targetInput){

		$(targetInput).attr("placeholder", $(this).attr("placeholder"));

	}

});
是否管理员下拉列表展示
/*管理员下拉列表选择*/

$("#state").combobox({

	width:150,

	panelHeight:'auto',

	textField:'label',

	valueField:'value',

	data:[{

		label:'是',

		value:'true'

	},{

		label:'否',

		value:'false'

	}]

});

$("#state").combobox({"select","否"});
9.保存
表单标签上填写name
<form id="employeeForm">

	<%--添加一个隐藏域  编辑--%>

	<input type="hidden" name="id">

	<table align="center" style="border-spacing: 0px 10px">

		<tr>

			<td>用户名:</td>

			<td><input type="text" name="username" class="easyui-validatebox" data-options="required:true"></td>

		</tr>

		<tr id="password">

			<td>密码:</td>

			<td><input type="text" name="password" class="easyui-validatebox"></td>

		</tr>

		<tr>

			<td>手机:</td>

			<td><input type="text" name="tel" class="easyui-validatebox" ></td>

		</tr>

		<tr>

			<td>邮箱:</td>

			<td><input type="text" name="email" class="easyui-validatebox" ></td>

		</tr>

		<tr>

			<td>入职日期:</td>

			<td><input type="text" name="inputtime" class="easyui-datebox"></td>

		</tr>

		<tr>

			<td>部门:</td>

			<td><input id="department" name="department.id" placeholder="请选择部门"/></td>

		</tr>

		<tr>

			<td>是否管理员:</td>

			<td><input id="state" name="admin" placeholder="是否为管理员"/></td>

		</tr>

		<tr>

			<td>选择角色:</td>

			<td><input id="role" name="role.rid" placeholder="请选择角色"/></td>

		</tr>

	</table>

</form>
下拉列表设置默认值时, 默认value也要设置上去
保存时判断添加还是编辑
监听保存按钮,提交表单
/*对话框*/

$("#dialog").dialog({

	width:350,

	height:400,

	closed:true,

	buttons:[{

		text:'保存',

		handler:function(){

			/*判断当前是添加 还是编辑*/

			var id = $("[name='id']").val();

			var url;

			if(id){

				/*编辑*/

				url = "updateEmployee";

			}else {

				/*添加*/

				url= "saveEmployee";

			}

			/*提交表单*/

			$("#employeeForm").form("submit",{

				url:url,

				onSubmit:function(param){

					/*获取选中的角色*/

				   var values =  $("#role").combobox("getValues");

				   for(var i = 0; i < values.length; i++){

					   var rid  =  values[i];

					   param["roles["+i+"].rid"] = rid;

				   }

				},

				success:function (data) {

				  data = $.parseJSON(data);

				  if (data.success){

					  $.messager.alert("温馨提示",data.msg);

					  /*关闭对话框 */

					  $("#dialog").dialog("close");

					  /*重新加载数据表格*/

					  $("#dg").datagrid("reload");

				  } else {

					  $.messager.alert("温馨提示",data.msg);

				  }

				}

			});

		}

	},{

		text:'关闭',

		handler:function(){

			$("#dialog").dialog("close");

		}

	}]

});
10.编辑
监听编辑按钮点击
/*监听编辑按钮点击*/

$("#edit").click(function () {

    /*获取当前选中的行*/

    var rowData = $("#dg").datagrid("getSelected");

    console.log(rowData);

    if(!rowData){

        $.messager.alert("提示","选择一行数据进行编辑");

        return;

    }

    /*取消密码验证*/

    $("[name='password']").validatebox({required:false});

    $("#password").hide();

    /*弹出对话框*/

    $("#dialog").dialog("setTitle","编辑员工");

    $("#dialog").dialog("open");

    /*回显部门*/

    rowData["department.id"] = rowData["department"].id;

    /*回显管理员*/

    rowData["admin"] = rowData["admin"]+"";

    /*回显角色*/

    /*根据当前用户的id,查出对应的角色*/

    $.get("/getRoleByEid?id="+rowData.id,function (data) {

        /*设置下拉列表数据回显*/

        $("#role").combobox("setValues",data);

    });

    /*选中数据的回示*/

    $("#employeeForm").form("load",rowData);

});
更新业务逻辑
/*接收更新员工请求*/

@RequestMapping("/updateEmployee")

@ResponseBody

@RequiresPermissions("employee:edit")

public AjaxRes updateEmployee(Employee employee){

	AjaxRes ajaxRes = new AjaxRes();

	try {

		/*调用业务层,更新员工*/

		employeeService.updateEmployee(employee);

		ajaxRes.setMsg("更新成功");

		ajaxRes.setSuccess(true);

	}catch (Exception e){

		ajaxRes.setSuccess(false);

		ajaxRes.setMsg("更新失败");

	}

	return ajaxRes;

}
11.离职
离职按钮点击
/*设置离职按钮点击*/

$("#delete").click(function () {

    /*获取当前选中的行*/

    var rowData = $("#dg").datagrid("getSelected");

    console.log(rowData);

    if(!rowData){

        $.messager.alert("提示","选择一行数据进行编辑");

        return;

    }

    /*提醒用户,是否做离职操作*/

    $.messager.confirm("确认","是否做离职操作",function (res) {

       if(res){

           /*做离职操作*/

           $.get("/updateState?id="+rowData.id,function (data) {

               if (data.success){

                   $.messager.alert("温馨提示",data.msg);

                   /*重新加载数据表格*/

                   $("#dg").datagrid("reload");

               } else {

                   $.messager.alert("温馨提示",data.msg);

               }

           });

       }

    });

});
业务处理
/*接收离职操作请求*/

@RequestMapping("/updateState")

@ResponseBody

@RequiresPermissions("employee:delete")

public AjaxRes updateState(Long id){

    AjaxRes ajaxRes = new AjaxRes();

    try {

        /*调用业务层,设置员工离职状态*/

        employeeService.updateState(id);

        ajaxRes.setMsg("更新成功");

        ajaxRes.setSuccess(true);

    }catch (Exception e){

        System.out.println(e);

        ajaxRes.setSuccess(false);

        ajaxRes.setMsg("更新失败");

    }

    return ajaxRes;

}
12.离职按钮禁用
给数据表格绑定选中事件
/*员式数据列表*/

$("#dg").datagrid({

    url:"/employeeList",

    columns:[[

        {field:'username',title:'姓名',width:100,align:'center'},

        {field:'inputtime',title:'入职时间',width:100,align:'center'},

        {field:'tel',title:'电话',width:100,align:'center'},

        {field:'email',title:'邮箱',width:100,align:'center'},

        {field:'department',title:'部门',width:100,align:'center',formatter: function(value,row,index){

            if (value){

                return value.name;

            }

        }},

        {field:'state',title:'状态',width:100,align:'center',formatter: function(value,row,index){

                if(row.state){

                    return "在职";

                }else {

                    return "<font style='color: red'>离职</font>"

                }

            }},

        {field:'admin',title:'管理员',width:100,align:'center',formatter: function(value,row,index){

                if(row.admin){

                    return "是";

                }else {

                    return "否"

                }

            }},

    ]],

    fit:true,

    fitColumns:true,

    rownumbers:true,

    pagination:true,

    singleSelect:true,

    striped:true,

    toolbar:"#tb",

    onClickRow:function (rowIndex,rowData) {

        /*判断当前行是否是离职状态*/

        if(!rowData.state){

            /*离职,把离职按钮禁用*/

            $("#delete").linkbutton("disable");

        }else {

            /*离职,把离职按钮启用*/

            $("#delete").linkbutton("enable");

        }

    }

});
添加按钮js插件(记得是因为EasyUI带有小bug)
base.js
/**

 * linkbutton方法扩展

 * @param {Object} jq

 */

$.extend($.fn.linkbutton.methods, {

    /**

     * 激活选项(覆盖重写)

     * @param {Object} jq

     */

    enable: function(jq){

        return jq.each(function(){

            var state = $.data(this, 'linkbutton');

            if ($(this).hasClass('l-btn-disabled')) {

                var itemData = state._eventsStore;

                //恢复超链接

                if (itemData.href) {

                    $(this).attr("href", itemData.href);

                }

                //回复点击事件

                if (itemData.onclicks) {

                    for (var j = 0; j < itemData.onclicks.length; j++) {

                        $(this).bind('click', itemData.onclicks[j]);

                    }

                }

                //设置target为null,清空存储的事件处理程序

                itemData.target = null;

                itemData.onclicks = [];

                $(this).removeClass('l-btn-disabled');

            }

        });

    },

    /**

     * 禁用选项(覆盖重写)

     * @param {Object} jq

     */

    disable: function(jq){

        return jq.each(function(){

            var state = $.data(this, 'linkbutton');

            if (!state._eventsStore)

                state._eventsStore = {};

            if (!$(this).hasClass('l-btn-disabled')) {

                var eventsStore = {};

                eventsStore.target = this;

                eventsStore.onclicks = [];

                //处理超链接

                var strHref = $(this).attr("href");

                if (strHref) {

                    eventsStore.href = strHref;

                    $(this).attr("href", "javascript:void(0)");

                }

                //处理直接耦合绑定到onclick属性上的事件

                var onclickStr = $(this).attr("onclick");

                if (onclickStr && onclickStr != "") {

                    eventsStore.onclicks[eventsStore.onclicks.length] = new Function(onclickStr);

                    $(this).attr("onclick", "");

                }

                //处理使用jquery绑定的事件

                var eventDatas = $(this).data("events") || $._data(this, 'events');

                if (eventDatas["click"]) {

                    var eventData = eventDatas["click"];

                    for (var i = 0; i < eventData.length; i++) {

                        if (eventData[i].namespace != "menu") {

                            eventsStore.onclicks[eventsStore.onclicks.length] = eventData[i]["handler"];

                            $(this).unbind('click', eventData[i]["handler"]);

                            i--;

                        }

                    }

                }

                state._eventsStore = eventsStore;

                $(this).addClass('l-btn-disabled');

            }

        });

    }

});
13.分页控制
EasyUI中可以自动的提交分页参数直接接收分页参数
@RequestMapping("/employeeList")

@ResponseBody

public PageListRes employeeList(QueryVo vo){

    System.out.println(vo);

    /*调用业务层查询员工*/

    PageListRes pageListRes = employeeService.getEmployee(vo);

    return pageListRes;

}
业务处理
@Override

public PageListRes getEmployee(QueryVo vo) {

    /*调用mapper 查询员工 */

    Page<Object> page = PageHelper.startPage(vo.getPage(), vo.getRows());

    List<Employee> employees = employeeMapper.selectAll(vo);

    /*封装成pageList*/

    PageListRes pageListRes = new PageListRes();

    pageListRes.setTotal(page.getTotal());

    pageListRes.setRows(employees);

    return pageListRes;

}
14.高级查询
在toolbar上添加搜索框
<input type="text" name="keyword" style="width: 200px; height: 30px;padding-left: 5px;">

<a class="easyui-linkbutton" iconCls="icon-search" id="searchbtn">查询</a>
监听搜索点击
/*监听搜索按钮点击*/

$("#searchbtn").click(function () {

    /*获取搜索的内容*/

   var keyword =  $("[name='keyword']").val();

  /*重新加载列表  把参数keyword传过去*/

    $("#dg").datagrid("load",{keyword:keyword});

});
接收参数处理
@Setter@Getter@ToString

public class QueryVo {

    private int page;

    private int rows;

    private String keyword;

}
@Override

public PageListRes getEmployee(QueryVo vo) {

    /*调用mapper 查询员工 */

    Page<Object> page = PageHelper.startPage(vo.getPage(), vo.getRows());

    List<Employee> employees = employeeMapper.selectAll(vo);

    /*封装成pageList*/

    PageListRes pageListRes = new PageListRes();

    pageListRes.setTotal(page.getTotal());

    pageListRes.setRows(employees);

    return pageListRes;

}
<sql id="where_sql">

	<where>

	   <if test="keyword !=null and keyword !=''">

		  and e.username like concat('%',#{keyword},'%')

		  or e.tel like concat('%',#{keyword},'%')

		  or e.email like concat('%',#{keyword},'%')

	   </if>

	</where>

</sql>

<!--员工关联部门查询-->

<select id="selectAll" resultMap="BaseResultMap" >

	select

	e.id,

	e.username,

	e.inputtime,

	e.tel,

	e.email,

	e.state,

	e.admin,

	d.id as d_id,

	d.`name` as d_name

	from employee as e

	LEFT JOIN department as d

	ON e.dep_id = d.id

	<include refid="where_sql"/>

	order by e.id desc

</select>
添加权限
1.建立角色与权限的表
为多对多关系
- 角色表
CREATE TABLE `employee` (

  `id` bigint(20) NOT NULL AUTO_INCREMENT,

  `username` varchar(50) DEFAULT NULL,

  `inputtime` datetime DEFAULT NULL,

  `tel` varchar(20) DEFAULT NULL,

  `email` varchar(50) DEFAULT NULL,

  `state` tinyint(1) DEFAULT NULL,

  `admin` tinyint(1) DEFAULT NULL,

  `dep_id` bigint(20) DEFAULT NULL,

  `password` varchar(50) DEFAULT NULL,

  PRIMARY KEY (`id`),

  KEY `dep_id` (`dep_id`),

  CONSTRAINT `employee_ibfk_1` FOREIGN KEY (`dep_id`) REFERENCES `department` (`id`)

) ENGINE=InnoDB AUTO_INCREMENT=26 DEFAULT CHARSET=utf8;
- 权限表
CREATE TABLE `permission` (

  `pid` bigint(20) NOT NULL,

  `pname` varchar(50) DEFAULT NULL,

  `presource` varchar(50) DEFAULT NULL,

  PRIMARY KEY (`pid`)

) ENGINE=InnoDB DEFAULT CHARSET=utf8;
- 角色与权限中间表
CREATE TABLE `employee_role_rel` (

  `eid` bigint(20) NOT NULL,

  `rid` bigint(20) NOT NULL,

  PRIMARY KEY (`eid`,`rid`),

  KEY `rid` (`rid`),

  CONSTRAINT `employee_role_rel_ibfk_1` FOREIGN KEY (`eid`) REFERENCES `employee` (`id`),

  CONSTRAINT `employee_role_rel_ibfk_2` FOREIGN KEY (`rid`) REFERENCES `role` (`rid`)

) ENGINE=InnoDB DEFAULT CHARSET=utf8;
使用代码生成器生成相关mapper
2.建立角色页面
角色数据列表
<table id="emp_dg"></table>

<div id="toolbar">

	<a href="#" class="easyui-linkbutton" data-options="iconCls:'icon-add',plain:true" id="add">添加</a>

	<a href="#" class="easyui-linkbutton" data-options="iconCls:'icon-edit',plain:true" id="edit">编辑</a>

	<a href="#" class="easyui-linkbutton" data-options="iconCls:'icon-remove',plain:true" id="remove">离职</a>

	<a href="#" class="easyui-linkbutton" data-options="iconCls:'icon-reload',plain:true" id="reload">刷新</a>

</div>
添加角色权限对话框
<div id="dialog">

	<form id="myform">

		<table align="center" style="border-spacing: 20px 30px">

			<input type="hidden" name="id">

			<tr align="center">

				<td>角色编号: <input type="text" name="username" class="easyui-validatebox" ></td>

				<td>角色名称: <input type="text" name="username" class="easyui-validatebox" ></td>

			</tr>

			<tr>

				<td><div id="role_data1"></div></td>

				<td><div id="role_data2"></div></td>

			</tr>

		</table>

	</form>

</div>
3.加载权限数据实现点击添加权限,点击删除权限
/*角色数据列表*/

$("#role_dg").datagrid({

	url:"/getRoles",

	columns:[[

		{field:'rnum',title:'角色编号',width:100,align:'center'},

		{field:'rname',title:'角色名称',width:100,align:'center'},

	]],

	fit:true,

	fitColumns:true,

	rownumbers:true,

	pagination:true,

	singleSelect:true,

	striped:true,

	toolbar:"#toolbar",

});

/*权限列表*/

$("#role_data1").datagrid({

	title:"所有权限",

	width:250,

	height:400,

	fitColumns:true,

	singleSelect:true,

	url:'/permissionList',

	columns:[[

		{field:'pname',title:'权限名称',width:100,align:'center'},

	]],

	onClickRow:function (rowIndex,rowData) {/*点击一行时,回调*/

		/*判断是否已经存在该权限*/

		/*取出所有的已选权限*/

		var allRows = $("#role_data2").datagrid("getRows");

		/*取出每一个进行判断*/

		for(var i = 0; i<allRows.length; i++){

			/*取出每一行*/

			var row = allRows[i];

			if(rowData.pid == row.pid){/*已经存在该权限*/

				/*让已经存在权限成为选中的状态*/

				/*获取已经成为选中状态当前角标*/

				var index = $("#role_data2").datagrid("getRowIndex",row);

				/*让该行成为选中状态*/

				$("#role_data2").datagrid("selectRow",index);

				return;

			}

		}

		/*把当前选中的,添加到已选权限*/

		$("#role_data2").datagrid("appendRow",rowData);

	}

});

/*选中权限列表*/

$("#role_data2").datagrid({

	title:"已选权限",

	width:250,

	height:400,

	singleSelect:true,

	fitColumns:true,

	columns:[[

		{field:'pname',title:'权限名称',width:100,align:'center'},

	]],

	onClickRow:function (rowIndex,rowData) {

		/*删除当中选中的一行*/

		$("#role_data2").datagrid("deleteRow",rowIndex);

	}

});
4.添加角色权限
定义角色权限关系:一个角色有多个权限
@Getter@Setter@ToString

public class Role {

    private Long rid;

    private String rnum;

    private String rname;

    /*一个角色可以有多个权限*/

    private List<Permission> permissions = new ArrayList<>();

}
点击保存时,如果没有隐藏字段id,则为添加操作
保存时, 参数传递;默认只传递input中的内容,还需要在提交表单时, 把添加的权限信息提交过去
/*添加/编辑对话框*/

$("#dialog").dialog({

    width:600,

    height:650,

    buttons:[{

        text:'保存',

        handler:function(){

            /*判断当前是保存操作还是编辑操作*/

           var rid =  $("[name='rid']").val();

           var url;

           if(rid){

               /*编辑*/

               url="updateRole"

           }else {

               /*保存*/

               url="saveRole";

           }

            /*提交表单*/

            $("#myform").form("submit",{

                url:url,

                onSubmit:function(param){  /*传递额外参数  已选择的权限*/

                    /*获取已经选择的权限*/

                   var allRows =  $("#role_data2").datagrid("getRows");

                   /*遍历出每一个权限*/

                    for(var i = 0; i< allRows.length; i++){

                        /*取出每一个权限 */

                       var row =  allRows[i];

                       /*给它封装到集合中*/

                        param["permissions["+i+"].pid"] = row.pid;

                    }

                },

                success:function (data) {

                    data = $.parseJSON(data);

                    if (data.success){

                        $.messager.alert("温馨提示",data.msg);

                        /*关闭对话框 */

                        $("#dialog").dialog("close");

                        /*重新加载数据表格*/

                        $("#role_dg").datagrid("reload");

                    } else {

                        $.messager.alert("温馨提示",data.msg);

                    }

                }

            });

        }

    },{

        text:'关闭',

        handler:function(){

            $("#dialog").dialog("close");

        }

    }],

    closed:true

});
接收参数,保存角色与权限
/*接收  保存角色请求地址*/

@RequestMapping("/saveRole")

@ResponseBody

public AjaxRes saveRole(Role role){

    AjaxRes ajaxRes = new AjaxRes();

    try {

        /*调用业务层, 保存角色和权限*/

        roleService.saveRole(role);

        ajaxRes.setMsg("保存成功");

        ajaxRes.setSuccess(true);

    }catch (Exception e){

        ajaxRes.setSuccess(false);

        ajaxRes.setMsg("保存失败");

    }

    return ajaxRes;

}
@Override

public void saveRole(Role role) {

    /*1.保存角色*/

    roleMapper.insert(role);

    /*2.保存角色与权限之间关系*/

    for (Permission permission : role.getPermissions()) {

        roleMapper.insertRoleAndPermissionRel(role.getRid(),permission.getPid());

    }

}
5.角色列表
/*角色数据列表*/

$("#role_dg").datagrid({

    url:"/getRoles",

    columns:[[

        {field:'rnum',title:'角色编号',width:100,align:'center'},

        {field:'rname',title:'角色名称',width:100,align:'center'},

    ]],

    fit:true,

    fitColumns:true,

    rownumbers:true,

    pagination:true,

    singleSelect:true,

    striped:true,

    toolbar:"#toolbar",

});
6.编辑角色权限
编辑回显
/*监听编辑点击*/

$("#edit").click(function () {

    /*获取当前选中的行*/

    var rowData = $("#role_dg").datagrid("getSelected");

    console.log(rowData);

    if(!rowData){

        $.messager.alert("提示","选择一行数据进行编辑");

        return;

    }

    /*加载当前角色下的权限*/

    var options =  $("#role_data2").datagrid("options");

    options.url = "/getPermissionByRid?rid="+rowData.rid;

    /*重新加载数据*/

    $("#role_data2").datagrid("load");

    /*选中数据的回示*/

    $("#myform").form("load",rowData);

    /*设置标题*/

    $("#dialog").dialog("setTitle","编辑角色");

    /*打开对话框 */

    $("#dialog").dialog("open");

});
添加时清空数据
/*添加角色*/

$("#add").click(function () {

    /*清空表单*/

    $("#myform").form("clear");

    /*清空已选权限*/

    $("#role_data2").datagrid("loadData",{rows:[]});

    /*设置标题*/

    $("#dialog").dialog("setTitle","添加角色");

    /*打开对话框 */

    $("#dialog").dialog("open");

});
打破关系重新保存
/*更新角色*/

@Override

public void updateRole(Role role) {

    /*打破角色与权限之间的之前关系*/

    roleMapper.deletePermissionRel(role.getRid());

    /*更新角色*/

    roleMapper.updateByPrimaryKey(role);

    /*重新建立与权限的关系*/

    /*重新保存角色与权限之间关系*/

    for (Permission permission : role.getPermissions()) {

        roleMapper.insertRoleAndPermissionRel(role.getRid(),permission.getPid());

    }

}
5.删除角色权限
监听删除按钮
/*监听删除点击*/

$("#remove").click(function () {

    /*获取当前选中的行*/

    var rowData = $("#role_dg").datagrid("getSelected");

    console.log(rowData);

    if(!rowData){

        $.messager.alert("提示","选择一行数据进行删除");

        return;

    }

    $.get("deleteRole?rid="+rowData.rid,function (data) {

        if (data.success){

            $.messager.alert("温馨提示",data.msg);

            /*重新加载数据表格*/

            $("#role_dg").datagrid("reload");

        } else {

            $.messager.alert("温馨提示",data.msg);

        }

    });

});
处理业务逻辑
/*接收删除的请求*/

@RequestMapping("/deleteRole")

@ResponseBody

public AjaxRes deleteRole(Long rid){

    AjaxRes ajaxRes = new AjaxRes();

    try {

        /*调用删除角色的业务*/

        roleService.deleteRole(rid);

        ajaxRes.setMsg("删除角色成功");

        ajaxRes.setSuccess(true);

    }catch (Exception e){

        ajaxRes.setSuccess(false);

        ajaxRes.setMsg("删除角色失败");

    }

    return ajaxRes;

}
/*删除角色的业务*/

@Override

public void deleteRole(Long rid) {

	/*1.删除关联的权限*/

	roleMapper.deletePermissionRel(rid);

	/*2.删除对应的角色*/

	roleMapper.deleteByPrimaryKey(rid);

}
6.员工添加角色
添加员工时, 添加角色下拉列表
/*回显角色*/

/*根据当前用户的id,查出对应的角色*/

$.get("/getRoleByEid?id="+rowData.id,function (data) {

    /*设置下拉列表数据回显*/

    $("#role").combobox("setValues",data);

});
保存时, 保存时传递角色信息
/*提交表单*/

$("#employeeForm").form("submit",{

	url:saveEmployee,

	onSubmit:function(param){

		/*获取选中的角色*/

	   var values =  $("#role").combobox("getValues");

	   for(var i = 0; i < values.length; i++){

		   var rid  =  values[i];

		   param["roles["+i+"].rid"] = rid;

	   }

	},

	success:function (data) {

	  data = $.parseJSON(data);

	  if (data.success){

		  $.messager.alert("温馨提示",data.msg);

		  /*关闭对话框 */

		  $("#dialog").dialog("close");

		  /*重新加载数据表格*/

		  $("#dg").datagrid("reload");

	  } else {

		  $.messager.alert("温馨提示",data.msg);

	  }

	}

});
7.员工编辑
回显数据
/*监听编辑按钮点击*/

$("#edit").click(function () {

    /*获取当前选中的行*/

    var rowData = $("#dg").datagrid("getSelected");

    console.log(rowData);

    if(!rowData){

        $.messager.alert("提示","选择一行数据进行编辑");

        return;

    }

    /*取消密码验证*/

    $("[name='password']").validatebox({required:false});

    $("#password").hide();

    /*弹出对话框*/

    $("#dialog").dialog("setTitle","编辑员工");

    $("#dialog").dialog("open");

    /*回显部门*/

    // 当rowData["department"]为空时,会异常

    if(rowData["department"] != null)

    {

        rowData["department.id"] = rowData["department"].id;

    }

    else

        rowData["department.id"] = rowData["department"]+"";

    /*回显管理员*/

    rowData["admin"] = rowData["admin"]+"";

    /*回显角色*/

    /*根据当前用户的id,查出对应的角色*/

    $.get("/getRoleByEid?id="+rowData.id,function (data) {

        /*设置下拉列表数据回显*/

        $("#role").combobox("setValues",data);

    });

    /*选中数据的回示*/

    $("#employeeForm").form("load",rowData);

});
保存编辑
/*更新员工*/

@Override

public void updateEmployee(Employee employee) {

    /*打破与角色之间关系*/

    employeeMapper.deleteRoleRel(employee.getId());

    /*更新员工*/

    employeeMapper.updateByPrimaryKey(employee);

    /*重新建立角色的关系*/

    for (Role role : employee.getRoles()) {

        employeeMapper.insertEmployeeAndRoleRel(employee.getId(),role.getRid());

    }

}
权限控制
登录认证
整合Shiro(添加pom依赖)
<dependency>

  <groupId>commons-logging</groupId>

  <artifactId>commons-logging</artifactId>

  <version>1.2</version>

</dependency>

<dependency>

  <groupId>org.slf4j</groupId>

  <artifactId>slf4j-nop</artifactId>

  <version>1.7.24</version>

</dependency>

<dependency>

  <groupId>commons-collections</groupId>

  <artifactId>commons-collections</artifactId>

  <version>3.2.1</version>

</dependency>

<dependency>

  <groupId>org.apache.shiro</groupId>

  <artifactId>shiro-core</artifactId>

  <version>1.4.0</version>

</dependency>

<dependency>

  <groupId>org.apache.shiro</groupId>

  <artifactId>shiro-web</artifactId>

  <version>1.4.0</version>

</dependency>

<dependency>

  <groupId>org.apache.shiro</groupId>

  <artifactId>shiro-ehcache</artifactId>

  <version>1.4.0</version>

</dependency>

<dependency>

  <groupId>org.apache.shiro</groupId>

  <artifactId>shiro-spring</artifactId>

  <version>1.4.0</version>

</dependency>
1.登录拦截,如果没有登录,跳转到登录页面
1.在web.xml当中配置过滤器拦截所有请求,进行处理
<!-- 拦截到所有请求,使用spring一个bean来进行处理 -->

<filter>

	<filter-name>shiroFilter</filter-name>

	<filter-class>org.springframework.web.filter.DelegatingFilterProxy</filter-class>

	<!-- 是否filter中的init和destroy-->

	<init-param>

		<param-name>targetFilterLifecycle</param-name>

		<param-value>true</param-value>

	</init-param>

</filter>

<filter-mapping>

	<filter-name>shiroFilter</filter-name>

	<url-pattern>/*</url-pattern>

</filter-mapping>
2.在spring当中配置shiro过滤器和安全管理器
<!-- 配置shiro过滤器 -->

<bean id="shiroFilter" class="org.apache.shiro.spring.web.ShiroFilterFactoryBean">

	<property name="securityManager" ref="securityManager"></property>

	<!-- 配置shiro过滤器pattern -->

	<property name="filterChainDefinitions">

		<value>

			/static/** = anon   <!--不需要登录验证-->

			/login.jsp = anon   <!--不需要登录验证-->

			/**=authc     <!--除指定请求外,其它所有的请求都需要身份验证-->

		</value>

	</property>

</bean>

<!-- 配置shiro安全管理器 -->

<bean id="securityManager" class="org.apache.shiro.web.mgt.DefaultWebSecurityManager"></bean>
2.登录认证流程
1.表单发送请求
$(function () {

    $("#loginBtn").click(function () {

        /*Ajax发送请求, 是没有办法跳转服务当中的请求

        * 只能通过在浏览器当中来跳转

        * */

        $.post("/login",$("form").serialize(),function (data) {

           /*把data  json格式的字符串  转成 json 数据*/

           data = $.parseJSON(data);

           if (data.success){

               /*跳转到首页*/

               window.location.href = "/index.jsp"

           } else {

              alert(data.msg);

           }

        });

    });

});
2.指定登录认证路径
<!-- 配置登录认证的路径 -->

<property name="loginUrl" value="/login" />
3.创建登录realm和重新配置过滤器
public class EmployeeRealm extends AuthorizingRealm {

    @Autowired

    private EmployeeService employeeService;

    /*认证*/

    @Override

    protected AuthenticationInfo doGetAuthenticationInfo(AuthenticationToken token) throws AuthenticationException {

        System.out.println("来到了认证-------");

        /*获取身份信息*/

        String username = (String)token.getPrincipal();

        System.out.println(username);

        /*根据用户名当中查询有没有当前用户*/

        Employee employee = employeeService.getEmployeeWithUserName(username);

        System.out.println(employee);

        if (employee == null){

            return null;

        }

        /*认证*/

        /*参数: 主体,正确的密码,盐,当前realm名称*/

        SimpleAuthenticationInfo info = new SimpleAuthenticationInfo(

                employee,

                employee.getPassword(),

                ByteSource.Util.bytes(employee.getUsername()),

                this.getName());

        return info;

    }

    /*授权

     web  doGetAuthorizationInfo 什么时候调用

     1.发现访问路径对应的方法上面 有授权注解  就会调用doGetAuthorizationInfo

     2.页面当中有授权标签  也会调用doGetAuthorizationInfo

    * */

    @Override

    protected AuthorizationInfo doGetAuthorizationInfo(PrincipalCollection principalCollection) {

        System.out.println("授权调用-------------------");

        /*获取用户的身份信息*/

        Employee employee = (Employee) principalCollection.getPrimaryPrincipal();

        /*根据当前用,查询角色和权限*/

        List<String> roles = new ArrayList<>();

        List<String> permissions = new ArrayList<>();

        /*判断当前用户是不是管理员 如果是管理员 拥有所有的权限*/

        if(employee.getAdmin()){

            /*拥有所有的权限*/

            permissions.add("*:*");

        }else {

            /*查询角色*/

            roles = employeeService.getRolesById(employee.getId());

            /*查询权限*/

            permissions = employeeService.getPermissionById(employee.getId());

        }

       /*给授权信息*/

        SimpleAuthorizationInfo info = new SimpleAuthorizationInfo();

        info.addRoles(roles);

        info.addStringPermissions(permissions);

        return info;

    }

}
4.配置realm数据源(在application-shiro.xml中配置)
<?xml version="1.0" encoding="UTF-8"?>

<beans xmlns="http://www.springframework.org/schema/beans"

       xmlns:xsi="http://www.w3.org/2001/XMLSchema-instance"

       xmlns:context="http://www.springframework.org/schema/context"

       xmlns:aop="http://www.springframework.org/schema/aop"

       xmlns:tx="http://www.springframework.org/schema/tx"

       xsi:schemaLocation="http://www.springframework.org/schema/beans

        http://www.springframework.org/schema/beans/spring-beans.xsd

        http://www.springframework.org/schema/context

        http://www.springframework.org/schema/context/spring-context.xsd

    http://www.springframework.org/schema/aop

    http://www.springframework.org/schema/aop/spring-aop.xsd

     http://www.springframework.org/schema/tx

        http://www.springframework.org/schema/tx/spring-tx.xsd

">

    <bean id="myFormFilter" class="com.itlike.web.filter.MyFormFilter"/>

    <!-- 配置shiro过滤器 -->

    <bean id="shiroFilter" class="org.apache.shiro.spring.web.ShiroFilterFactoryBean">

        <!--

        index

        其它的请求  会判断 当前有没有认证过

        默认情况 ,           没有认证,会跳转到login.jsp

        如果配置了 loginUrl  没有认证  执行对应的login请求

        login

        loginUrl:如果发现请求是loginUrl值  会去做认证

        配置登录认证的路径

        -->

        <property name="loginUrl" value="/login"/>

        <!--重新配置表单监听的过滤器-->

        <property name="filters">

            <map>

                <entry key="authc" value-ref="myFormFilter"/>

            </map>

        </property>

        <!--配置安全管理器-->

        <property name="securityManager" ref="securityManager"></property>

        <!-- 配置shiro过滤器pattern -->

        <property name="filterChainDefinitions">

            <value>

                /static/** = anon   <!--不需要登录验证-->

                /login.jsp = anon   <!--不需要登录验证-->

                /logout = logout   <!--取消认证-->

                /**=authc     <!--除指定请求外,其它所有的请求都需要身份验证-->

            </value>

        </property>

    </bean>

    <!--自定义realm-->

    <bean id="employeeRealm" class="com.itlike.web.realm.EmployeeRealm">

        <property name="credentialsMatcher" ref="credentialsMatcher"/>

    </bean>

    <!-- 凭证匹配器 -->

    <bean id="credentialsMatcher" class="org.apache.shiro.authc.credential.HashedCredentialsMatcher">

        <!-- 散列算法 -->

        <property name="hashAlgorithmName" value="md5"/>

        <!-- 散列次数 -->

        <property name="hashIterations" value="2"></property>

    </bean>

    <!-- 缓存管理器 -->

    <bean id="ehCache" class="org.apache.shiro.cache.ehcache.EhCacheManager">

        <property name="cacheManagerConfigFile" value="classpath:shiro-ehcache.xml"/>

    </bean>

    <!-- 配置shiro安全管理器 -->

    <bean id="securityManager" class="org.apache.shiro.web.mgt.DefaultWebSecurityManager">

        <!--注入realm-->

        <property name="realm" ref="employeeRealm"/>

        <!--注入缓存-->

        <property name="cacheManager" ref="ehCache"/>

    </bean>

    <!--

    配置为true即使用cglib继承的方式,

    false为jdk的接口动态代理   控制器没有实现接口

    -->

    <aop:config proxy-target-class="true" ></aop:config>

    <!-- 使用第三方去扫描shiro的注解 -->

    <bean class="org.apache.shiro.spring.security.interceptor.AuthorizationAttributeSourceAdvisor ">

        <property name="securityManager" ref="securityManager"></property>

    </bean>

</beans>
5.创建表单认证过滤器
public class MyFormFilter extends FormAuthenticationFilter {

    /*当认证成功时,会调用*/

    protected boolean onLoginSuccess(AuthenticationToken token, Subject subject, ServletRequest request, ServletResponse response) throws Exception {

       /*响应给浏览器*/

        response.setCharacterEncoding("utf-8");

        System.out.println("认证成功");

        AjaxRes ajaxRes = new AjaxRes();

        ajaxRes.setSuccess(true);

        ajaxRes.setMsg("登录成功");

        /*把对象转成json格式字符串*/

        String jsonString = new ObjectMapper().writeValueAsString(ajaxRes);

        response.getWriter().print(jsonString);

        return false;

    }

    /*当认证失败时, 会调用*/

    protected boolean onLoginFailure(AuthenticationToken token,

                                     AuthenticationException e,

                                     ServletRequest request,

                                     ServletResponse response) {

        System.out.println("认证失败");

        AjaxRes ajaxRes = new AjaxRes();

        ajaxRes.setSuccess(false);

        if (e!=null){

            /*获取异常名称*/

            String name = e.getClass().getName();

            if(name.equals(UnknownAccountException.class.getName())){

                /*没有帐号*/

                ajaxRes.setMsg("帐号不正确");

            } else if(name.equals(IncorrectCredentialsException.class.getName())){

                /*密码错误*/

                ajaxRes.setMsg("密码不正确");

            }else {

                /*未知异常*/

                ajaxRes.setMsg("未知错误");

            }

        }

        try {

            /*把对象转成json格式字符串*/

            String jsonString = new ObjectMapper().writeValueAsString(ajaxRes);

            response.setCharacterEncoding("utf-8");

            response.getWriter().print(jsonString);

        } catch (IOException e1) {

            e1.printStackTrace();

        }

        /*响应给浏览器*/

        return false;

    }

}
登录授权
当我们在控制器方法写了 @RequiresPermissions,Shiro在访问时, 就会判断有没有该权限
如果没有,就不会执行对应方法
实现过程
1.在配置文件当中添加Shiro注解扫描
<!--

	配置为true即使用cglib继承的方式,

	false为jdk的接口动态代理   控制器没有实现接口

-->

<aop:config proxy-target-class="true" ></aop:config>

<!-- 使用第三方去扫描shiro的注解 -->

<bean class="org.apache.shiro.spring.security.interceptor.AuthorizationAttributeSourceAdvisor ">

	<property name="securityManager" ref="securityManager"></property>

</bean>
2.在realm中添加授权信息
public class EmployeeRealm extends AuthorizingRealm {

    @Autowired

    private EmployeeService employeeService;

    /*认证*/

    @Override

    protected AuthenticationInfo doGetAuthenticationInfo(AuthenticationToken token) throws AuthenticationException {

        System.out.println("来到了认证-------");

        /*获取身份信息*/

        String username = (String)token.getPrincipal();

        System.out.println(username);

        /*根据用户名当中查询有没有当前用户*/

        Employee employee = employeeService.getEmployeeWithUserName(username);

        System.out.println(employee);

        if (employee == null){

            return null;

        }

        /*认证*/

        /*参数: 主体,正确的密码,盐,当前realm名称*/

        SimpleAuthenticationInfo info = new SimpleAuthenticationInfo(

                employee,

                employee.getPassword(),

                ByteSource.Util.bytes(employee.getUsername()),

                this.getName());

        return info;

    }

    /*授权

     web  doGetAuthorizationInfo 什么时候调用

     1.发现访问路径对应的方法上面 有授权注解  就会调用doGetAuthorizationInfo

     2.页面当中有授权标签  也会调用doGetAuthorizationInfo

    * */

    @Override

    protected AuthorizationInfo doGetAuthorizationInfo(PrincipalCollection principalCollection) {

        System.out.println("授权调用-------------------");

        /*获取用户的身份信息*/

        Employee employee = (Employee) principalCollection.getPrimaryPrincipal();

        /*根据当前用,查询角色和权限*/

        List<String> roles = new ArrayList<>();

        List<String> permissions = new ArrayList<>();

        /*判断当前用户是不是管理员 如果是管理员 拥有所有的权限*/

        if(employee.getAdmin()){

            /*拥有所有的权限*/

            permissions.add("*:*");

        }else {

            /*查询角色*/

            roles = employeeService.getRolesById(employee.getId());

            /*查询权限*/

            permissions = employeeService.getPermissionById(employee.getId());

        }

       /*给授权信息*/

        SimpleAuthorizationInfo info = new SimpleAuthorizationInfo();

        info.addRoles(roles);

        info.addStringPermissions(permissions);

        return info;

    }

}
没有权限结果处理
@ExceptionHandler(AuthorizationException.class)

public void handleShiroException(HandlerMethod method,HttpServletResponse response) throws Exception{ /*method  发生异常的方法*/

    /*跳转到一个界面  界面提示没有 权限*/

    /*判断 当前的请求是不是Json请求  如果是  返回json给浏览器 让它自己来做跳转*/

    /*获取方法上的注解*/

    ResponseBody methodAnnotation = method.getMethodAnnotation(ResponseBody.class);

    if (methodAnnotation != null){

        //Ajax

        AjaxRes ajaxRes = new AjaxRes();

        ajaxRes.setSuccess(false);

        ajaxRes.setMsg("你没有权限操作");

        String s = new ObjectMapper().writeValueAsString(ajaxRes);

        response.setCharacterEncoding("utf-8");

        response.getWriter().print(s);

    }else {

        response.sendRedirect("nopermission.jsp");

    }

}
权限按钮控制
- 引入Shiro的标签库
- 在需要权限控制的地方添加对应的shiro标签
<%@ taglib uri="http://shiro.apache.org/tags" prefix="shiro" %>

<shiro:hasPermission name="employee:add">

            <a href="#" class="easyui-linkbutton" data-options="iconCls:'icon-add',plain:true" id="add">添加</a>

</shiro:hasPermission>
密码散列
在保存用户时, 给用户密码进行加密处理
/*把密码进行加密*/

把用户名作为盐值,进行2次散列

Md5Hash md5Hash = new Md5Hash(employee.getPassword(), employee.getUsername(), 2);

employee.setPassword(md5Hash.toString());
在认证当中添加密码处理
/*认证*/

/*参数: 主体,正确的密码,盐,当前realm名称*/

SimpleAuthenticationInfo info = new SimpleAuthenticationInfo(

employee,

employee.getPassword(),

ByteSource.Util.bytes(employee.getUsername()),

this.getName());
添加凭证匹配器
<!-- 配置realm数据源 -->

<bean id="employeeRealm" class="com.itlike.realm.EmployeeRealm">

	<property name="credentialsMatcher" ref="credentialsMatcher"/>

</bean>

<!-- 凭证匹配器 -->

<bean id="credentialsMatcher" class="org.apache.shiro.authc.credential.HashedCredentialsMatcher">

	<!-- 散列算法 -->

	<property name="hashAlgorithmName" value="md5"/>

	<!-- 散列次数 -->

	<property name="hashIterations" value="2"></property>

</bean>
权限缓存
- 进入页面时, 页面当中写了Shiro的标签,每一个标签都要去到授权当中进行一次授权查询
- 授权查询只使用一次即可, 所以使用缓存,把对应的内容缓存起来,下次再去, 直接从缓存当中进行查询
使用步骤:
1.添加缓存pom依赖
<dependency>

  <groupId>org.apache.shiro</groupId>

  <artifactId>shiro-ehcache</artifactId>

  <version>1.2.2</version>

</dependency>
2.添加shiro缓存配置
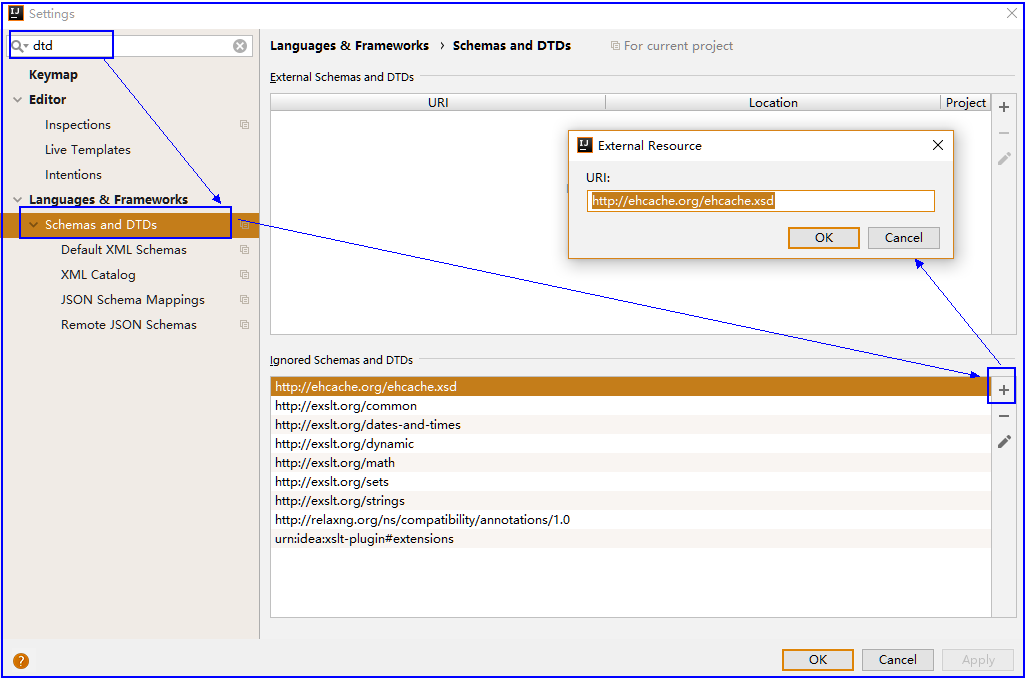
添加shiro-ehcache.xml
<ehcache xmlns:xsi="http://www.w3.org/2001/XMLSchema-instance"

	xsi:noNamespaceSchemaLocation="http://ehcache.org/ehcache.xsd">

	<defaultCache

		maxElementsInMemory="1000"

		maxElementsOnDisk="10000000"

		eternal="false"

		overflowToDisk="false"

		diskPersistent="false"

		timeToIdleSeconds="120"

		timeToLiveSeconds="120"

		diskExpiryThreadIntervalSeconds="120"

		memoryStoreEvictionPolicy="LRU">

	</defaultCache>

</ehcache>
配置约束
3.application-shiro中配置缓存管理器
<!-- 缓存管理器 -->

<bean id="ehCache" class="org.apache.shiro.cache.ehcache.EhCacheManager">

	<property name="cacheManagerConfigFile" value="classpath:shiro-ehcache.xml"/>

</bean>
4.把缓存管理器添加到安全管理器当中
<!-- 配置shiro安全管理器 -->

<bean id="securityManager" class="org.apache.shiro.web.mgt.DefaultWebSecurityManager">

	<property name="realm" ref="employeeRealm" />

	<property name="cacheManager" ref="ehCache"/>

</bean>
菜单权限管理
菜单页面
页面搭建
1.创建菜单表
CREATE TABLE `menu` (

  `id` bigint(20) NOT NULL,

  `text` varchar(10) DEFAULT NULL,

  `url` varchar(30) DEFAULT NULL,

  `parent_id` bigint(20) DEFAULT NULL,

  PRIMARY KEY (`id`),

  KEY `parent_id` (`parent_id`),

  CONSTRAINT `menu_ibfk_1` FOREIGN KEY (`parent_id`) REFERENCES `menu` (`id`)

) ENGINE=InnoDB DEFAULT CHARSET=utf8;
2.生成Mapper,添加父菜单字段
@Setter@Getter@ToString

public class Menu {

    private Long id;

    private String text;

    private String url;

    private Menu parent;

    private Permission permission;

    private List<Menu> children = new ArrayList<>();

}
3.创建Menu页面
<!-- 数据表格 -->

<table id="menu_datagrid">

    <thead>

    <tr>

        <th>名称</th>

        <th>url</th>

        <th>父菜单</th>

    </tr>

    </thead>

</table>

<!-- 数据表格CRUD按钮 -->

<div id="menu_toolbar">

    <div>

        <a class="easyui-linkbutton" iconCls="icon-add" plain="true" id="add">新增</a>

        <a class="easyui-linkbutton" iconCls="icon-edit" plain="true" id="edit">编辑</a>

        <a class="easyui-linkbutton" iconCls="icon-remove" plain="true" id="del">刪除</a>

        <a class="easyui-linkbutton" iconCls="icon-reload" plain="true" id="reload">刷新</a>

    </div>

</div>

<div id="menu_dialog">

    <form id="menu_form" method="post">

        <table align="center" style="margin-top: 15px;">

            <input type="hidden" name="id">

            <tr>

                <td>名称</td>

                <td><input type="text" name="text"></td>

            </tr>

            <tr>

                <td>url</td>

                <td><input type="text" name="url"></td>

            </tr>

            <tr>

                <td>父菜单</td>

                <td><input type="text" id="parentMenu" name="parent.id" class="easyui-combobox" placeholder="请选择父菜单"/></td>

            </tr>

        </table>

    </form>

</div>

<!-- 对话框保存取消按钮 -->

<div id="menu_dialog_bt">

    <a class="easyui-linkbutton" iconCls="icon-save" plain="true" id="save">保存</a>

    <a class="easyui-linkbutton" iconCls="icon-cancel" plain="true" id="cancel">取消</a>

</div>
4.创建Menu.js
$(function () {

    $("#menu_datagrid").datagrid({

        url:"/menuList",

        columns:[[

            {field:'text',title:'名称',width:1,align:'center'},

            {field:'url',title:'跳转地址',width:1,align:'center'},

            {field:'parent',title:'父菜单',width:1,align:'center',formatter:function(value,row,index){

                    return value?value.text:'';

                }

            }

        ]],

        fit:true,

        rownumbers:true,

        singleSelect:true,

        striped:true,

        pagination:true,

        fitColumns:true,

        toolbar:'#menu_toolbar'

    });

    /*

     * 初始化新增/编辑对话框

     */

    $("#menu_dialog").dialog({

        width:300,

        height:240,

        closed:true,

        buttons:'#menu_dialog_bt'

    });

    /*加载选择父菜单*/

    $("#parentMenu").combobox({

        width:150,

        panelHeight:'auto',

        editable:false,

        url:'parentList',

        textField:'text',

        valueField:'id',

        onLoadSuccess:function () { /*数据加载完毕之后回调*/

            $("#parentMenu").each(function(i){

                var span = $(this).siblings("span")[i];

                var targetInput = $(span).find("input:first");

                if(targetInput){

                    $(targetInput).attr("placeholder", $(this).attr("placeholder"));

                }

            });

        }

    });

    /*添加菜单*/

    $("#add").click(function () {

        $("#menu_dialog").dialog("setTitle","添加菜单");

        $("#menu_form").form("clear");

        $("#menu_dialog").dialog("open");

    });

    /*保存菜单*/

    $("#save").click(function () {

        /*判断当前是添加 还是编辑*/

        var id = $("[name='id']").val();

        var url;

        if(id){

            var parent_id = $("[name='parent.id']").val();

            if (id == parent_id) {

                $.messager.alert("温馨提示","不能设置自己为父菜单");

                return;

            }

            /*编辑*/

            url = "updateMenu";

        }else {

            /*添加*/

            url= "saveMenu";

        }

        /*提交表单*/

        $("#menu_form").form("submit",{

            url:url,

            success:function (data) {

                data = $.parseJSON(data);

                if (data.success){

                    $.messager.alert("温馨提示",data.msg);

                    /*关闭对话框 */

                    $("#menu_dialog").dialog("close");

                    $("#parentMenu").combobox("reload");

                    $("#menu_datagrid").datagrid("reload");

                } else {

                    $.messager.alert("温馨提示",data.msg);

                }

            }

        });

    });

    /*编辑菜单*/

    $("#edit").click(function () {

        $("#menu_form").form("clear");

        /*获取当前选中的行*/

        var rowData = $("#menu_datagrid").datagrid("getSelected");

        if(!rowData){

            $.messager.alert("提示","选择一行数据进行编辑");

            return;

        }

        /*父菜单回显*/

        if(rowData.parent){

            rowData["parent.id"] = rowData.parent.id;

        }else {/*回显的placeholder*/

            $("#parentMenu").each(function(i){

                var span = $(this).siblings("span")[i];

                var targetInput = $(span).find("input:first");

                if(targetInput){

                    $(targetInput).attr("placeholder", $(this).attr("placeholder"));

                }

            });

        }

        /*弹出对话框*/

        $("#menu_dialog").dialog("setTitle","编辑菜单");

        $("#menu_dialog").dialog("open");

        /*选中数据的回示*/

        $("#menu_form").form("load",rowData);

    });

    $("#cancel").click(function () {

        $("#menu_dialog").dialog("close");

    });

    $("#del").click(function () {

        /*获取当前选中的行*/

        var rowData = $("#menu_datagrid").datagrid("getSelected");

        if(!rowData){

            $.messager.alert("提示","选择一行数据进行删除");

            return;

        }

        /*提醒用户,是否做删除操作*/

        $.messager.confirm("确认","是否做删除操作",function (res) {

            if(res){

                /*做离职操作*/

                $.get("/deleteMenu?id="+rowData.id,function (data) {

                    if (data.success){

                        $.messager.alert("温馨提示",data.msg);

                        /*重新加载下拉列表数据*/

                        $("#parentMenu").combobox("reload");

                        /*重新加载数据表格*/

                        $("#menu_datagrid").datagrid("reload");

                    } else {

                        $.messager.alert("温馨提示",data.msg);

                    }

                });

            }

        });

    });

});
菜单列表
1.接收菜单请求
@Service

public class MenuServiceImpl implements MenuService {

    @Autowired

    private MenuMapper menuMapper;

    @Override

    public PageListRes getMenuList(QueryVo vo) {

        /*调用mapper 查询菜单 */

        Page<Object> page = PageHelper.startPage(vo.getPage(), vo.getRows());

        List<Menu> menus = menuMapper.selectAll();

        /*封装成pageList*/

        PageListRes pageListRes = new PageListRes();

        pageListRes.setTotal(page.getTotal());

        pageListRes.setRows(menus);

        return pageListRes;

    }

}
2.底层实现
<resultMap id="BaseResultMap" type="com.itlike.domain.Menu" >

  <id column="id" property="id" jdbcType="BIGINT" />

  <result column="text" property="text" jdbcType="VARCHAR" />

  <result column="url" property="url" jdbcType="VARCHAR" />

  <association property="parent" javaType="com.itlike.domain.Menu" columnPrefix="m_">

    <result property="id" column="id"/>

    <result property="text" column="text"/>

    <result property="url" column="url"/>

  </association>

  <association property="permission" javaType="com.itlike.domain.Permission">

    <result property="pid" column="pid"/>

    <result property="pname" column="pname"/>

    <result property="presource" column="presource"/>

  </association>

  <collection property="children" ofType="com.itlike.domain.Menu"  select="listChildMenu" column="id"/>

</resultMap>

<!-- /*查询所有菜单*/-->

<select id="selectAll" resultMap="BaseResultMap" >

  SELECT

  m1.id,

  m1.text,

  m1.url,

  m2.id as m_id,

  m2.text as m_text,

  m2.url as m_url

  from menu  as m1

  LEFT JOIN menu as m2

  ON m1.parent_id = m2.id

  order by m1.id desc

</select>
3.页面处理
formatter这个属性属于列参数,意思就是对当前列的数据进行格式化操作,它是一个函数,有三个参数,value,row,index,

value:代表当前单元格中的值,

row:代表当前行,

index:代表当前行的下标,

可以使用return 返回你想要的数据显示在单元格中;

formatter:function(value,row,index){

	return value?value.text:'';

}
菜单添加
获取所有父菜单
<tr>

	<td>父菜单</td>

	<td><input type="text" id="parentMenu" name="parent.id" class="easyui-combobox" placeholder="请选择父菜单"/></td>

</tr>

$(function () {

    /*加载选择父菜单*/

    $("#parentMenu").combobox({

        width:150,

        panelHeight:'auto',

        editable:false,

        url:'parentList',

        textField:'text',

        valueField:'id',

        onLoadSuccess:function () { /*数据加载完毕之后回调*/

            $("#parentMenu").each(function(i){

                var span = $(this).siblings("span")[i];

                var targetInput = $(span).find("input:first");

                if(targetInput){

                    $(targetInput).attr("placeholder", $(this).attr("placeholder"));

                }

            });

        }

    });

});
保存菜单
监听保存点击
/*保存菜单*/

$("#save").click(function () {

    /*判断当前是添加 还是编辑*/

    var id = $("[name='id']").val();

    var url;

    if(id){

        var parent_id = $("[name='parent.id']").val();

        if (id == parent_id) {

            $.messager.alert("温馨提示","不能设置自己为父菜单");

            return;

        }

        /*编辑*/

        url = "updateMenu";

    }else {

        /*添加*/

        url= "saveMenu";

    }

    /*提交表单*/

    $("#menu_form").form("submit",{

        url:url,

        success:function (data) {

            data = $.parseJSON(data);

            if (data.success){

                $.messager.alert("温馨提示",data.msg);

                /*关闭对话框 */

                $("#menu_dialog").dialog("close");

                $("#parentMenu").combobox("reload");

                $("#menu_datagrid").datagrid("reload");

            } else {

                $.messager.alert("温馨提示",data.msg);

            }

        }

    });

});
业务处理
/*保存菜单*/

@RequestMapping("/saveMenu")

@ResponseBody

public AjaxRes saveMenu(Menu menu){

    AjaxRes ajaxRes = new AjaxRes();

    try {

        /*调用业务层,保存菜单*/

        menuService.saveMenu(menu);

        ajaxRes.setMsg("保存成功");

        ajaxRes.setSuccess(true);

    }catch (Exception e){

        ajaxRes.setSuccess(false);

        ajaxRes.setMsg("保存失败");

        System.out.println(e);

    }

    return ajaxRes;

}
编辑菜单
/*编辑菜单*/

$("#edit").click(function () {

    $("#menu_form").form("clear");

    /*获取当前选中的行*/

    var rowData = $("#menu_datagrid").datagrid("getSelected");

    if(!rowData){

        $.messager.alert("提示","选择一行数据进行编辑");

        return;

    }

    /*父菜单回显*/

    if(rowData.parent){

        rowData["parent.id"] = rowData.parent.id;

    }else {/*回显的placeholder*/

        $("#parentMenu").each(function(i){

            var span = $(this).siblings("span")[i];

            var targetInput = $(span).find("input:first");

            if(targetInput){

                $(targetInput).attr("placeholder", $(this).attr("placeholder"));

            }

        });

    }

    /*弹出对话框*/

    $("#menu_dialog").dialog("setTitle","编辑菜单");

    $("#menu_dialog").dialog("open");

    /*选中数据的回示*/

    $("#menu_form").form("load",rowData);

});
删除菜单
监听删除按钮
$("#del").click(function () {

    /*获取当前选中的行*/

    var rowData = $("#menu_datagrid").datagrid("getSelected");

    if(!rowData){

        $.messager.alert("提示","选择一行数据进行删除");

        return;

    }

    /*提醒用户,是否做删除操作*/

    $.messager.confirm("确认","是否做删除操作",function (res) {

        if(res){

            /*做离职操作*/

            $.get("/deleteMenu?id="+rowData.id,function (data) {

                if (data.success){

                    $.messager.alert("温馨提示",data.msg);

                    /*重新加载下拉列表数据*/

                    $("#parentMenu").combobox("reload");

                    /*重新加载数据表格*/

                    $("#menu_datagrid").datagrid("reload");

                } else {

                    $.messager.alert("温馨提示",data.msg);

                }

            });

        }

    });

});
处理业务逻辑
@Override

public AjaxRes deleteMenu(Long id) {

    AjaxRes ajaxRes = new AjaxRes();

    try {

        /*1.打破菜单关系*/

        menuMapper.updateMenuRel(id);

        /*2.删除记录*/

        menuMapper.deleteByPrimaryKey(id);

        ajaxRes.setMsg("删除成功");

        ajaxRes.setSuccess(true);

    }catch (Exception e){

        ajaxRes.setSuccess(false);

        ajaxRes.setMsg("删除失败");

        System.out.println(e);

    }

    return ajaxRes;

}
<!--根据id删除菜单-->

<delete id="deleteByPrimaryKey" parameterType="java.lang.Long" >

  delete from menu

  where id = #{id,jdbcType=BIGINT}

</delete>

<!--根基id更新菜单-->

<update id="updateByPrimaryKey" parameterType="com.itlike.domain.Menu" >

  update menu

  set text = #{text},

    url = #{url},

    parent_id = #{parent.id}

  where id = #{id}

</update>
菜单权限
在**menu**数据表中, 添加外键, 每一个菜单对应一个权限,通过判断用户有没有该权限来控制菜单的显示隐藏

设置菜单对应权限并取出
1.在menu表中添加权限外键
2.在菜单domain当中添加权限对象
tree数据加载
$(function () {

    $("#tabs").tabs({

        fit:true

    })

    $('#tree').tree({

        url:"/getTreeData",

        lines:true,

        onSelect: function(node){

            /*在添加之前, 做判断  判断这个标签是否存在 */

            var exists =   $("#tabs").tabs("exists",node.text);

            if(exists){

                /*存在,就让它选中*/

                $("#tabs").tabs("select",node.text);

            }else {

                if (node.url !=''&& node.url !=null){

                    /*如果不存在 ,添加新标签*/

                    $("#tabs").tabs("add",{

                        title:node.text,

                        /*href:node.attributes.url,*/  /*href  引入的是body当中*/

                        content:"<iframe src="+node.url+" frameborder='0' width='100%' height='100%'></iframe>",

                        closable:true

                    })

                }

            }

        },

        onLoadSuccess: function (node, data) {

            console.log(data[0].children[0].id);

            if (data.length > 0) {

                //找到第一个元素

                var n = $('#tree').tree('find', data[0].children[0].id);

                //调用选中事件

                $('#tree').tree('select', n.target);

            }

        }

    });

});
3.查询菜单时, 把对应权限查出来, 检查权限
@Override

public List<Menu> getTreeData() {

    List<Menu> treeData = menuMapper.getTreeData();

    /*

    判断当前用户有没有对应的权限

    如果没有就从集合当中移除

    */

    /*获取用户 判断用户是否是管理员 是管理就不需要做判断*/

    Subject subject = SecurityUtils.getSubject();

    /*当前的用户*/

    Employee employee = (Employee)subject.getPrincipal();

    if (!employee.getAdmin()){

        /*做检验权限*/

        checkPermission(treeData);

    }

    return treeData;

}

public void checkPermission(List<Menu> menus){

    //获取主体

    Subject subject = SecurityUtils.getSubject();

    //遍历所有的菜单及子菜单

    Iterator<Menu> iterator = menus.iterator();

    while (iterator.hasNext()){

        Menu menu = iterator.next();

        if (menu.getPermission() !=null){

            //判断当前menu是否有权限对象,如果说没有 当前遍历的菜单从集合当中移除

            String presource = menu.getPermission().getPresource();

            if (!subject.isPermitted(presource)){

                //当前遍历的菜单从集合当中移除

                iterator.remove();

                continue;

            }

        }

        /*判断是否有子菜单  有子菜单也要做权限检验*/

        if (menu.getChildren().size() > 0){

            checkPermission(menu.getChildren());

        }

    }

}
<resultMap id="BaseResultMap" type="com.itlike.domain.Menu" >

  <id column="id" property="id" jdbcType="BIGINT" />

  <result column="text" property="text" jdbcType="VARCHAR" />

  <result column="url" property="url" jdbcType="VARCHAR" />

  <association property="parent" javaType="com.itlike.domain.Menu" columnPrefix="m_">

    <result property="id" column="id"/>

    <result property="text" column="text"/>

    <result property="url" column="url"/>

  </association>

  <association property="permission" javaType="com.itlike.domain.Permission">

    <result property="pid" column="pid"/>

    <result property="pname" column="pname"/>

    <result property="presource" column="presource"/>

  </association>

  <collection property="children" ofType="com.itlike.domain.Menu"  select="listChildMenu" column="id"/>

</resultMap>

<!--获取树形菜单数据

 分步查询  先查根菜单

 根据根菜单的id  查询出子菜单

-->

<select id="getTreeData" resultMap="BaseResultMap">

  select * from menu as m

  LEFT JOIN permission as p

  on m.permission_id = p.pid where parent_id is null

</select>

<!--根据根菜单的id  查询出子菜单-->

<select id="listChildMenu" resultMap="BaseResultMap">

  select * from menu as m

  LEFT JOIN permission as p

  on m.permission_id = p.pid where parent_id = #{id}

</select>
系统日志
建立日志表和对应mapper
CREATE TABLE `systemlog` (

  `id` bigint(20) NOT NULL AUTO_INCREMENT,

  `optime` datetime DEFAULT NULL,

  `ip` varchar(20) DEFAULT NULL,

  `function` varchar(255) DEFAULT NULL,

  `params` varchar(255) DEFAULT NULL,

  PRIMARY KEY (`id`)

) ENGINE=InnoDB DEFAULT CHARSET=utf8;
添加拦截器,记录当前请求的ip
创建本地线程变量
public class RequestUtil {

    public static ThreadLocal<HttpServletRequest> local  = new ThreadLocal();

    public static HttpServletRequest getRequest(){

        return local.get();

    }

    public static void setRequest(HttpServletRequest request){

        local.set(request);

    }

}
配置拦截器拦截所有请求
<!--配置拦截器-->

<mvc:interceptors>

    <mvc:interceptor>

        <mvc:mapping path="/*"/>

        <bean class="com.itlike.interceptor.RequestInterceptor"></bean>

    </mvc:interceptor>

</mvc:interceptors>
创建拦截器把当前请求写入到本地线程变量
public class RequestInterceptor implements HandlerInterceptor {

    @Override

    public boolean preHandle(HttpServletRequest request, HttpServletResponse response, Object handler)

            throws Exception {

        System.out.println("来到了拦截器...");

        RequestUtil.setRequest(request);

        return true;

    }

}
Systemlog systemlog = new Systemlog();

//设置ip地址  request 添加拦截器  获取请求对象

HttpServletRequest request = RequestUtil.getRequest();

if (request != null){

   String IP = request.getRemoteAddr();

   System.out.println(IP);

   systemlog.setIp(IP);

}
创建日志切面、在切面中获取ip、获取当前执行的方法及参数
public class SystemAspect {

    @Autowired

    private SystemlogMapper systemlogMapper;

    public void writeLog(JoinPoint joinPoint) throws JsonProcessingException {

        System.out.println("记录日志");

        //设置时间

        Systemlog systemlog = new Systemlog();

        systemlog.setOptime(new Date());

        //设置ip地址  request 添加拦截器  获取请求对象

        HttpServletRequest request = RequestUtil.getRequest();

        if (request != null){

           String IP = request.getRemoteAddr();

           System.out.println(IP);

           systemlog.setIp(IP);

        }

        //方法

        //获取目标执行方法的全路径

        String name = joinPoint.getTarget().getClass().getName();

        //获取方法名称

        String signature = joinPoint.getSignature().getName();

        String func = name+":"+signature;

        systemlog.setFunction(func);

        //获取方法参数

       String params = new ObjectMapper().writeValueAsString(joinPoint.getArgs());

       systemlog.setParams(params);

       systemlogMapper.insert(systemlog);

    }

}
添加切面
<!-- aop配置 日志配置 -->

<bean id="SystemAspect" class="com.itlike.aspect.SystemAspect"></bean>

<aop:config>

    <aop:pointcut expression="execution(* com.itlike.service.*.*(..))" id="servicePoint" />

    <aop:aspect ref="SystemAspect">

        <aop:after method="writeLog" pointcut-ref="servicePoint"/>

    </aop:aspect>

</aop:config>
Excel导入导出
介绍
操作Excel的方式jxl和poi

官方文档

	https://poi.apache.org/components/spreadsheet/quick-guide.html#CellContents

	参考文档

	https://www.cnblogs.com/huajiezh/p/5467821.html

	依赖

	<dependency>

		<groupId>org.apache.poi</groupId>

  		<artifactId>poi</artifactId>

  		<version>4.0.1</version>

	</dependency>
导出
// Excel导出

$("#excelOut").click(function () {

   window.open('/downloadExcel')

});
@RequestMapping("/downloadExcel")

@ResponseBody

public void downloadExcel(HttpServletResponse response){

    try {

    System.out.println("---------downloadExcel---------");

    //1.从数据库当中取列表数据

    QueryVo queryVo = new QueryVo();

    queryVo.setPage(1);

    queryVo.setRows(10);

    PageListRes plr = employeeService.getEmployee(queryVo);

    List<Employee> employees = (List<Employee>)plr.getRows();

    //2.创建Excel 写到excel当中

    HSSFWorkbook wb = new HSSFWorkbook();

    HSSFSheet sheet = wb.createSheet("员工数据");

    //创建一行

    HSSFRow row = sheet.createRow(0);

    //设置行的每一列的数据

    row.createCell(0).setCellValue("编号");

    row.createCell(1).setCellValue("用户名");

    row.createCell(2).setCellValue("入职日期");

    row.createCell(3).setCellValue("电话");

    row.createCell(4).setCellValue("邮件");

    HSSFRow employeeRow = null;

    /*取出每一个员工来去设置数据*/

    for(int i = 0; i < employees.size(); i++){

        Employee employee = employees.get(i);

        employeeRow = sheet.createRow(i+1);

        employeeRow.createCell(0).setCellValue(employee.getId());

        employeeRow.createCell(1).setCellValue(employee.getUsername());

        if (employee.getInputtime() !=null){

            SimpleDateFormat sdf = new SimpleDateFormat("yyyy-MM-dd");

            String format = sdf.format(employee.getInputtime());

            employeeRow.createCell(2).setCellValue(format);

        }else {

            employeeRow.createCell(2).setCellValue("");

        }

        employeeRow.createCell(3).setCellValue(employee.getTel());

        employeeRow.createCell(4).setCellValue(employee.getEmail());

    }

    //3.响应给浏览器

        String fileName = new String("员工数据.xls".getBytes("utf-8"), "iso8859-1");

        response.setHeader("content-Disposition","attachment;filename="+fileName);

        wb.write(response.getOutputStream());

    } catch (Exception e) {

        e.printStackTrace();

    }

}
导入
上传界面
<div id="excelUpload">

	<form method="post" enctype="multipart/form-data">

		<tabel>

			<tr>

				<td><input type="file" name="excel" style="width: 180px; margin-top: 20px; margin-left: 5px;"></td>

				<td><a href="javascript:void(0);" id="downloadTml">下载模板</a></td>

			</tr>

		</tabel>

	</form>

</div>
$("#excelUpload").dialog({

        width:260,

        height:180,

        title:"导入Excel",

        buttons:[{

            text:'保存',

            handler:function(){

            }

        },{

            text:'关闭',

            handler:function(){

                $("#excelUpload").dialog("close");

            }

        }],

        closed:true

    })

    $("#excelImpot").click(function () {

        $("#excelUpload").dialog("open");

    });
下载模板
/*下载Excel模板*/

$("#downloadTml").click(function () {

    window.open('/downloadExcelTpl')

});
/*下载模板*/

@RequestMapping("downloadExcelTpl")

@ResponseBody

public void downloadExcelTpl(HttpServletRequest request, HttpServletResponse response){

    FileInputStream is = null;

    try {

        String fileName = new String("EmployeeTpl.xls".getBytes("utf-8"), "iso8859-1");

        response.setHeader("content-Disposition","attachment;filename="+fileName);

       /*获取文件路径*/

        String realPath = request.getSession().getServletContext().getRealPath("static/ExcelTml.xls");

        is = new FileInputStream(realPath);

        IOUtils.copy(is,response.getOutputStream());

    }catch (Exception e){

        e.printStackTrace();

    }finally {

        if (is != null){

            try {

                is.close();

            } catch (IOException e) {

                e.printStackTrace();

            }

        }

    }

}
上传Excel处理
上传模板
// 打开上传窗口

$("#excelIn").click(function () {

    $("#excelUpload").dialog("open");

});

// Excel导入

$("#excelUpload").dialog({

    width:260,

    height:180,

    title:"导入Excel",

    buttons:[{

        text:'保存',

        handler:function(){

            $("#uploadForm").form("submit",{

                url:"uploadExcelFile",

                success:function (data) {

                    data = $.parseJSON(data);

                    if (data.success){

                        $.messager.alert("温馨提示",data.msg);

                        /*关闭对话框 */

                        $("#excelUpload").dialog("close");

                        /*重新加载数据表格*/

                        $("#dg").datagrid("reload");

                    } else {

                        $.messager.alert("温馨提示",data.msg);

                    }

                }

            })

        }

    },{

        text:'关闭',

        handler:function(){

            $("#excelUpload").dialog("close");

        }

    }],

    closed:true

});
业务处理
/*配置文件上传解析器  mvc配置当中*/

@RequestMapping("/uploadExcelFile")

@ResponseBody

@RequiresPermissions("employee:add")

public AjaxRes uploadExcelFile(MultipartFile excel){

    AjaxRes ajaxRes = new AjaxRes();

    try {

        ajaxRes.setMsg("导入成功");

        ajaxRes.setSuccess(true);

        HSSFWorkbook wb = new HSSFWorkbook(excel.getInputStream());

        HSSFSheet sheet = wb.getSheetAt(0);

        /*获取最大的行号*/

        int lastRowNum = sheet.getLastRowNum();

        Row employeeRow = null;

        if(1 <= lastRowNum)

        {

            employeeRow = sheet.getRow(0);

            if(!getCellValue(employeeRow.getCell(1)).toString().equals("用户名"))

                throw new Exception("格式错误");

            else if(!getCellValue(employeeRow.getCell(2)).toString().equals("入职日期"))

                throw new Exception("格式错误");

            else if(!getCellValue(employeeRow.getCell(3)).toString().equals("电话"))

                throw new Exception("格式错误");

            else if(!getCellValue(employeeRow.getCell(4)).toString().equals("邮件"))

                throw new Exception("格式错误");

        }

        for (int i=1; i <= lastRowNum; i++){

            employeeRow = sheet.getRow(i);

            Employee employee = new Employee();

            employee.setState(true);

            employee.setUsername(getCellValue(employeeRow.getCell(1)).toString());

            SimpleDateFormat sdf = new SimpleDateFormat("yyyy-MM-dd");

            Date parse = sdf.parse(getCellValue(employeeRow.getCell(2)).toString());

            employee.setInputtime(parse);

            employee.setTel(getCellValue(employeeRow.getCell(3)).toString());

            employee.setEmail(getCellValue(employeeRow.getCell(4)).toString());

            employee.setPassword("123456");

            employeeService.saveEmployee(employee);

        }

    }catch (Exception e){

        e.printStackTrace();

        ajaxRes.setMsg("导入失败!"+e.getMessage());

        ajaxRes.setSuccess(false);

    }

    return ajaxRes;

}

private Object getCellValue(Cell cell){

    switch (cell.getCellType()) {

        case STRING:

            return cell.getRichStringCellValue().getString();

        case NUMERIC:

            if (DateUtil.isCellDateFormatted(cell)) {

                return cell.getDateCellValue();

            } else {

                return cell.getNumericCellValue();

            }

        case BOOLEAN:

            return cell.getBooleanCellValue();

        case FORMULA:

            return cell.getCellFormula();

    }

    return cell;

}
配置文件上传解析器
<!--配置文件上传解析器-->

<bean id="multipartResolver" class="org.springframework.web.multipart.commons.CommonsMultipartResolver">

    <property name="maxUploadSize">

        <value>1040000</value>

    </property>

</bean>
SSM项目实战 之 权限管理系统的更多相关文章
- Asp.Net Core 项目实战之权限管理系统(4) 依赖注入、仓储、服务的多项目分层实现
0 Asp.Net Core 项目实战之权限管理系统(0) 无中生有 1 Asp.Net Core 项目实战之权限管理系统(1) 使用AdminLTE搭建前端 2 Asp.Net Core 项目实战之 ...
- Asp.Net Core 项目实战之权限管理系统(0) 无中生有
0 Asp.Net Core 项目实战之权限管理系统(0) 无中生有 1 Asp.Net Core 项目实战之权限管理系统(1) 使用AdminLTE搭建前端 2 Asp.Net Core 项目实战之 ...
- Asp.Net Core 项目实战之权限管理系统(1) 使用AdminLTE搭建前端
0 Asp.Net Core 项目实战之权限管理系统(0) 无中生有 1 Asp.Net Core 项目实战之权限管理系统(1) 使用AdminLTE搭建前端 2 Asp.Net Core 项目实战之 ...
- Asp.Net Core 项目实战之权限管理系统(2) 功能及实体设计
0 Asp.Net Core 项目实战之权限管理系统(0) 无中生有 1 Asp.Net Core 项目实战之权限管理系统(1) 使用AdminLTE搭建前端 2 Asp.Net Core 项目实战之 ...
- Asp.Net Core 项目实战之权限管理系统(3) 通过EntityFramework Core使用PostgreSQL
0 Asp.Net Core 项目实战之权限管理系统(0) 无中生有 1 Asp.Net Core 项目实战之权限管理系统(1) 使用AdminLTE搭建前端 2 Asp.Net Core 项目实战之 ...
- Asp.Net Core 项目实战之权限管理系统(5) 用户登录
0 Asp.Net Core 项目实战之权限管理系统(0) 无中生有 1 Asp.Net Core 项目实战之权限管理系统(1) 使用AdminLTE搭建前端 2 Asp.Net Core 项目实战之 ...
- Asp.Net Core 项目实战之权限管理系统(6) 功能管理
0 Asp.Net Core 项目实战之权限管理系统(0) 无中生有 1 Asp.Net Core 项目实战之权限管理系统(1) 使用AdminLTE搭建前端 2 Asp.Net Core 项目实战之 ...
- Asp.Net Core 项目实战之权限管理系统(7) 组织机构、角色、用户权限
0 Asp.Net Core 项目实战之权限管理系统(0) 无中生有 1 Asp.Net Core 项目实战之权限管理系统(1) 使用AdminLTE搭建前端 2 Asp.Net Core 项目实战之 ...
- Net Core 项目实战之权限管理系统(0)
0 前言 Net Core 项目实战之权限管理系统(0) 无中生有 0 http://www.cnblogs.com/fonour/p/5848933.html 学习的最好方法就是动手去做,这里以 ...
随机推荐
- Django:缓存及相关配置
缓存 由于Django是动态网站,所有每次请求均会去数据进行相应的操作,当程序访问量大时,耗时必然会更加明显,最简单解决方式是使用:缓存,缓存将一个某个views的返回值保存至内存或者memcache ...
- springboot通过idea打jar包
springboot打jar包 一. 检查pom文件 <packaging>jar</packaging> 二. 切换到maven窗口 三. 先c ...
- MySQL- [Err] 1055 - Expression #1 of ORDER BY clause is not in GROUP BY clause and contains nonaggregated column 'information_schema.PROFILING.SEQ' which is not functionally dependent on columns in GR
新建的mysql,在查询时报异常信息,虽然有正常执行结果. [Err] 1055 - Expression #1 of ORDER BY clause is not in GROUP BY claus ...
- python变量的内存机制
python变量的内存机制 作为一门简单易用的语言,且配备海量的库,python可谓是程序员手中的掌中宝,编程本身就是一种将人类思维转化为计算机思维的技术,如果不需要去追求极致的运行效率同时又不限制于 ...
- Python+Selenium+Appium对APP进行UI自动化测试
1. 安装Python3.7版本 pythonjava的JDK java -version javac nodejs node --versionappium 若nodejs安装完毕,使用npm安装a ...
- LoadRunner 11的破解方法和license号
安装过程中遇到“命令行选项语法错误键入命令 \?获得帮助”2005的安装问题,可参考本文:http://www.cnblogs.com/lelexiong/p/8974149.html解决 破解方法: ...
- anyproxy学习1-windows平台安装和抓手机app上https请求
前言 做接口测试肯定离不开抓包,目前比较流行的抓包工具是fiddler和charles,相信并不陌生.这里介绍一个阿里公司研发的一个抓包神器,只需打开web页面,就能抓到手机app上的http和htt ...
- nginx的alias与root的区别
root的写法: location /request_path/image/ { root /local_path/image/; } 这样配置的结果就是当客户端请求 /request_path/im ...
- 如何使用powerdesigner导出sql脚本
使用power designer可以很方便的对数据库设计进行管理,并且能够更方便的查看表与表之间的关系.同时,还可以对设计好的数据库直接导出创建脚本,根据不同的数据库实例导出对应的创建脚本,然后根据脚 ...
- MyBatis框架-ResultMap节点
需求:查询结果要求显示用户名,用户密码,用户的角色 因为在用户表中只有用户角色码值,没有对应的名称,角色名称是在码表smbms_role表中,这时我们就需要联表查询了. 之前我们使用的是给查询结果字段 ...