uiautomator2+python自动化测试1-环境准备
前言
uiautomator是Google提供的用来做安卓自动化测试的一个Java库。功能很强,可以对第三方App进行测试,获取屏幕上任意一个APP的任意一个控件属性,并对其进行任意操作,但有两个缺点:
- 测试脚本只能使用Java语言
- 测试脚本必须每次被上传到设备上运行。
我们希望测试能够用Python编写,能够在电脑上运行的时候就控制手机,于是就有了uiautomator,后来又有了uiautomator2,详情查看github地址https://github.com/openatx/uiautomator2
环境准备
python 3.6
uiautomator2 0.3.3
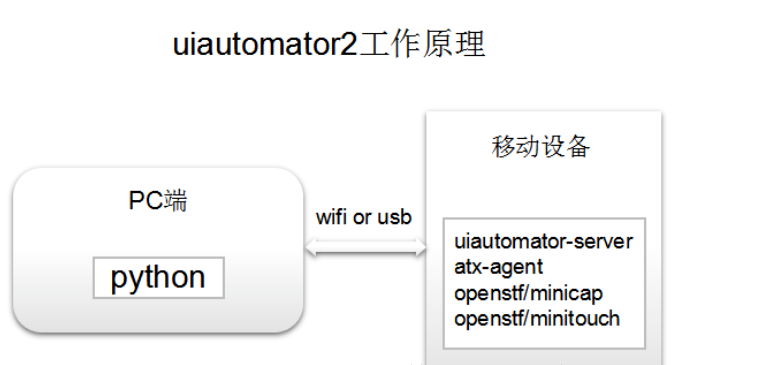
uiautomator2工作原理
分为两个部分:
PC上的python端:运行脚本,并向系统设备发送http请求
移动设备:移动设备上运行了封装了uiautomator2的HTTP服务,解析收到的请求,并转化成uiautomator2的代码。
详情可以参考这篇:https://blog.csdn.net/zhuhuahong/article/details/81868671
1.安装uiautomator2
使用pip3安装uiautomator2 ,安装的过程中有点坑,用pip install --pre -U uiautomator2一直安装失败,找了很多教程都是这个。
最后去github上找了下教程https://github.com/openatx/uiautomator2,发现用pip3安装,抱着试试的心态,安装成功了
需cd到python的Scripts目录,再使用pip3安装
E:\python36\Scripts>pip3 install -U uiautomator2
2.adb连上手机
确保手机和电脑能连得上,使用adb devices查看链接状态,adb相关的环境本篇就不多说了,搞android测试的都知道
E:\python36\Scripts>adb devices

List of devices attached

adb server version (31) doesn't match this client (40); killing...

* daemon started successfully

emulator-5554   device
安装atx-agent
python -m uiautomator2 init
E:\python36\Scripts>python -m uiautomator2 init

[D 190716 23:34:53 __main__:28] use cache directory: C:\Users\dell\.uiautomator2

Namespace(serial=None, server=None, subparser='init') init

[I 190716 23:34:53 __main__:88] >>> Initial device AdbDevice(serial=emulator-5554)

[I 190716 23:34:53 __main__:172] Install minicap, minitouch

[Kminitouch |################################| 33.5K / 33.5K

[?25h[D 190716 23:34:56 __main__:157] Push https://github.com/openatx/stf-binaries/raw/master/node_modules/minitouch-prebuilt/prebuilt/x86/bin/minitouch -> /data/local/tmp/minitouch:0755

[I 190716 23:34:56 __main__:176] abi:x86 seems to be android emulator, skip install minicap

[I 190716 23:34:56 __main__:182] Install com.github.uiautomator, com.github.uiautomator.test

[D 190716 23:34:56 __main__:100] Shell: ('pm', 'uninstall', 'com.github.uiautomator')

[D 190716 23:34:56 __main__:100] Shell: ('pm', 'uninstall', 'com.github.uiautomator.test')

[Kapp-uiautomator.apk |################################| 1.7M / 1.7M.7M

[?25h[D 190716 23:35:05 __main__:157] Push https://github.com/openatx/android-uiautomator-server/releases/download/1.1.7/app-uiautomator.apk -> /data/local/tmp/app-uiautomator.apk:0644

[D 190716 23:35:05 __main__:100] Shell: ('pm', 'install', '-r', '-t', '/data/local/tmp/app-uiautomator.apk')

[Kapp-uiautomator-test.apk |################################| 966.8K / 966.8K

[?25h[D 190716 23:35:11 __main__:157] Push https://github.com/openatx/android-uiautomator-server/releases/download/1.1.7/app-uiautomator-test.apk -> /data/local/tmp/app-uiautomator-test.apk:0644

[D 190716 23:35:11 __main__:100] Shell: ('pm', 'install', '-r', '-t', '/data/local/tmp/app-uiautomator-test.apk')

[I 190716 23:35:18 __main__:193] Install atx-agent

[Katx-agent_0.6.0_linux_386.tar.gz |################################| 4.0M / 4.0M.0M

[?25h[D 190716 23:35:23 __main__:157] Push https://github.com/openatx/atx-agent/releases/download/0.6.0/atx-agent_0.6.0_linux_386.tar.gz -> /data/local/tmp/atx-agent:0755

[D 190716 23:35:26 __main__:100] Shell: ('/data/local/tmp/atx-agent', 'server', '--stop')

[D 190716 23:35:26 __main__:100] Shell: ('/data/local/tmp/atx-agent', 'server', '-d')

[I 190716 23:35:26 __main__:202] Check install

[D 190716 23:35:26 __main__:212] Forward: local:tcp:53461 -> remote:tcp:7912

[D 190716 23:35:28 __main__:214] atx-agent version 0.6.0

Successfully init AdbDevice(serial=emulator-5554)
看到Successfully就是安装成功了(当然总是有几个小伙伴的手机需要换下了!!!)
连接手机
python-uiautomator2连接手机的方式有两种,一种是通过WIFI,另外一种是通过USB
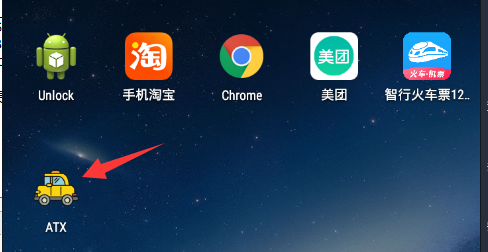
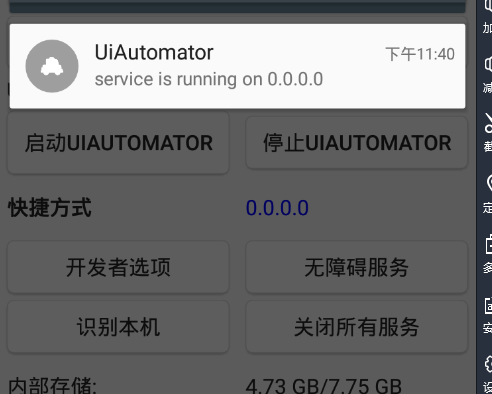
首先查看uiautomator状态是启动状态
1.usb连接手机
先使用adb devices获取手机的唯一识别序列号,也就是devices前面的那一串:emulator-5554
E:\python36\Scripts>adb devices
List of devices attached
emulator-5554 device
测试是否连接成功,先打开你的手机上的任意app,比如淘宝,cmd输入以下信息
E:\python36\Scripts>python

Python 3.6.0 (v3.6.0:41df79263a11, Dec 23 2016, 08:06:12) [MSC v.1900 64 bit (AMD64)] on win32

Type "help", "copyright", "credits" or "license" for more information.

>>> import uiautomator2 as u2

>>> d = u2.connect_usb('emulator-5554')

>>> d.info

{'currentPackageName': 'com.taobao.taobao', 'displayHeight': 1280, 'displayRotation': 0, 'displaySizeDpX': 360,

 'displaySizeDpY': 640, 'displayWidth': 720, 'productName': 'h60-l01', 'screenOn': True, 'sdkInt': 22, 'naturalOrientation': True}

>>>
看到输出'currentPackageName': 'com.taobao.taobao'说明连接成功了
2.wifi连接
首先保证手机和电脑在一个局域网,可以先ping 手机ip,看能不能ping的通
>>> import uiautomator2 as u2

>>> d = u2.connect('192.168.1.xx')

>>> d.info
uiautomator2+python自动化测试1-环境准备的更多相关文章
- uiautomator2+python自动化测试2-查看app页面元素利器weditor
前言 android sdk里面自带的uiautomatorviewer.bat可以查看手机app上的元素,但是不太好用,网上找了个大牛写的weditor,试用了下还是蛮不错的 python环境:3. ...
- selenium + python 自动化测试环境搭建
selenium + python 自动化测试 —— 环境搭建 关于 selenium Selenium 是一个用于Web应用程序测试的工具.Selenium测试直接运行在浏览器中,就像真正的用户在操 ...
- 基于Selenium2与Python自动化测试环境搭建
简介: selenium 是一个web的自动化测试工具,不少学习功能自动化的同学开始首选selenium ,相因为它相比QTP有诸多有点: * 免费,也不用再为破解QTP而大伤脑筋 * 小巧,对于 ...
- 篇5 python自动化测试应用-Selenium环境篇
篇5 python自动化测试应用-Selenium环境篇 --lamecho 1.1概要 大家好!我是lamecho(辣么丑),从本篇开始我将开始 ...
- 《Selenium自动化测试实战:基于Python》之 Python与Selenium环境的搭建
第2章 Python与Selenium环境的搭建 购买链接: 京东:https://item.jd.com/13123910.html 当当:http://product.dangdang.co ...
- Python自动化测试 -ConfigParser模块读写配置文件
C#之所以容易让人感兴趣,是因为安装完Visual Studio, 就可以很简单的直接写程序了,不需要做如何配置. 对新手来说,这是非常好的“初体验”, 会激发初学者的自信和兴趣. 而有些语言的开发环 ...
- python自动化测试
python自动化测试 欢迎光临 python自动化测试 小站! 小站基于IT行业,重点关注python,软件自动化测试,测试等. 联系方式 飞信 372818219 相关的群:python开发自动化 ...
- python自动化测试应用-第6篇(WEB测试)--Selenium元素篇
篇6 python自动化测试应用-Selenium基础篇 --lamecho 1.1概要 大家好!我是lamecho(辣么丑),上一篇我们搭建好p ...
- selenium+python自动化测试系列(一):登录
最近接手商城的项目,针对后台测试,功能比较简单,但是流程比较繁多,涉及到前后台的交叉测试.在对整个项目进行第一轮测试完成之后,考虑以后回归测试任务比较重,为了减轻回归测试的工作量,所以考虑后台 ...
随机推荐
- 破解MySQL登录密码的几种方法
工具列表 Medusa Ncrack Hydra Metasploit Medusa medusa -h 192.168.1.106 –U /root/Desktop/user.txt –P /ro ...
- OSI七层与TCP/IP四层(小结)
OSI 七层模型 我们一般使用的网络数据传输由下而上共有七层,分别为物理层.数据链路层.网络层.传输层.会话层.表示层.应用层,也被依次称为 OSI 第一层.第二层.⋯⋯. 第七层. 各层功能简介 1 ...
- Zabbix 3.0 配置企业微信报警(配置zabbix-web)
一.添加报警媒体类型 Name:自定义 Type:选择script Scripts name:填写脚本名称 Script parameters:脚本参数 --corpid=XXX --corpsecr ...
- 【springcloud】【idea】启动服务报错Command line is too long. Shorten command line for XXXApplication or also for Spring Boot default configuration.
在workspace.xml 在标签<component name="PropertiesComponent">里 添加<property name=" ...
- jQuery.js引入时要在其他js文件之前,否则js中无法识别jQuery的语法
- springboot结合日志门面SLF4j和日志实现Logback的使用
一.此处主要介绍在springboot工程下如何使用 logback + slf4j 进行日志记录. logback主要包含三个组成部分:Loggers(日志记录器).Appenders(输出目的在 ...
- modbus汇总
ModBus协议简介及移植到STM32单片机 https://blog.csdn.net/silent123go/article/details/92440091 Modbus测试工具ModbusPo ...
- GitLab+Jenkins持续集成
一.概述 GitLab是一个代码仓库,用来管理代码.Jenkins是一个自动化服务器,可以运行各种自动化构建.测试或部署任务.所以这两者结合起来,就可以实现开发者提交代码到GitLab,Jenkins ...
- MVC中常用的返回值方法
我们上边所看到的Action都是return View();我们可以看作这个返回值用于解析一个aspx文件.而它的返回类型是ActionResult如 public ActionResult Inde ...
- Java调用Http/Https接口(5)--HttpAsyncClient调用Http/Https接口
HttpAsyncClient是HttpClient的异步版本,提供异步调用的api.文中所使用到的软件版本:Java 1.8.0_191.HttpClient 4.1.4. 1.服务端 参见Java ...