
python Linux 环境 (版本隔离工具)
python Linux 环境 (版本隔离工具)
首先新建用户,养成良好习惯useradd python
1、安装pyenv
GitHub官网:https://github.com/pyenv/pyenv-installer
pyenv installer
This tool installs pyenv and friends. It is inspired by rbenv-installer.
Prerequisites
In general, compiling your own Python interpreter requires the installation of the appropriate libraries and packages. The installation wiki provides a list of these for common operating systems.
Install:
$ curl https://pyenv.run | bash
pyenv.run redirects to the install script in this repository and the invocation above is equivalent to:
$ curl -L https://github.com/pyenv/pyenv-installer/raw/master/bin/pyenv-installer | bash
Restart your shell so the path changes take effect:
You can now begin using pyenv.
Update:
$ pyenv update
Uninstall: pyenv is installed within $PYENV_ROOT (default: ~/.pyenv). To uninstall, just remove it:
$ rm -fr ~/.pyenv
and remove these three lines from .bashrc:
export PATH="$HOME/.pyenv/bin:$PATH"

eval "$(pyenv init -)"

eval "$(pyenv virtualenv-init -)"
If you need, export USE_GIT_URI to use git:// instead of https:// for git clone.
Travis itself uses pyenv and therefore PYENV_ROOT is set already. To make it work anyway the installation for pyenv-installer needs to look like this:
[...]

- unset PYENV_ROOT

- curl -L https://github.com/pyenv/pyenv-installer/raw/master/bin/pyenv-installer | bash

- export PATH="$HOME/.pyenv/bin:$PATH"

- pyenv install 3.5.2
The project on github contains a setup for vagrant to test the installer inside a vagrant managed virtual image.
If you don't know vagrant yet: just install the latest package, open a shell in this project directory and say
$ vagrant up

$ vagrant ssh
Now you are inside the vagrant container and your prompt should like something like vagrant@vagrant-ubuntu-trusty-64:~$
The project (this repository) is mapped into the vagrant image at /vagrant
$ cd /vagrant

$ python setup.py install

$ echo 'export PATH="$HOME/.pyenv/bin:$PATH"' >> ~/.bashrc

$ echo 'eval "$(pyenv init -)"' >> ~/.bashrc

$ echo 'eval "$(pyenv virtualenv-init -)"' >> ~/.bashrc

$ source ~/.bashrc
Pyenv should be installed and responding now.
20190111
Remove experimental PyPi support and replace with a dummy package.
Initial release on PyPi.
Initial public release.
MIT - see License file.
2、安装python
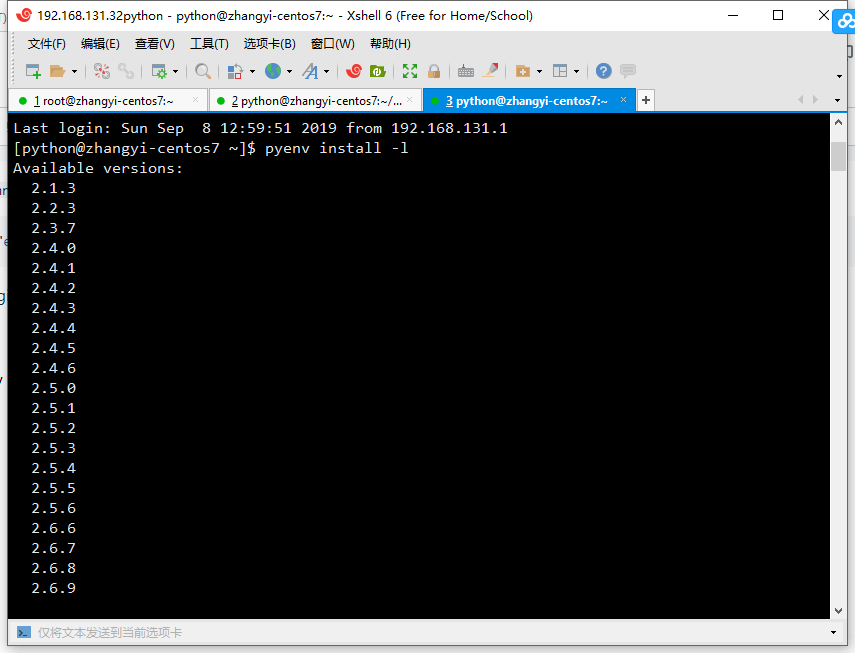
查看python可用版本
pyenv install -l
在线安装
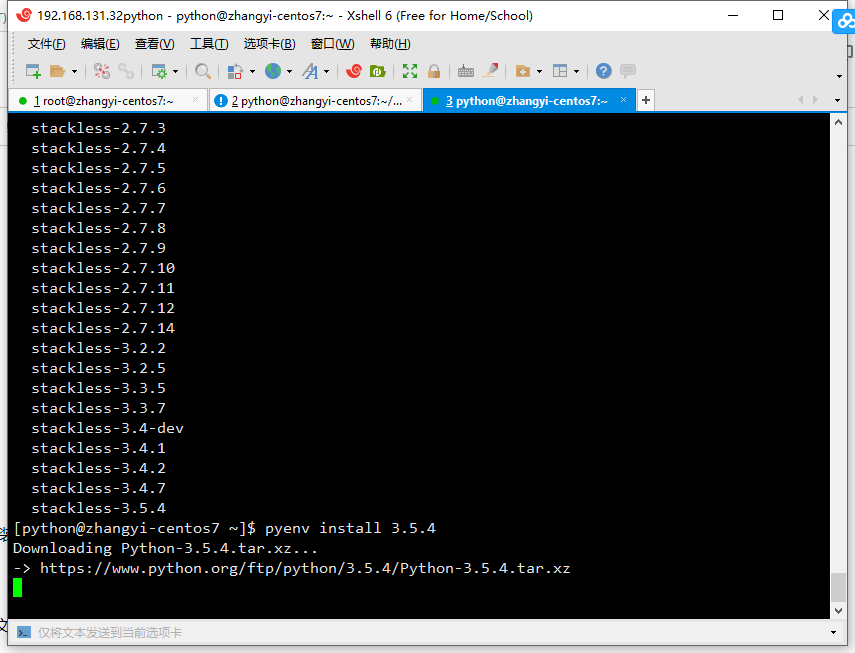
[python@zhangyi-centos7 ~]$ pyenv install 3.5.4

Downloading Python-3.5.4.tar.xz...-> https://www.python.org/ftp/python/3.5.4/Python-3.5.4.tar.xz
离线安装
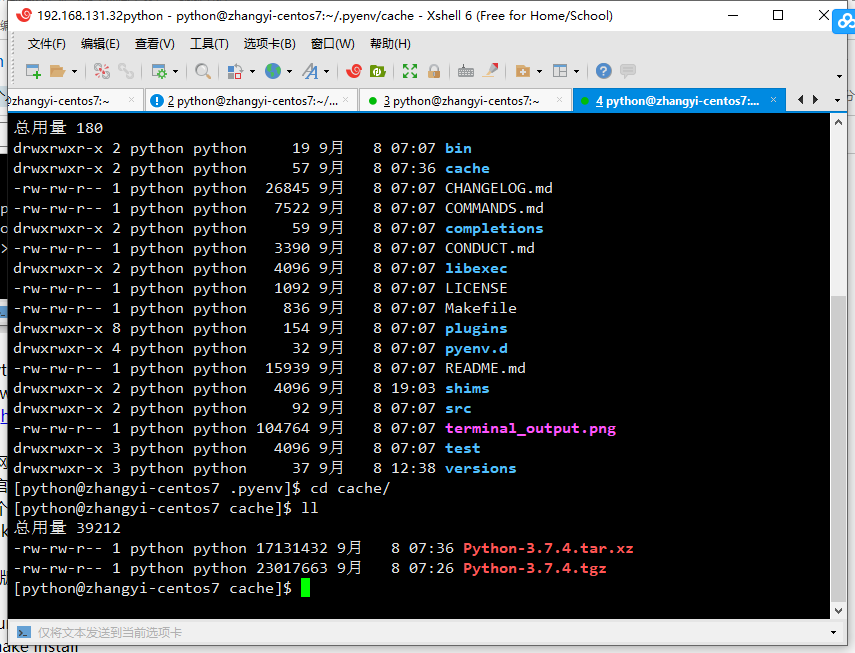
到官网下载 对应版本源码
https://www.python.org/downloads/source/
两个包都下载好
Python-x.x.x.tar.xz
Python-x.x.x.tgz
放入用户目录下的~/.pyenv/cache文件夹
新建文件夹
makedir -r ~/.pyenv/cache
3、3.7版本依赖问题:
3.7版本需要一个新的包libffi-devel,安装此包之后再次进行编译安装即可。
#yum install libffi-devel -y

#make install
若在安装前移除了/usr/bin下python的文件链接依赖,此时yum无法正常使用,需要自己下载相关软件包安装,为节省读者时间,放上链接
#wget http://mirror.centos.org/centos/7/os/x86_64/Packages/libffi-devel-3.0.13-18.el7.x86_64.rpm

#rpm -ivh libffi-devel-3.0.13-18.el7.x86_64.rpm
安装完成后重新进行make install,结束后再次配置相关文件的软连接即可。
4、使用 pyenv 进行版本隔离
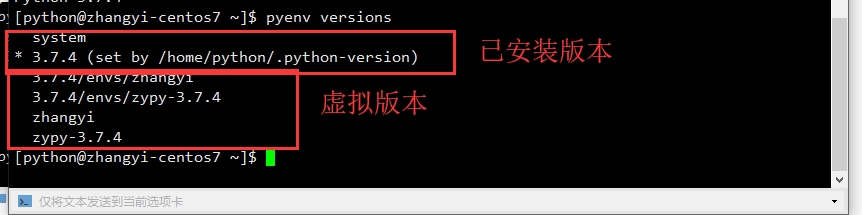
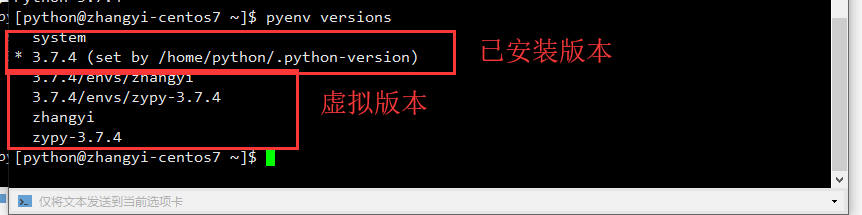
查看已安装的python版本
5、把用户目录下的环境设置成新安装的python版本
pyenv local 3.7.4

6、增加虚拟环境
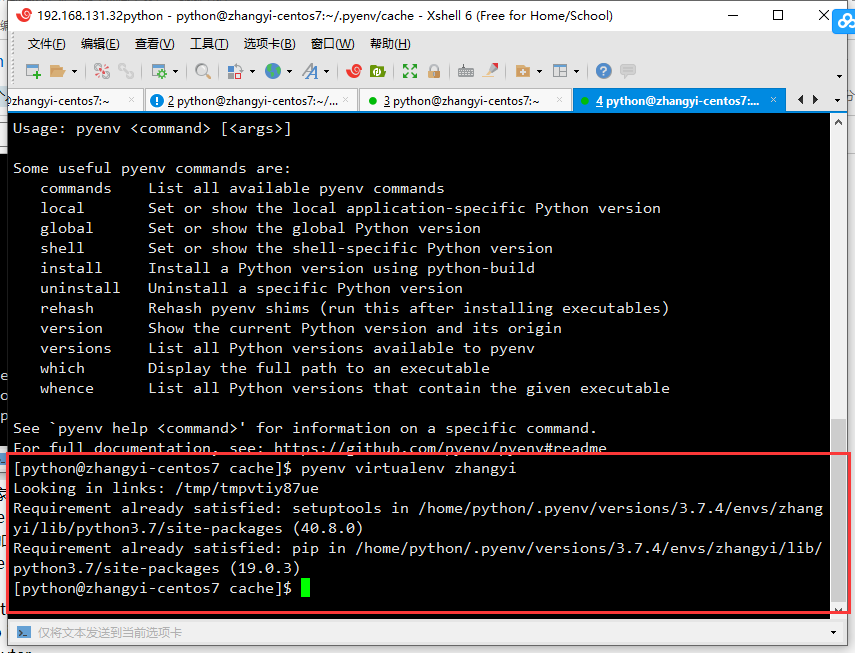
增加名为zhangyi的虚拟环境
pyenv virtualenv zhangyi
.png)
查看虚拟环境
7、安装ipython
切换pip源
参考博客:https://blog.csdn.net/u011220960/article/details/81512435
Linux系统:
mkdir ~/.pip

cat > ~/.pip/pip.conf << EOF

[global]trusted-host=[mirrors.aliyun.com](http://mirrors.aliyun.com/)index-url=https://mirrors.aliyun.com/pypi/simple/

EOF

pip install ipython
8、安装jupyter
pip install jupyter
启动jupyter初始化密码
jupyter notebook passwd

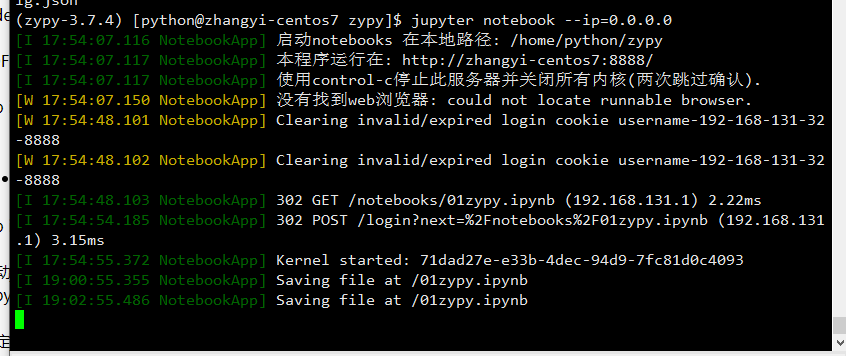
指定jupyter 启动绑定的ip
jupyter notebook --ip=0.0.0.0
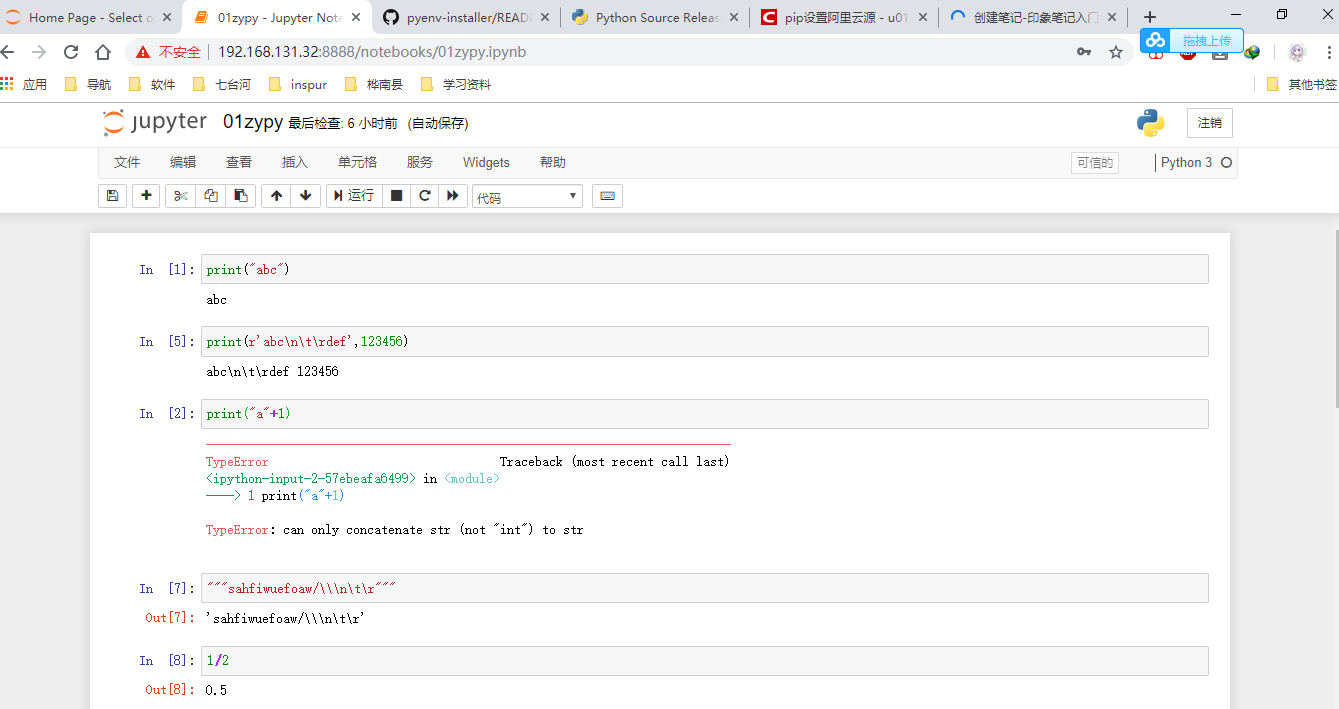
浏览器访问jupyter

9、Python 虚拟环境包导出
导出包配置文件
pip freeze > requirement
导入包配置文件
pip -r requirement
python Linux 环境 (版本隔离工具)的更多相关文章
- [转]windows环境下使用virtualenv对python进行多版本隔离
windows环境下使用virtualenv对python进行多版本隔离 最近在用python做一个文本的情感分析的项目,用到tensorflow,需要用python3的版本,之前因为<机器学习 ...
- Python linux多版本共存以及虚拟环境管理(转摘)
Python linux多版本共存以及虚拟环境管理 2017年08月01日 18:42:25 sliderSun 阅读数:197更多 个人分类: python 版权声明:本文为博主原创文章,未经博 ...
- Linux 环境下自动化测试工具,Redhat dogtail的安装
dogtail基于Accessibility(a11y)的GUI图形界面测试工具和自动化框架可以与linux桌面应用程序进行交互操作. dogtail是用Python语言写的.dogtail的测试脚本 ...
- windows下使用virtualenv对python进行多版本隔离开发
1.windows下安装virtualenv pip install virtualenv 2.进入项目目录,创建虚拟环境,例如: virtualenv venv (默认python版本) virtu ...
- windows环境下使用virtualenv对python进行多版本隔离
最近在用python做一个文本的情感分析的项目,用到tensorflow,需要用python3的版本,之前因为<机器学习实战>那本书的缘故,用的是python2.7.所以目前的情况是要两个 ...
- Python linux 上的管理工具 pyenv 安装, pip 使用, python项目(版本分割, 项目分割, 虚拟环境创建)
01: 假设你有一个最小环境安装的 centos-6.x 的linux操作系统 02: 安装 git => yum -y install git 03: 安装依赖 => yum -y in ...
- s11 day 101 python Linux环境安装 与路飞项目支付功能
from django.conf.urls import urlfrom django.contrib import adminfrom app01 import viewsurlpatterns = ...
- Linux环境安装Eclipse工具开发
1.官网下载maven:https://maven.apache.org/download.cgi 2.上传到虚拟机进行解压缩操作: [hadoop@slaver1 package]$ tar -zx ...
- Linux环境下FTP工具的使用方法
在Windows环境下创建Ftp目录作为服务器根目录 在Linux端的操作: 从服务器端下载文件到Linux端: ftpget -u User -p Password ServerIP File Fi ...
随机推荐
- 012 spring retry重试原理的解析
有点复杂,在后续的章节,将会对其中涉及到的知识点,再分章节进行说明. 1.程序结构 2.@Retryable package com.jun.web.annotation.theory; import ...
- window上可以执行的shell脚本,复制到linux上执行报错了
原因:.sh脚本在windows系统下用记事本文件编写的.不同系统的编码格式引起的. 解决方法:修改.sh文件格式 (1)使用vi工具vi build_android.sh (2)利用如下命令查看文件 ...
- 使用create-react-app遇到问题解决方案汇总
使用create-react-app时遇到Module not found问题 转 https://blog.csdn.net/wkq_1212/article/details/90291558 本来 ...
- [转]curl 命令模拟 HTTP GET/POST 请求
在 Linux 操作系统上对后端程序进行测试的时候,需要进行模拟连接或者书写测试脚本 curl 访问百度,通过GET方法请求 命令格式: curl protocol://address:port/ur ...
- asp.net core 获取appsettings.json里的配置
public GoodsController(IConfiguration configuration) { Configuration = configuration; UpFileDir = Co ...
- 【转载】 LSTM构建步骤以及static_rnn与dynamic_rnn之间的区别
原文地址: https://blog.csdn.net/qq_23981335/article/details/89097757 --------------------- 作者:周卫林 来源:CSD ...
- ISO/IEC 9899:2011 条款6——语言
6 语言 6.1 标记法 1.在本条款中所使用的语法标记法.语义类别(非终结符)用斜体字指示,而字面量单词以及字符集成员(终结符)用粗体字指示.跟在一个非终结符后面的冒号(:)引出其定义.在单独的行中 ...
- 单例设计模式代码-bxy
struct ConnectInfo { const QObject *sender; //发送者 const char *signal_str; //发送信号 const QObject *reci ...
- idea创建一个springboot项目
第一种通过maven创建: 1.点击Create New Project 2.创建maven项目,选择jdk版本,点击next. 3.填写GroupId和ArtifactId,都是自定义的,然后点击n ...
- 《十天学会 PHP》的重难点
记录一下我在学习<十天学会 PHP>(第六版)的过程中的遇到的重难点,该课程是学习制作一个简单的留言板. 准备工作 XAMPP(Apache + MySQL + PHP + PERL) 是 ...