AOP中获取自定义注解的参数值
目录
1.2、创建一个service,使用上面定义的注解来指定切点
1.3、创建Aspect,增加业务逻辑
1.4、创建Spring配置类
1.5、测试
2.1、创建带属性的自定义注解
2.3、创建Aspect的错误示例
2.4、创建Aspect的正确做法
2.5、测试
三、总结
一、利用注解实现AOP的基本流程
如果特别熟悉自定义注解实现AOP,可以直接转到第二部分:跳转。
Spring中,可以通过自定义注解的方式来实现AOP,比较简单,流程如下:
1.1、创建一个注解,用来注解切点(pointcut)
|
1
2
3
4
5
6
7
8
9
10
11
12
|
package cn.ganlixin.annotation;import java.lang.annotation.ElementType;import java.lang.annotation.Retention;import java.lang.annotation.RetentionPolicy;import java.lang.annotation.Target;@Retention(RetentionPolicy.RUNTIME)@Target(ElementType.METHOD)public @interface DemoAnnotation { //注意这里没有定义属性} |
1.2、创建一个service,使用上面定义的注解来指定切点
这里为了节约篇幅,就不创建service接口,再创建serviceImpl来实现接口了,直接写在service中:
|
1
2
3
4
5
6
7
8
9
10
11
12
13
|
package cn.ganlixin.service;import cn.ganlixin.annotation.DemoAnnotation;import org.springframework.stereotype.Service;@Servicepublic class DemoService { @DemoAnnotation // 使用自定义的注解,声明该方法为切点方法 public void demo() { System.out.println("this is DemoService.demo()"); }} |
1.3、创建Aspect,增加业务逻辑
|
1
2
3
4
5
6
7
8
9
10
11
12
13
14
15
|
package cn.ganlixin.aspect;import org.aspectj.lang.annotation.Aspect;import org.aspectj.lang.annotation.Before;import org.springframework.stereotype.Component;@Component@Aspectpublic class DemoAspect { @Before("@annotation(cn.ganlixin.annotation.DemoAnnotation)") public void demoBefore() { System.out.println("this is before output message"); }} |
1.4、创建Spring配置类
主要做的是:指定包扫描路径
|
1
2
3
4
5
6
7
8
9
10
11
12
|
package cn.ganlixin;import org.springframework.context.annotation.ComponentScan;import org.springframework.context.annotation.Configuration;import org.springframework.context.annotation.EnableAspectJAutoProxy;@Configuration@ComponentScan("cn.ganlixin")@EnableAspectJAutoProxypublic class AppConfig { } |
1.5、测试
|
1
2
3
4
5
6
7
8
9
10
11
12
13
14
15
16
17
|
package cn.ganlixin;import cn.ganlixin.service.DemoService;import org.junit.Test;import org.springframework.context.ApplicationContext;import org.springframework.context.annotation.AnnotationConfigApplicationContext;public class AppTest { @Test public void testAOP1() { ApplicationContext context = new AnnotationConfigApplicationContext(AppConfig.class); DemoService demoService = context.getBean(DemoService.class); demoService.demo(); }} |
输出:
|
1
2
|
this is before output messagethis is DemoService.demo() |
二、获取自定义注解的参数
2.1、创建带属性的自定义注解
要获取自定义注解参数,就需要在自定义注解中增加几个属性,下面自定义的TestAnnotation中有两个属性:value和description。
|
1
2
3
4
5
6
7
8
9
10
11
12
13
|
package cn.ganlixin.annotation;import java.lang.annotation.ElementType;import java.lang.annotation.Retention;import java.lang.annotation.RetentionPolicy;import java.lang.annotation.Target;@Retention(RetentionPolicy.RUNTIME)@Target(ElementType.METHOD)public @interface TestAnnotation { String value(); String description() default "default description";} |
2.2、创建service使用带属性的自定义注解
service中有两个方法,分别使用了自定义注解:
|
1
2
3
4
5
6
7
8
9
10
11
12
13
14
15
16
17
18
|
package cn.ganlixin.service;import cn.ganlixin.annotation.TestAnnotation;import org.springframework.stereotype.Service;@Servicepublic class TestService { @TestAnnotation("this is value") public void test1() { System.out.println("this is TestService.test1()"); } @TestAnnotation(value = "this is another value", description = "this is description") public void test2() { System.out.println("this is TestService.test2()"); }} |
2.3、创建Aspect的错误示例
在写博客之前,我也搜过相关的博客,但是发现很多博客中写的都是利用@Around来实现获取注解信息,但是我如果需要在@Before中,@After中获取又怎么办呢?虽然可以通过以下骚操作,通过@Around来模拟@Before和@After,但是还是感觉不好。
下面还是使用@Before来实现的。
|
1
2
3
4
5
6
7
8
9
10
11
12
13
14
15
16
17
|
package cn.ganlixin.aspect;import cn.ganlixin.annotation.TestAnnotation;import org.aspectj.lang.annotation.Aspect;import org.aspectj.lang.annotation.Before;import org.springframework.stereotype.Component;@Component@Aspectpublic class TestAspect { @Before("@annotation(cn.ganlixin.annotation.TestAnnotation)") public void one(TestAnnotation testAnonotation) { System.out.println(testAnonotation.value()); System.out.println(testAnonotation.description()); }} |
上面的代码看似没有问题,one()方法中接收一个TestAnnotation的参数,以为能够获取到切点方法的注解信息,但是,IDE会告诉你如下错误:

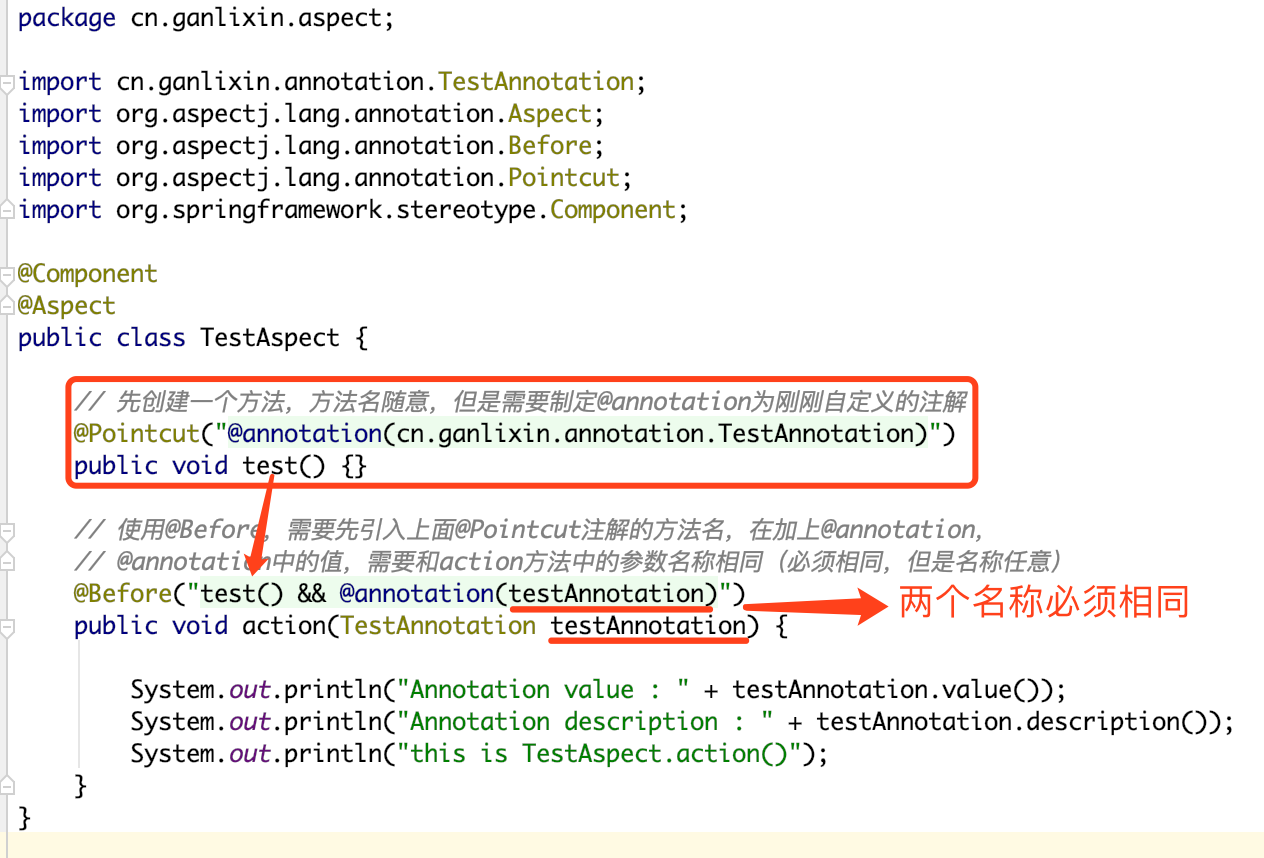
2.4、创建Aspect的正确做法
|
1
2
3
4
5
6
7
8
9
10
11
12
13
14
15
16
17
18
19
20
21
22
23
24
25
|
package cn.ganlixin.aspect;import cn.ganlixin.annotation.TestAnnotation;import org.aspectj.lang.annotation.Aspect;import org.aspectj.lang.annotation.Before;import org.aspectj.lang.annotation.Pointcut;import org.springframework.stereotype.Component;@Component@Aspectpublic class TestAspect { // 先创建一个方法,方法名随意,但是需要制定@annotation为刚刚自定义的注解 @Pointcut("@annotation(cn.ganlixin.annotation.TestAnnotation)") public void test() {} // 使用@Before,需要先引入上面@Pointcut注解的方法名,在加上@annotation, // @annotation中的值,需要和action方法中的参数名称相同(必须相同,但是名称任意) @Before("test() && @annotation(testAnnotation)") public void action(TestAnnotation testAnnotation) { System.out.println("Annotation value : " + testAnnotation.value()); System.out.println("Annotation description : " + testAnnotation.description()); System.out.println("this is TestAspect.action()"); }} |
划重点:
|
1
2
3
4
5
6
7
|
// 第2个示例,强调@annotation中的值,需要和方法参数名相同@Before("test() && @annotation(abcdef)")public void action2(TestAnnotation abcdef) { System.out.println("Annotation value : " + abcdef.value()); System.out.println("Annotation description : " + abcdef.description()); System.out.println("this is TestAspect.action()");} |
2.5、测试
Spring的配置类不用更改,测试代码如下:
|
1
2
3
4
5
6
7
8
9
10
11
12
13
14
15
16
17
18
|
package cn.ganlixin;import cn.ganlixin.service.TestService;import org.junit.Test;import org.springframework.context.ApplicationContext;import org.springframework.context.annotation.AnnotationConfigApplicationContext;public class AppTest { @Test public void testAOP2() { ApplicationContext context = new AnnotationConfigApplicationContext(AppConfig.class); TestService testService = context.getBean(TestService.class); testService.test1(); System.out.println("----------------------------"); testService.test2(); }} |
输出:
|
1
2
3
4
5
6
7
8
9
|
Annotation value : this is valueAnnotation description : default descriptionthis is TestAspect.action()this is TestService.test1()----------------------------Annotation value : this is another valueAnnotation description : this is descriptionthis is TestAspect.action()this is TestService.test2() |
三、总结
要想是获取AOP中自定义注解的参数值,主要就一点:
AOP中获取自定义注解的参数值的更多相关文章
- [asp.net mvc 奇淫巧技] 01 - 封装上下文 - 在View中获取自定义的上下文
我们在asp.net 开发中已经封装了最强大的HttpContext,我们可以在HttpContext中可以获取到几乎任何想获取的东西,也可以在HttpContext写入需要返回客户端的信息.但是这些 ...
- java反射机制获取自定义注解值和方法
由于工作需求要应用到java反射机制,就做了一下功能demo想到这些就做了一下记录 这个demo目的是实现动态获取到定时器的方法好注解名称,废话不多说了直接上源码 1.首先需要自定义注解类 /** * ...
- 如何优雅地在 Spring Boot 中使用自定义注解,AOP 切面统一打印出入参日志 | 修订版
欢迎关注个人微信公众号: 小哈学Java, 文末分享阿里 P8 资深架构师吐血总结的 <Java 核心知识整理&面试.pdf>资源链接!! 个人网站: https://www.ex ...
- Spring Boot 中使用自定义注解,AOP 切面打印出入参日志及Dubbo链路追踪透传traceId
一.使用背景 开发排查系统问题用得最多的手段就是查看系统日志,在分布式环境中一般使用 ELK 来统一收集日志,但是在并发大时使用日志定位问题还是比较麻烦,由于大量的其他用户/其他线程的日志也一起输出穿 ...
- 使用AOP获取自定义注解的内容
目录结构: 一:自定义注解 package org.example.annotation; import java.lang.annotation.ElementType; import java.l ...
- AOP通过反射获取自定义注解
自定义注解: @Target({ElementType.METHOD}) @Retention(RetentionPolicy.RUNTIME) @Documented @Component publ ...
- java之aop使用及自定义注解
目的: 1.Java注解简介 2.Java元注解(重点) 3.自定义注解 案例一(获取类与方法上的注解值) 案例二(获取类属性上的注解属性值) 案例三(获取参数修饰注解对应的属性值) 4.Aop自定义 ...
- 在springMVC中使用自定义注解来进行登录拦截控制
1:java注解使用是相当频繁,特别是在搭建一些框架时,用到类的反射获取方法和属性,用的尤其多. java中元注解有四个: @Retention @Target @Document ...
- Spring启动时获取自定义注解的属性值
1.自定义注解 @Target({ElementType.TYPE, ElementType.METHOD}) @Retention(RetentionPolicy.RUNTIME) @Documen ...
随机推荐
- js 过滤字符 和检测 特殊字符【转】
// var str1 = str.replace(/\[\\'\\"\\\\\\/\\b\\f\\n\\r\\t\]/g, '');// 去掉转义字符 // var str2= str.r ...
- kolla部署openstack allinone,报错APIError: 500 Server Error: Internal Server Error (\"oci runtime error: container_linux.go:235: starting container process caused \"container init exited prematurely
使用 kolla-ansible 部署 opnenstack:stein 执行 kolla-ansible -i ./all-in-one deploy 开始自动化部署 在部署过程中报错,报错信息如下 ...
- CSS的四种基本选择器和四种高级选择器
做个快乐的搬运工:https://blog.csdn.net/DYD850804/article/details/80997251
- 201777010217-金云馨《面向对象程序设计(java)》第十三周学习
项目 内容 这个作业属于哪个课程 https://www.cnblogs.com/nwnu-daizh/ 这个作业的要求在哪里 https://www.cnblogs.com/nwnu-daizh/p ...
- datagrid editor动态的改变不同行修改列的editor属性
onBeforeEdit: function (row) { let options = $(this).treegrid('options'); options.tempeditor = optio ...
- 13-numpy笔记-莫烦pandas-1
代码 import pandas as pd import numpy as np s = pd.Series([1,3,6,np.nan, 44,1]) print('-1-') print(s) ...
- scp、rsync、xsync
scp. 拷贝完全相同 scp -r etc/hadoop/dfs.hosts root@192.168.121.134:/usr/local/hadoop/hadoop-2.7.6/etc/hado ...
- VIJOS-P1059 积木城堡
洛谷 P1504 积木城堡 https://www.luogu.org/problem/P1504 JDOJ 1240: VIJOS-P1059 积木城堡 https://neooj.com/oldo ...
- 【oracle】11g服务器安装详细步骤
以下是百度经验:https://jingyan.baidu.com/article/363872eccfb9266e4aa16f5d.html 1.同时解压 2.setup 3.
- js的call()方法
// ① 当函数中没有this时,call().apply()和直接执行没有区别 function fn(){ console.log("aaa") } fn() // aaa f ...