03 .NET CORE 2.2 使用OCELOT -- Docker中的Consul
部署consul-docker镜像
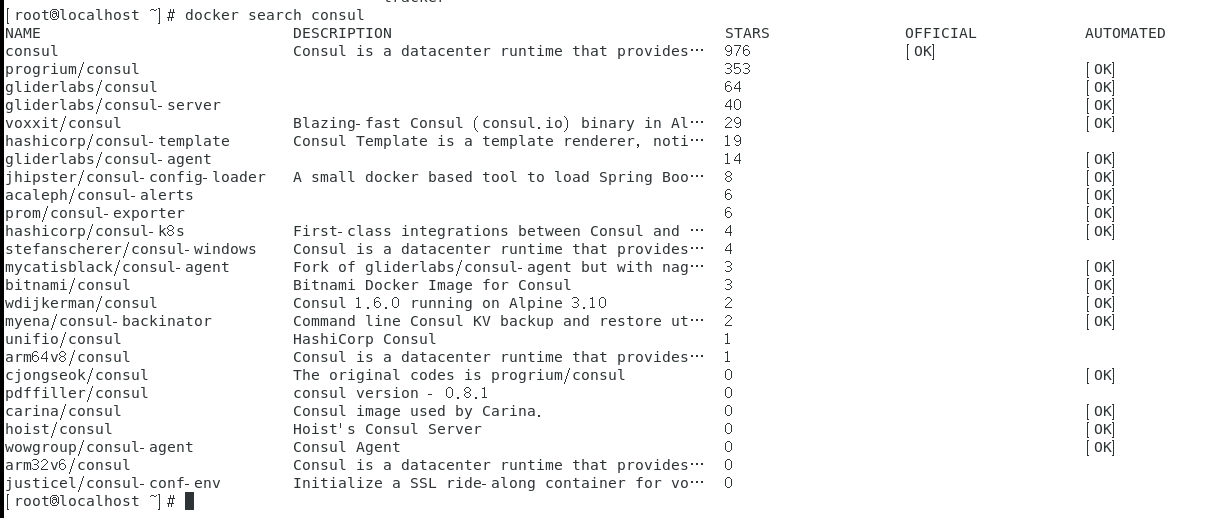
先搜索consul的docker镜像
docker search consul
然后选择了第一个,也就是官方镜像
下载镜像
docker pull consul
然后运行镜像
docker run -d --name consul -v /home/root/config:/config --restart=always\
-p 8300:8300 \
-p 8301:8301 \
-p 8301:8301/udp \
-p 8302:8302 \
-p 8302:8302/udp \
-p 8400:8400 \
-p 8500:8500 \
consul agent -server \
-bootstrap-expect 1 \
-ui \
-client 0.0.0.0
consul中每个启动参数的含义,参考了以下链接:
https://www.bitdoom.com/2017/09/07/p125/
https://yq.aliyun.com/articles/536508
https://blog.csdn.net/yinwaner/article/details/80762757
https://blog.csdn.net/qq_36228442/article/details/89085373
https://www.cnblogs.com/PearlRan/p/11225953.html
https://www.cnblogs.com/magic-chenyang/p/7975677.html
注册服务
参考链接:
https://blog.csdn.net/hailang2ll/article/details/82079192
新建一个common项目
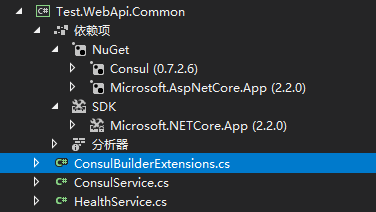
新建ConsulBuilderExtensions.cs 、ConsulService.cs、HealthService.cs
 using Consul;

 using Microsoft.AspNetCore.Builder;

 using Microsoft.AspNetCore.Hosting;

 using System;

 using System.Collections.Generic;

 using System.Linq;

 using System.Threading.Tasks;

 namespace Test.WebApi.Common

 {

     public static class ConsulBuilderExtensions

     {

         // 服务注册

         public static IApplicationBuilder RegisterConsul(this IApplicationBuilder app, IApplicationLifetime lifetime, HealthService healthService, ConsulService consulService)

         {

             var consulClient = new ConsulClient(x => x.Address = new Uri($"http://{consulService.IP}:{consulService.Port}"));//请求注册的 Consul 地址

             var httpCheck = new AgentServiceCheck()

             {

                 DeregisterCriticalServiceAfter = TimeSpan.FromSeconds(),//服务启动多久后注册

                 Interval = TimeSpan.FromSeconds(),//健康检查时间间隔,或者称为心跳间隔

                 HTTP = $"http://{healthService.IP}:{healthService.Port}/api/health",//健康检查地址

                 Timeout = TimeSpan.FromSeconds()

             };

             // Register service with consul

             var registration = new AgentServiceRegistration()

             {

                 Checks = new[] { httpCheck },

                 ID = healthService.Name + "_" + healthService.Port,

                 Name = healthService.Name,

                 Address = healthService.IP,

                 Port = healthService.Port,

                 Tags = new[] { $"urlprefix-/{healthService.Name}" }//添加 urlprefix-/servicename 格式的 tag 标签,以便 Fabio 识别

             };

             consulClient.Agent.ServiceRegister(registration).Wait();//服务启动时注册,内部实现其实就是使用 Consul API 进行注册(HttpClient发起)

             lifetime.ApplicationStopping.Register(() =>

             {

                 consulClient.Agent.ServiceDeregister(registration.ID).Wait();//服务停止时取消注册

             });

             return app;

         }

     }

 }
 namespace Test.WebApi.Common

 {

     public class ConsulService

     {

         public string IP { get; set; }

         public int Port { get; set; }

     }

 }
 namespace Test.WebApi.Common

 {

     public class HealthService

     {

         public string Name { get; set; }

         public string IP { get; set; }

         public int Port { get; set; }

     }

 }
两个webapi项目引用这个common项目
并修改各自的 startup.cs
 public void Configure(IApplicationBuilder app, IHostingEnvironment env, IApplicationLifetime lifetime)

         {

             if (env.IsDevelopment())

             {

                 app.UseDeveloperExceptionPage();

             }

             else

             {

                 // The default HSTS value is 30 days. You may want to change this for production scenarios, see https://aka.ms/aspnetcore-hsts.

                 app.UseHsts();

             }

             ConsulService consulService = new ConsulService()

             {

                 IP = Configuration["Consul:IP"],

                 Port = Convert.ToInt32(Configuration["Consul:Port"])

             };

             HealthService healthService = new HealthService()

             {

                 IP = Configuration["Service:IP"],

                 Port = Convert.ToInt32(Configuration["Service:Port"]),

                 Name = Configuration["Service:Name"],

             };

             app.RegisterConsul(lifetime, healthService, consulService);

             //app.UseConsul();

             app.UseHttpsRedirection();

             app.UseMvc();

         }
修改 appsettings.json。 192.168.2.16是本机地址。192.168.2.29是docker中consul的地址。 两个项目的配置类似,区别是本地项目的端口9001、9002。
 {

   "Logging": {

     "LogLevel": {

       "Default": "Warning"

     }

   },

   "AllowedHosts": "*",

   "Service": {

     "Name": "ApiService",

     "IP": "192.168.2.16",

     "Port": ""

   },

   "Consul": {

     "IP": "192.168.2.29",

     "Port": ""

   }

 }
IIS部署 .NET CORE 2.2
参考链接:
https://www.cnblogs.com/wxlv/p/netcore-to-iis.html
部署期间遇到过以下问题
HTTP Error 500.35 - ANCM Multiple In-Process Applications in same Process ASP.NET Core 3
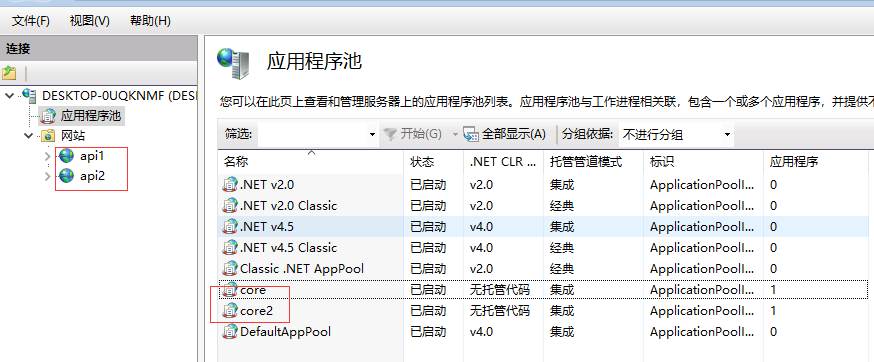
解决方法:两个webapi项目 用不一样的应用池。
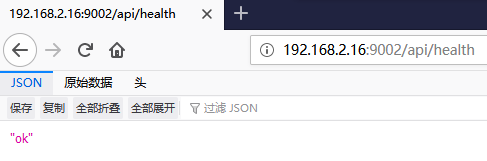
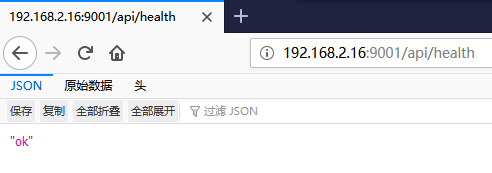
部署完成后,测试下 各自项目的 /api/health接口是否正常。
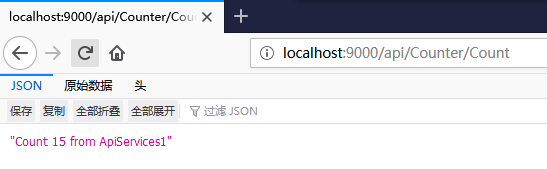
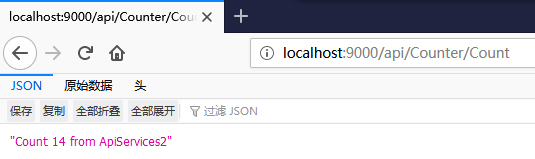
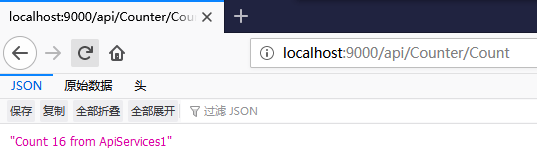
测试网关项目
修改网关项目的配置configuration.json
 {

   "ReRoutes": [

     {

       "UseServiceDiscovery": true,

       "DownstreamPathTemplate": "/{url}",

       "DownstreamScheme": "http",

       "ServiceName": "ApiService",

       "LoadBalancerOptions": {

         "Type": "RoundRobin"

       },

       "UpstreamPathTemplate": "/{url}",

       "UpstreamHttpMethod": [ "Get" ],

       "ReRoutesCaseSensitive": false

     }

   ],

   "GlobalConfiguration": {

     "ServiceDiscoveryProvider": {

       "Host": "192.168.2.29",

       "Port": ,

       "Type": "PollConsul",

       "PollingInterval":

     }

   }

 }
修改 startup.cs
 public void ConfigureServices(IServiceCollection services)

         {

             services.AddMvc().SetCompatibilityVersion(CompatibilityVersion.Version_2_2);

             services.AddOcelot(new ConfigurationBuilder()

                     .AddJsonFile("configuration.json")

                     .Build())

                     .AddConsul();

         }

         // This method gets called by the runtime. Use this method to configure the HTTP request pipeline.

         public async void Configure(IApplicationBuilder app, IHostingEnvironment env)

         {

             if (env.IsDevelopment())

             {

                 app.UseDeveloperExceptionPage();

             }

             else

             {

                 // The default HSTS value is 30 days. You may want to change this for production scenarios, see https://aka.ms/aspnetcore-hsts.

                 app.UseHsts();

             }

             await app.UseOcelot();

             app.UseHttpsRedirection();

             app.UseMvc();

         }
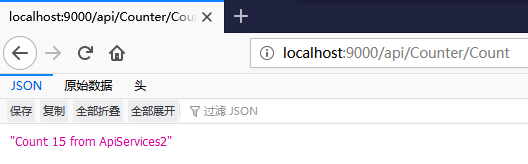
F5启动项目
03 .NET CORE 2.2 使用OCELOT -- Docker中的Consul的更多相关文章
- .NET Core Web 应用部署到 Docker 中运行
环境介绍 : 虚拟机:VirtualBox 5.1.6 系 统:Ubuntu 16.04.1 LTS 系统准备完成后可以使用 sudo apt-get udpate 和 sudo apt-get up ...
- Asp.Net Core WebAPI+PostgreSQL部署在Docker中
PostgreSQL是一个功能强大的开源数据库系统.它支持了大多数的SQL:2008标准的数据类型,包括整型.数值值.布尔型.字节型.字符型.日期型.时间间隔型和时间型,它也支持存储二进制的大对像, ...
- [Linux之旅一] .NET Core 2.2部署到Docker中
第一步,使用VS2017或者VS2019创建.NET Core 2.2或3.1的项目,如下图: 在创建项目的时候记得勾选Docker支持,这样会自动创建Dockerfile文件,这个文件用于构建Doc ...
- .net core Ocelot实现API网关并部署在docker中
基于Ocelot(http://ocelot.readthedocs.io)搭建的API网关demo 软件以及系统版本: Asp.Net Core 2.2 Ocelot 13.5.0 CentOS ...
- 在docker中运行ASP.NET Core Web API应用程序
本文是一篇指导快速演练的文章,将介绍在docker中运行一个ASP.NET Core Web API应用程序的基本步骤,在介绍的过程中,也会对docker的使用进行一些简单的描述.对于.NET Cor ...
- 将 ASP.NET Core 1.0 应用作为 docker 镜像发布 (Linux版)
var appInsights=window.appInsights||function(config){ function r(config){t[config]=function(){var i= ...
- docker中运行ASP.NET Core Web API
在docker中运行ASP.NET Core Web API应用程序 本文是一篇指导快速演练的文章,将介绍在docker中运行一个ASP.NET Core Web API应用程序的基本步骤,在介绍的过 ...
- ASP.NET Core 网站在Docker中运行
Docker作为新一代的虚拟化方式,未来肯定会得到广泛的应用,传统虚拟机的部署方式要保证开发环境.测试环境.UAT环境.生产环境的依赖一致性,需要大量的运维人力,使用Docker我们可以实现一次部署, ...
- .net core微服务之基于Docker+Consul+Registrator服务注册服务发现
一.Docker部分: 先拉最新的asp.net core的镜像: docker pull microsoft/aspnetcore 将下载下来的镜像重命名,为什么要重命名?等会讲Registrato ...
随机推荐
- 9.InfluxDB-InfluxQL基础语法教程--LIMIT and SLIMIT 子句
本文翻译自官网,官网地址:(https://docs.influxdata.com/influxdb/v1.7/query_language/data_exploration/) LIMIT和SLIM ...
- long类型在内存中占8个字节,float类型在内存中占4个字节,为什么long还要比float小呢?
结论:数值范围大小和占用的字节没有关系. float类型的范围: 负数:-3.402823E38~-1.401298E-45 整数:0 正数:1.401298E-45~3.402823E38 long ...
- Linux 信号量之Posix有名字的信号量
信号量(semaphore),也和互斥锁一样提供了线程间或者进程间的同步功能. 信号量有三种: Posix有名字的信号量 Posix基于内存的信号量 System V信号量 信号量比互斥锁高级,互斥锁 ...
- docker研究-4 docker镜像制作
这次实验以centos镜像为基础镜像进行相关docker镜像制作. 1. 下载centos镜像 [root@localhost ~]# docker pull centosUsing default ...
- 逆向破解之160个CrackMe —— 010-011
CrackMe —— 010 160 CrackMe 是比较适合新手学习逆向破解的CrackMe的一个集合一共160个待逆向破解的程序 CrackMe:它们都是一些公开给别人尝试破解的小程序,制作 c ...
- java1.8新特性整理(全)
版权声明:本文为博主原创文章,遵循CC 4.0 BY-SA版权协议,转载请附上原文出处链接和本声明. 本文链接:https://blog.csdn.net/yitian_66/article/deta ...
- 什么是微信小程序?简单介绍
1.微信小程序是一种全新的连接用户与服务的方式,它可以在微信内被便捷地获取和传播,同时具有色的使用体验. 2.手机端App的另外一种新的展现形式 3.无需下载过多占用手机内存的app,小程序直接打开 ...
- mysql字段约束-索引-外键---3
本节所讲内容: 字段修饰符 清空表记录 索引 外键 视图 一:字段修饰符 (约束) 1:null和not null修饰符 我们通过这个例子来看看 mysql> create table wo ...
- 1.python进行if条件相等时候的条件
在我们进行 if == 判断的时候!其中判断的条件: 1:其值是不是一样 3:其类型是否是一样 ###二者少了任何一个都不可以 >>> pwd = 23>>> cc ...
- adb连接夜神模拟器与adb常用操作命令
adb connect 127.0.0.1:62001 adb kill-server 在关闭adb服务后,要使用如下的命令启动adb服务. adb start-servermore than one ...