C# 使用摄像头拍照 支持Win7 64位
So, how do we capture an image from a WebCam?
Once you download the source code that is attached to the article you should have the following three projects:
- Demo – simple Windows Forms project that demonstrates how a WebCam is used. It references WebCamWrapper which in turn references WebCamLib.
- WebCamLib – this is where the magic is happening – it is a C++ project with just two files (WebCamLib.h andWebCamLib.cpp) that queries a WebCam using DirectShow and returns results.
- WebCamWrapper – a C# wrapper on top of the C++ project that enables easy integration into the .NET world.
For a starting point I recommend a code view of Demo\MainForm.cs. This form implements most of the operations you can think of when it comes to WebCam access. First is the iteration through the WebCams hooked up to the computer:
private void MainForm_Load(object sender, EventArgs e)

{

    if (!DesignMode)

    {

        comboBoxCameras.Items.Clear();

        foreach (Camera cam in CameraService.AvailableCameras)

            comboBoxCameras.Items.Add(cam);

        if (comboBoxCameras.Items.Count > 0)

            comboBoxCameras.SelectedIndex = 0;

    }

}
The CameraService class you see in the code is contained in the WebCamWrapper project and is the main wrapper over the main class CameraMethods that is the only class implemented in the C++ WebCamLib project.CameraService exposes AvailableCameras as a list of Camera classes that contain the logic for a certain WebCam. Once the user makes a choice of camera, you’ll obviously want to start the capture:
private CameraFrameSource _frameSource;

private static Bitmap _latestFrame;

private void btnStart_Click(object sender, EventArgs e)

{

    if (_frameSource != null && _frameSource.Camera == comboBoxCameras.SelectedItem)

        return;

    thrashOldCamera();

    startCapturing();

}
_frameSource is the variable in which we’ll save the currently selected Camera. Touchless developers decided not to tie their capture source exclusively to WebCam (good choice obviously) so they made a generic IFrameSourceinterface that CameraFrameSource implements… and that’s how this class ended up as a container instead of theCamera class directly. The rest of the code is pretty self-explanatory – if we select the same frame source, we’ll just exit; if not we will thrash the old camera and start a new one. Onto the startCapturing method:
private void startCapturing()

{

    try

    {

        Camera c = (Camera)comboBoxCameras.SelectedItem;

        setFrameSource(new CameraFrameSource(c));

        _frameSource.Camera.CaptureWidth = 320;

        _frameSource.Camera.CaptureHeight = 240;

        _frameSource.Camera.Fps = 20;

        _frameSource.NewFrame += OnImageCaptured;

        pictureBoxDisplay.Paint += new PaintEventHandler(drawLatestImage);

        _frameSource.StartFrameCapture();

    }

    catch (Exception ex)

    {

        comboBoxCameras.Text = "Select A Camera";

        MessageBox.Show(ex.Message);

    }

}

private void setFrameSource(CameraFrameSource cameraFrameSource)

{

    if (_frameSource == cameraFrameSource)

        return;

    _frameSource = cameraFrameSource;

}

private void drawLatestImage(object sender, PaintEventArgs e)

{

    if (_latestFrame != null)

    {

        e.Graphics.DrawImage(_latestFrame, 0, 0, _latestFrame.Width, _latestFrame.Height);

    }

}

public void OnImageCaptured(Touchless.Vision.Contracts.IFrameSource frameSource,

                            Touchless.Vision.Contracts.Frame frame, double fps)

{

    _latestFrame = frame.Image;

    pictureBoxDisplay.Invalidate();

}
We start off by fetching the selected Camera from the ComboBox which we then use to create and set theCameraFrameSource. Lines after that influence the capture parameters (be sure to remember these three lines as we will be getting back to them later) and after that we have a subscription to two events.
The first event, NewFrame, is raised whenever WebCamLib captures an image from the WebCam. As you can see, we save that image into a local variable _latestFrame and from there you can do any additional image processing you like. The second event is just a fancy (and more efficient) way of saying pictureBoxDisplay.Image = frame.Image. For some reason, setting the Image property on a PictureBox too often causes flicker and we obviously do not want that – instead we resort to invalidating the PictureBox and then handling its paint event to draw the current image from the WebCam.
Now that all that is implemented, we just StartFrameCapture and enjoy the view from our WebCam. Try it out – press F5 and then click the ‘Start’ button once the Form loads up.
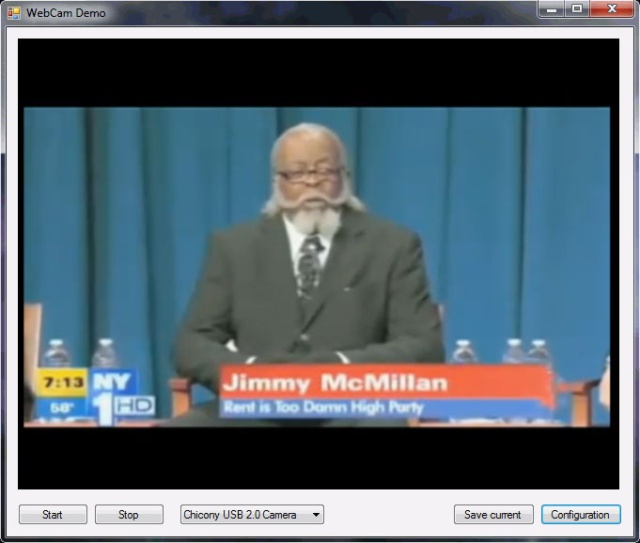
When you grow tired of watching yourself, simply close the form. Once you are back in Visual Studio, check out thethrashOldCamera method (that is utilized from the Form_Closing and btnStop_Click methods also):
private void thrashOldCamera()

{

    if (_frameSource != null)

    {

        _frameSource.NewFrame -= OnImageCaptured;

        _frameSource.Camera.Dispose();

        setFrameSource(null);

        pictureBoxDisplay.Paint -= new PaintEventHandler(drawLatestImage);

    }

}
Well, nothing too fancy – we unsubscribe from the two mentioned events, set the _frameSource variable to null, and call Dispose on Camera so that the C++ WebCamLib can perform cleanup operations.
Believe it or not – that’s it. There is nothing more critical to explain or implement in order to use images from your WebCam in C#. The extra code that exists in MainForm.cs is just there for saving the current image:
private void btnSave_Click(object sender, EventArgs e)

{

    if (_frameSource == null)

        return;

    Bitmap current = (Bitmap)_latestFrame.Clone();

    using (SaveFileDialog sfd = new SaveFileDialog())

    {

        sfd.Filter = "*.bmp|*.bmp";

        if (sfd.ShowDialog() == DialogResult.OK)

        {

            current.Save(sfd.FileName);

        }

    }

    current.Dispose();

}
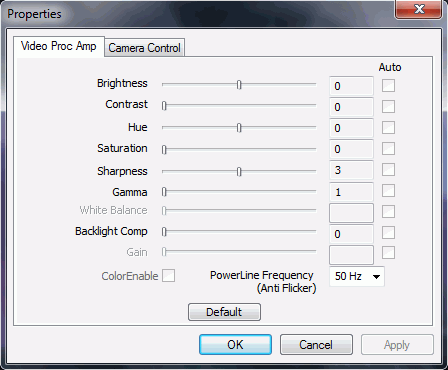
And bringing up the configuration dialog:
private void btnConfig_Click(object sender, EventArgs e)

{

    // snap camera

    if (_frameSource != null)

        _frameSource.Camera.ShowPropertiesDialog();

}
Problem(s)
As you can see from the code – the implementation is pretty easy and clean (unlike some other approaches that use WIA, obscure DLLs, clipboard, or hard disk for saving images, etc.), meaning that there are not many problems. Actually, currently there is only one problem I can identify. You remember these three lines?
_frameSource.Camera.CaptureWidth = 320;

_frameSource.Camera.CaptureHeight = 240;

_frameSource.Camera.Fps = 20;
Well, it turns out that they are not working as advertised. First, let’s talk about FPS. If we dive into the Camera class (line 254) here is what we will see (the method that gets called after an image is captured from the webcam):
private void ImageCaptured(Bitmap bitmap)

{

    DateTime dtCap = DateTime.Now;

    // Always save the bitmap

    lock (_bitmapLock)

    {

        _bitmap = bitmap;

    }

    // FPS affects the callbacks only

    if (_fpslimit != -1)

    {

        if (_dtLastCap != DateTime.MinValue)

        {

            double milliseconds = ((dtCap.Ticks - _dtLastCap.Ticks) / TimeSpan.TicksPerMillisecond) * 1.15;

            if (milliseconds + _timeBehind >= _timeBetweenFrames)

            {

                _timeBehind = (milliseconds - _timeBetweenFrames);

                if (_timeBehind < 0.0)

                {

                    _timeBehind = 0.0;

                }

            }

            else

            {

                _timeBehind = 0.0;

                return; // ignore the frame

            }

        }

    }

    if (OnImageCaptured != null)

    {

        var fps = (int)(1 / dtCap.Subtract(_dtLastCap).TotalSeconds);

        OnImageCaptured.Invoke(this, new CameraEventArgs(bitmap, fps));

    }

    _dtLastCap = dtCap;

}
Even if you just glanced at the method, you probably saw that most of it is dedicated to calculating the time between frames and ditching the frame if it came too soon. Which is not too bad, I guess – controlling the frame rate on C# level rather than on hardware level will probably not kill you.
But what about finding out the other two lines, which influence the size of the captured image, also not working (line 235 in Camera.cs)?
private void CaptureCallbackProc(int dataSize, byte[] data)

{

    // Do the magic to create a bitmap

    int stride = _width * 3;

    GCHandle handle = GCHandle.Alloc(data, GCHandleType.Pinned);

    var scan0 = (int)handle.AddrOfPinnedObject();

    scan0 += (_height - 1) * stride;

    var b = new Bitmap(_width, _height, -stride, PixelFormat.Format24bppRgb, (IntPtr)scan0);

    b.RotateFlip(_rotateFlip);

    // Copy the image using the Thumbnail function to also resize if needed

    var copyBitmap = (Bitmap)b.GetThumbnailImage(_width, _height, null, IntPtr.Zero);

    //var copyBitmap = (Bitmap)b.Clone();

    // Now you can free the handle

    handle.Free();

    ImageCaptured(copyBitmap);

}
As you can see, the image size is actually faked. Majority of cameras I’ve tested out will tend to return images in the 640x480 size. Which is fine in most cases – if you need a smaller image, b.GetThumbnailImage will allow you to easily resize it. However, if you wish a higher resolution image, you are stuck and that’s not a good thing.
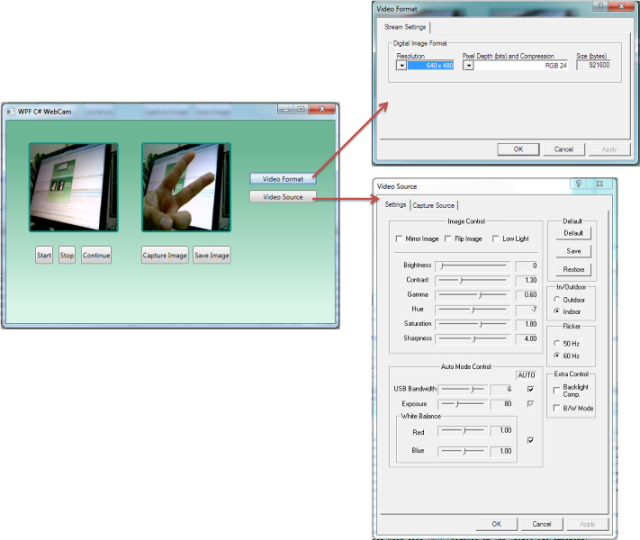
So, anyone from the C++ world is more than welcome to help with this. The following links I’ve read gave me the impression that all that’s needed to be done is somehow invoke the Video Format window in C++, the same way we are now invoking the Video Source Configuration window (for setting Brightness, Contracts, etc):
- Setting up Webcam properties with DirectShow forum post
- EasyWebCam project – for most part it is bad, but it does have a Video Format window. I decompiledWebCam_Capture.dll from the project only to find out that everything is implemented using PInvoke - meaning that it’s useless for our approach. So, if somebody can bring up that same window using C++ and DirectShow – please help out by extending the existing
CameraMethodsclass.
源码下载地址: Source
C# 使用摄像头拍照 支持Win7 64位的更多相关文章
- HP QC IE11不支持( win7 64位 无法安装)解决方法
QC IE11不支持( win7 64位 无法安装)解决方法 使用HP公司的QC做项目缺陷管理,发现IE浏览器只支持IE7,IE8.安装插件ALP_Platform_Loader提示64位无法安装,顿 ...
- WIN7 64位配置Oracle SQL Developer工具
在使用Oracle SQL 的过程中,很多参考资料,辅导机构,各种书籍绝大多数都是使用PL/SQL进行讲解,但是问题是PL/SQL对WIN7 64位系统支持不好,网上有各种各样的配置教程,我尝试了很多 ...
- Win7 64位下配置Qt5.3和Wincap
最近在学网络编程,想在windows下用Qt做个网络抓包工具,就要用到WinPcap,而我的电脑的系统是Win7 64位,qt版本是Qt 5.3.1 for Windows 64-bit ( ...
- 偶然碰到的Win7 64位下CHM 的问题解决
最近下了几个沪江资料,都是chm格式的,但是在win7 64位下,都显示不了里面的音频和视频flash之类的控件,虽然可以通过源文件的方式打开视频文件,但是很麻烦. 网上似乎碰到的人也不是很多, ...
- Win7 64位 + LoadRunner 11录制时弹不出IE的解决办法 Win7 64位 + LoadRunner 11录制时弹不出IE的解决办法
Win7 64位 + LoadRunner 11录制时弹不出IE的解决办法 Win7 64位 + LoadRunner 11录制时弹不出IE的解决办法 1. 卸载IE9( 装了Win7 64位后,默认 ...
- 怎么安装Scrapy框架以及安装时出现的一系列错误(win7 64位 python3 pycharm)
因为要学习爬虫,就打算安装Scrapy框架,以下是我安装该模块的步骤,适合于刚入门的小白: 一.打开pycharm,依次点击File---->setting---->Project---- ...
- 黄聪:win7 64位系统PS、AI、PSD缩略图预览补丁
MysticThumbs支持Windows 7 / Vista / XP,32位和64位.除了预览PSD以外,还支持DDS.SGI缩略图显示. Mystic Thumbs是一款用来支持win7 64位 ...
- Loadrunner11无法在win7 64位上启用ie解决办法
Loadrunner11无法在win7 64位上启用ie解决办法 1.loadrunner11在win7 64位上默认启用的是32位的那个IE浏览器,路径:C:\Program Files (x86) ...
- 雨林木风ghost win7 64位快速装机版V2016年
雨林木风ghost win7 64位快速装机版V2016年2月 系统下载:http://www.xitongma.com 系统概述 雨林木风ghost win7 64位旗舰装机版自动无人值守安装,采用 ...
随机推荐
- hdu4288 Coder(段树+分离)
主题链接: huangjing 题意: 题目中给了三个操作 1:add x 就是把x插进去 2:delete x 就是把x删除 3:sum 就是求下标%5=3的元素的和. 另一个条件是插入和删除最后 ...
- 学习pthreads,创建和终止多线程
更CPU多线程编程,通过笔者的研究发现,,pthreads使用日趋广泛.它是螺纹POSIX标准,它定义了一组线程的创建和操作API. 配置环境见上博客文章.配置环境后,只需要加入#include &l ...
- axWindowsMediaPlayer1获取音频长度
OpenFileDialog openFileDialog1 = new OpenFileDialog { InitialDirectory = "c:\\", Filter = ...
- C利用宏语言(#,##,do…while(0)盛大)
C利用宏语言(#,##.do-while(0)盛大) 1.使用宏预先定义__FILE__,__FUNCTION__.__LINE__. #include <stdio.h> void fu ...
- Sqlserver2000联系Oracle11G数据库进行实时数据的同步
Sqlserver2000联系Oracle11G数据库进行实时数据的同步 1,前提条件 我有sqlserver2000环境,已经存在oracle11g环境,准备这两个数据库,建立各自的訪问账号,两者之 ...
- 【原创】构建高性能ASP.NET站点 第六章—性能瓶颈诊断与初步调优(下前篇)—简单的优化措施
原文:[原创]构建高性能ASP.NET站点 第六章-性能瓶颈诊断与初步调优(下前篇)-简单的优化措施 构建高性能ASP.NET站点 第六章—性能瓶颈诊断与初步调优(下前篇)—简单的优化措施 前言:本篇 ...
- hdu 4856 Tunnels(bfs+状态压缩)
题目链接:hdu 4856 Tunnels 题目大意:给定一张图,图上有M个管道,管道给定入口和出口,单向,如今有人想要体验下这M个管道,问最短须要移动的距离,起点未定. 解题思路:首先用bfs处理出 ...
- SQL Server 2005中的CHECKSUM功能
原文:SQL Server 2005中的CHECKSUM功能 转自此处 页面 checksum 是SQL2005的新功能,提供了一种比残缺页检测强大的机制检测IO方面的损坏.以下是详细描述: 页面 C ...
- 使用RESTClient插件数据模拟(GET,POST)提交
1:在Firefox下载RESTClient插件安装 2:安装界面后, 3:点击设置头文件:(设请求地址有头部文件) 4:设置界面,当然有非常多选择.依据你的须要.一般在输入的时候有智能提示,我这里以 ...
- android:GLSurfaceView绘制bitmap图片及glViewport调整的效果
首先看一下GLSurfaceView是怎样绘制的.正如android开发文档中描写叙述的那样,我们须要new一个GLSurfaceView对象,然后设置一个实现了Renderer接口的对象,我们须要写 ...