
【高级功能】使用canvas元素(第二部分)
本文将继续介绍canvas的功能,展示如何绘制更复杂的图形(包括圆弧和曲线),如何使用剪裁区域来限制操作以及如何绘制文本。还是介绍可以应用在画布上的特效和变换,包括阴影、透明度、旋转和坐标重映射。
1. 用路径绘图
路径本质上是一组独立的线条(被称为子路径),它们组合到一起构成图形。我们绘制子路径的方式就像用笔在纸上画图一样,笔尖不离开纸面:画布上的每一条子路径都以上一条的终点作为起点。下面展示了绘制基本路径的方法:

绘制一条路径的基本顺序如下:
* 调用 beginPath方法;
* 用 moveTo方法移动到起点;
* 用 arc和 lineTo等方法绘制子路径;
* 调用 closePath方法(可选)
* 调用 fill或 stroke方法
1.1 用线条绘制路径
最简单的路径是那些由直线所组成的。
<!DOCTYPE html>

<html lang="en">

<head>

    <meta charset="UTF-8">

    <title>由直线创建路径</title>

    <style>

        canvas {border: thin solid orange;}

        body > * {float: left;}

    </style>

</head>

<body>

<canvas id="canvas" width="500" height="140">

    Your browser doesn't support the <code>canvas</code> element

</canvas>

<script type="application/javascript">

    var ctx = document.getElementById("canvas").getContext("2d");

    ctx.fillStyle = "yellow";

    ctx.strokeStyle = "black";

    ctx.lineWidth = ;

    ctx.beginPath();

    ctx.moveTo(,);

    ctx.lineTo(,);

    ctx.lineTo(,);

    ctx.closePath();

    ctx.fill();

    ctx.beginPath();

    ctx.moveTo(,);

    ctx.lineTo(,);

    ctx.lineTo(,);

    ctx.lineTo(,);

    ctx.fill();

    ctx.stroke();

    ctx.beginPath();

    ctx.moveTo(,);

    ctx.lineTo(,);

    ctx.stroke();

</script>

</body>

</html>
此例创建了三条路径,其显示效果如下:

对于第一条路径。此例明确绘制了两条线,然后使用closePath方法,这样canvas就会闭合路径。然后调用了fill方法,用fillStyle属性所定义的样式填充了这个图形。
对于第二个图形,此例指定了三条子路径,然没有闭合图形。可以看到调用了fill和stroke这两个方法来给图形填色,并沿着路径绘制了一条线。请注意填充色的绘制方式就行图形已经闭合了那样。canvas元素会假定存在一条从终点到起点的子路径,然后借助它填充图形。相比之下,stroke方法只会沿着已经定义的子路径。
PS:对于第二个图形,在stroke方法之前先调用了fill方法,这会使canvas先用纯色填充图形,然后再沿着路径绘制线条。如果lineWidth属性大于1并且先调用了stroke方法,得到的视觉效果就会有所不同。更宽的线条会在路径两侧绘制。因此线条的一部分会在调用fill方法时被遮盖,导致线条的宽度变窄。
对于第三个图形,此例只是简单地在两点之间绘制了一条线,因为路径不一定需要包含多条子路径。我们在绘制线条或未闭合图形时可以使用 lineCap属性来设置线条末端的样式。这个属性允许的三个值是:butt、round 和square(butt为默认值)。
<!DOCTYPE html>

<html lang="en">

<head>

    <meta charset="UTF-8">

    <title>设置lineCap属性</title>

    <style>

        canvas {border: thin solid orange;}

        body > * {float: left;}

    </style>

</head>

<body>

<canvas id="canvas" width="500" height="140">

    Your browser doesn't support the <code>canvas</code> element

</canvas>

<script type="application/javascript">

    var ctx = document.getElementById("canvas").getContext("2d");

    ctx.strokeStyle = "red";

    ctx.lineWidth = 2;

    ctx.beginPath();

    ctx.moveTo(0,50);

    ctx.lineTo(200,50);

    ctx.stroke();

    ctx.strokeStyle = "black";

    ctx.lineWidth = 40;

    var xpos = 50;

    var styles = ["butt","round","square"];

    for(var i=0;i<styles.length;i++){

        ctx.beginPath();

        ctx.lineCap = styles[i];

        ctx.moveTo(xpos,50);

        ctx.lineTo(xpos,150);

        ctx.stroke();

        xpos += 50;

    }

</script>

</body>

</html>
此例的脚本为每一种样式都绘制了一条非常粗的线。默认值作为参考线,用它演示 round和 square样式在绘制时会超过线条末端。

1.2 绘制矩形
rect 方法会给当前路径添加一条矩形的子路径。如果只需要一个单独的矩阵,那么之前介绍的 fillRect和 strokeRect方法是更合适的选择。如果需要给一个更复杂的图像添加矩形,rect方法就很有用了。
<!DOCTYPE html>

<html lang="en">

<head>

    <meta charset="UTF-8">

    <title>用rect方法绘制矩形</title>

    <style>

        canvas {border: thin solid orange;}

        body > * {float: left;}

    </style>

</head>

<body>

<canvas id="canvas" width="500" height="140">

    Your browser doesn't support the <code>canvas</code> element

</canvas>

<script type="application/javascript">

    var ctx = document.getElementById("canvas").getContext("2d");

    ctx.fillStyle = "yellow";

    ctx.strokeStyle = "red";

    ctx.lineWidth = ;

    ctx.beginPath();

    ctx.moveTo(,);

    ctx.lineTo(,);

    ctx.lineTo(,);

    ctx.closePath();

    ctx.rect(,,,);

    ctx.rect(,,,);

    ctx.fill();

    ctx.stroke();

</script>

</body>

</html>
使用rect方法时不需要moveTo方法,因为我们在此方法的前两个参数里已经指定了矩形的坐标。此例绘制了一对线条,调用closePath方法创建了一个三角形,然后绘制了两个邻接的矩形,此例显示效果如下:

子路径不一定需要相连才能组成路径。可以绘制几条分离的子路径,它们仍然会被视为同一个图形的组成部分。修改JavaScript代码如下:
<script type="application/javascript">

    var ctx = document.getElementById("canvas").getContext("2d");

    ctx.fillStyle = "yellow";

    ctx.strokeStyle = "red";

    ctx.lineWidth = 4;

    ctx.beginPath();

    ctx.moveTo(110,10);

    ctx.lineTo(110,100);

    ctx.lineTo(10,10);

    ctx.closePath();

    ctx.rect(,,,);

    ctx.rect(,,,);

    ctx.fill();

    ctx.stroke();

</script>
此例里的子路径之间并不相连,但总体结果仍然是一条单独的路径。当调用 stroke或 fill方法时,它们的效果会应用到所有创建的子路径上,其显示效果如下:

2. 绘制圆弧
我们使用 arc和 arcTo方法在画布上绘制圆弧,不过这两种方法绘制圆弧的方式有所不同。下表介绍了canvas里与圆弧有关的方法:

2.1 使用arcTo方法
下例演示了如何使用arcTo方法:
<!DOCTYPE html>

<html lang="en">

<head>

    <meta charset="UTF-8">

    <title>使用arcTo方法</title>

    <style>

        canvas {border: thin solid orange;}

        body > * {float: left;}

    </style>

</head>

<body>

<canvas id="canvas" width="500" height="140">

    Your browser doesn't support the <code>canvas</code> element

</canvas>

<script type="application/javascript">

    var ctx = document.getElementById("canvas").getContext("2d");

    var point1 = [100,10];

    var point2 = [200,10];

    var point3 = [200,110];

    ctx.fillStyle = "yellow";

    ctx.strokeStyle = "blue";

    ctx.lineWidth = 4;

    ctx.beginPath();

    ctx.moveTo(point1[0],point1[1]);

    ctx.arcTo(point2[],point2[],point3[],point3[],);

    ctx.stroke();

    drawPoint(point1[0],point1[1]);

    drawPoint(point2[0],point2[1]);

    drawPoint(point3[0],point3[1]);

    ctx.beginPath();

    ctx.moveTo(point1[0],point1[1]);

    ctx.lineTo(point2[0],point2[1]);

    ctx.lineTo(point3[0],point3[1]);

    ctx.stroke();

    function drawPoint(x,y){

        ctx.lineWidth = 1;

        ctx.strokeStyle = "red";

        ctx.strokeRect(x-2,y-2,4,4);

    }

</script>

</body>

</html>
arcTo方法绘制的圆弧依靠两条线完成。第一条是从上一条子路径的终点绘制到前两个方法参数所描述的点。第二条线是从前两个方法参数所描述的点绘制到第三个和第四个参数所描述的点。然后canvas会绘制从上一条子路径的终点到第二个点之间最短的一条圆弧,其半径由最后一个参数指定。为了让它便于理解,此例给画布添加了两条额外的路径来提供一些上下文信息,此例显示效果如下:

可以看到两条红色的线。此例指定了一个半径,两条线的长度也完全一致,这就意味着我们得到一条匀称的曲线,刚好触碰到上一条子路径的终点和第三个与第四个参数所描述的点。半径和线条长度并不总是具有如此方便的尺寸,所以canvas会根据需要调整所绘制的圆弧。演示例子如下,此例使用事件监控鼠标运动,在屏幕上的鼠标移动时为不同的点绘制圆弧:
<!DOCTYPE html>

<html lang="en">

<head>

    <meta charset="UTF-8">

    <title>响应鼠标绘制移动绘制圆弧</title>

    <style>

        canvas {border: thin solid orange;}

        body > * {float: left;}

    </style>

</head>

<body>

<canvas id="canvas" width="500" height="140">

    Your browser doesn't support the <code>canvas</code> element

</canvas>

<script type="application/javascript">

    var canvasElement = document.getElementById("canvas");

    var ctx = document.getElementById("canvas").getContext("2d");

    var point1 = [100,10];

    var point2 = [200,10];

    var point3 = [200,110];

    draw();

    canvasElement.onmousemove = function(e){

        if(e.ctrlKey){

            point1 = [e.clientX, e.clientY];

        }else if(e.shiftKey){

            point2 = [e.clientX, e.clientY];

        }else {

            point3 = [e.clientX, e.clientY];

        }

        ctx.clearRect(,,,);

        draw();

    }

    function draw(){

        ctx.fillStyle = "yellow";

        ctx.strokeStyle = "blue";

        ctx.lineWidth = 4;

        ctx.beginPath();

        ctx.moveTo(point1[0],point1[1]);

        ctx.arcTo(point2[0],point2[1],point3[0],point3[1],50);

        ctx.stroke();

        drawPoint(point1[0],point1[1]);

        drawPoint(point2[0],point2[1]);

        drawPoint(point3[0],point3[1]);

        ctx.beginPath();

        ctx.moveTo(point1[0],point1[1]);

        ctx.lineTo(point2[0],point2[1]);

        ctx.lineTo(point3[0],point3[1]);

        ctx.stroke();

    }

    function drawPoint(x,y){

        ctx.lineWidth = 1;

        ctx.strokeStyle = "red";

        ctx.strokeRect(x-2,y-2,4,4);

    }

</script>

</body>

</html>
根据按键的不同,此例中的脚本会随着鼠标运动不同的点。

2.2 使用arc方法
arc方法使用起来略微简单一些。用前两个方法参数在画布上指定一个点。用第三个参数指定圆弧的半径,然后指定圆弧的起始和结束角度。最后一个参数指定绘制圆弧时是按顺时针还是逆时针方向。示例如下:
<!DOCTYPE html>

<html lang="en">

<head>

    <meta charset="UTF-8">

    <title>使用arc方法</title>

    <style>

        canvas {border: thin solid orange;}

        body > * {float: left;}

    </style>

</head>

<body>

<canvas id="canvas" width="500" height="140">

    Your browser doesn't support the <code>canvas</code> element

</canvas>

<script type="application/javascript">

    var ctx = document.getElementById("canvas").getContext("2d");

    ctx.fillStyle = "yellow";

    ctx.lineWidth = 3;

    ctx.beginPath();

    ctx.arc(,,,,Math.PI*,true);

    ctx.stroke();

    ctx.beginPath();

    ctx.arc(,,,Math.PI/2,Math.PI,true);

    ctx.fill();

    ctx.stroke();

    ctx.beginPath();

    var val = ;

    for(var i=;i<;i++){

        ctx.arc(,,,val,val + Math.PI/4,false);

        val += Math.PI/2;

    }

    ctx.closePath();

    ctx.fill();

    ctx.stroke();

</script>

</body>

</html>
显示效果如下:
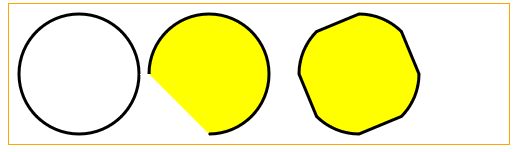
如第一个和第二个圆弧所示,我们可以用arc方法绘制完整的圆和普通圆弧。但是,如第三个圆形所示,我们可以用arc方法创建更为复杂的路径。如果使用arc方法时已经绘制了一条子路径,那么就会有一条线直接从上一条路径的终点绘制到arc方法前两个参数所描述的坐标上。这条线是额外添加到我们描述的圆弧上的。此例把这种特性和for循环结合使用,连接四小段围绕着同一点绘制的圆弧,从而实现上面展示的图形。
3. 绘制贝塞尔曲线
canvas支持绘制两种贝塞尔曲线:三次和两次。我们选择一个起点和一个终点,然后添加一个或多个控制点来形成曲线。canvas贝塞尔曲线的问题在于我们不能得到任何视觉反馈,这就更难以获得我们想要的曲线。下表展示了可以用来绘制曲线的方法:

3.1 绘制三次贝塞尔曲线
bezierCurveTo 方法会绘制一条曲线,范围是从上一条子路径的终点到第五个与第六个方法参数所指定的点。控制点有两个,它们由前四个参数指定。下面的例子展示了如何使用这个方法(并添加了一些额外路径以便能够更容易理解参数值与曲线之间的关系):
<!DOCTYPE html>

<html lang="en">

<head>

    <meta charset="UTF-8">

    <title>绘制三次贝塞尔曲线</title>

    <style>

        canvas {border: thin solid orange;}

        body > * {float: left;}

    </style>

</head>

<body>

<canvas id="canvas" width="500" height="140">

    Your browser doesn't support the <code>canvas</code> element

</canvas>

<script type="application/javascript">

    var canvasElement = document.getElementById("canvas");

    var ctx = canvasElement.getContext("2d");

    var startPoint = [50,100];

    var endPoint = [400,100];

    var cp1 = [250,50];

    var cp2 = [350,50];

    canvasElement.onmousemove = function(e){

        if(e.shiftKey){

            cp1 = [e.clientX, e.clientY];

        }else if(e.ctrlKey){

            cp2 = [e.clientX, e.clientY];

        }

        ctx.clearRect(0,0,500,140);

        draw();

    }

    draw();

    function draw(){

        ctx.lineWidth = 3;

        ctx.strokeStyle = "black";

        ctx.beginPath();

        ctx.moveTo(startPoint[0],startPoint[1]);

        ctx.bezierCurveTo(cp1[],cp1[],cp2[],cp2[],endPoint[],endPoint[]);

        ctx.stroke();

        ctx.lineWidth = 1;

        ctx.strokeStyle = "red";

        var points = [startPoint,endPoint,cp1,cp2];

        for(var i=0;i<points.length;i++){

            drawPoint(points[i]);

        }

        drawLine(startPoint,cp1);

        drawLine(endPoint,cp2);

    }

    function drawPoint(point){

        ctx.beginPath();

        ctx.strokeRect(point[0]-1,point[1]-2,4,4);

    }

    function drawLine(from,to){

        ctx.beginPath();

        ctx.moveTo(from[0],from[1]);

        ctx.lineTo(to[0],to[1]);

        ctx.stroke();

    }

</script>

</body>

</html>
此例的脚本会响应鼠标运动而移动贝塞尔曲线上的控制点。其效果如下:

3.2 绘制二次贝塞尔曲线
二次贝塞尔曲线只有一个控制点,因此 quadraticCurveTo 方法的参数比 bezierCurveTo 方法要少两个。修改上面例子脚本中的draw 函数如下:
    function draw(){

        ctx.lineWidth = 3;

        ctx.strokeStyle = "black";

        ctx.beginPath();

        ctx.moveTo(startPoint[0],startPoint[1]);

        ctx.quadraticCurveTo(cp1[0],cp1[1],cp2[0],cp2[1]);

        ctx.stroke();

        ctx.lineWidth = 1;

        ctx.strokeStyle = "red";

        var points = [startPoint,endPoint,cp1,cp2];

        for(var i=0;i<points.length;i++){

            drawPoint(points[i]);

        }

        drawLine(startPoint,cp1);

        drawLine(endPoint,cp2);

    }
其显示效果如下:

4. 创建剪辑区域
前面有介绍可以用stroke 和fill 方法来绘制或填充一条路径。还有另一种方式可以做到这一点。

一旦定义了一块剪裁区域,就只有区域内的路径才会显示到屏幕上了。
<!DOCTYPE html>

<html lang="en">

<head>

    <meta charset="UTF-8">

    <title>使用剪裁区域</title>

    <style>

        canvas {border: thin solid orange;}

        body > * {float: left;}

    </style>

</head>

<body>

<canvas id="canvas" width="500" height="140">

    Your browser doesn't support the <code>canvas</code> element

</canvas>

<script type="application/javascript">

    var canvasElement = document.getElementById("canvas");

    var ctx = canvasElement.getContext("2d");

    ctx.fillStyle = "yellow";

    ctx.beginPath();

    ctx.rect(0,0,500,140);

    ctx.fill();

    ctx.beginPath();

    ctx.rect(,,,);

    ctx.clip();

    ctx.fillStyle = "red";

    ctx.beginPath();

    ctx.rect(0,0,500,140);

    ctx.fill();

</script>

</body>

</html>
此例的脚本绘制了一个填满画布的矩形,然后创建了一个较小的剪裁区域并绘制了另一个填满画布的矩形。从下图可以看到,第二个矩形只绘制了剪裁区域之内的部分。

5. 绘制文本
可以在画布上绘制文本,不过对这种功能的支持还很初步。下表展示了可用的方法。

我们可以使用三种绘制状态属性来控制文本绘制的方式:

下面的例子展示了如何填充和描边文本。我们可以用与CSS字体简写属性相同的格式字符串来指定font属性的值:
<!DOCTYPE html>

<html lang="en">

<head>

    <meta charset="UTF-8">

    <title>在画布上绘制文本</title>

    <style>

        canvas {border: thin solid orange;}

        body > * {float: left;}

    </style>

</head>

<body>

<canvas id="canvas" width="500" height="140">

    Your browser doesn't support the <code>canvas</code> element

</canvas>

<script type="application/javascript">

    var ctx = document.getElementById("canvas").getContext("2d");

    ctx.fillStyle = "lightgrey";

    ctx.strokeStyle = "black";

    ctx.lineWidth = 3;

    ctx.font = "100px sans-serif";

    ctx.fillText("Hello",,);

    ctx.strokeText("Hello",,);

    ctx.fillText("Luka",,);

    ctx.strokeText("Chao",,);

</script>

</body>

</html>
此例效果如下:

6. 使用特效和变换
我们可以为画布应用许多特效和变换。
6.1 使用阴影
可以用四种绘制状态属性来给在画布上绘制的图形和文本添加阴影。

<!DOCTYPE html>

<html lang="en">

<head>

    <meta charset="UTF-8">

    <title>给图形和文本应用阴影</title>

    <style>

        canvas {border: thin solid orange;}

        body > * {float: left;}

    </style>

</head>

<body>

<canvas id="canvas" width="500" height="140">

    Your browser doesn't support the <code>canvas</code> element

</canvas>

<script type="application/javascript">

    var ctx = document.getElementById("canvas").getContext("2d");

    ctx.fillStyle = "lightgrey";

    ctx.strokeStyle = "red";

    ctx.lineWidth = 3;

    ctx.shadowOffsetX = ;

    ctx.shadowOffsetY = ;

    ctx.shadowBlur = ;

    ctx.shadowColor = "blue";

    ctx.strokeRect(250,20,100,100);

    ctx.beginPath();

    ctx.arc(420,70,50,0,Math.PI,true);

    ctx.stroke();

    ctx.beginPath();

    ctx.arc(420,80,40,0,Math.PI,false);

    ctx.fill();

    ctx.font = "100px sans-serif";

    ctx.fillText("Hello",10,100);

    ctx.strokeText("Hello",10,100);

</script>

</body>

</html>
此例的显示效果如下所示,各个文本图形都应用了阴影。所有无论图形时开放、闭合、填充还是描边,都能应用阴影。

6.2 使用透明度
可以用两种方式来给我们绘制的文本和图形设置透明度。第一种是使用rgba函数(不是rgb)指定一个fillStyle 或strokeStyle 值。还可以使用绘制状态属性globalAlpha,它应用的透明度是全局性的。
<!DOCTYPE html>

<html lang="en">

<head>

    <meta charset="UTF-8">

    <title>使用globalAlpha属性</title>

    <style>

        canvas {border: thin solid orange;}

        body > * {float: left;}

    </style>

</head>

<body>

<canvas id="canvas" width="500" height="140">

    Your browser doesn't support the <code>canvas</code> element

</canvas>

<script type="application/javascript">

    var ctx = document.getElementById("canvas").getContext("2d");

    ctx.fillStyle = "lightgrey";

    ctx.strokeStyle = "black";

    ctx.lineWidth = 3;

    ctx.font = "100px sans-serif";

    ctx.fillText("Hello",10,100);

    ctx.strokeText("Hello",10,100);

    ctx.fillStyle = "red";

    ctx.globalAlpha = 0.5;

    ctx.fillRect(100,10,150,100);

</script>

</body>

</html>
globalAlpha 属性的值可以从0(完全透明)到1(完全不透明,这是默认值)。此例绘制了一些文本,将globalAlpha 属性设为0.5,然后在文字上部分填充了一个矩形,其显示效果如下:

6.3 使用合成
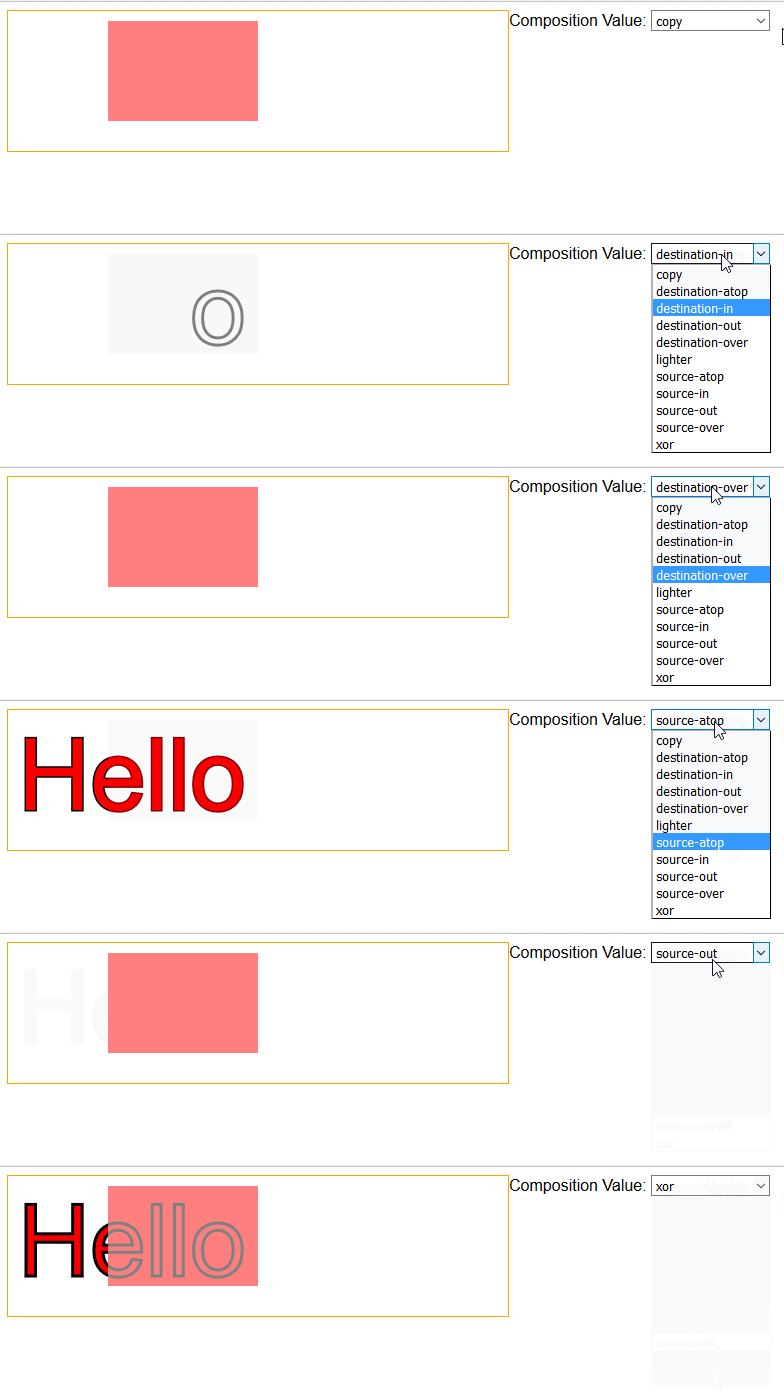
可以将透明度与globalCompositeOperation属性结合使用,来控制图形和文本在画布上绘制的方式。下表介绍了这个属性允许的值。对于这个属性来说,source 包括了在该属性设置后执行的所有操作,而目标图像是属性设置时画布状态。

globalCompositeOperation 属性的值可以创造出一些引人注目的效果。下面的例子包含了一个select元素,它里面的选项囊括了所有的合成属性值。
<!DOCTYPE html>

<html lang="en">

<head>

    <meta charset="UTF-8">

    <title>使用globalCompositeOperation属性</title>

    <style>

        canvas {border: thin solid orange;}

        body > * {float: left;}

    </style>

</head>

<body>

<div>

<canvas id="canvas" width="500" height="140">

    Your browser doesn't support the <code>canvas</code> element

</canvas>

</div>

<div>

<label>Composition Value:</label>

<select id="list">

    <option>copy</option>

    <option>destination-atop</option>

    <option>destination-in</option>

    <option>destination-out</option>

    <option>destination-over</option>

    <option>lighter</option>

    <option>source-atop</option>

    <option>source-in</option>

    <option>source-out</option>

    <option>source-over</option>

    <option>xor</option>

</select>

</div>

<script type="application/javascript">

    var ctx = document.getElementById("canvas").getContext("2d");

    ctx.fillStyle = "lightgrey";

    ctx.strokeStyle = "black";

    ctx.lineWidth = 3;

    var compVal = "copy";

    document.getElementById("list").onchange = function(e){

        compVal = e.target.value;

        draw();

    }

    draw();

    function draw(){

        ctx.clearRect(0,0,300,120);

        ctx.globalAlpha = 1.0;

        ctx.font = "100px sans-serif";

        ctx.fillText("Hello",10,100);

        ctx.strokeText("Hello",10,100);

        ctx.globalCompositeOperation = compVal;

        ctx.fillStyle = "red";

        ctx.globalAlpha = 0.5;

        ctx.fillRect(100,10,150,100);

    }

</script>

</body>

</html>
其显示效果如下,有些浏览器解释这些样式的方式稍有不同,因此看到的可能与图中这是展示的不完全一致。
6.4 使用变换
我们可以给画布应用变换,它会应用到后续所有的绘制操作上。

这些方法创建的变换只会应用到后续的绘图操作上(画布上现有的内容保持不变)。下面的例子展示了如何使用缩选择和坐标重映射方法。
<!DOCTYPE html>

<html lang="en">

<head>

    <meta charset="UTF-8">

    <title>使用变换</title>

    <style>

        canvas {border: thin solid orange;}

        body > * {float: left;}

    </style>

</head>

<body>

<div>

    <canvas id="canvas" width="500" height="140">

        Your browser doesn't support the <code>canvas</code> element

    </canvas>

</div>

<script type="application/javascript">

    var ctx = document.getElementById("canvas").getContext("2d");

    ctx.fillStyle = "lightgrey";

    ctx.strokeStyle = "black";

    ctx.lineWidth = 3;

    ctx.clearRect(0,0,300,120);

    ctx.globalAlpha = 1.0;

    ctx.font = "100px sans-serif";

    ctx.fillText("Hello",10,100);

    ctx.strokeText("Hello",10,100);

    ctx.scale(1.3,1.3);

    ctx.translate(,-);

    ctx.rotate(0.5);

    ctx.fillStyle = "red";

    ctx.globalAlpha = 0.5;

    ctx.fillRect(100,10,150,100);

    ctx.strokeRect(0,0,300,200);

</script>

</body>

</html>
此例填充并描边了一些文本,然后缩放、坐标重映射和旋转了画布,这些操作影响了接下来绘制的实现矩形和空心矩形。其显示效果如下:

来源:《HTML5权威指南》(《The Definitive Guide to HTML5》)
【高级功能】使用canvas元素(第二部分)的更多相关文章
- 【高级功能】使用canvas元素(第一部分)
1. 开始使用 canvas 元素 canvas 元素非常简单,这是指它所有的功能都体现在一个JavaScript对象上,因此该元素本身只有两个属性:width 和 height. canvas 元素 ...
- 【温故而知新-Javascript】使用canvas元素(第二部分)
本文将继续介绍canvas的功能,展示如何绘制更复杂的图形(包括圆弧和曲线),如何使用剪裁区域来限制操作以及如何绘制文本.还是介绍可以应用在画布上的特效和变换,包括阴影.透明度.旋转和坐标重映射. 1 ...
- 【温故而知新-Javascript】使用canvas元素(第一部分)
1. 开始使用 canvas 元素 canvas 元素非常简单,这是指它所有的功能都体现在一个JavaScript对象上,因此该元素本身只有两个属性:width 和 height. canvas 元素 ...
- html5 canvas元素使用(一)
html5新增了一个canvas元素,用于在网页上生成一块矩形区域,用于绘制图像,功能非常强大,下面我来简单介绍一下 在页面中添加canvas <canvas id="canvasDe ...
- canvas元素
一.canvas元素的基础知识 canvas元素是html5中新增的一个重要的元素,专门用来绘制图形.在页面上放置了一个canvas元素,就相当于在页面上放置了一块"画布",可以在 ...
- Jexus高级功能设置
我们对服务器软件Jexus作了简单的介绍,同时我们也对Jexus的整体配置作了详细的讲解,介绍了Jexus的进程守护工具"jws.guard",相信各位读者对于Jexus应该已经有 ...
- 【高级功能】使用 Ajax
Ajax 是现代Web 应用程序开发的一项关键工具.它让你能向服务器异步发送和接收数据,然后用 Javascript 解析. Ajax 是 Asynchronous JavaScript and XM ...
- Python爬虫之selenium高级功能
Python爬虫之selenium高级功能 原文地址 表单操作 元素拖拽 页面切换 弹窗处理 表单操作 表单里面会有文本框.密码框.下拉框.登陆框等. 这些涉及与页面的交互,比如输入.删除.点击等. ...
- MVC5 Entity Framework学习之Entity Framework高级功能(转)
在之前的文章中,你已经学习了如何实现每个层次结构一个表继承.本节中你将学习使用Entity Framework Code First来开发ASP.NET web应用程序时可以利用的高级功能. 在本节中 ...
随机推荐
- ux.form.field.Verify 验证码控件
//验证码控件 Ext.define('ux.form.field.Verify', { extend: 'Ext.container.Container', alias: ['widget.fiel ...
- java.lang.NullPointerException
你妹的这是什么错误啊? Errors occurred during the build. Errors running builder 'Android Resource Manager' on p ...
- Node快速安装
1.安装nvm nvm是一个快速安装和切换nodejs版本的管理器 直接从 github clone nvm 到本地, 这里假设大家都使用 ~/git 目录存放 git 项目: $ cd ~/git ...
- php随机密码函数的实例代码
php随机密码函数的入门例子 时间:2015-12-16 20:42:48来源:网络 导读:php生成随机密码的函数实例,php生成随机密码的函数,生成数字.大小写字母与特殊字符组合的随机密码. ...
- JavaScript的9个陷阱及评点
1. 最后一个逗号 如这段代码,注意最后一个逗号,按语言学角度来说应该是不错的(python的类似数据类型辞典dictionary就允许如此).IE会报语法错误,但语焉不详,你只能用人眼从几千行代码中 ...
- sql: 查找约束
主键约束 SELECT tab.name AS [表名], idx.name AS [主键名称], col.name AS [主键列名] FROM sys.indexes idx ...
- 发布大幅重构优化的 TouchVG 1.0.2
发布大幅重构优化的 TouchVG 1.0.2,支持SVG.多模块扩展结构,欢迎评阅改进.提交pull request. https://github.com/rhcad/touchvg 关于 Tou ...
- 【原创】C#搭建足球赛事资料库与预测平台(5) 赔率数据表设计1
本博客所有文章分类的总目录:http://www.cnblogs.com/asxinyu/p/4288836.html 开源C#彩票数据资料库系列文章总目录:http://www.cn ...
- [ML] Naive Bayes for email classification
20 Newsgroups (Original) Author: Jeffrey H 1. Introduction This is only a test report for naive baye ...
- [Node.js] 也说this
原文地址:http://www.moye.me/2014/11/21/也说this/ 引子 Any sufficiently advanced technology is indistinguisha ...