Vue项目中使用基于Vue.js的移动组件库cube-ui
cube-ui 是滴滴公司的技术团队基于 Vue.js 实现的精致移动端组件库。很赞,基本场景是够用了,感谢开源!感谢默默奉献的你们。
刚爬完坑,就来总结啦!!希望对需要的朋友有小小的帮助。
(一)创建一个vue项目
(1) (安装全局vue-cli,通过vue -V查看版本)
npm install -g vue-cli
(2)vue init 你用的模板工具 项目名称 (这里采用webpack作为模板工具)
vue init webpack cubeUiPro
(根据选项填写或者选择,可以按enter键进入下一步)如下图 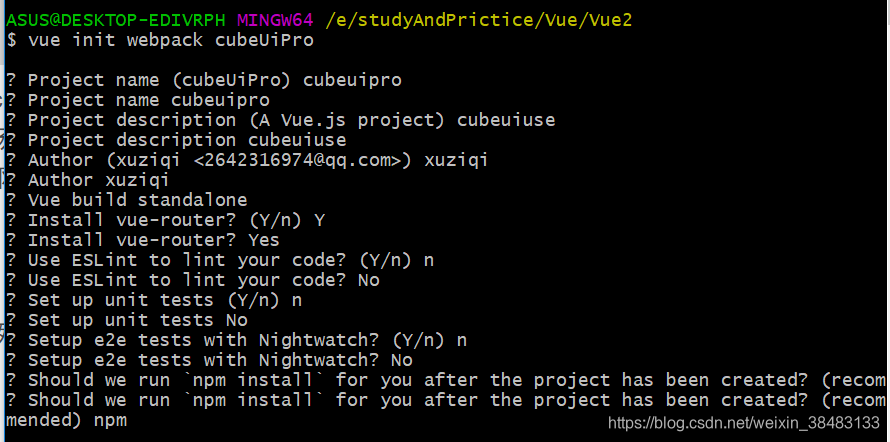
(3)安装成功后进入你的项目目录
cd cubeUiPro
(4) 启动项目啦
npm run dev
(二)安装cube-ui
建议大家先看看官网快速上手怎么说:https://didi.github.io/cube-ui/#/zh-CN/docs/introduction
安装:(注意:此安装部分只针对于 vue-cli < 3 的情况,vue -V查看你的版本去,cue-cli>3的请移步官网哦)
npm install cube-ui --save
cube-ui 搭配 webpack 2+ 支持后编译和普通编译 2 种构建方式(默认使用后编译),使用前都需要修改应用的依赖和配置。
- 后编译
(1)修改 package.json 并安装依赖
{

  // webpack-transform-modules-plugin 依赖 transformModules

  "transformModules": {

    "cube-ui": {

      "transform": "cube-ui/src/modules/${member}",

      "kebabCase": true

    }

  },

  "devDependencies": {

    // 新增 stylus 相关依赖

    "stylus": "^0.54.5",

    "stylus-loader": "^2.1.1",

    "webpack-post-compile-plugin": "^0.4.1",

    "webpack-transform-modules-plugin": "^0.3.5"

  }

}
(2)修改 webpack.base.conf.js
var PostCompilePlugin = require('webpack-post-compile-plugin')

var TransformModulesPlugin = require('webpack-transform-modules-plugin')

module.exports = {

  // ...

  plugins: [

    // ...

    new PostCompilePlugin(),

    new TransformModulesPlugin()

  ]

  // ...

}
(3)修改 build/utils.js 中的 exports.cssLoaders 函数
exports.cssLoaders = function (options) {

  // ...

  const stylusOptions = {

    'resolve url': true

  }

  // https://vue-loader.vuejs.org/en/configurations/extract-css.html

  return {

    css: generateLoaders(),

    postcss: generateLoaders(),

    less: generateLoaders('less'),

    sass: generateLoaders('sass', { indentedSyntax: true }),

    scss: generateLoaders('sass'),

    stylus: generateLoaders('stylus', stylusOptions),

    styl: generateLoaders('stylus', stylusOptions)

  }

}
(4)修改 vue-loader.conf.js
module.exports = {

  loaders: utils.cssLoaders({

    sourceMap: sourceMapEnabled,

    extract: false

  }),

  // ...

}
具体参见 https://github.com/vuejs-templates/webpack/pull/970/files
(5)index.html中引入以下文件
<script src="https://unpkg.com/cube-ui/lib/cube.min.js"></script>

<link rel="stylesheet" href="https://unpkg.com/cube-ui/lib/cube.min.css">
到此为止后编译配置完毕,用后编译就后编译哦,普通编译和后编译不能混着配置,就是说你不能既要配置普通编译还要配置后编译,会报错哒(作为一个过来人的忠告,嘻嘻),下面看看普通编译
- 普通编译
(1)修改 package.json 并安装依赖
{

  // webpack-transform-modules-plugin 依赖 transformModules

  "transformModules": {

    "cube-ui": {

      "transform": "cube-ui/lib/${member}",

      "kebabCase": true,

      "style": {

        "ignore": ["create-api", "better-scroll", "locale"]

      }

    }

  },

  "devDependencies": {

    "webpack-transform-modules-plugin": "^0.3.5"

  }

}
(2)修改 webpack 配置:
// webpack.config.js

var TransformModulesPlugin = require('webpack-transform-modules-plugin')

module.exports = {

  // ...

  resolve: {

    // ...

    alias: {

      // ...

      'cube-ui': 'cube-ui/lib'

      // ...

    }

    // ...

  }

  // ...

  plugins: [

    // ...

    new TransformModulesPlugin()

  ]

  // ...

}
(3)同样的要引入CDN文件到index.html中
<script src="https://unpkg.com/cube-ui/lib/cube.min.js"></script>

<link rel="stylesheet" href="https://unpkg.com/cube-ui/lib/cube.min.css">
(三)使用
全部引入(推荐,简单粗暴(嘻嘻))
一般在入口文件main.js中:
import Vue from 'vue'

import Cube from 'cube-ui'

Vue.use(Cube)
按需引入这里就暂时不介绍了哦,可以到官网看看哦,下面是个例子
- 案例
<template>

  <cube-button @click="showDialog">show dialog</cube-button>

</template>

<script>

  export default {

    methods: {

      showDialog() {

        this.$createDialog({

          type: 'alert',

          title: 'Alert',

          content: 'dialog content'

        }).show()

      }

    }

  }

</script>
运行你的项目看看是不是ok啦,以上是本文的全部内容,菜鸟总结,希望大神多多指点哦
Vue项目中使用基于Vue.js的移动组件库cube-ui的更多相关文章
- RSuite 一个基于 React.js 的 Web 组件库
RSuite http://rsuite.github.io RSuite 是一个基于 React.js 开发的 Web 组件库,参考 Bootstrap 设计,提供其中常用组件,支持响应式布局. 我 ...
- Vue项目中如何引用外部js
第一种方法:(感觉这个有问题) 1.把需要的js放到static文件夹下 2.在Index.html页面引入 3.在webpack.base.conf.js添加下面代码 externals: { 'W ...
- vue项目中引入mui.poppicker.js文件时报错“Uncaught ReferenceError: mui is not defined”
解决:在mui.js的源文件后最后加上 window.mui = mui;
- 在vue项目中使用element-ui的Upload上传组件
<el-upload v-else class='ensure ensureButt' :action="importFileUrl" :data="upLoadD ...
- 在vue项目中使用canvas-nest.js,报parameter 1 is not of type 'Element'
canvas-nest.js是一款轻量的网页特效,如图: github地址:https://github.com/hustcc/canvas-nest.js 在普通的html项目中,只要将<sc ...
- 在vue项目中使用axios发送FormData
这个是axios的中文文档,挺详细的: https://www.kancloud.cn/luponu/axios/873153 文档中的 使用 application/x-www-form-ur ...
- <转载> VUE项目中CSS管理
vue的scoped 在vue项目中,当 .vue文件中 <style> 标签有 *scoped 属性时,它的 CSS 只作用于当前组件中的元素,很好的实现了样式私有化的目的. 使用sco ...
- Vue项目中使用Vuex + axios发送请求
本文是受多篇类似博文的影响写成的,内容也大致相同.无意抄袭,只是为了总结出一份自己的经验. 一直以来,在使用Vue进行开发时,每当涉及到前后端交互都是在每个函数中单独的写代码,这样一来加大了工作量,二 ...
- vue项目中net::ERR_CONNECTION_TIMED_OUT错误
我出错的原因时network地址与我本机ip地址不一致 Network: http://192.168.13.30:8080/ 处理方法: 在vue项目中新建一个vue.config.js文件 配置上 ...
随机推荐
- token
18f9nWvThC274lo3USjgfeldynt0t/r/w0yjLbj9 http://app-static.acc5.com/app/testpost.php
- 为什么很多IT公司不喜欢进过培训机构的人呢?
转载原文链接:https://www.cnblogs.com/alex3714/p/9105765.html 这几天在知乎看到一个问题“为什么很多IT公司不喜欢进过培训机构的人呢?” 身为老男孩的教学 ...
- Java面试准备之探究源码
摘要:之前虽然对集合框架一些知识点作了总结,但是想想面试可能会问源码,于是又大致研究了一下集合框架的一些实现类的源码,在此整理一下. 一.集合框架 二.深究实现类 1.ArrayList源码实现 Ar ...
- Leetcode 226. Invert Binary Tree(easy)
Invert a binary tree. 4 / \ 2 7 / \ / \ 1 3 6 9 to 4 / \ 7 2 / \ / \ 9 6 3 1 Trivia:This problem was ...
- C# Note38: Export data into Excel
Microsoft.Office.Interop.Excel You have to have Excel installed. Add a reference to your project to ...
- SpringBoot 统一时区的方案
系统采用多时区设计的时候,往往我们需要统一时区,需要统一的地方如下: 服务器(Tomcat服务) 数据库(JPA + Hibernate) 前端数据(前端采用Vuejs) 思路为:将数据库和服务器的时 ...
- map遍历性能记录
map遍历可以通过keySet或者entrySet方式. 性能上:entrySet略胜一筹,原因是keySet获取到key后再根据key去获取value,在查一遍,所以慢一些. keySet: //先 ...
- Shell命令-线上查询及帮助之man、help
线上查询及帮助 - man.help 1.man:获取命令的帮助信息 man命令的简单介绍 man命令是Linux系统中最核心的命令之一 ,因为通过它可以查看其它Linux命令的使用信息.当然了 ,m ...
- Jupyter Notebook(推荐使用Anaconda安装)
一.Jupyter Notebook介绍 1.简介 Jupyter Notebook是基于网页的用于交互计算的应用程序.其可被应用于全过程计算:开发.文档编写.运行代码和展示结果. 简而言之,Jupy ...
- Routing 为 Magento 2 一个重要的部分,本文介绍基本应用
Routing 为 Magento 2 一个重要的部分,本文介绍基本应用 Magento 2请求的流程 在Magento 2中,请求URL将如下所示: http://example.com/index ...