MongoDB 及 scrapy 应用
0
1.Scrapy 使用 MongoDB
https://doc.scrapy.org/en/latest/topics/item-pipeline.html#write-items-to-mongodb
Write items to MongoDB
In this example we’ll write items to MongoDB using pymongo. MongoDB address and database name are specified in Scrapy settings; MongoDB collection is named after item class.
The main point of this example is to show how to use from_crawler() method and how to clean up the resources properly.:
import pymongo

class MongoPipeline(object):

    collection_name = 'scrapy_items'

    def __init__(self, mongo_uri, mongo_db):

        self.mongo_uri = mongo_uri

        self.mongo_db = mongo_db

    @classmethod

    def from_crawler(cls, crawler):

        return cls(

            mongo_uri=crawler.settings.get('MONGO_URI'),

            mongo_db=crawler.settings.get('MONGO_DATABASE', 'items')

        )

    def open_spider(self, spider):

        self.client = pymongo.MongoClient(self.mongo_uri)

        self.db = self.client[self.mongo_db]

    def close_spider(self, spider):

        self.client.close()

    def process_item(self, item, spider):

        self.db[self.collection_name].insert_one(dict(item))

        return item
2.MongoDB Tutorial
https://api.mongodb.com/python/current/tutorial.html
建立文件夹并运行 MongoDB instance
C:\Users\win7>mongod --dbpath e:\mongodb\db
连接数据库
from pymongo import MongoClient

client = MongoClient()

# client = MongoClient('localhost', 27017)

# client = MongoClient('mongodb://localhost:27017/')

db = client.test_database

# db = client['test-database']
collection(等同于table) 插入一个个 document
posts = db.posts

# posts = db['posts']

import datetime

post = {"author": "Mike",

        "text": "My first blog post!",

        "tags": ["mongodb", "python", "pymongo"],

        "date": datetime.datetime.utcnow()}

post2 = {"author": "Martin",

        "text": "My second blog post!",

        "tags": ["mongodb", "python", "pymongo"],

        "date": datetime.datetime.utcnow()}

post_id = posts.insert_one(post).inserted_id  #其实等于 result =posts.insert_one(post) 再 post_id = result.inserted_id, 而 insert_many 则是 inserted_ids 返回一个list
posts.insert_one(post2)
允许插入重复 document
插入之后自动更新了 post3,再次执行 posts.insert_one(post3) 提示 ObjectId 重复
如果插入 post3 之前执行了 post4 = post3.copy() 其实可以插入相同内容
In [689]: post3 = {"author": "Mike",

     ...:         "text": "My first blog post!",

     ...:         "tags": ["mongodb", "python", "pymongo"],

     ...:         "date": datetime.datetime.utcnow()}

In [690]: posts.insert_one(post3)

Out[690]: <pymongo.results.InsertOneResult at 0xb803788>

In [691]: post3

Out[691]:

{'_id': ObjectId('59e57919fca565500c8e3692'),

 'author': 'Mike',

 'date': datetime.datetime(2017, 10, 17, 3, 29, 14, 966000),

 'tags': ['mongodb', 'python', 'pymongo'],

 'text': 'My first blog post!'}
检查确认:
db.collection_names(include_system_collections=False) posts.count() import pprint
pprint.pprint(posts.find_one()) #满足限制条件,而且仅限一条。不设条件也即get the first document from the posts collection posts.find_one({"author": "Mike"}) for i in posts.find(): #find()returns aCursorinstance, which allows us to iterate over all matching documents. 返回 Cursor 迭代器,同样支持 posts.find({"author": "Mike"})
print i
c:\program files\anaconda2\lib\site-packages\pymongo\cursor.py
A cursor / iterator over Mongo query results.
In [707]: posts.find()

Out[707]: <pymongo.cursor.Cursor at 0x118a62b0>

In [708]: a=posts.find()

In [709]: a?

Type:           Cursor

String form:    <pymongo.cursor.Cursor object at 0x00000000116C6208>

File:           c:\program files\anaconda2\lib\site-packages\pymongo\cursor.py

Docstring:

A cursor / iterator over Mongo query results.

Init docstring:

Create a new cursor.

Should not be called directly by application developers - see

:meth:`~pymongo.collection.Collection.find` instead.

.. mongodoc:: cursors
关于编码:
MongoDB stores data in BSON format. BSON strings are UTF-8 encoded
PyMongo decodes each BSON string to a Python unicode string, not a regular str.
存储时 str 不变,unicode 自动编码为 utf-8
输出统一解码为 unicode
post = {"author": "Mike",

{u'_id': ObjectId('...'),

 u'author': u'Mike',
Bulk Inserts 批量插入多条文档,每条文档可以不同 field,因此又称 schema-free
>>> new_posts = [{"author": "Mike",

...               "text": "Another post!",

...               "tags": ["bulk", "insert"],

...               "date": datetime.datetime(2009, 11, 12, 11, 14)},

...              {"author": "Eliot",

...               "title": "MongoDB is fun",

...               "text": "and pretty easy too!",

...               "date": datetime.datetime(2009, 11, 10, 10, 45)}]

>>> result = posts.insert_many(new_posts)

>>> result.inserted_ids

[ObjectId('...'), ObjectId('...')]
查询数量:
posts.count()

posts.find({"author": "Mike"}).count()
##Range Queries 高级查询
##Indexing 索引
#Aggregation Examples 聚合
https://api.mongodb.com/python/current/examples/aggregation.html
from pymongo import MongoClient

db = MongoClient().aggregation_example

result = db.things.insert_many([{"x": 1, "tags": ["dog", "cat"]},

                                {"x": 2, "tags": ["cat"]},

                                {"x": 2, "tags": ["mouse", "cat"]},

                                {"x": 3, "tags": []}])

result.inserted_ids
OperationFailure: $sort key ordering must be 1 (for ascending) or -1 (for descending)
from bson.son import SON

pipeline = [

    {"$unwind": "$tags"},  # tags 字段是一个 array,松绑

    {"$group": {"_id": "$tags", "count": {"$sum": 1}}},  #按照 tag 分组,即为唯一值

    {"$sort": SON([("count", -1), ("_id", 1)])}  #先按 count 降序,再按 _id 升序

]
SON 有序字典
In [773]: SON?

Init signature: SON(cls, *args, **kwargs)

Docstring:

SON data.

A subclass of dict that maintains ordering of keys and provides a

few extra niceties for dealing with SON. SON objects can be

converted to and from BSON.
In [779]: db.things.aggregate(pipeline)

Out[779]: <pymongo.command_cursor.CommandCursor at 0x118a6cc0>

In [780]: list(db.things.aggregate(pipeline))  #list(迭代器)

Out[780]:

[{u'_id': u'cat', u'count': 3},

 {u'_id': u'dog', u'count': 1},

 {u'_id': u'mouse', u'count': 1}]
Map/Reduce
Copying a Database 复制备份数据库
https://api.mongodb.com/python/current/examples/copydb.html#copying-a-database
from pymongo import MongoClient

client = MongoClient()

client.admin.command('copydb',

                    fromdb='test_database',

                    todb='test_database_bak')

#{u'ok': 1.0}
跨服务器以及密码认证,见原文。
#Bulk Write Operations 批处理 InsertOne, DeleteMany, ReplaceOne, UpdateOne
Bulk Insert
https://api.mongodb.com/python/current/examples/bulk.html
import pymongo

db = pymongo.MongoClient().bulk_example

db.test.insert_many([{'i': i} for i in range(10000)]).inserted_ids

db.test.count()
Mixed Bulk Write Operations
1/2 Ordered Bulk Write Operations
Ordered bulk write operations are batched and sent to the server in the order provided for serial execution. 按照顺序执行操作
from pprint import pprint

from pymongo import InsertOne, DeleteMany, ReplaceOne, UpdateOne  #类

result = db.test.bulk_write([  #根据帮助:也可写成 requests = [InsertOne({'y': 1}),]

    DeleteMany({}),   #类实例

    InsertOne({'_id': 1}),

    InsertOne({'_id': 2}),

    InsertOne({'_id': 3}),

    UpdateOne({'_id': 1}, {'$set': {'foo': 'bar'}}),

    UpdateOne({'_id': 4}, {'$inc': {'j': 1}}, upsert=True),  #没有则插入

    ReplaceOne({'j': 1}, {'j': 2})])  #也可满足 {'j': 2}, 替换为{'i': 5}

pprint(result.bulk_api_result)
#{'nInserted': 3,
#'nMatched': 2,
#'nModified': 2,
#'nRemoved': 4,
#'nUpserted': 1,
#'upserted': [{u'_id': 4, u'index': 5}],
#'writeConcernErrors': [],
#'writeErrors': []}
for i in db.test.find():

    print i

#{u'_id': 1, u'foo': u'bar'}

#{u'_id': 2}

#{u'_id': 3}

#{u'_id': 4, u'j': 2}
清空col
In [844]: r=db.test.delete_many({})

In [845]: r.deleted_count

Out[845]: 4
删除col
In [853]: db.name

Out[853]: u'bulk_example'

In [855]: db.collection_names()

Out[855]: [u'test']

In [860]: db.test.drop() #无返回,不报错,建议用下面的

In [861]: db.drop_collection('test')

Out[861]:

{u'code': 26,

 u'codeName': u'NamespaceNotFound',

 u'errmsg': u'ns not found',

 u'ok': 0.0}
The first write failure that occurs (e.g. duplicate key error) aborts the remaining operations, and PyMongo raises BulkWriteError. 出错则中止后续操作。
>>> from pymongo import InsertOne, DeleteOne, ReplaceOne

>>> from pymongo.errors import BulkWriteError

>>> requests = [

...     ReplaceOne({'j': 2}, {'i': 5}),

...     InsertOne({'_id': 4}),  # Violates the unique key constraint on _id.

...     DeleteOne({'i': 5})]

>>> try:

...     db.test.bulk_write(requests)

... except BulkWriteError as bwe:

...     pprint(bwe.details)

...

{'nInserted': 0,

 'nMatched': 1,

 'nModified': 1,

 'nRemoved': 0,

 'nUpserted': 0,

 'upserted': [],

 'writeConcernErrors': [],

 'writeErrors': [{u'code': 11000,

                  u'errmsg': u'...E11000...duplicate key error...',

                  u'index': 1,

                  u'op': {'_id': 4}}]}
2/2 Unordered Bulk Write Operations 并行无序操作,最后报告出错的部分操作
db.test.bulk_write(requests, ordered=False)
#Datetimes and Timezones
https://api.mongodb.com/python/current/examples/datetimes.html
避免使用本地时间 datetime.datetime.now()
import datetime

result = db.objects.insert_one({"last_modified": datetime.datetime.utcnow()})
关于时区读写,详见原文
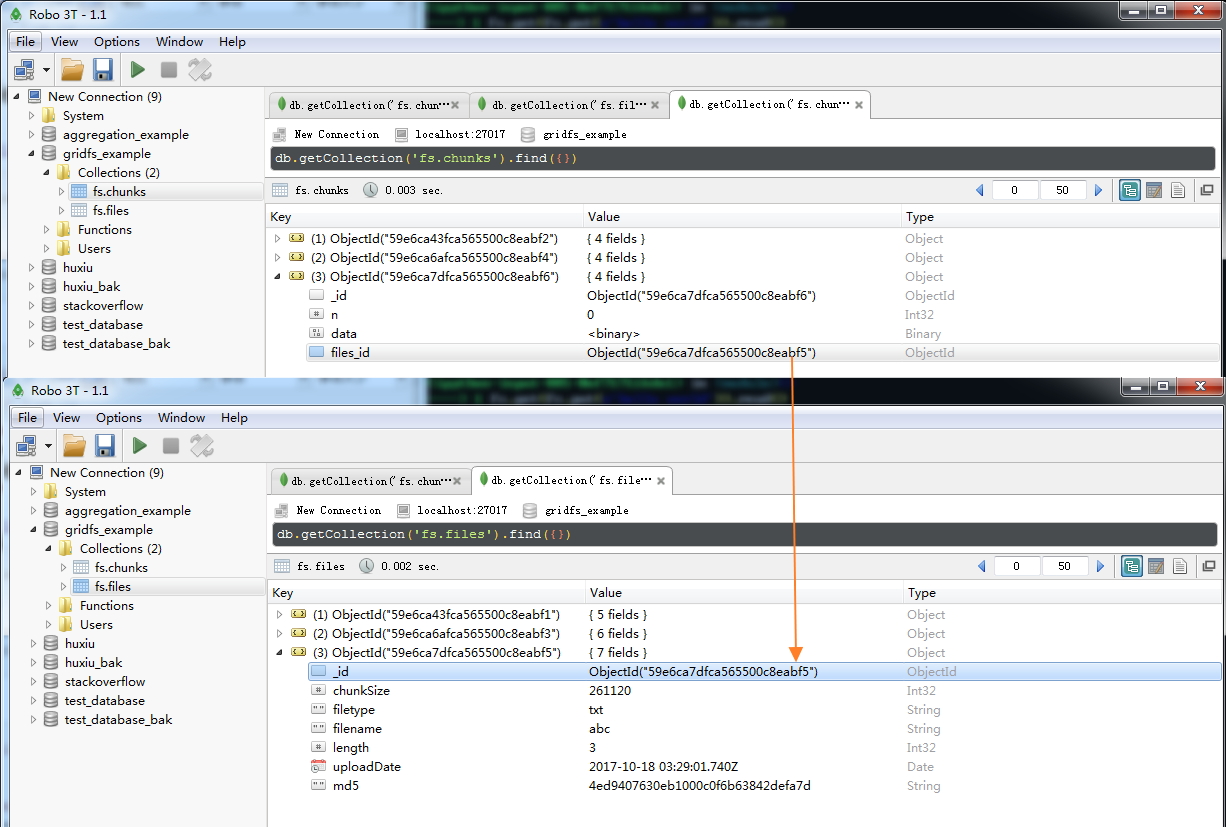
#GridFS Example 存储二进制对象,比如文件
This example shows how to use gridfs to store large binary objects (e.g. files) in MongoDB.
from pymongo import MongoClient

import gridfs

db = MongoClient().gridfs_example

fs = gridfs.GridFS(db)  # collection 表
读写doc: str,unicode,file-like
In [883]: fs.get(fs.put('hello world')).read()

Out[883]: 'hello world'

In [885]: fs.get(fs.put(u'hello world')).read()

TypeError: must specify an encoding for file in order to write unicode

In [886]: fs.get(fs.put(u'hello world',encoding='utf-8')).read()  # 写入 unicode 必须传入 encoding,没有默认

Out[886]: 'hello world'

In [888]: fs.get(fs.put(open('abc.txt'),filename='abc',filetype='txt')).read()  # file-like object (an object with a read() method),自定义属性为可选 filename ,filetype
Out[888]: 'def'
相比第一个doc,第二个多出 encoding 字段,第三个多出 filenname 和 filetype
这里将 doc 看成 file 更容易理解
In [896]: for doc in fs.find():

     ...:     print doc.upload_date

     ...:

2017-10-18 03:28:04

2017-10-18 03:28:42.036000

2017-10-18 03:29:01.740000
print dir(doc)
'aliases', 'chunk_size', 'close', 'content_type', 'filename', 'length', 'md5', 'metadata', 'name', 'read', 'readchunk', 'readline', 'seek', 'tell', 'upload_date'
In [899]: doc?

Type:           GridOut

String form:    <gridfs.grid_file.GridOut object at 0x000000000AB2B8D0>

File:           c:\program files\anaconda2\lib\site-packages\gridfs\grid_file.py

Docstring:

Class to read data out of GridFS.

Init docstring:

Read a file from GridFS
MongoDB 及 scrapy 应用的更多相关文章
- day96_11_28 mongoDB与scrapy框架
一.mongodb mongodb是一个面向文档的数据库,而不是关系型数据库.不采用关系型是为了获得更好的扩展性. 它与mysql的区别在于它没有表连接,但是可以通过其他办法实现. 安装数据库. 上官 ...
- Python下用Scrapy和MongoDB构建爬虫系统(1)
本文由 伯乐在线 - 木羊 翻译,xianhu 校稿.未经许可,禁止转载!英文出处:realpython.com.欢迎加入翻译小组. 这篇文章将根据真实的兼职需求编写一个爬虫,用户想要一个Python ...
- 放养的小爬虫--豆瓣电影入门级爬虫(mongodb使用教程~)
放养的小爬虫--豆瓣电影入门级爬虫(mongodb使用教程~) 笔者声明:只用于学习交流,不用于其他途径.源代码已上传github.githu地址:https://github.com/Erma-Wa ...
- scrapy wiki资料汇总
See also: Scrapy homepage, Official documentation, Scrapy snippets on Snipplr Getting started If you ...
- python爬虫框架scrapy 豆瓣实战
Scrapy 官方介绍是 An open source and collaborative framework for extracting the data you need from websit ...
- 爬虫框架Scrapy 的使用
一.官网链接 https://docs.scrapy.org/en/latest/topics/architecture.html 二.Scrapy 需要安装的包 #Windows平台 # pip3 ...
- CentOS 6 安装python3.6
参考博客:https://www.cnblogs.com/xiaodangshan/p/7197563.html 安装过程比较简单,需要注意,安装之后,为了不影响系统自带的python2.6版本,需要 ...
- scrapy--cnblogs
之前一直在学习关于滑块验证码的爬虫知识,最接近的当属于模拟人的行为进行鼠标移动,登录页面之后在获取了,由于一直找不到滑块验证码的原图,无法通过openCV获取当前滑块所需要移动的距离. 1.机智如我开 ...
- <读书笔记>如何入门爬虫?
大部分爬虫框架都是 发送请求 获得页面 解析页面 下载内容 存储内容 定个宏伟目标 淘宝1000页 知乎 豆瓣 ... python基础 list.dict:序列化爬取的内容 切片:分割爬取内容,获取 ...
随机推荐
- python基础5 字典
一.字典 字典是python的基础数据类型之一:字典可以存储大量的数据,关系型数据. 同样他也是python中唯一的映射类的数据类型. 数据类型的分类: 可变的(不可哈希)数据类型:list,dict ...
- jQUERY中的属性获取
jQuery获取Select选择的Text和Value:语法解释:1. $("#select_id").change(function(){//code...}); //为Se ...
- MT【318】分式不等式双代换
已知$a,b>0$且$\dfrac{1}{a}+\dfrac{1}{b}=\dfrac{2}{3}$,求$\dfrac{1}{a-1}+\dfrac{4}{b-1}$的最小值. 解:令$m=\d ...
- properties文件操作
properties文件操作类 可以使用java.util.Properties读取.properties文件中的内容 import java.io.InputStream; import java. ...
- halcon+WinForm显示rgb图并灰度化
1.halcon代码,并导出成C# read_image (Demo, 'C:/Users/user/Pictures/demo.jpg') dev_display (Demo) rgb1_to_gr ...
- cobbler批量安装操作
打开mirrors.aliyun.com/epel http://mirrors.aliyun.com/epel/epel-release-latest-6.noarch.rpm rpm -ivh h ...
- 20165232 实现pwd
20165232 实现mypwd 题目要求 学习pwd命令 研究pwd实现需要的系统调用(man -k; grep),写出伪代码 实现mypwd 测试mypwd 学习pwd命令 用man pwd 查看 ...
- Web请求相关
HTTP简介 HTTP协议是Hyper Text Transfer Protocol(超文本传输协议)的缩写,是用于从万维网(WWW:World Wide Web )服务器传输超文本到本地浏览器的传送 ...
- Java实现AES加密
一)什么是AES? 高级加密标准(英语:Advanced Encryption Standard,缩写:AES),是一种区块加密标准.这个标准用来替代原先的DES,已经被多方分析且广为全世界所使用. ...
- solr面板的使用
创建数据库 先别着急点击Add Core,先去目录下创建几个文件. 去solrhome目录下创建一个文件夹,比如test,这个文件夹就是数据库文件夹.