ConstraintLayoutDemo【约束性布局知识梳理】【基于1.1.3】
版权声明:本文为HaiyuKing原创文章,转载请注明出处!
前言
在较新版本的Android Studio中新建项目默认使用 ConstraintLayout进行布局的。
ConstraintLayout是一个允许您以灵活的方式定位和调整小部件的ViewGroup。
注意: ConstraintLayout作为支持库提供,您可以在API级别9(Gingerbread)开始的Android系统上使用。
开发者指南梳理
以下内容参考《ConstraintLayout开发者指南》
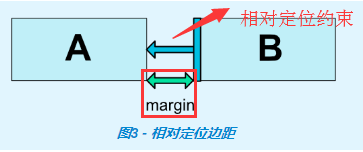
一、相对定位【Relative positioning】
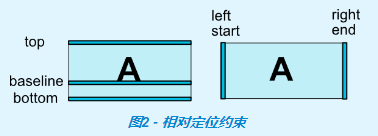
相对定位是在ConstraintLayout中创建布局的基本构建块之一。这些约束允许您将指定的控件(源控件)相对于另一个控件(目标控件)进行定位。您可以在水平和垂直轴上约束控件:
- 水平方向: left、right、start、end
- 垂直方向: top、bottom、text baseline
备注:start,end,left,right的区别
1、其中left/right代表一种绝对的对齐,start/end表示基于阅读顺序的对齐。
说到阅读顺序又不得不提目前存在的主要阅读方式: 从左向右(LTR)和从右向左(RTL);
当使用left/right的时候,无论是LTR还是RTL,总是左/右对齐的;而使用start/end,如阅读顺序是从左到右(LTR)的国家,start在左边,在阅读顺序是从右到左(RTL)的国家(比如阿拉伯),start在右边。
2、当minSdkVersion>=17时,建议使用start/end来代替left/right;
当minSdkVersion<17时,旧的平台不支持RTL(从右到左--Right To Left),start/end属性是未知的,会被忽略,所以需要同时使用start/end和left/right。
以下是可用约束属性的列表
- app:layout_constraintLeft_toLeftOf
- app:layout_constraintLeft_toRightOf
- app:layout_constraintRight_toLeftOf
- app:layout_constraintRight_toRightOf
- app:layout_constraintTop_toTopOf
- app:layout_constraintTop_toBottomOf
- app:layout_constraintBottom_toTopOf
- app:layout_constraintBottom_toBottomOf
- app:layout_constraintBaseline_toBaselineOf
- app:layout_constraintStart_toEndOf
- app:layout_constraintStart_toStartOf
- app:layout_constraintEnd_toStartOf
- app:layout_constraintEnd_toEndOf
用法解析:
1、上面的约束属性一般写在源控件上;
2、约束属性引用的id或者parent代表目标控件;
3、约束属性含义解读:将源控件的指定侧约束到目标控件的其中一侧。
比如:app:layout_constraintLeft_toLeftOf——当前源控件的左侧被约束(constraintLeft)到目标控件的左侧(toLeftOf)
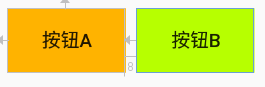
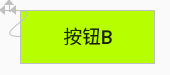
例子1:将按钮B定位在按钮A的右侧,意味着系统将尝试让双方共享相同的位置。
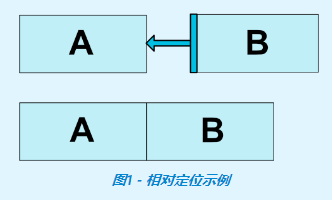
<Button

        android:id="@+id/buttonA"

        app:layout_constraintLeft_toLeftOf="parent"

        app:layout_constraintTop_toTopOf="parent" />

<Button

        android:id="@+id/buttonB"

        app:layout_constraintLeft_toRightOf="@id/buttonA"/>
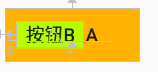
例子2:按钮A和按钮B文本基线对齐,且按钮B在按钮A右侧
<?xml version="1.0" encoding="utf-8"?>

<android.support.constraint.ConstraintLayout xmlns:android="http://schemas.android.com/apk/res/android"

    xmlns:app="http://schemas.android.com/apk/res-auto"

    xmlns:tools="http://schemas.android.com/tools"

    android:layout_width="match_parent"

    android:layout_height="match_parent"

    tools:context=".MainActivity"

    android:padding="8dp">

    <Button

        android:id="@+id/buttonA"

        android:layout_width="100dp"

        android:layout_height="40dp"

        android:text="按钮A"

        android:background="#ffb300"

        app:layout_constraintLeft_toLeftOf="parent"

        app:layout_constraintTop_toTopOf="parent" />

    <Button

        android:id="@+id/buttonB"

        android:layout_width="50dp"

        android:layout_height="20dp"

        android:text="按钮B"

        android:background="#b7ff00"

        app:layout_constraintBaseline_toBaselineOf="@id/buttonA"

        app:layout_constraintLeft_toRightOf="@id/buttonA"

        />

</android.support.constraint.ConstraintLayout>
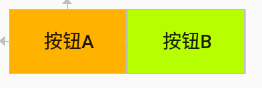
二、外边距【Margins】
如果设置了边距,则它们将应用于相应的约束(如果存在约束),系统将边距强制为目标和源边之间的空间。
什么叫边距应用于相应的约束(如果存在约束)?可以简单理解为android:layout_marginLeft和app:layout_constraintLeft_toLeftOf、app:layout_constraintLeft_toRightOf配合使用才会生效!保证设置边距的方向(left\right\top\bottom\start\end)和相对定位约束的源控件的方向(left\right\top\bottom\start\end)一致!剩下的以此类推!见例子2。
以下是布局边距属性的列表:
- android:layout_marginStart
- android:layout_marginEnd
- android:layout_marginLeft
- android:layout_marginTop
- android:layout_marginRight
- android:layout_marginBottom
用法解析:
1、一般写在源控件上;
2、约束属性含义解读:当前控件(源控件)的指定侧距离与其具有约束关系的控件(目标控件)的其中一侧的空间值;
3、属性值必须是大于或者等于0;
4、当目标控件设置为可见性为gone的时候,源控件的边距仍有效;
例子1:将按钮B定位在按钮A的右侧,并且设置相距8dp
<Button

        android:id="@+id/buttonA"

        app:layout_constraintLeft_toLeftOf="parent"

        app:layout_constraintTop_toTopOf="parent" />

<Button

        android:id="@+id/buttonB"

        app:layout_constraintLeft_toRightOf="@id/buttonA"

        android:layout_marginLeft="8dp"/>
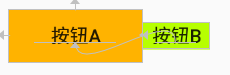
例子2:按钮B和按钮A文本基线对齐,且按钮B的左侧和按钮A的左侧对齐,且边距为8dp
<?xml version="1.0" encoding="utf-8"?>

<android.support.constraint.ConstraintLayout xmlns:android="http://schemas.android.com/apk/res/android"

    xmlns:app="http://schemas.android.com/apk/res-auto"

    xmlns:tools="http://schemas.android.com/tools"

    android:layout_width="match_parent"

    android:layout_height="match_parent"

    tools:context=".MainActivity"

    android:padding="8dp">

    <Button

        android:id="@+id/buttonA"

        android:layout_width="100dp"

        android:layout_height="40dp"

        android:text="按钮A"

        android:background="#ffb300"

        app:layout_constraintLeft_toLeftOf="parent"

        app:layout_constraintTop_toTopOf="parent" />

    <Button

        android:id="@+id/buttonB"

        android:layout_width="50dp"

        android:layout_height="20dp"

        android:text="按钮B"

        android:background="#b7ff00"

        app:layout_constraintBaseline_toBaselineOf="@id/buttonA"

        app:layout_constraintLeft_toLeftOf="@id/buttonA"

        android:layout_marginLeft="8dp"

        />

</android.support.constraint.ConstraintLayout>
如果去掉app:layout_constraintLeft_toLeftOf属性的话,设置的边距值是无效的,效果如下:

<Button

        android:id="@+id/buttonA"

        android:layout_width="100dp"

        android:layout_height="40dp"

        android:text="按钮A"

        android:background="#ffb300"

        app:layout_constraintLeft_toLeftOf="parent"

        app:layout_constraintTop_toTopOf="parent" />

    <Button

        android:id="@+id/buttonB"

        android:layout_width="50dp"

        android:layout_height="20dp"

        android:text="按钮B"

        android:background="#b7ff00"

        app:layout_constraintBaseline_toBaselineOf="@id/buttonA"

        android:layout_marginLeft="8dp"

        />
例子3:按钮A隐藏的情况下,按钮B在按钮A右侧,且边距为8dp【此时按钮B的外边距8dp仍是有效的】
<Button

        android:id="@+id/buttonA"

        app:layout_constraintLeft_toLeftOf="parent"

        app:layout_constraintTop_toTopOf="parent"

        android:visibility="gone"/>

<Button

        android:id="@+id/buttonB"

        app:layout_constraintLeft_toRightOf="@id/buttonA"

        android:layout_marginLeft="8dp"

        />
三、连接到GONE控件时的边距【Margins when connected to a GONE widget】
当约束目标控件的可见性为View.GONE时,可以配合使用以下属性设置不同边距值:
- app:layout_goneMarginStart
- app:layout_goneMarginEnd
- app:layout_goneMarginLeft
- app:layout_goneMarginTop
- app:layout_goneMarginRight
- app:layout_goneMarginBottom
和android:layout_MarginLeft等的区别就在于,当目标控件隐藏(GONE)的时候,android:layout_MarginLeft设置的外边距值还生效,而app:layout_goneMarginLeft设置的外边距值则会失效!
例子1:按钮A隐藏的情况下,按钮B在按钮A右侧,且边距为8dp【此时按钮B的外边距8dp是无效的】
<?xml version="1.0" encoding="utf-8"?>

<android.support.constraint.ConstraintLayout xmlns:android="http://schemas.android.com/apk/res/android"

    xmlns:app="http://schemas.android.com/apk/res-auto"

    xmlns:tools="http://schemas.android.com/tools"

    android:layout_width="match_parent"

    android:layout_height="match_parent"

    tools:context=".MainActivity"

    android:padding="8dp">

    <Button

        android:id="@+id/buttonA"

        android:layout_width="100dp"

        android:layout_height="40dp"

        android:text="按钮A"

        android:background="#ffb300"

        app:layout_constraintLeft_toLeftOf="parent"

        app:layout_constraintTop_toTopOf="parent"

        android:visibility="gone"/>

    <Button

        android:id="@+id/buttonB"

        android:layout_width="100dp"

        android:layout_height="40dp"

        android:text="按钮B"

        android:background="#b7ff00"

        app:layout_constraintLeft_toRightOf="@id/buttonA"

        app:layout_goneMarginLeft="8dp"

        />

</android.support.constraint.ConstraintLayout>
四、可见性行为【Visibility behavior】
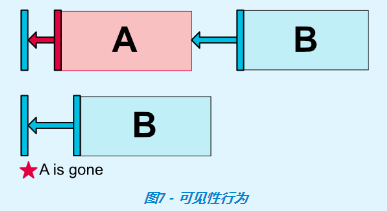
一般情况下,A控件设置 GONE属性后,A控件就不会出现在布局中了,B控件对A控件的android:layout_MarginXXX属性也就没有作用了。但是 ConstraintLayout 能对已经设置 GONE属性的控件进行特殊处理。当A控件设置 GONE之后,A控件相当于变成了一个点,B控件相对于对A的约束仍然是起作用的,B控件的android:layout_MarginXXX属性还是有作用的。
- 对于gone的控件,它们的尺寸将被视为零(基本上,它们将被解析为一个点);
- 如果已gone的控件对其他控件有约束,他们仍然会受到尊重,但已gone的控件任何边距都会等于零;
有时候,B控件是不希望相对于隐藏控件A的属性还起作用。这时候可以用到上面提到的app:layout_goneMarginXXX属性。
例子1:按钮A隐藏后,按钮A的外边距失效,均等于0
初始状态:
<?xml version="1.0" encoding="utf-8"?>

<android.support.constraint.ConstraintLayout xmlns:android="http://schemas.android.com/apk/res/android"

    xmlns:app="http://schemas.android.com/apk/res-auto"

    xmlns:tools="http://schemas.android.com/tools"

    android:layout_width="match_parent"

    android:layout_height="match_parent"

    tools:context=".MainActivity"

    android:padding="8dp"

    >

    <Button

        android:id="@+id/buttonA"

        android:layout_width="100dp"

        android:layout_height="40dp"

        android:text="按钮A"

        android:background="#ffb300"

        app:layout_constraintLeft_toLeftOf="parent"

        app:layout_constraintTop_toTopOf="parent"

        />

    <Button

        android:id="@+id/buttonB"

        android:layout_width="100dp"

        android:layout_height="40dp"

        android:text="按钮B"

        android:background="#b7ff00"

        app:layout_constraintLeft_toRightOf="@id/buttonA"

        />

</android.support.constraint.ConstraintLayout>
设置按钮A的外边距值为5dp:
<Button

        android:id="@+id/buttonA"

        app:layout_constraintLeft_toLeftOf="parent"

        app:layout_constraintTop_toTopOf="parent"

        android:layout_marginLeft="5dp"

        />

<Button

        android:id="@+id/buttonB"

        app:layout_constraintLeft_toRightOf="@id/buttonA"

        />
设置按钮A隐藏状态GONE(可以发现按钮A的外边距5dp失效了):
    <Button

        android:id="@+id/buttonA"

        app:layout_constraintLeft_toLeftOf="parent"

        app:layout_constraintTop_toTopOf="parent"

        android:layout_marginLeft="5dp"

        android:visibility="gone"

        />

    <Button

        android:id="@+id/buttonB"

        app:layout_constraintLeft_toRightOf="@id/buttonA"

        />
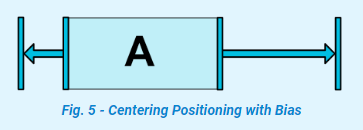
五、居中定位【Centering positioning】
水平居中(parent表示相对于父节点):
app:layout_constraintLeft_toLeftOf="parent"
app:layout_constraintRight_toRightOf="parent"
垂直居中(parent表示相对于父节点):
app:layout_constraintTop_toTopOf="parent"
app:layout_constraintBottom_toBottomOf="parent"
上图是水平居中的示意图。
ConstraintLayout是如何处理“相反”的约束,比如下面的代码,除非ConstraintLayout恰好具有Button与之完全相同的大小,否则两个约束不能同时满足;在这种情况下发生的事情是,约束的作用就像是相反的力量将控件拉平; 这样控件最终将在父容器中居中。这同样适用于垂直约束。
例子1:按钮A水平居中
<?xml version="1.0" encoding="utf-8"?>

<android.support.constraint.ConstraintLayout xmlns:android="http://schemas.android.com/apk/res/android"

    xmlns:app="http://schemas.android.com/apk/res-auto"

    xmlns:tools="http://schemas.android.com/tools"

    android:layout_width="match_parent"

    android:layout_height="match_parent"

    tools:context=".MainActivity"

    android:padding="8dp"

    >

    <Button

        android:id="@+id/buttonA"

        android:layout_width="100dp"

        android:layout_height="40dp"

        android:text="按钮A"

        android:background="#ffb300"

        app:layout_constraintLeft_toLeftOf="parent"

        app:layout_constraintRight_toRightOf="parent"

        />

</android.support.constraint.ConstraintLayout>
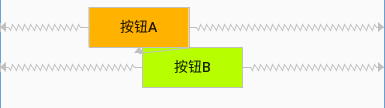
例子2:按钮B居中在按钮A中(如果按钮A和按钮B大小一致,那么按钮B就会和按钮A重叠)
<?xml version="1.0" encoding="utf-8"?>

<android.support.constraint.ConstraintLayout xmlns:android="http://schemas.android.com/apk/res/android"

    xmlns:app="http://schemas.android.com/apk/res-auto"

    xmlns:tools="http://schemas.android.com/tools"

    android:layout_width="match_parent"

    android:layout_height="match_parent"

    tools:context=".MainActivity"

    android:padding="8dp"

    >

    <Button

        android:id="@+id/buttonA"

        android:layout_width="200dp"

        android:layout_height="80dp"

        android:text="按钮A"

        android:background="#ffb300"

        />

    <Button

        android:id="@+id/buttonB"

        android:layout_width="100dp"

        android:layout_height="40dp"

        android:text="按钮B"

        android:background="#b7ff00"

        app:layout_constraintLeft_toLeftOf="@id/buttonA"

        app:layout_constraintRight_toRightOf="@id/buttonA"

        app:layout_constraintTop_toTopOf="@id/buttonA"

        app:layout_constraintBottom_toBottomOf="@id/buttonA"

        />

</android.support.constraint.ConstraintLayout>
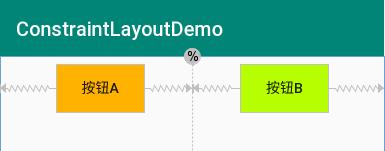
五、偏差【Bias】
遇到这种相反的约束时的默认设置是使控件居中(也就是默认偏差50%); 但是您可以使用偏差属性调整定位以使一侧偏向另一侧:
可以使用的属性:
- layout_constraintHorizontal_bias(水平偏差,取值范围:0.0~1.0)
- layout_constraintVertical_bias(垂直偏差,取值范围:0.0~1.0)
所以,可以得知,偏差属性是需要和“反约束”属性一起使用的。那么什么是“反约束”属性呢?个人简单理解为下面的是反约束属性(仅供参考):
- app:layout_constraintLeft_toLeftOf【反约束属性】
- app:layout_constraintLeft_toRightOf
- app:layout_constraintRight_toLeftOf
- app:layout_constraintRight_toRightOf【反约束属性】
- app:layout_constraintTop_toTopOf【反约束属性】
- app:layout_constraintTop_toBottomOf
- app:layout_constraintBottom_toTopOf
- app:layout_constraintBottom_toBottomOf【反约束属性】
- app:layout_constraintBaseline_toBaselineOf
- app:layout_constraintStart_toEndOf
- app:layout_constraintStart_toStartOf【反约束属性】
- app:layout_constraintEnd_toStartOf
- app:layout_constraintEnd_toEndOf【反约束属性】
例子1:按钮A水平居偏移30%,按钮B水平居中
<?xml version="1.0" encoding="utf-8"?>

<android.support.constraint.ConstraintLayout xmlns:android="http://schemas.android.com/apk/res/android"

    xmlns:app="http://schemas.android.com/apk/res-auto"

    xmlns:tools="http://schemas.android.com/tools"

    android:layout_width="match_parent"

    android:layout_height="match_parent"

    tools:context=".MainActivity"

    android:padding="8dp"

    >

    <Button

        android:id="@+id/buttonA"

        android:layout_width="100dp"

        android:layout_height="40dp"

        android:text="按钮A"

        android:background="#ffb300"

        app:layout_constraintLeft_toLeftOf="parent"

        app:layout_constraintRight_toRightOf="parent"

        app:layout_constraintHorizontal_bias="0.3"

        />

    <Button

        android:id="@+id/buttonB"

        android:layout_width="100dp"

        android:layout_height="40dp"

        android:text="按钮B"

        android:background="#b7ff00"

        app:layout_constraintTop_toBottomOf="@id/buttonA"

        app:layout_constraintLeft_toLeftOf="parent"

        app:layout_constraintRight_toRightOf="parent"

        />

</android.support.constraint.ConstraintLayout>
六、圆形定位(1.1中增加)【Circular positioning (Added in 1.1)】
您可以以角度和半径距离约束控件中心相对于另一个控件中心。这允许您将控件放在圆上(如下图所示)。
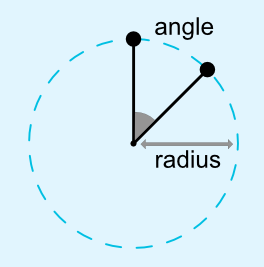

可以使用以下属性:
- app:layout_constraintCircle :引用的另一个控件(目标控件)ID值
- app:layout_constraintCircleRadius :源控件的中心到其他控件(目标控件)中心的距离
- app:layout_constraintCircleAngle :源控件应该处于哪个角度(以度为单位,从0到360)
例子1、按钮B在按钮A的30度角半径为100dp的位置上
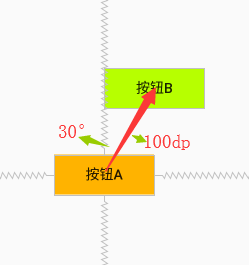
<?xml version="1.0" encoding="utf-8"?>

<android.support.constraint.ConstraintLayout xmlns:android="http://schemas.android.com/apk/res/android"

    xmlns:app="http://schemas.android.com/apk/res-auto"

    xmlns:tools="http://schemas.android.com/tools"

    android:layout_width="match_parent"

    android:layout_height="match_parent"

    tools:context=".MainActivity"

    android:padding="8dp"

    >

    <Button

        android:id="@+id/buttonA"

        android:layout_width="100dp"

        android:layout_height="40dp"

        android:text="按钮A"

        android:background="#ffb300"

        app:layout_constraintLeft_toLeftOf="parent"

        app:layout_constraintRight_toRightOf="parent"

        app:layout_constraintTop_toTopOf="parent"

        app:layout_constraintBottom_toBottomOf="parent"

        />

    <Button

        android:id="@+id/buttonB"

        android:layout_width="100dp"

        android:layout_height="40dp"

        android:text="按钮B"

        android:background="#b7ff00"

        app:layout_constraintCircle="@id/buttonA"

        app:layout_constraintCircleRadius="100dp"

        app:layout_constraintCircleAngle="30"

        />

</android.support.constraint.ConstraintLayout>
七、尺寸约束【Dimensions constraints】
7.1、ConstraintLayout上的最大、最小尺寸约束【Minimum dimensions on ConstraintLayout】
你可以给ConstraintLayout设置以下最大、最小尺寸约束:
- android:minWidth 设置布局的最小宽度
- android:minHeight 设置布局的最小高度
- android:maxWidth 设置布局的最大宽度
- android:maxHeight 设置布局的最大高度
当 ConstraintLayout宽高设置为 wrap_content时,以上属性可以起作用。
按照字面的理解是在ConstraintLayout布局控件上设置这些属性,而不是控件上(比如Button、TextView等)设置这些属性。可能这些属性更适合用在ConstraintLayout布局控件上吧。普通控件上也是可以使用的,但是有问题。
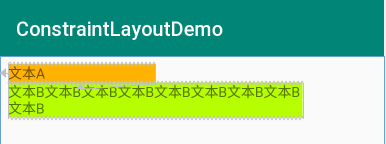
例子1:文本A所在的ConstraintLayout区域设置最小宽高,文本B所在的ConstraintLayout区域设置最大宽高
<?xml version="1.0" encoding="utf-8"?>
<android.support.constraint.ConstraintLayout xmlns:android="http://schemas.android.com/apk/res/android"
xmlns:app="http://schemas.android.com/apk/res-auto"
xmlns:tools="http://schemas.android.com/tools"
android:layout_width="match_parent"
android:layout_height="match_parent"
tools:context=".MainActivity"
android:padding="8dp"
>
<android.support.constraint.ConstraintLayout
android:id="@+id/buttonALayout"
android:layout_width="wrap_content"
android:layout_height="wrap_content"
android:minWidth="100dp"
android:minHeight="40dp"> <TextView
android:id="@+id/textA"
android:layout_width="wrap_content"
android:layout_height="wrap_content"
android:text="文本A"
android:background="#ffb300"
/> </android.support.constraint.ConstraintLayout> <android.support.constraint.ConstraintLayout
android:id="@+id/buttonBLayout"
android:layout_width="wrap_content"
android:layout_height="wrap_content"
android:maxWidth="100dp"
android:maxHeight="40dp"
app:layout_constraintLeft_toRightOf="@id/buttonALayout"> <TextView
android:id="@+id/textB"
android:layout_width="wrap_content"
android:layout_height="wrap_content"
android:text="文本B文本B文本B文本B\n文本B文本B文本B文本B\n文本B文本B文本B文本B"
android:background="#b7ff00"
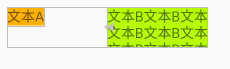
/> </android.support.constraint.ConstraintLayout> </android.support.constraint.ConstraintLayout>
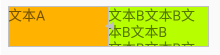
例子2:直接设置文本A的最小宽高,设置文本B的最大宽高【问题:文本B的展现不符合预期】
<?xml version="1.0" encoding="utf-8"?>

<android.support.constraint.ConstraintLayout xmlns:android="http://schemas.android.com/apk/res/android"

    xmlns:app="http://schemas.android.com/apk/res-auto"

    xmlns:tools="http://schemas.android.com/tools"

    android:layout_width="match_parent"

    android:layout_height="match_parent"

    tools:context=".MainActivity"

    android:padding="8dp"

    >

    <TextView

        android:id="@+id/textA"

        android:layout_width="wrap_content"

        android:layout_height="wrap_content"

        android:minWidth="100dp"

        android:minHeight="40dp"

        android:text="文本A"

        android:background="#ffb300"

        />

    <TextView

        android:id="@+id/textB"

        android:layout_width="wrap_content"

        android:layout_height="wrap_content"

        android:maxWidth="100dp"

        android:maxHeight="40dp"

        android:text="文本B文本B文本B文本B\n文本B文本B文本B文本B\n文本B文本B文本B文本B"

        android:background="#b7ff00"

        app:layout_constraintLeft_toRightOf="@id/textA"

        />

</android.support.constraint.ConstraintLayout>
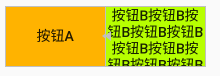
例子3:按钮A设置最小宽高,按钮B设置最大宽高(注意:Button控件系统默认设置了最小宽高:比如宽88dp,高48dp,去style.xml中AppTheme的父主题里面查看)
<?xml version="1.0" encoding="utf-8"?>

<android.support.constraint.ConstraintLayout xmlns:android="http://schemas.android.com/apk/res/android"

    xmlns:app="http://schemas.android.com/apk/res-auto"

    xmlns:tools="http://schemas.android.com/tools"

    android:layout_width="match_parent"

    android:layout_height="match_parent"

    tools:context=".MainActivity"

    android:padding="8dp"

    >

    <Button

        android:id="@+id/buttonA"

        android:layout_width="wrap_content"

        android:layout_height="wrap_content"

        android:minWidth="100dp"

        android:minHeight="60dp"

        android:text="按钮A"

        android:background="#ffb300"

        />

    <Button

        android:id="@+id/buttonB"

        android:layout_width="wrap_content"

        android:layout_height="wrap_content"

        android:maxWidth="100dp"

        android:maxHeight="60dp"

        android:text="按钮B按钮B按钮B按钮B按钮B按钮B按钮B按钮B按钮B按钮B按钮B按钮B"

        android:background="#b7ff00"

        app:layout_constraintLeft_toRightOf="@id/buttonA"

        />

</android.support.constraint.ConstraintLayout>
7.2、控件尺寸约束【Widgets dimension constraints】
我们可以通过以下3种不同方式设置android:layout_width和android:layout_height属性值指定控件的尺寸。
- 使用指定数值(例如52dp或@dimens/toolbarheight);
- 使用wrap_content,这将要求控件自己计算自己的大小;
- 使用0dp,相当于match_constraint(在1.1.3版本中,使用match_constraint找不到,所以还是使用0dp,注意不能使用match_parent,有些地方0dp和match_parent是不一样的)
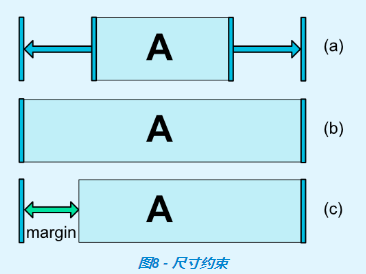
上图中,(a)是wrap_content,(b)是0dp,如果设置了边距,则在计算中将考虑它们(图8,(c)中的0dp。
重要提示: match_parent不建议用于ConstraintLayout中的控件。可以通过使用match_constraint设置为相应的left/right或top/bottom 约束来定义类似的行为——"parent"。
但是在com.android.support.constraint:constraint-layout:1.1.3中,android:layout_width和android:layout_height属性没有这个match_constraint值。
7.3、wrap_content:强制约束(在1.1中添加)【WRAP_CONTENT : enforcing constraints (Added in 1.1)】
如果将维度设置为WRAP_CONTENT,则在1.1之前的版本中,它们将被视为文字维度 - 这意味着约束不会限制生成的维度。虽然通常这足够(并且更快),但在某些情况下,您可能希望使用WRAP_CONTENT,但仍然强制执行约束以限制生成的维度。在这种情况下,您可以添加一个相应的属性:
- app:layout_constrainedWidth=”true|false”【默认false】
- app:layout_constrainedHeight=”true|false”【默认false】
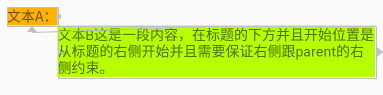
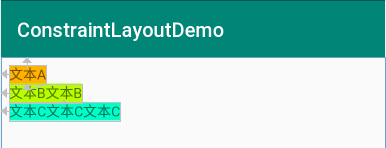
例子1:文本B在文本A的下方,并且文本B的左侧约束文本A的右侧,文本B的右侧约束parent的右侧(这样可以保证文本全部显示出来)
<?xml version="1.0" encoding="utf-8"?>

<android.support.constraint.ConstraintLayout xmlns:android="http://schemas.android.com/apk/res/android"

    xmlns:app="http://schemas.android.com/apk/res-auto"

    xmlns:tools="http://schemas.android.com/tools"

    android:layout_width="match_parent"

    android:layout_height="match_parent"

    tools:context=".MainActivity"

    android:padding="8dp"

    >

    <TextView

        android:id="@+id/textA"

        android:layout_width="wrap_content"

        android:layout_height="wrap_content"

        android:text="文本A:"

        android:background="#ffb300"

        />

    <TextView

        android:id="@+id/textB"

        android:layout_width="wrap_content"

        android:layout_height="wrap_content"

        android:text="文本B这是一段内容,在标题的下方并且开始位置是从标题的右侧开始并且需要保证右侧跟parent的右侧约束。"

        android:background="#b7ff00"

        app:layout_constraintTop_toBottomOf="@id/textA"

        app:layout_constraintLeft_toRightOf="@id/textA"

        app:layout_constraintRight_toRightOf="parent"

        app:layout_constrainedWidth="true"

        />

</android.support.constraint.ConstraintLayout>
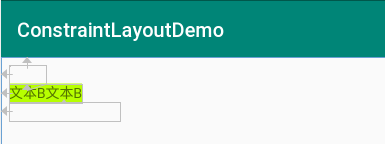
如果去掉app:layout_constrainedWidth="true",效果如下:文本B的左右约束失效,且文本显示不全!

<TextView

        android:id="@+id/textA"

        android:layout_width="wrap_content"

        android:layout_height="wrap_content"

        android:text="文本A:"

        android:background="#ffb300"

        />

    <TextView

        android:id="@+id/textB"

        android:layout_width="wrap_content"

        android:layout_height="wrap_content"

        android:text="文本B这是一段内容,在标题的下方并且开始位置是从标题的右侧开始并且需要保证右侧跟parent的右侧约束。"

        android:background="#b7ff00"

        app:layout_constraintTop_toBottomOf="@id/textA"

        app:layout_constraintLeft_toRightOf="@id/textA"

        app:layout_constraintRight_toRightOf="parent"

        />
如果继续去掉app:layout_constraintRight_toRightOf="parent",效果如下:文本B的左右约束还在,但是文本显示不全

<TextView

        android:id="@+id/textA"

        android:layout_width="wrap_content"

        android:layout_height="wrap_content"

        android:text="文本A:"

        android:background="#ffb300"

        />

    <TextView

        android:id="@+id/textB"

        android:layout_width="wrap_content"

        android:layout_height="wrap_content"

        android:text="文本B这是一段内容,在标题的下方并且开始位置是从标题的右侧开始并且需要保证右侧跟parent的右侧约束。"

        android:background="#b7ff00"

        app:layout_constraintTop_toBottomOf="@id/textA"

        app:layout_constraintLeft_toRightOf="@id/textA"

        />
7.4、match_constraint(0dp)尺寸(在1.1中添加)【MATCH_CONSTRAINT dimensions (Added in 1.1)】
当维度设置为时match_constraint(0dp),默认行为是使结果大小占用所有可用空间。还有几个额外的修饰符:
- app:layout_constraintWidth_min和app:layout_constraintHeight_min:将设置最小宽高值【可以是数值,比如100dp,也可以是“wrap”——它将使用与其相同的值WRAP_CONTENT】
- app:layout_constraintWidth_max和app:layout_constraintHeight_max:将设置最大宽高值【可以是数值,比如100dp,也可以是“wrap”——它将使用与其相同的值WRAP_CONTENT】
- app:layout_constraintWidth_percent和app:layout_constraintHeight_percent:宽高相对于父容器的百分比【数值是0~1之间的数字,比如0.3】
注意:使用上面的min、max和percent属性的时候,需要一个方向下只含有一个约束,不能含有两个约束(percent属性可以两个约束)。
比如,app:layout_constraintWidth_min、app:layout_constraintWidth_max,想要生效的话,控件只需要app:layout_constraintLeft_toLeftOf(隐形声明也可以)即可,不能同时含有app:layout_constraintRight_toRightOf="parent"。
例子1:设置文本A的最小宽度值,设置文本B的最大宽度值【可以理解为从左侧开始,设置最小、最大宽度值】

<?xml version="1.0" encoding="utf-8"?>

<android.support.constraint.ConstraintLayout xmlns:android="http://schemas.android.com/apk/res/android"

    xmlns:app="http://schemas.android.com/apk/res-auto"

    xmlns:tools="http://schemas.android.com/tools"

    android:layout_width="match_parent"

    android:layout_height="match_parent"

    tools:context=".MainActivity"

    android:padding="8dp"

    >

    <TextView

        android:id="@+id/textA"

        android:layout_width="0dp"

        android:layout_height="wrap_content"

        android:text="文本A"

        android:background="#ffb300"

        app:layout_constraintLeft_toLeftOf="parent"

        app:layout_constraintWidth_min="80dp"

        />

    <TextView

        android:id="@+id/textB"

        android:layout_width="0dp"

        android:layout_height="wrap_content"

        android:text="文本B文本B文本B文本B文本B文本B文本B文本B文本B"

        android:background="#b7ff00"

        app:layout_constraintTop_toBottomOf="@id/textA"

        app:layout_constraintWidth_max="200dp"

        />

</android.support.constraint.ConstraintLayout>
例子2:设置文本A、文本B的宽度占父容器的百分比【可以理解为从左侧开始,文本占百分比】
<?xml version="1.0" encoding="utf-8"?>

<android.support.constraint.ConstraintLayout xmlns:android="http://schemas.android.com/apk/res/android"

    xmlns:app="http://schemas.android.com/apk/res-auto"

    xmlns:tools="http://schemas.android.com/tools"

    android:layout_width="match_parent"

    android:layout_height="match_parent"

    tools:context=".MainActivity"

    android:padding="8dp"

    >

    <TextView

        android:id="@+id/textA"

        android:layout_width="0dp"

        android:layout_height="wrap_content"

        android:text="文本A"

        android:background="#ffb300"

        app:layout_constraintLeft_toLeftOf="parent"

        app:layout_constraintWidth_percent="0.4"

        />

    <TextView

        android:id="@+id/textB"

        android:layout_width="0dp"

        android:layout_height="wrap_content"

        android:text="文本B文本B文本B文本B文本B文本B文本B文本B文本B"

        android:background="#b7ff00"

        app:layout_constraintTop_toBottomOf="@id/textA"

        app:layout_constraintWidth_percent="0.8"

        />

</android.support.constraint.ConstraintLayout>
八、设置宽高比例【Ratio】
当 android:layout_width或者 android:layout_height设置为0dp时,还可以通过 app:layout_constraintDimensionRatio设置宽高比例。该比例表示 width:height的值。
该比率可表示为:
- 浮点值,表示宽度和高度之间的比率(比如:1.0F)
- “宽度:高度”形式的比率(比如:1:1)
注意:使用app:layout_constraintDimensionRatio属性的时候还是需要至少一个约束,比如可能会忽略的app:layout_constraintLeft_toLeftOf="parent"。
例子1:文本A、文本B宽高比是1:1
<?xml version="1.0" encoding="utf-8"?>

<android.support.constraint.ConstraintLayout xmlns:android="http://schemas.android.com/apk/res/android"

    xmlns:app="http://schemas.android.com/apk/res-auto"

    xmlns:tools="http://schemas.android.com/tools"

    android:layout_width="match_parent"

    android:layout_height="match_parent"

    tools:context=".MainActivity"

    android:padding="8dp"

    >

    <TextView

        android:id="@+id/textA"

        android:layout_width="wrap_content"

        android:layout_height="0dp"

        android:text="文本A"

        android:background="#ffb300"

        app:layout_constraintLeft_toLeftOf="parent"

        app:layout_constraintDimensionRatio="1.0f"

        />

    <TextView

        android:id="@+id/textB"

        android:layout_width="50dp"

        android:layout_height="0dp"

        android:text="文本B"

        android:background="#b7ff00"

        app:layout_constraintTop_toBottomOf="@id/textA"

        app:layout_constraintDimensionRatio="1:1"

        />

</android.support.constraint.ConstraintLayout>
如果两个尺寸都设置为MATCH_CONSTRAINT(0dp),您也可以使用比率。
在这种情况下,系统设置满足所有约束的最大尺寸并保持指定的纵横比。要根据另一个特定边的尺寸限制一个特定边,可以预先附加W,“或” H,表示想要约束的宽度或高度。
例如,如果一个尺寸受两个目标约束,则可以指示应该约束哪一边,通过 在比率前添加字母W(用于约束宽度)或H(用于约束高度),用逗号分隔。
例子2:文本A宽度全屏,根据16:9的比率设置高度(要约束的是H)
<?xml version="1.0" encoding="utf-8"?>

<android.support.constraint.ConstraintLayout xmlns:android="http://schemas.android.com/apk/res/android"

    xmlns:app="http://schemas.android.com/apk/res-auto"

    xmlns:tools="http://schemas.android.com/tools"

    android:layout_width="match_parent"

    android:layout_height="match_parent"

    tools:context=".MainActivity"

    android:padding="8dp"

    >

    <TextView

        android:id="@+id/textA"

        android:layout_width="0dp"

        android:layout_height="0dp"

        android:text="文本A"

        android:background="#ffb300"

        app:layout_constraintLeft_toLeftOf="parent"

        app:layout_constraintRight_toRightOf="parent"

        app:layout_constraintDimensionRatio="H,16:9"

        />

</android.support.constraint.ConstraintLayout>
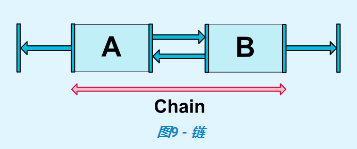
九、链【Chains】
在横轴或或者竖轴上的控件相互约束时,可以组成一个链式约束。链在单个轴(水平或垂直)上提供类似行的行为。另一个轴可以独立约束。
创建一个链
如果一组控件通过双向连接链接在一起,则它们被视为链。
链头
链由链的第一个元素(链的“头部”)上设置的属性控制:
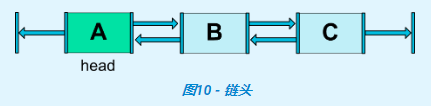
链头是水平链的最左侧控件,垂直链的最顶部控件。
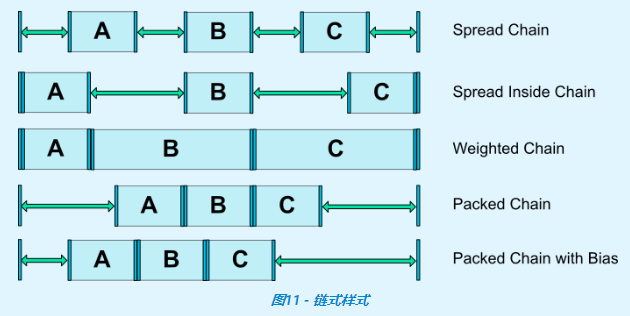
链的样式
可以通过 app:layout_constraintHorizontal_chainStyle或 app:layout_constraintVertical_chainStyle设置链式控件的样式。这个属性有点像 LinearLayout中的 weight 属性平分布局。
- spread模式:元素将展开(默认样式);
- spread_inside模式: 类似spread模式,但链的端点不会分散;
- 含有权重spread模式:如果设置了某个或某些控件MATCH_CONSTRAINT(0dp),这个或这些控件将分割可用空间;
- packed模式:链条的元素将被包装在一起。然后,子项的水平或垂直偏差属性将影响打包元素的定位;
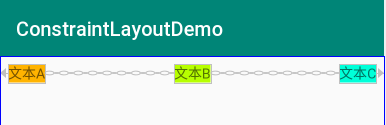
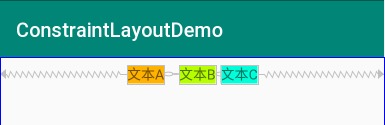
例子1:spread模式
<?xml version="1.0" encoding="utf-8"?>

<android.support.constraint.ConstraintLayout xmlns:android="http://schemas.android.com/apk/res/android"

    xmlns:app="http://schemas.android.com/apk/res-auto"

    xmlns:tools="http://schemas.android.com/tools"

    android:layout_width="match_parent"

    android:layout_height="match_parent"

    tools:context=".MainActivity"

    android:padding="8dp"

    >

    <TextView

        android:id="@+id/textA"

        android:layout_width="wrap_content"

        android:layout_height="wrap_content"

        android:text="文本A"

        android:background="#ffb300"

        app:layout_constraintLeft_toLeftOf="parent"

        app:layout_constraintRight_toLeftOf="@id/textB"

        app:layout_constraintHorizontal_chainStyle="spread"

        />

    <TextView

        android:id="@+id/textB"

        android:layout_width="wrap_content"

        android:layout_height="wrap_content"

        android:text="文本B"

        android:background="#b7ff00"

        app:layout_constraintLeft_toRightOf="@id/textA"

        app:layout_constraintRight_toLeftOf="@id/textC"

        />

    <TextView

        android:id="@+id/textC"

        android:layout_width="wrap_content"

        android:layout_height="wrap_content"

        android:text="文本C"

        android:background="#00ffd9"

        app:layout_constraintLeft_toRightOf="@id/textB"

        app:layout_constraintRight_toRightOf="parent"

        />

</android.support.constraint.ConstraintLayout>
例子2:spread_inside模式
<?xml version="1.0" encoding="utf-8"?>

<android.support.constraint.ConstraintLayout xmlns:android="http://schemas.android.com/apk/res/android"

    xmlns:app="http://schemas.android.com/apk/res-auto"

    xmlns:tools="http://schemas.android.com/tools"

    android:layout_width="match_parent"

    android:layout_height="match_parent"

    tools:context=".MainActivity"

    android:padding="8dp"

    >

    <TextView

        android:id="@+id/textA"

        android:layout_width="wrap_content"

        android:layout_height="wrap_content"

        android:text="文本A"

        android:background="#ffb300"

        app:layout_constraintLeft_toLeftOf="parent"

        app:layout_constraintRight_toLeftOf="@id/textB"

        app:layout_constraintHorizontal_chainStyle="spread_inside"

        />

    <TextView

        android:id="@+id/textB"

        android:layout_width="wrap_content"

        android:layout_height="wrap_content"

        android:text="文本B"

        android:background="#b7ff00"

        app:layout_constraintLeft_toRightOf="@id/textA"

        app:layout_constraintRight_toLeftOf="@id/textC"

        />

    <TextView

        android:id="@+id/textC"

        android:layout_width="wrap_content"

        android:layout_height="wrap_content"

        android:text="文本C"

        android:background="#00ffd9"

        app:layout_constraintLeft_toRightOf="@id/textB"

        app:layout_constraintRight_toRightOf="parent"

        />

</android.support.constraint.ConstraintLayout>
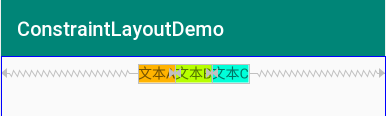
例子3:含有权重spread模式
加权链
链的默认行为是在可用空间中平均分布元素。如果使用了一个或多个元素MATCH_CONSTRAINT(0dp),它们将使用可用的空白空间(在它们之间平均分配)。
属性app:layout_constraintHorizontal_weight和app:layout_constraintVertical_weight 将控制如何将空间利用的元素之间进行分配MATCH_CONSTRAINT(0dp)。例如,在包含两个元素的链上使用MATCH_CONSTRAINT,第一个元素使用权重2,第二个元素使用权重1,第一个元素占用的空间将是第二个元素占用的空间的两倍。
例子3.1:文本B和文本C平分可用空白空间
<?xml version="1.0" encoding="utf-8"?>

<android.support.constraint.ConstraintLayout xmlns:android="http://schemas.android.com/apk/res/android"

    xmlns:app="http://schemas.android.com/apk/res-auto"

    xmlns:tools="http://schemas.android.com/tools"

    android:layout_width="match_parent"

    android:layout_height="match_parent"

    tools:context=".MainActivity"

    android:padding="8dp"

    >

    <TextView

        android:id="@+id/textA"

        android:layout_width="wrap_content"

        android:layout_height="wrap_content"

        android:text="文本A"

        android:background="#ffb300"

        app:layout_constraintLeft_toLeftOf="parent"

        app:layout_constraintRight_toLeftOf="@id/textB"

        app:layout_constraintHorizontal_chainStyle="spread"

        />

    <TextView

        android:id="@+id/textB"

        android:layout_width="0dp"

        android:layout_height="wrap_content"

        android:text="文本B"

        android:background="#b7ff00"

        app:layout_constraintLeft_toRightOf="@id/textA"

        app:layout_constraintRight_toLeftOf="@id/textC"

        />

    <TextView

        android:id="@+id/textC"

        android:layout_width="0dp"

        android:layout_height="wrap_content"

        android:text="文本C"

        android:background="#00ffd9"

        app:layout_constraintLeft_toRightOf="@id/textB"

        app:layout_constraintRight_toRightOf="parent"

        />

</android.support.constraint.ConstraintLayout>
例子3.2:文本B占2份可用空白空间,文本C占1份可用空白空间
<?xml version="1.0" encoding="utf-8"?>

<android.support.constraint.ConstraintLayout xmlns:android="http://schemas.android.com/apk/res/android"

    xmlns:app="http://schemas.android.com/apk/res-auto"

    xmlns:tools="http://schemas.android.com/tools"

    android:layout_width="match_parent"

    android:layout_height="match_parent"

    tools:context=".MainActivity"

    android:padding="8dp"

    >

    <TextView

        android:id="@+id/textA"

        android:layout_width="wrap_content"

        android:layout_height="wrap_content"

        android:text="文本A"

        android:background="#ffb300"

        app:layout_constraintLeft_toLeftOf="parent"

        app:layout_constraintRight_toLeftOf="@id/textB"

        app:layout_constraintHorizontal_chainStyle="spread"

        />

    <TextView

        android:id="@+id/textB"

        android:layout_width="0dp"

        android:layout_height="wrap_content"

        android:text="文本B"

        android:background="#b7ff00"

        app:layout_constraintLeft_toRightOf="@id/textA"

        app:layout_constraintRight_toLeftOf="@id/textC"

        app:layout_constraintHorizontal_weight="2"

        />

    <TextView

        android:id="@+id/textC"

        android:layout_width="0dp"

        android:layout_height="wrap_content"

        android:text="文本C"

        android:background="#00ffd9"

        app:layout_constraintLeft_toRightOf="@id/textB"

        app:layout_constraintRight_toRightOf="parent"

        app:layout_constraintHorizontal_weight="1"

        />

</android.support.constraint.ConstraintLayout>
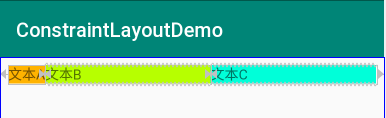
例子4:packed模式
<?xml version="1.0" encoding="utf-8"?>

<android.support.constraint.ConstraintLayout xmlns:android="http://schemas.android.com/apk/res/android"

    xmlns:app="http://schemas.android.com/apk/res-auto"

    xmlns:tools="http://schemas.android.com/tools"

    android:layout_width="match_parent"

    android:layout_height="match_parent"

    tools:context=".MainActivity"

    android:padding="8dp"

    >

    <TextView

        android:id="@+id/textA"

        android:layout_width="wrap_content"

        android:layout_height="wrap_content"

        android:text="文本A"

        android:background="#ffb300"

        app:layout_constraintLeft_toLeftOf="parent"

        app:layout_constraintRight_toLeftOf="@id/textB"

        app:layout_constraintHorizontal_chainStyle="packed"

        />

    <TextView

        android:id="@+id/textB"

        android:layout_width="wrap_content"

        android:layout_height="wrap_content"

        android:text="文本B"

        android:background="#b7ff00"

        app:layout_constraintLeft_toRightOf="@id/textA"

        app:layout_constraintRight_toLeftOf="@id/textC"

        />

    <TextView

        android:id="@+id/textC"

        android:layout_width="wrap_content"

        android:layout_height="wrap_content"

        android:text="文本C"

        android:background="#00ffd9"

        app:layout_constraintLeft_toRightOf="@id/textB"

        app:layout_constraintRight_toRightOf="parent"

        />

</android.support.constraint.ConstraintLayout>
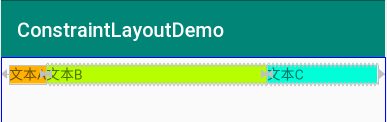
例子5:含有边距的packed模式
链中的边距
如果在链上指定了边距,则会考虑它们。在扩散链的情况下,将从分配的空间中扣除边距。
边距和链条(1.1)
在链中的元素上使用边距时,边距是相加的。
例如,在水平链上,如果一个元素定义了10dp的右边距而下一个元素定义了5dp的左边距,则这两个元素之间产生的边距为15dp。
在计算链用于定位项目的剩余空间时,会同时考虑项目及其边距。剩余空间不包含已设置的边距。
<?xml version="1.0" encoding="utf-8"?>

<android.support.constraint.ConstraintLayout xmlns:android="http://schemas.android.com/apk/res/android"

    xmlns:app="http://schemas.android.com/apk/res-auto"

    xmlns:tools="http://schemas.android.com/tools"

    android:layout_width="match_parent"

    android:layout_height="match_parent"

    tools:context=".MainActivity"

    android:padding="8dp"

    >

    <TextView

        android:id="@+id/textA"

        android:layout_width="wrap_content"

        android:layout_height="wrap_content"

        android:text="文本A"

        android:background="#ffb300"

        app:layout_constraintLeft_toLeftOf="parent"

        app:layout_constraintRight_toLeftOf="@id/textB"

        app:layout_constraintHorizontal_chainStyle="packed"

        android:layout_marginRight="10dp"

        />

    <TextView

        android:id="@+id/textB"

        android:layout_width="wrap_content"

        android:layout_height="wrap_content"

        android:text="文本B"

        android:background="#b7ff00"

        app:layout_constraintLeft_toRightOf="@id/textA"

        app:layout_constraintRight_toLeftOf="@id/textC"

        android:layout_marginLeft="5dp"

        />

    <TextView

        android:id="@+id/textC"

        android:layout_width="wrap_content"

        android:layout_height="wrap_content"

        android:text="文本C"

        android:background="#00ffd9"

        app:layout_constraintLeft_toRightOf="@id/textB"

        app:layout_constraintRight_toRightOf="parent"

        android:layout_marginLeft="5dp"

        />

</android.support.constraint.ConstraintLayout>
十、辅助布局【Virtual Helper objects】
Guideline对象允许您创建相对于ConstraintLayout容器定位的水平和垂直指南。然后可以通过将小部件约束到这样的指导来定位小部件。在1.1中,Barrier也Group被添加了。
10.1、 Guideline
参考《https://developer.android.google.cn/reference/android/support/constraint/Guideline》
Guideline表示约束布局的指导帮助对象的实用工具类。Guideline不显示在设备上(它们被标记为View.GONE),并且仅用于布局目的,它们只在ConstraintLayout中工作。
Guideline可以设置类似于LinearLayout中的orientation属性,设置垂直方向或者水平方向,若设置垂直方向,则水平方向的高度为0,若设置为水平方向,则垂直方向的宽度为0。
Guideline可以是水平的,也是可以是竖直的。通过设置android:orientation属性:
- 垂直Guideline的宽度为0,高度为父级ConstraintLayout的高度。
- 水平Guideline的高度为0,宽度为父级ConstraintLayout的宽度。
Guideline 具有以下的三种定位方式:
- app:layout_constraintGuide_begin【距离父容器起始位置的距离(左侧或顶部)】
- app:layout_constraintGuide_end【距离父容器结束位置的距离(右侧或底部)】
- app:layout_constraintGuide_percent【距离父容器宽度或高度的百分比,取值范围:0.0~1.0】
例子1:按钮A和按钮B分别在屏幕一半区域的中间
<?xml version="1.0" encoding="utf-8"?>

<android.support.constraint.ConstraintLayout xmlns:android="http://schemas.android.com/apk/res/android"

    xmlns:app="http://schemas.android.com/apk/res-auto"

    xmlns:tools="http://schemas.android.com/tools"

    android:layout_width="match_parent"

    android:layout_height="match_parent"

    tools:context=".MainActivity"

    android:padding="8dp"

    >

    <android.support.constraint.Guideline

        android:id="@+id/guideline"

        android:layout_width="wrap_content"

        android:layout_height="wrap_content"

        app:layout_constraintGuide_percent="0.5"

        android:orientation="vertical"/>

    <Button

        android:id="@+id/buttonA"

        android:layout_width="wrap_content"

        android:layout_height="wrap_content"

        android:text="按钮A"

        android:background="#ffb300"

        app:layout_constraintLeft_toLeftOf="parent"

        app:layout_constraintRight_toRightOf="@id/guideline"

        />

    <Button

        android:id="@+id/buttonB"

        android:layout_width="wrap_content"

        android:layout_height="wrap_content"

        android:text="按钮B"

        android:background="#b7ff00"

        app:layout_constraintLeft_toLeftOf="@id/guideline"

        app:layout_constraintRight_toRightOf="parent"

        />

</android.support.constraint.ConstraintLayout>
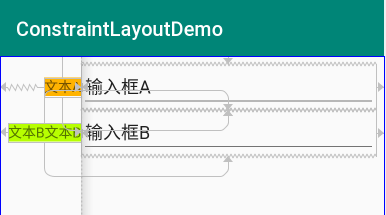
10.2、 Barrier(Added in 1.1)
参考《https://developer.android.google.cn/reference/android/support/constraint/Barrier》
Barrier,直译为障碍、屏障。在约束布局中,可以使用app:constraint_referenced_ids属性来引用多个带约束的组件,从而将它们看作一个整体。设置app:barrierDirection属性指定方向。
Barrier是一个虚拟的辅助控件,它可以阻止一个或者多个控件越过自己,就像一个屏障一样。当某个控件要越过自己的时候,Barrier会自动移动,避免自己被覆盖。
例子1:app:barrierDirection="start"效果【注意:建议添加上app:layout_constraintRight_toRightOf="@id/barrier"】
<?xml version="1.0" encoding="utf-8"?>

<android.support.constraint.ConstraintLayout xmlns:android="http://schemas.android.com/apk/res/android"

    xmlns:app="http://schemas.android.com/apk/res-auto"

    xmlns:tools="http://schemas.android.com/tools"

    android:layout_width="match_parent"

    android:layout_height="match_parent"

    tools:context=".MainActivity"

    android:padding="8dp"

    >

    <TextView

        android:id="@+id/textA"

        android:layout_width="wrap_content"

        android:layout_height="wrap_content"

        android:text="文本A"

        android:background="#ffb300"

        app:layout_constraintTop_toTopOf="parent"

        app:layout_constraintLeft_toLeftOf="parent"

        app:layout_constraintRight_toRightOf="@id/barrier"

        />

    <TextView

        android:id="@+id/textB"

        android:layout_width="wrap_content"

        android:layout_height="wrap_content"

        android:text="文本B文本B"

        android:background="#b7ff00"

        app:layout_constraintTop_toBottomOf="@id/textA"

        app:layout_constraintLeft_toLeftOf="parent"

        app:layout_constraintRight_toRightOf="@id/barrier"

        />

    <android.support.constraint.Barrier

        android:id="@+id/barrier"

        android:layout_width="wrap_content"

        android:layout_height="wrap_content"

        app:barrierDirection="start"

        app:constraint_referenced_ids="textA,textB"/>

</android.support.constraint.ConstraintLayout>
例子2:app:barrierDirection="end"效果【注意:建议添加上app:layout_constraintRight_toRightOf="@id/barrier"】

<?xml version="1.0" encoding="utf-8"?>

<android.support.constraint.ConstraintLayout xmlns:android="http://schemas.android.com/apk/res/android"

    xmlns:app="http://schemas.android.com/apk/res-auto"

    xmlns:tools="http://schemas.android.com/tools"

    android:layout_width="match_parent"

    android:layout_height="match_parent"

    tools:context=".MainActivity"

    android:padding="8dp"

    >

    <TextView

        android:id="@+id/textA"

        android:layout_width="wrap_content"

        android:layout_height="wrap_content"

        android:text="文本A"

        android:background="#ffb300"

        app:layout_constraintTop_toTopOf="parent"

        app:layout_constraintLeft_toLeftOf="parent"

        app:layout_constraintRight_toRightOf="@id/barrier"

        />

    <TextView

        android:id="@+id/textB"

        android:layout_width="wrap_content"

        android:layout_height="wrap_content"

        android:text="文本B文本B"

        android:background="#b7ff00"

        app:layout_constraintTop_toBottomOf="@id/textA"

        app:layout_constraintLeft_toLeftOf="parent"

        app:layout_constraintRight_toRightOf="@id/barrier"

        />

    <android.support.constraint.Barrier

        android:id="@+id/barrier"

        android:layout_width="wrap_content"

        android:layout_height="wrap_content"

        app:barrierDirection="end"

        app:constraint_referenced_ids="textA,textB"/>

</android.support.constraint.ConstraintLayout>
例子3:表单样式,左侧标签,右侧输入框
<?xml version="1.0" encoding="utf-8"?>

<android.support.constraint.ConstraintLayout xmlns:android="http://schemas.android.com/apk/res/android"

    xmlns:app="http://schemas.android.com/apk/res-auto"

    xmlns:tools="http://schemas.android.com/tools"

    android:layout_width="match_parent"

    android:layout_height="match_parent"

    tools:context=".MainActivity"

    android:padding="8dp"

    >

    <TextView

        android:id="@+id/textA"

        android:layout_width="wrap_content"

        android:layout_height="wrap_content"

        android:text="文本A"

        android:background="#ffb300"

        app:layout_constraintTop_toTopOf="@id/edtA"

        app:layout_constraintBottom_toBottomOf="@id/edtA"

        app:layout_constraintLeft_toLeftOf="parent"

        app:layout_constraintRight_toRightOf="@id/barrier"

        app:layout_constraintHorizontal_bias="1"

        />

    <EditText

        android:id="@+id/edtA"

        android:layout_width="0dp"

        android:layout_height="wrap_content"

        android:text="输入框A"

        app:layout_constraintLeft_toRightOf="@id/barrier"

        app:layout_constraintRight_toRightOf="parent"/>

    <TextView

        android:id="@+id/textB"

        android:layout_width="wrap_content"

        android:layout_height="wrap_content"

        android:text="文本B文本B"

        android:background="#b7ff00"

        app:layout_constraintTop_toTopOf="@id/edtB"

        app:layout_constraintBottom_toBottomOf="@id/edtB"

        app:layout_constraintLeft_toLeftOf="parent"

        app:layout_constraintRight_toRightOf="@id/barrier"

        app:layout_constraintHorizontal_bias="1"

        />

    <EditText

        android:id="@+id/edtB"

        android:layout_width="0dp"

        android:layout_height="wrap_content"

        android:text="输入框B"

        app:layout_constraintTop_toBottomOf="@id/edtA"

        app:layout_constraintLeft_toRightOf="@id/barrier"

        app:layout_constraintRight_toRightOf="parent"/>

    <android.support.constraint.Barrier

        android:id="@+id/barrier"

        android:layout_width="wrap_content"

        android:layout_height="wrap_content"

        app:barrierDirection="end"

        app:constraint_referenced_ids="textA,textB"/>

</android.support.constraint.ConstraintLayout>
10.3、 Group(Added in 1.1)
参考《https://developer.android.google.cn/reference/android/support/constraint/Group》
Group用于控制多个控件的可见性。
通过app:constraint_referenced_ids属性,以逗号分隔的ID列表来引用控件。
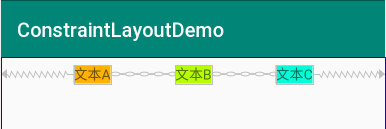
例子1:隐藏文本A和文本C,保留文本B
上图中,左侧是全部显示的效果,右侧是隐藏文本A和文本C的效果。
<?xml version="1.0" encoding="utf-8"?>

<android.support.constraint.ConstraintLayout xmlns:android="http://schemas.android.com/apk/res/android"

    xmlns:app="http://schemas.android.com/apk/res-auto"

    xmlns:tools="http://schemas.android.com/tools"

    android:layout_width="match_parent"

    android:layout_height="match_parent"

    tools:context=".MainActivity"

    android:padding="8dp"

    >

    <TextView

        android:id="@+id/textA"

        android:layout_width="wrap_content"

        android:layout_height="wrap_content"

        android:text="文本A"

        android:background="#ffb300"

        app:layout_constraintTop_toTopOf="parent"

        app:layout_constraintLeft_toLeftOf="parent"

        />

    <TextView

        android:id="@+id/textB"

        android:layout_width="wrap_content"

        android:layout_height="wrap_content"

        android:text="文本B文本B"

        android:background="#b7ff00"

        app:layout_constraintTop_toBottomOf="@id/textA"

        app:layout_constraintLeft_toLeftOf="parent"

        />

    <TextView

        android:id="@+id/textC"

        android:layout_width="wrap_content"

        android:layout_height="wrap_content"

        android:text="文本C文本C文本C"

        android:background="#00ffc8"

        app:layout_constraintTop_toBottomOf="@id/textB"

        app:layout_constraintLeft_toLeftOf="parent"

        />

    <android.support.constraint.Group

        android:id="@+id/group"

        android:layout_width="wrap_content"

        android:layout_height="wrap_content"

        app:constraint_referenced_ids="textA,textC"

        android:visibility="invisible"/>

</android.support.constraint.ConstraintLayout>
10.4、 Placeholder(Added in 1.1)
参考《https://developer.android.google.cn/reference/android/support/constraint/Placeholder》
Placeholder就是用来一个占位的东西,它可以把自己的内容设置为ConstraintLayout内的其它view。因此它用来写布局的模版,也可以用来动态修改UI的内容。
当在占位符(使用setContent()或者app:content="id")上设置另一个视图的id时,占位符有效地成为内容视图。如果内容视图存在于屏幕上,则将其视为从其原始位置消失。
Placeholder 简单地在布局中约束,就像任何其他视图一样。
例子1:暂时没有想好
使用步骤
一、导入步骤
在build.gradle中引入依赖即可
apply plugin: 'com.android.application'

android {

    compileSdkVersion 28

    defaultConfig {

        applicationId "com.why.project.constraintlayoutdemo"

        minSdkVersion 16

        targetSdkVersion 28

        versionCode 1

        versionName "1.0"

        testInstrumentationRunner "android.support.test.runner.AndroidJUnitRunner"

    }

    buildTypes {

        release {

            minifyEnabled false

            proguardFiles getDefaultProguardFile('proguard-android.txt'), 'proguard-rules.pro'

        }

    }

}

dependencies {

    implementation fileTree(dir: 'libs', include: ['*.jar'])

    implementation 'com.android.support:appcompat-v7:28.0.0'

    implementation 'com.android.support.constraint:constraint-layout:1.1.3'

    testImplementation 'junit:junit:4.12'

    androidTestImplementation 'com.android.support.test:runner:1.0.2'

    androidTestImplementation 'com.android.support.test.espresso:espresso-core:3.0.2'

}
二、使用方法
见上面的例子。
参考资料
Constraint Layout 1.1.x带来了哪些新东西?
【Android】AS环境下,在布局中使用android:gravity="left/right"提示使用start/end
android布局文件中start,end,left,right的区别
ConstraintLayoutDemo【约束性布局知识梳理】【基于1.1.3】的更多相关文章
- css-flex布局知识梳理
一.传统的布局 布局的传统解决方案,基于盒装模型,依赖 display 属性 + position属性 + float属性.它对于那些特殊布局非常不方便,比如,垂直居中就不容易实现. 二. Flex的 ...
- MySQL 基础知识梳理
MySQL 的安装方式有多种,但是对于不同场景,会有最适合该场景的 MySQL 安装方式,下面就介绍一下 MySQL 常见的安装方法,包括 rpm 安装,yum 安装,通用二进制安装以及源码编译安装, ...
- [SQL] SQL 基础知识梳理(四) - 数据更新
SQL 基础知识梳理(四) - 数据更新 [博主]反骨仔 [原文]http://www.cnblogs.com/liqingwen/p/5929786.html 序 这是<SQL 基础知识梳理( ...
- spring远程服务知识梳理
序:本文主要是总结和归纳spring的远程服务相关知识,可作为入门学习笔记.写博客目的也是为了进行知识梳理,便于以后查看.本文主要参考资料 spring 实战第三版 本文主要讨论内容如下: 远程调度概 ...
- jQuery知识梳理20190817
目录 jQuery知识梳理20190817 1. jQuery的特征 2. jQuery的两把利器 2.1 jQuery核心函数 2.2 jQuery核心对象 3. jQuery核心函数详解 4. j ...
- [SQL] SQL 基础知识梳理(一)- 数据库与 SQL
SQL 基础知识梳理(一)- 数据库与 SQL [博主]反骨仔 [原文地址]http://www.cnblogs.com/liqingwen/p/5902856.html 目录 What's 数据库 ...
- Oracle知识梳理(三)操作篇:SQL基础操作汇总
Oracle知识梳理(三)操作篇:SQL基础操作汇总 一.表操作 1.表的创建(CREATE TABLE): 基本语句格式: CREATE TABLE table_name ( col_ ...
- Linux基础知识梳理
Linux基础知识梳理 Linux内核最初只是由芬兰人林纳斯?托瓦兹(Linus Torvalds)在赫尔辛基大学上学时出于个人爱好而编写的.Linux是一套免费使用和自由传播的类Unix操作系统,是 ...
- iOS多线程知识梳理
iOS多线程知识梳理 线程进程基础概念 进程 进程是指在系统中正在运行的一个应用程序 每个进程之间是独立的,每个进程均运行在其专用且受保护的内存空间内 线程 1个进程要想执行任务,必须得有线程(每1个 ...
随机推荐
- 在Windows上安装FFmpeg程序的方法(you-get下载视频必备程序)
FFmpeg是一套可以用来记录.转换数字音频.视频,并能将其转化为流的开源计算机程序.它提供了录制.转换以及流化音视频的完整解决方案.它包含了非常先进的音频/视频编解码库libavcodec. 该程序 ...
- Scala编程入门---面向对象编程之Trait
Scala中Trait是一种特殊概念 首先我们可以将Triat做为接口来使用,此时的Triat就与java中的接口非常相似 在Triat中可以定义抽象方法,就与抽象类中的抽象方法一样,只要不给出具体的 ...
- 微信小程序UI组件、开发框架、实用库...
UI组件 weui-wxss ★852 - 同微信原生视觉体验一致的基础样式库 Wa-UI ★122 - 针对微信小程序整合的一套UI库 wx-charts ★105 - 微信小程序图表工具 wema ...
- 通过jdbc完成单表的curd操作以及对JDBCUtils的封装
概述:jdbc是oracle公司制定的一套规范(一套接口),驱动是jdbc的实现类,由数据库厂商提供.所以我们可以通过一套规范实现对不同的数据库操作(多态) jdbc的作用:连接数据库,发送sql语句 ...
- 一文读懂 Spring Boot、微服务架构和大数据治理三者之间的故事
微服务架构 微服务的诞生并非偶然,它是在互联网高速发展,技术日新月异的变化以及传统架构无法适应快速变化等多重因素的推动下诞生的产物.互联网时代的产品通常有两类特点:需求变化快和用户群体庞大,在这种情况 ...
- Scrapy爬虫框架补充内容三(代理及其基本原理介绍)
前言:(本文参考维基百科及百度百科所写) 当我们使用爬虫抓取数据时,有时会产生错误比如:突然跳出来了403 Forbidden 或者网页上出现以下提示:您的ip访问频率太高 或者时不时跳出一个验证码需 ...
- SSM-SpringMVC-07:SpringMVC中处理器映射器
------------吾亦无他,唯手熟尔,谦卑若愚,好学若饥------------- BeanNameUrlHandlerMapping和SimpleUrlHandlerMapping BeanN ...
- 微信小程序基于第三方websocket的服务器端部署
微信小程序后台请求越来越严格 1.request要求用https 2.websocket要求用wss 3.测试后发现websocket只能走433端口 作为.net开发,websocket又是使用的第 ...
- Linux网络简介
Linux的网络简介 1.TCP/IP协议簇 (通俗的解释就是为了网路传输指定的一种标准),它将网络划分为四层:应用层 .传输层.互联层 .网络接口层 . 基础层是网络接口层(说白了就是把帧格式的数 ...
- 浅析mydumper
Ⅰ.背景 mysqldump单线程备份,很慢 恢复慢,一张表一张表恢复, 如果备份了100G的数据,想恢复其中一个表,做不到(所有的表都在一个文件里) 所以推荐使用mydumper备份 备份并行,基于 ...