
mysql8.0绿色版安装及mysqldump备份
1、下载mysql绿色版压缩包
https://dev.mysql.com/downloads/mysql/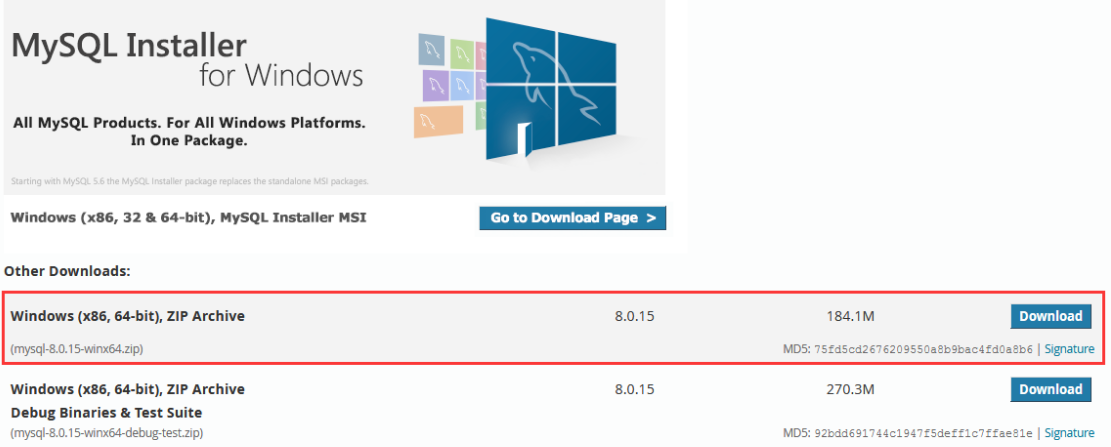
2、解压到安装目录后,在根目录创建data文件夹
3、把mysql下的bin目录添加到环境变量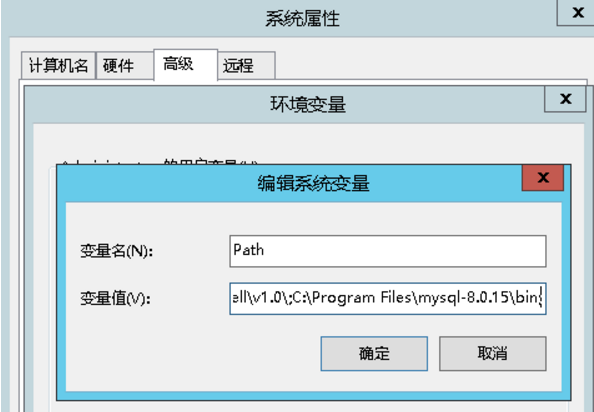
4、根目录创建my.ini文件,并拷贝以下代码,并修改basedir和datadir路径
# MySQL Server Instance Configuration File

# ----------------------------------------------------------------------

# Generated by the MySQL Server Instance Configuration Wizard

#

#

# Installation Instructions

# ----------------------------------------------------------------------

#

# On Linux you can copy this file to /etc/my.cnf to set global options,

# mysql-data-dir/my.cnf to set server-specific options

# (@localstatedir@ for this installation) or to

# ~/.my.cnf to set user-specific options.

#

# On Windows you should keep this file in the installation directory

# of your server (e.g. C:\Program Files\MySQL\MySQL Server X.Y). To

# make sure the server reads the config file use the startup option

# "--defaults-file".

#

# To run run the server from the command line, execute this in a

# command line shell, e.g.

# mysqld --defaults-file="D:\GreenSoft\MySQL\my.ini"

#

# To install the server as a Windows service manually, execute this in a

# command line shell, e.g.

# mysqld --install mysql --defaults-file="D:\GreenSoft\MySQL\my.ini"

#

# And then execute this in a command line shell to start the server, e.g.

# net start mysql

#

#

# Guildlines for editing this file

# ----------------------------------------------------------------------

#

# In this file, you can use all long options that the program supports.

# If you want to know the options a program supports, start the program

# with the "--help" option.

#

# More detailed information about the individual options can also be

# found in the manual.

#

# For advice on how to change settings please see

# http://dev.mysql.com/doc/refman/8.0/en/server-configuration-defaults.html

#

#

# CLIENT SECTION

# ----------------------------------------------------------------------

#

# The following options will be read by MySQL client applications.

# Note that only client applications shipped by MySQL are guaranteed

# to read this section. If you want your own MySQL client program to

# honor these values, you need to specify it as an option during the

# MySQL client library initialization.

#

[client]

no-beep

# pipe

# socket=0.0

port=

[mysql]

default-character-set=utf8

[mysqld]

# 这是8..4的新特性 caching_sha2_password,在linux上面使用命宁 mysql -uroot -proot 可以链接,但是使用windows下面的navict链接不成功

default_authentication_plugin = mysql_native_password

# These are commonly set, remove the # and set as required.

character-set-server = utf8

basedir = D:\Program Files\mysql-8.0.-winx64

datadir = D:\Program Files\mysql-8.0.-winx64\data

port =

server_id =

# Remove leading # and set to the amount of RAM for the most important data

# cache in MySQL. Start at % of total RAM for dedicated server, else %.

innodb_buffer_pool_size = 128M

# Remove leading # to turn on a very important data integrity option: logging

# changes to the binary log between backups.

# log_bin

# General and Slow logging.

log-output=FILE

general-log=

general_log_file="CUPID.log"

slow-query-log=

slow_query_log_file="CUPID-slow.log"

long_query_time=

# Binary Logging.

# log-bin

# Error Logging.

log-error="CUPID.err"

# Remove leading # to set options mainly useful for reporting servers.

# The server defaults are faster for transactions and fast SELECTs.

# Adjust sizes as needed, experiment to find the optimal values.

# join_buffer_size = 128M

# sort_buffer_size = 2M

# read_rnd_buffer_size = 2M

# 8.0.4版本的时候,用的是这个sql_mode,但在8..11版本中会报错,改成下面那个

# sql_mode=STRICT_TRANS_TABLES,NO_ZERO_IN_DATE,NO_ZERO_DATE,ERROR_FOR_DIVISION_BY_ZERO,NO_AUTO_CREATE_USER,NO_ENGINE_SUBSTITUTION

sql-mode="STRICT_TRANS_TABLES,NO_ENGINE_SUBSTITUTION"

default-storage-engine=INNODB

innodb_log_file_size = 512M

binlog_format='MIXED'

max_allowed_packet = 1G

# innodb_file_per_table =

# innodb_file_format = Barracuda

# 大小写是否敏感,0敏感 Linux下默认为0, Windows下默认值是 , MacOS下默认值是 (0敏感)

lower_case_table_names =

innodb_strict_mode =

max_connections =
5、mysqld --install //安装MYSQL服务
6、mysqld --initialize --user=mysql --console //初始化mysql,并记下临时密码
7、net start mysql //启动mysql服务
8、SET PASSWORD = '123456'; //修改密码
或者使用 ALTER USER 'root'@'localhost' IDENTIFIED BY '123456';
9、CREATE USER 'username'@'host' IDENTIFIED BY 'password'; (创建异地登录用户)
例:CREATE USER 'backup'@'10.0.0.2' IDENTIFIED BY '123456'; (用户名为backup,密码123456,只允许10.0.0.2远程登录)
10、GRANT privileges ON databasename.tablename TO 'username'@'host';(用户授权)
例:GRANT select,lock tables ON db1.* TO 'backup'@'%';(授权db1数据库的select和lock tables权限给backup用户)
客户端下使用mysqldump备份
1、下载mysql绿色版,解压后,进入bin目录(客户端可以不用安装服务和初始化)
2、mysqldump -h主机名 -P端口 -u用户名 -p密码 数据库名 > 文件名.sql
mysqldump -h10.0.0.1 -P3310 -ubackup -p123456 db1 > db1.sql (备份db1数据库并保存为db1.sql文件)
安装mysql过程中,出现过的报错
1、丢失MSVCP140.DLL
解决方法:安装VC++2015运行库

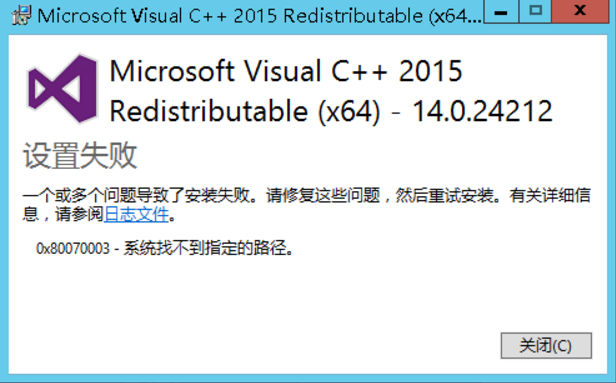
2、安装VC++2015运行库失败
解决方法:控制面板-》Windows更新,更新到最新补丁

mysql8.0绿色版安装及mysqldump备份的更多相关文章
- mysql-8.0解压缩版安装配置完整过程
https://www.cnblogs.com/xiongzaiqiren/p/8970203.html
- mysql-8.0.11-winx64 免安装版配置方法
mysql-8.0.11-winx64.zip 下载地址:https://dev.mysql.com/downloads/file/?id=476233 mysql-8.0.11-winx64.zi ...
- mysql8.0.15二进制安装
mysql8.0.15二进制安装 今天有幸尝试安装了社区版本的mysql8.0.15,记录下来,供以后方便使用.特此感谢知数堂的叶老师,提供了配置文件的模板. # 第一部分:系统配置 # 1.安装系统 ...
- mysql8.0.16二进制安装
mysql8.0.16二进制安装 环境简介操作系统:Centos 6.10 64位 目前版本:8.0.16 MySQL Community Server 二进制 安装目录:/data/mysql/my ...
- 硬盘图标修改器 V1.0 绿色版
软件名称:硬盘图标修改器 V1.0 绿色版软件语言: 简体中文授权方式: 免费软件应用平台: Win7 / Vista / Win2003 / WinXP / Win2008 软件大小: 12.3MB ...
- mysql-5.7.10-winx64 绿色版安装办法
mysql-5.7.10-winx64 绿色版安装办法 为了防止安装程序造成电脑系统冗余,经过测试,终于将绿色版的mysql for windows安装成功.当然很多是从事百度搜索到的,但作为一种积累 ...
- MySQL5.6绿色版安装
1.下载 MySQL绿色版安装需下载好三个文件 (1).MySQL5.6版本离线安装包 (2).Microsoft Visual C++ (3).Microsoft .NET Framework 1. ...
- 微信小程序(原名微信应用号)开发工具0.9版安装教程
微信小程序全称微信公众平台·小程序,原名微信公众平台·应用号(简称微信应用号) 声明 微信小程序开发工具类似于一个轻量级的IDE集成开发环境,目前仅开放给了少部分受微信官方邀请的人士(据说仅200个名 ...
- 2016032201 - mysql5.7.10绿色版安装
参考地址:http://jingyan.baidu.com/article/ff42efa93580c4c19e2202b6.html 其实您完全可以参考上面的百度贴吧内容搞定的,我记录只是做个笔记, ...
随机推荐
- 解决Dynamics 365使用JS调用Web API时报no property value was found in the payload 错误。
摘要: 微软动态CRM专家罗勇 ,回复323或者20190421可方便获取本文,同时可以在第一间得到我发布的最新博文信息,follow me! 碰到如下报错: message: "An er ...
- dart 如何优雅的避空
前言 对于每一个程序员来说,空指针异常应该是基本都会遇到过的异常,而且这个异常出现的概率还比较大. 但是,空指针异常又是最容易解决的异常,因为只要加个非空判断就可以避免了. 本篇通过对比一般非空判断和 ...
- SQL Server统计信息偏差影响表联结方式案例浅析
我们知道数据库中的统计信息的准确性是非常重要的.它会影响执行计划.一直想写一篇关于统计信息影响执行计划的相关博客,但是都卡在如何构造一个合适的例子上,所以一直拖着没有写.巧合,最近在生产环境中遇到 ...
- Taurus.MVC 2.3 开源发布:增强属性Require验证功能,自带WebAPI文档生成功能
背景: 上周,把 Taurus.MVC 在 Linux (CentOS7) 上部署任务完成后. 也不知怎么的,忽然就想给框架集成一下WebAPI文档功能,所以就动手了. 以为一天能搞完,结果,好几天过 ...
- Quartz+ssm注解方式的最最最最简单使用
Maven配置 <!-- quartz监控 --> <dependency> <groupId>org.quartz-scheduler</groupId&g ...
- .NET Core微服务之基于EasyNetQ使用RabbitMQ消息队列
Tip: 此篇已加入.NET Core微服务基础系列文章索引 一.消息队列与RabbitMQ 1.1 消息队列 “消息”是在两台计算机间传送的数据单位.消息可以非常简单,例如只包含文本字符串:也可以更 ...
- ASP.NET Core中使用GraphQL - 第六章 使用EF Core作为持久化仓储
ASP.NET Core中使用GraphQL ASP.NET Core中使用GraphQL - 第一章 Hello World ASP.NET Core中使用GraphQL - 第二章 中间件 ASP ...
- 关于获取资源文件,Class.getResource和ClassLoader.getResource的区别
原文同步发表至个人博客[夜月归途] 原文链接:http://www.guitu18.com/se/java/2019-02-22/29.html 作者:夜月归途 出处:http://www.guitu ...
- QLineEdit拾遗:数据的过滤、验证和补全
QLineEdit是使用频率最高的控件之一,当我们想获取用户输入时自然而然得会用到它. 通常我们会将QLineEdit的信号或其他控件的信号绑定至槽函数,然后获取并处理编辑器内的数据.你会觉得我们拿到 ...
- js对象数组(JSON) 根据某个共同字段 分组
首先判断 var arr = [ {"id":"1001","name":"值1","value": ...