Ant Design Pro项目ProTable怎么实现单元格合并效果
前情
公司有经常需要做一些后台管理页面,我们选择了Ant Design Pro,它是基于 Ant Design 和 umi 的封装的一整套企业级中后台前端/设计解决方案。
产品效果图
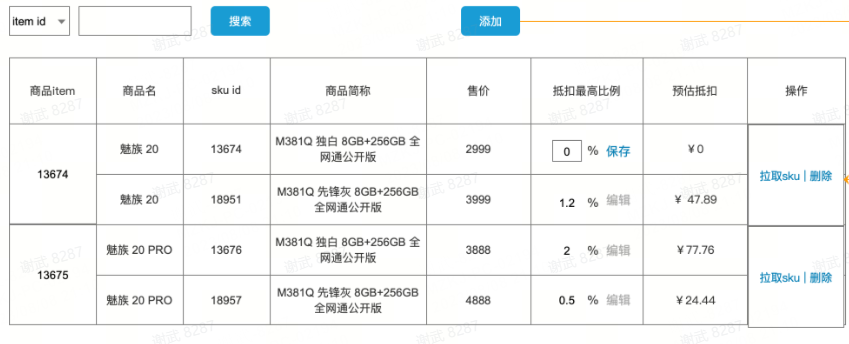
最新接到的一个后台管理界面需求,需要根据相同的itemId做单元格合并,要实现的效果如下:
解决方案
方式1:使用表格的rowspan属性来实现单元格合并
关键示例代码:
/**

 * 实现单元格合并

 * 在原始数据中加上rowSpan属性,该值为接下来和当前项itemId相同的个数+1,

 * 其它相同的项rowSpan设为0即为不显示

 * @param list

 */

const dataProcessingForRowspan = (list, key) => {

  let repeatCount = 1;

  let startIndex = 0;

  list.forEach((item, index) => {

    if (index < list.length - 1 && item.itemId === list[index+1].itemId) {

      item.rowSpan = 0;

      repeatCount += 1

    } else {

      list[startIndex].rowSpan = repeatCount;

      startIndex = index + 1;

      repeatCount = 1;

    }

  })

}

const columns: ProColumns<API.EduAuthenticatedUserItem>[] = [

    {

      title: '商品itemId',

      dataIndex: 'itemId',

      editable: false,

      render: (text: any, record: any, index: number) => {

        return {

          children: text || '',

          props: {

            rowSpan: record.rowSpan ? record.rowSpan : 0

          }

        }

      }

    },

		...

    {

      title: '操作',

      dataIndex: 'option',

      valueType: 'option',

      render: (text, record:any, index) => {

        return {

          children: [

            <a

              key="config"

              onClick={() => {

              }}

            >

              拉取sku

            </a>,

            ' | '

            ,

            <a

              key="delete"

              onClick={() => {

              }}

            >

              删除

            </a>,

          ],

          props: {

            rowSpan: record.rowSpan ? record.rowSpan : 0

          }

        }

      },

    },

  ];

return (

<PageContainer>

      <ProTable<API.EduAuthenticatedUserItem, API.AuthenticatedUserParams>

        headerTitle=''

        rowKey="skuId"

        search={{

          labelWidth: 120,

        }}

        toolBarRender={() => [

        ]}

        request={async (params) => {

          await waitTime(3000)

					// 这里是模拟的数据

          const initData = [{

            itemId: '1',

            name: '魅族20',

            skuId: 'a123456b',

            productAbbreviation: '魅族20 独白 8GB+256GB 全网通公开版',

            price: 2459,

            maximumDeduction: 3,

            estimatedDeduction: 49.18

          },{

            itemId: '1',

            name: '魅族20',

            skuId: 'b123456b',

            productAbbreviation: '魅族20 独白 8GB+256GB 全网通公开版',

            price: 2459,

            maximumDeduction: 2,

            estimatedDeduction: 49.18

          },{

            itemId: '2',

            name: '魅族20',

            skuId: 'c123456b',

            productAbbreviation: '魅族20 独白 8GB+256GB 全网通公开版',

            price: 2459,

            maximumDeduction: 1,

            estimatedDeduction: 49.18

          },{

            itemId: '2',

            name: '魅族20',

            skuId: 'd123456b',

            productAbbreviation: '魅族20 独白 8GB+256GB 全网通公开版',

            price: 2459,

            maximumDeduction: 1,

            estimatedDeduction: 49.18

          },{

            itemId: '2',

            name: '魅族20',

            skuId: 'e123456b',

            productAbbreviation: '魅族20 独白 8GB+256GB 全网通公开版',

            price: 2459,

            maximumDeduction: 1,

            estimatedDeduction: 49.18

          },{

            itemId: '3',

            name: '魅族20',

            skuId: 'f123456b',

            productAbbreviation: '魅族20 独白 8GB+256GB 全网通公开版',

            price: 2459,

            maximumDeduction: 1,

            estimatedDeduction: 49.18

          }]

          dataProcessingForRowspan(initData, 'itemId');

          return {

            data: initData,

            // success 请返回 true,

            // 不然 table 会停止解析数据,即使有数据

            success: true,

            // 不传会使用 data 的长度,如果是分页一定要传

            total: 5,

          };

        }}

        columns={columns}

      />

    </PageContainer>

);
方式2:直接自定义reander方法,在一个单元格中生成遍历的内容,内容块之间加下边框,实现伪单元格合并效果
关键示例代码:
const columns: ProColumns<API.EduAuthenticatedUserItem>[] = [

    {

      title: '商品itemId',

      dataIndex: 'itemId',

      editable: false,

    },

    {

      title: '商品名',

      dataIndex: 'itemName',

    },

    {

      title: 'skuId',

      dataIndex: 'itemSkuList',

      key: 'skuId',

      render: (text: any, record: any) => {

        return record.itemSkuList.map((item: any, indexIn: number) => {

          return (

            <div

              key={item.skuId + '' + indexIn}

              style={{

                borderBottom: indexIn === record.itemSkuList.length - 1 ? '' : '1px solid #f0f0f0',

              }}

            >

              <div

                style={{

                  width: '100%',

                  height: '50px',

                  display: 'flex',

                  justifyContent: 'center',

                  alignItems: 'center',

                  margin: 'auto',

                }}

              >

                {item['skuId']}

              </div>

            </div>

          );

        });

      },

    },

    ...

    {

      title: '预估抵扣',

      dataIndex: 'itemSkuList',

      key: 'predictDeductionPrice',

      editable: false,

      hideInSearch: true,

      render: (text: any, record: any) => {

        return record.itemSkuList.map((item: any, indexIn: number) => {

          return (

            <div

              key={item.skuId + '' + indexIn}

              style={{

                borderBottom: indexIn === record.itemSkuList.length - 1 ? '' : '1px solid #f0f0f0',

              }}

            >

              <div

                style={{

                  width: '100%',

                  height: '50px',

                  display: 'flex',

                  justifyContent: 'center',

                  alignItems: 'center',

                  margin: 'auto',

                }}

              >

                {item['predictDeductionPrice']}

              </div>

            </div>

          );

        });

      },

    },

    {

      title: '操作',

      dataIndex: 'option',

      valueType: 'option',

      render: (text: any, record: any) => {

        return (

          <>

            <a

              key="config"

              onClick={async () => {

              }}

            >

              拉取sku

            </a>{' '}

            |{' '}

            <a

              key="delete"

              onClick={async () => {

              }}

            >

              删除

            </a>

          </>

        );

      },

    },

  ];

  return (

    <PageContainer>

      <ProTable<API.EduAuthenticatedUserItem, API.AuthenticatedUserParams>

        headerTitle=''

        rowKey="itemId"

        search={{

          labelWidth: 120,

        }}

        toolBarRender={() => [

        ]}

        request={async (params) => {

          await waitTime(3000)

          const initData = [{

            itemId: '1',

            itemSkuList:[

              {

                name: '魅族20',

                skuId: 'a123456b',

                productAbbreviation: '魅族20 独白 8GB+256GB 全网通公开版',

                price: 2459,

                maximumDeduction: 3,

                estimatedDeduction: 49.18

              },{

                name: '魅族20',

                skuId: 'b123456b',

                productAbbreviation: '魅族20 独白 8GB+256GB 全网通公开版',

                price: 2459,

                maximumDeduction: 2,

                estimatedDeduction: 49.18

              },{

                name: '魅族20',

                skuId: 'c123456b',

                productAbbreviation: '魅族20 独白 8GB+256GB 全网通公开版',

                price: 2459,

                maximumDeduction: 1,

                estimatedDeduction: 49.18

              },{

              }

            ]

          },{

            itemId: '2',

            itemSkuList: [

              {

                name: '魅族20',

                skuId: 'd123456b',

                productAbbreviation: '魅族20 独白 8GB+256GB 全网通公开版',

                price: 2459,

                maximumDeduction: 1,

                estimatedDeduction: 49.18

              },{

                name: '魅族20',

                skuId: 'e123456b',

                productAbbreviation: '魅族20 独白 8GB+256GB 全网通公开版',

                price: 2459,

                maximumDeduction: 1,

                estimatedDeduction: 49.18

              }

            ]

          },{

            itemId: '3',

            name: '魅族20',

            skuId: 'f123456b',

            productAbbreviation: '魅族20 独白 8GB+256GB 全网通公开版',

            price: 2459,

            maximumDeduction: 1,

            estimatedDeduction: 49.18

          }]

          dataProcessingForRowspan(initData, 'itemId');

          return {

            data: initData,

            // success 请返回 true,

            // 不然 table 会停止解析数据,即使有数据

            success: true,

            // 不传会使用 data 的长度,如果是分页一定要传

            total: 5,

          };

        }}

        columns={columns}

      />

    </PageContainer>

  );
- 注:二种方式是对不同的数据结构做的更优的方法,如果只想用其中一种,二种数据结构互转一下也可以的。
Ant Design Pro项目ProTable怎么实现单元格合并效果的更多相关文章
- Ant Design Pro项目打开页设为登录或者其他页面
Ant Design Pro项目打开页设为登录或者其他页面 一.打开页设为登录页 首先找到utils包中的authority文件,在该文件中找到如下代码: export function getAut ...
- 修改TreeList单元格格式(实现类似单元格合并效果)
关键点:(1)TreeList中显示的单元格默认不显示上.下.左.右边框,显示的是TreeList自身的行横边框.列纵边框,具体对应TreeList属性中OptionView项下的ShowVertLi ...
- 【后台管理系统】—— Ant Design Pro 项目爬坑(一)
1.表单rule中可以分对象处理不同规则 <FormItem label="类型名称" {...formLayout}> { form.getFieldDecorato ...
- element-ui 格式化树形数组在table组件中展示(单元格合并)
最近做的项目涉及到很多单元格合并问题,element-ui组件对于单元格合并的处理虽然很灵活,但是需要事先计算好每个单元格合并的rowspan和colspan,直接在span-method属性中计算实 ...
- ant design pro(一)安装、目录结构、项目加载启动【原始、以及idea开发】
一.概述 1.1.脚手架概念 编程领域中的“脚手架(Scaffolding)”指的是能够快速搭建项目“骨架”的一类工具.例如大多数的React项目都有src,public,webpack配置文件等等, ...
- 使用ant design pro搭建项目
脚手架搭建 git clone --depth=1 https://github.com/ant-design/ant-design-pro.git my-project 然后 cd my-proje ...
- 阿里开源项目之Ant Design Pro
本篇文章主要包含的内容有三个方面. 第一.Ant Design Pro简介; 第二.Ant Design Pro能做什么; 第三.初步使用; 我相信通过这三个方面的讲解能让你大概知道Ant Desig ...
- 【后台管理系统】—— Ant Design Pro入门学习&项目实践笔记(三)
前言:前一篇记录了[后台管理系统]目前进展开发中遇到的一些应用点,这一篇会梳理一些自己学习Ant Design Pro源码的功能点.附:Ant Design Pro 在线预览地址. Dashboard ...
- Ant Design Pro+Electron+electron-builder实现React应用脱离浏览器,桌面安装运行
ant-design-pro ----> version :2.3.1 由于网上Ant Design Pro+Electron的资料太少,我就贡献一点经验 最近需要讲AntD Pro项目(以 ...
- ant design pro (十五)advanced 使用 API 文档工具
一.概述 原文地址:https://pro.ant.design/docs/api-doc-cn 在日常开发中,往往是前后端分离的,这个时候约定好一套接口标准,前后端各自独立开发,就不会被对方的技术难 ...
随机推荐
- k8s StorageClass 存储类
目录 一.概述 1.StorageClass 对象定义 2.StorageClass YAML 示例 二.StorageClass 字段 1.provisioner(存储制备器) 1.1.内置制备器 ...
- NL2SQL之DB-GPT-Hub<详解篇>:text2sql任务的微调框架和基准对比
NL2SQL之DB-GPT-Hub<详解篇>:text2sql任务的微调框架和基准对比 随着生成式人工智能(Artificial Intelligence Generated Conten ...
- USB总线-Linux内核USB3.0主机控制器驱动初始化流程分析(十三)
1.概述 RK3588有2个USB3.0 DRD控制器,2个USB2.0 Host控制器.USB3.0 DRD控制器既可以做Host,也可以做Device,向下兼容USB2.0和USB1.0.USB3 ...
- 使用BPF之前和之后生成直方图过程的对比
以bitehist为例: 使用BPF之前: 1.在内核中:开启磁盘IO事件的插桩观测. 2.在内核中,针对每个事件:向perf缓冲区写入一条记录.如果使用了跟踪点技术(推荐方式),记录中会包含关于磁盘 ...
- Linux进程调度-组调度及带宽控制
1. 概述 组调度(task_group)是使用Linux cgroup(control group)的cpu子系统来实现的,可以将进程进行分组,按组来分配CPU资源等. 比如,看一个实际的例子: A ...
- 2023年6月墨天轮中国图数据库排行榜:TGS 开新局,创邻和字节多点突破露锋芒
鸿鹄不坠青云志,鲲鹏展翅九万里. 2023年 墨天轮中国图数据库流行度排行 已经火热出炉,本月中国图数据库排行榜共有31个数据库参与排名,相比今年1月新增3个数据库.本月图数据库榜单前十变动较大:Tu ...
- vue前端开发仿钉图系列(6)左侧记事本的开发详解
在页面开发中,深深的被element组件所吸引,里面很多小组件都可以直接使用.像是记事本提示.记事本列表时间线.右侧编辑页面的form表单,编辑和查看状态的切换等等,比之前iOS原生开发所有的东西都要 ...
- iOS中xib文件维护使用小结
最近一直在做项目维护,由于项目比较大,开发时间比较早,早期的很多页面都是用xib拖拽页面控件.简单的页面还好,详情页面也是拖拽搭建,项目维护成本可想而知.闲言少叙,下面说一下不是特别复杂的xib页面维 ...
- ⼯作⾥中的token是怎么管理的?
我们公司的token管理都是通过vuex配合本地存储来做的,使⽤vuex是因为token数据⽐较特殊,在很多 模块中都可能会⽤到,vuex⽅便管理,配合本地存储⽐如localstorage,是因为vu ...
- 使用rancher cli对接k8s
一.获得rancher的token 1.进入rancher,点击右上角弹出框的ApI&Keys 2.进入页面后选择添加key 3.注意,这里的作用集群范围必须不能指定,否则在jenkins服务 ...