安卓入门 使用android创建一个项目 从启动activity中响应按钮事件 启动另一个activity 并传递参数
启动android studio创建一个新项目
  public  void  sendMessage(View view){

        Intent intent=new Intent(this,DispalyMessageActivity.class);

        EditText text =(EditText) findViewById(R.id.edit_message);

        String message=text.getText().toString();

        intent.putExtra(EXTRA_MESSAGE,message);

        startActivity(intent);

    }
添加按钮响应函数 sendMessage view中绑定的响应函数必须为公开无返回值 带有一个View参数的函数 通过View注入可以拿到View上的数据
Intent 对象常用语启动一个新的activity
findViewById 通过view中的id获取到控件对象 这与js获取input类似
通过getText 获取到输入框文本内容
intent.putExtra 将数据保存到intent对象中 这里EXTRA_MESSAGE 是当前类中定义的一个常量
startActivity用语启动一个activity
<?xml version="1.0" encoding="utf-8"?>

<LinearLayout xmlns:android="http://schemas.android.com/apk/res/android"

    xmlns:app="http://schemas.android.com/apk/res-auto"

    xmlns:tools="http://schemas.android.com/tools"

    android:orientation="horizontal"

    android:layout_width="match_parent"

    android:layout_height="match_parent"

    app:layout_behavior="@string/appbar_scrolling_view_behavior"

    tools:showIn="@layout/activity_my"

    android:id="@+id/content">

    <EditText

        android:layout_width="0dp"

        android:layout_weight="1"

        android:layout_height="wrap_content"

        android:hint="@string/edit_message"

        android:id="@+id/edit_message"/>

    <Button

        android:layout_width="wrap_content"

        android:layout_height="wrap_content"

        android:text="@string/button_message"

        android:onClick="sendMessage"/>

</LinearLayout>

<LinearLayout xmlns:android="http://schemas.android.com/apk/res/android"

xmlns:app="http://schemas.android.com/apk/res-auto"

xmlns:tools="http://schemas.android.com/tools"

android:orientation="horizontal"

android:layout_width="match_parent"

android:layout_height="match_parent"

app:layout_behavior="@string/appbar_scrolling_view_behavior"

tools:showIn="@layout/activity_my"

android:id="@+id/content">

<EditText

    android:layout_width="0dp"

    android:layout_weight="1"

    android:layout_height="wrap_content"

    android:hint="@string/edit_message"

    android:id="@+id/edit_message"/>

<Button

    android:layout_width="wrap_content"

    android:layout_height="wrap_content"

    android:text="@string/button_message"

    android:onClick="sendMessage"/>

</LinearLayout>
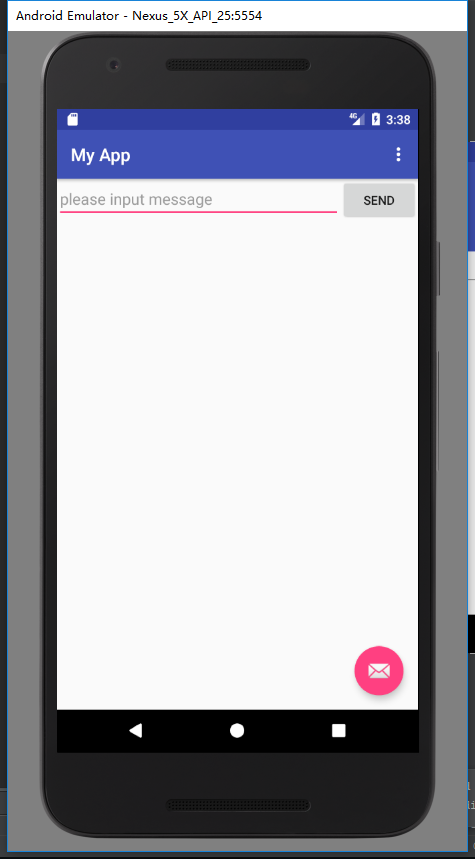
启动效果 这时点击send将跳转到一个新的activity
添加一个activity
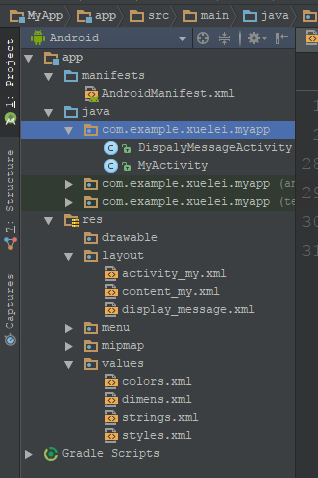
在myactivity下添加一个class并且继承AppCompatActivity
重写 onCreate方法
protected void onCreate(Bundle savedInstanceState) {

        super.onCreate(savedInstanceState);

        setContentView(R.layout.display_message);

        getSupportActionBar().setDisplayHomeAsUpEnabled(true);

        Intent intent = getIntent();

        String message = intent.getStringExtra(MyActivity.EXTRA_MESSAGE);

        TextView textView = new TextView(this);

        textView.setTextSize(80);

        textView.setText(message);

        textView.setWidth(100);

        RelativeLayout layout = (RelativeLayout) findViewById(R.id.content);

        layout.addView(textView);

    }
这通过getIntent获取到intent对象
获取其中保存的message数据
创建一个TextView对象
通过id获取到View 并向该View动态添加一个textView空间
<?xml version="1.0" encoding="utf-8"?>

<RelativeLayout xmlns:android="http://schemas.android.com/apk/res/android"

    android:id="@+id/content"

    android:layout_width="match_parent"

    android:layout_height="match_parent">

    </RelativeLayout>
在AndroidManifest(清单)中注册该View
<?xml version="1.0" encoding="utf-8"?>

<manifest xmlns:android="http://schemas.android.com/apk/res/android"

    package="com.example.xuelei.myapp">

    <application

        android:allowBackup="true"

        android:icon="@mipmap/ic_launcher"

        android:label="@string/app_name"

        android:roundIcon="@mipmap/ic_launcher_round"

        android:supportsRtl="true"

        android:theme="@style/AppTheme">

        <activity

            android:name=".MyActivity"

            android:label="@string/app_name"

            android:theme="@style/AppTheme.NoActionBar">

            <intent-filter>

                <action android:name="android.intent.action.MAIN" />

                <category android:name="android.intent.category.LAUNCHER" />

            </intent-filter>

        </activity>

        <activity

            android:name="com.example.xuelei.myapp.DispalyMessageActivity"

            android:label="@string/title_activity_display_message"

            android:parentActivityName="com.example.xuelei.myapp.MyActivity" >

            <meta-data

                android:name="android.support.PARENT_ACTIVITY"

                android:value="com.example.xuelei.myapp.MyActivity"/>

        </activity>

    </application>

</manifest>
添加一个activity name 该class的完全限定名 包名+类名
lable 设置该activity显示的lable名称
parentActivityName 指定父窗口对象 包名+类名
meta-data  这个名字值是额外的任意的可以提供给父组件的数据。一个组件元素能够包含任意数量的meta-data子元素。它们所有的值都会被收集在Bundle对象中并且使其可以作为组件的 PackageItemInfo.metaData 字段。
     一般的值可以通过value属性来指定,但是如果要指定一个资源id作为一个值,那么就要用resource属性来代替。在这里用于获取 myactivity这个对象
这样就完成一个activity的跳转了
安卓入门 使用android创建一个项目 从启动activity中响应按钮事件 启动另一个activity 并传递参数的更多相关文章
- 【SSRS】入门篇(一) -- 创建SSRS项目
原文:[SSRS]入门篇(一) -- 创建SSRS项目 在本篇中,您将学习如何在 SQL Server Data Tools (SSDT) 中创建报表服务器项目. 报表服务器项目用于创建在报表服务器中 ...
- Spring入门案例 idea创建Spring项目
spring入门案例 idea创建spring项目 Spring介绍 Spring概述 Spring是一个开源框架,Spring是2003年兴起的轻量级java开发框架,由Rod Johnson 在其 ...
- Gym 101064 D Black Hills golden jewels 【二分套二分/给定一个序列,从序列中任意取两个数形成一个和,两个数不可相同,要求求出第k小的组合】
D. Black Hills golden jewels time limit per test 2 seconds memory limit per test 256 megabytes input ...
- Spring入门(一):创建Spring项目
本篇博客作为Spring入门系列的第一篇博客,不会讲解什么是Spring以及Spring的发展史这些太理论的东西,主要讲解下如何使用IntelliJ IDEA创建第一个Spring项目以及通过一个示例 ...
- Intellij IDEA 创建Web项目并在Tomcat中部署运行(不使用maven)【转载】
原文链接:http://www.thinksaas.cn/topics/0/350/350000.html 一.创建Web项目 1.File -> New Module,进入创建项目窗口 2.选 ...
- MyEclipse下创建的项目导入到Eclipse中详细的图文配置方法
一.情景再现. 有些人比较喜欢用Myeclipse开发,有些人却比较喜欢用eclipse开发.但是其中有一个问题,Myeclipse里面的项目导入的时候出现了一个小小的问题. 如下: 二.说明问题 导 ...
- Intellij IDEA 创建Web项目并在Tomcat中部署运行
一.创建Web项目 1.File -> New Module,进入创建项目窗口 2.选择Java类型,在 Module name 处输入项目名,点击Next 3.勾选 Web Applica ...
- Eclipse和MyEclipse使用技巧--MyEclipse下创建的项目导入到Eclipse中详细的图文配置方法
一.情景再现. 有些人比较喜欢用Myeclipse开发,有些人却比较喜欢用eclipse开发.但是其中有一个问题,Myeclipse里面的项目导入的时候出现了一个小小的问题. 如下: 二.说明问题 导 ...
- IntelliJ IDEA 学习(二):Intellij IDEA 创建Web项目并在Tomcat中部署运行IDEA
一.创建Web项目 1.File -> New Module,进入创建项目窗口 2.选择Java类型,在 Module name 处输入项目名,点击Next 3.勾选 Web Applicat ...
随机推荐
- localhost与127.0.0.1的区别 2
localhost与127.0.0.1的区别localhost与127.0.0.1的区别是什么?相信有人会说是本地ip,曾有人说,用127.0.0.1比localhost好,可以减少一次解析.看来这个 ...
- The differentiation program with abstract data
#!r6rs ( import ( rnrs base ( 6 ) ) ( rnrs io simple ( 6 ) ) ) ( define ( deriv exp var ) ...
- .jar包文件的生成与运行
首先你得线配置好你的JRE,否则下面的都不会有作用,还没有配置的,请百度上搜索一下如何配置.这里我就不多讲了. jar包是一个可执行的文件包,简单说jar包就是一个外包.Java 程序是由若干个 .c ...
- EatCam Webcam Recorder Pro
EatCam Webcam Recorder Pro Webcam Recorder records webcams to AVI, FLV, WMV files and watch them whe ...
- 使用openURL实现程序间带参数跳转详解
使用openURL实现程序间带参数跳转详解 实现的效果:有两款应用A与B,A打开B A --> B 1. 新建工程B,bundle ID为com.YouXianMing.B 建立一个URL 这么 ...
- 用 Nokitjs 解决前端开发中的跨域问题
问题 在开发一些「单页应用」时,通常会使用 Ajax 和服务器通讯,比如 RESTful API,通常「前端」和「服务端 API」可能是有不同人员在负责,也不在同一个工程下,那么开发过程中就可能会遇到 ...
- 卷积神经网络CNN 手写数字识别
1. 知识点准备 在了解 CNN 网络神经之前有两个概念要理解,第一是二维图像上卷积的概念,第二是 pooling 的概念. a. 卷积 关于卷积的概念和细节可以参考这里,卷积运算有两个非常重要特性, ...
- react组件引用时的default常见错误
1.下面使用方法是正确的: export class StepLoad extends React.Component {} 引用上面插件的方法,重命名 import {StepLoad as Ste ...
- JAVA泛型通配符T,E,K,V区别,T以及Class<T>,Class<?>的区别以及接口里default方法
使用大写字母A,B,C,D......X,Y,Z定义的,就都是泛型,把T换成A也一样,这里T只是名字上的意义而已 ? 表示不确定的java类型 T (type) 表示具体的一个java类型 K V ( ...
- windows环境按照dcm4chee
背景: dcm4chee是dcm4che开源项目中的一部分,是一款符合IHE规定的影像管理/归档应用.dcm4chee遵循DICOM.HL7标准,实现了图像存储.图像提取.及健康领域的工作流程管理.d ...