
SSH(一)
系统程序架构: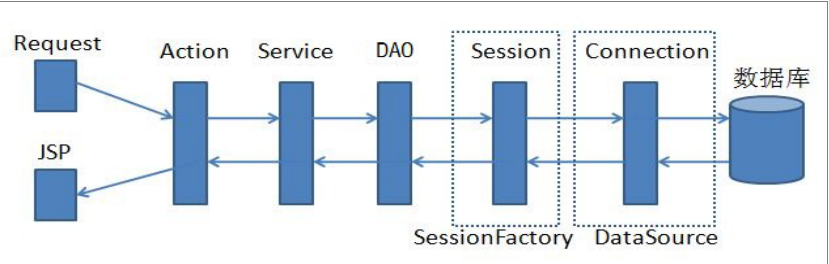
整合思路
1.逆依赖方向而行,由Spring提供对象管理和服务
2.依次实现Spring与Hibernate、Spring与Struts2的集成
配置web.xml文件:
1.设置Spring配置文件
Spring配置文件的存放位置,若文件放置在/WEB-INF/目录下且名称为applicationContext.xml,可以不配置此项
范例:
 <context-param>

         <param-name>contextConfigLocation</param-name>

         <param-value>classpath:applicationContext.xml</param-value>

 </context-param>
2.指定何时启动Spring容器
该监听器用于在web环境中启动Spring容器
范例:
 <listener>

         <listener-class>

             org.springframework.web.context.ContextLoaderListener

         </listener-class>

 </listener>
3.配置OpenSessionInVIew模式
该过滤器把一个Hibernate Session和一次完整的请求过程相绑定解决了诸如延迟加载等问题。
范例:
 <filter>

         <filter-name>OpenSessionInViewFilter</filter-name>

         <filter-class>

             org.springframework.orm.hibernate3.support.OpenSessionInViewFilter

         </filter-class>

 </filter>

 <filter-mapping>

         <filter-name>OpenSessionInViewFilter</filter-name>

         <url-pattern>/*</url-pattern>

 </filter-mapping>
注意:
1. 该过滤器要配置在Struts 2核心控制器之前
2. 若Spring中定义的SessionFactory Bean的id不是sessionFactory,需要为该过滤器配置sessionFactoryBeanName参数
在Spring中配置数据源和会话工厂:
方法一:配置文件分离
a.定义独立的Hibernate配置文件
b.由Spring导入并创建会话工厂Bean
方法二:在Spring配置文件中进行集中配置
a.先配置数据源,再以此为基础配置会话工厂Bean
b.持久化类的映射文件可以逐个配置,也可以按目录导入
使用HibernateDaoSupport基类:
1.HibernateDaoSupport基类的setSessionFactory()方法
范例:
  <bean id="sessionFactory"

         class="org.springframework.orm.hibernate3.LocalSessionFactoryBean">

         <property name="configLocation" value="classpath:hibernate.cfg.xml"></property>

 </bean>

 <bean id="userDao" class="com.xuetang9.demo.dao.impl.UserDaoImpl">

         <property name="sessionFactory" ref="sessionFactory"></property>

 </bean>
1.hibernate的配置文件自动生成时,没有userName 和 password?
范例:
1.hibernate.cfg.xml
 <?xml version="1.0" encoding="UTF-8"?>

 <!DOCTYPE hibernate-configuration PUBLIC

         "-//Hibernate/Hibernate Configuration DTD 3.0//EN"

         "http://hibernate.sourceforge.net/hibernate-configuration-3.0.dtd">

 <hibernate-configuration>

     <session-factory>

         <property name="hibernate.connection.driver_class">com.mysql.jdbc.Driver</property>

         <property name="hibernate.connection.url">jdbc:mysql://localhost/hibernatedb</property>

            <property name="connection.username">root</property>

         <property name="connection.password">root</property>

         <property name="hibernate.dialect">org.hibernate.dialect.MySQLDialect</property>

         <property name="show_sql">true</property>

         <property name="format_sql">true</property>

         <mapping resource="com/Elastic/SpringDemo3/ivy/entity/User.hbm.xml"/>

     </session-factory>

 </hibernate-configuration>
2.struts.xml
 <?xml version="1.0" encoding="UTF-8"?>

 <!DOCTYPE struts PUBLIC

     "-//Apache Software Foundation//DTD Struts Configuration 2.3//EN"

     "http://struts.apache.org/dtds/struts-2.3.dtd">

 <struts>

 </struts>
3.web.xml
 <?xml version="1.0" encoding="UTF-8"?>

 <web-app xmlns:xsi="http://www.w3.org/2001/XMLSchema-instance" xmlns="http://java.sun.com/xml/ns/javaee" xsi:schemaLocation="http://java.sun.com/xml/ns/javaee http://java.sun.com/xml/ns/javaee/web-app_2_5.xsd" id="WebApp_ID" version="2.5">

   <display-name>SpringDemo3_ivy</display-name>

   <welcome-file-list>

     <welcome-file>index.html</welcome-file>

     <welcome-file>index.htm</welcome-file>

     <welcome-file>index.jsp</welcome-file>

     <welcome-file>default.html</welcome-file>

     <welcome-file>default.htm</welcome-file>

     <welcome-file>default.jsp</welcome-file>

   </welcome-file-list>

   <!-- 配置Spring文件的位置 -->

   <context-param>

       <param-name>contextConfigLocation</param-name><!-- 固定 -->

       <!-- classPath:表示放在项目的根目录下 -->

       <param-value>classPath:applicationContext.xml</param-value>

   </context-param>

   <!-- 配置Spring的启动监听器 -->

   <listener>

       <listener-class>org.springframework.web.context.ContextCleanupListener</listener-class>

   </listener>

   <!-- 配置OpenSessionInView模式 -->

   <filter>

       <filter-name>OpenSessionInView</filter-name>

       <filter-class>org.springframework.orm.hibernate3.support.OpenSessionInViewFilter</filter-class>

   </filter>

   <filter-mapping>

       <filter-name>OpenSessionInView</filter-name>

       <url-pattern>/*</url-pattern>

   </filter-mapping>

   <!-- 配置Struts2核心控制器 -->

   <filter>

       <filter-name>Struts2</filter-name>

       <filter-class>org.apache.struts2.dispatcher.ng.filter.StrutsPrepareAndExecuteFilter</filter-class>

   </filter>

   <filter-mapping>

       <filter-name>Struts2</filter-name>

       <url-pattern>/*</url-pattern>

   </filter-mapping>

   <!-- 配置HttpSession过期时间(单位:分钟) -->

   <session-config>

       <session-timeout>20</session-timeout>

   </session-config>

 </web-app>
4.applicationContext.xml
 <?xml version="1.0" encoding="UTF-8"?>

 <beans xmlns="http://www.springframework.org/schema/beans"

     xmlns:xsi="http://www.w3.org/2001/XMLSchema-instance"

     xmlns:aop="http://www.springframework.org/schema/aop"

     xsi:schemaLocation="http://www.springframework.org/schema/beans http://www.springframework.org/schema/beans/spring-beans-3.2.xsd

         http://www.springframework.org/schema/aop http://www.springframework.org/schema/aop/spring-aop-3.2.xsd">

     <!-- 配置SessionFactory(方法1:独立hibernate配置文件) -->

     <!-- <bean id="sessionFactory" class="org.springframework.orm.hibernate3.LocalSessionFactoryBean">

         <property name="configLocation" value="classPath:applicationContext.xml"></property>

     </bean> -->

     <!-- 使用Spring集成Hibernate(方法2:不需要hibernate配置文件) -->

     <bean id="dataSource" class="com.mchange.v2.c3p0.ComboPooledDataSource">

         <property name="user" value="root"></property>

         <property name="password" value="root"></property>

         <property name="jdbcUrl" value="jdbc:mysql://localhost/hibernatedb"></property>

         <property name="driverClass" value="com.mysql.jdbc.Driver"></property>

         <!-- 连接池 -->

         <property name="initialPoolSize" value="10"></property>

         <property name="minPoolSize" value="5"></property>

         <property name="maxPoolSize" value="100"></property>

         <property name="acquireIncrement" value="3"></property>

         <!-- 请求获取连接的重试次数 -->

         <property name="acquireRetryAttempts" value="3"></property>

         <property name="acquireRetryDelay" value="5"></property>

         <property name="idleConnectionTestPeriod" value="60"></property>

     </bean>

     <!-- 使用dataSource配置SessionFactory -->

     <bean id="sessionFactory" class="org.springframework.orm.hibernate3.LocalSessionFactoryBean">

         <property name="dataSource" ref="dataSource"></property>

         <property name="hibernateProperties">

             <props>

                 <prop key="dialect">org.hibernate.dialect.MySQLDialect</prop>

                 <prop key="show_sql">true</prop>

                 <prop key="format_sql">true</prop>

             </props>

         </property>

         <!-- 通配 -->

         <property name="mappingLocations" value="classPath:com/Elastic/SpringDemo3/ivy/entity/*.hbm.xml">

         </property>

         <!-- 穷举 -->

         <!-- <property name="mappingLocations">

             <list>

                 <value>classPath:com/Elastic/SpringDemo3/ivy/entity/*.hbm.xml</value>

             </list>

         </property> -->

     </bean>

 </beans>
SSH(一)的更多相关文章
- [linux]阿里云主机的免登陆安全SSH配置与思考
公司服务器使用的第三方云端服务,即阿里云,而本地需要经常去登录到服务器做相应的配置工作,鉴于此,每次登录都要使用密码是比较烦躁的,本着极速思想,我们需要配置我们的免登陆. 一 理论概述 SSH介绍 S ...
- SSH实战 · 唯唯乐购项目(上)
前台需求分析 一:用户模块 注册 前台JS校验 使用AJAX完成对用户名(邮箱)的异步校验 后台Struts2校验 验证码 发送激活邮件 将用户信息存入到数据库 激活 点击激活邮件中的链接完成激活 根 ...
- 记录一则Linux SSH的互信配置过程
需求:四台Linux主机,IP地址为192.168.10.10/11/12/13,配置登录用户的互信 1.各节点ssh-keygen生成RSA密钥和公钥 ssh-keygen -q -t rsa -N ...
- SSH免手动输入密码和设置代理
通过使用sshpass将密码写入命令里,直接执行,免去手动密码输入的步骤命令如下: sshpass -p password_abc ssh user_abc@ssh_host -p ssh_port ...
- github免输用户名/密码SSH登录的配置
从github上获取的,自己整理了下,以备后用. Generating an SSH key mac windows SSH keys are a way to identify trusted co ...
- Linux 利用Google Authenticator实现ssh登录双因素认证
1.介绍 双因素认证:双因素身份认证就是通过你所知道再加上你所能拥有的这二个要素组合到一起才能发挥作用的身份认证系统.双因素认证是一种采用时间同步技术的系统,采用了基于时间.事件和密钥三变量而产生的一 ...
- mac下生成ssh keys 并上传github仓储
使用github仓储需要本机生成一个公钥key 添加到自己的git账户SSH keys中 mac 生成方法: 1. 打开终端 输入 ssh-keygen 然后系统提示输入文件保存位置等信息 ...
- Linux实战教学笔记05:远程SSH连接服务与基本排错(新手扫盲篇)
第五节 远程SSH连接服务与基本排错 标签(空格分隔):Linux实战教学笔记-陈思齐 第1章 远程连接LInux系统管理 1.1 为什么要远程连接Linux系统 在实际的工作场景中,虚拟机界面或物理 ...
- 树莓派3B的食用方法-1(装系统 网线ssh连接)
首先要有一个树莓派3B , 在某宝买就行, 这东西基本上找到假货都难,另外国产和英国也没什么差别,差不多哪个便宜买哪个就行. 不要买店家的套餐,一个是配的东西有些不需要,有的质量也不好. 提示:除了G ...
- linux启动SSH及开机自动启动
本文地址 分享提纲: 1.查看是否启动 2. 设置自动启动 1.[查看是否启动] 启动SSH服务 “/etc/init.d/sshd start”.然后用netstat -antulp | grep ...
随机推荐
- 20191031-7 beta week 1/2 Scrum立会报告+燃尽图 05
此作业的要求参见:https://edu.cnblogs.com/campus/nenu/2019fall/homework/9915 git地址:https://e.coding.net/Eusti ...
- ObjectArx 使用消息钩子实现鼠标滚轮旋转实体
测试结果: 实现方法:主要是程序注册一个消息函数:func,拦截鼠标滚轮触发的消息,需要注意的是,以写的方式处理实体时需要锁定文档.注册func的主要方法是:BOOL acedRegisterFilt ...
- python文件及目录操作
python文件及目录操作 读/写文件 新建/打开文件 写入 #举个例子,打开D:\test\data.txt #以写入模式打开文件 #如果test(上级目录)不存在则报错 #如果data.txt(文 ...
- FTP服务器虚拟用户配置
FTP服务配置问题及解决方案 使用被动模式,设置云主机IP为被动模式数据传输地址:在配置文件内添加 pasv_enable=YES pasv_promiscuous=YES pasv_address= ...
- nor flash之写保护
背景 没有电池的嵌入式设备,很容易发生随机掉电.因此要让产品可靠稳定,就必须保证各种场景下的掉电安全. 例如系统更新过程随机掉电,不能导致系统无法启动.例如正常读写flash过程中掉电,最多正在传输的 ...
- 【原理】从零编写ILI9341驱动全过程(基于Arduino)
最近在淘宝入手了一块ILI9341彩色屏幕,支持320x240分辨率.之前一直很好奇这类单片机驱动的彩色屏幕的原理,就打算自己写一个驱动,从电流层面操控ILI9341屏幕.话不多说,我们开始吧( ̄▽ ̄ ...
- Bonny手机APP试用体验
在上周四(即6月13日)下午,应王建民老师的邀请,我参观了学长学姐们的软件设计评比以及专业交流的活动,看到了形形色色学长学姐设计出的软件我觉得非常有趣,并对学长学姐们设计的软件的种类与功能感到由衷的钦 ...
- Android Gradle脚本从Groovy迁移到Kotlin DSL
Android Gradle从Groovy迁移到Kotlin Android项目用Gradle构建, 其脚本语言之前是Groovy, 目前也提供了Kotlin的支持, 所以可以迁移到Kotlin. 官 ...
- SpringCloud-Hystrix原理
Hystrix官网的原理介绍以及使用介绍非常详细,非常建议看一遍,地址见参考文档部分. 一 Hystrix原理 1 Hystrix能做什么 通过hystrix可以解决雪崩效应问题,它提供了资源隔离.降 ...
- cogs 1361. 树 线段树
1361. 树 ★ 输入文件:treed.in 输出文件:treed.out 简单对比时间限制:1 s 内存限制:128 MB [问题描述] 在一个凉爽的夏夜,xth和rabbit来到 ...