Python全栈开发:DOM
一、查找元素
1、直接查找
|
1
2
3
4
|
document.getElementById 根据ID获取一个标签document.getElementsByName 根据name属性获取标签集合document.getElementsByClassName 根据class属性获取标签集合document.getElementsByTagName 根据标签名获取标签集合 |
2、间接查找
|
1
2
3
4
5
6
7
8
9
10
11
12
13
|
parentNode // 父节点childNodes // 所有子节点firstChild // 第一个子节点lastChild // 最后一个子节点nextSibling // 下一个兄弟节点previousSibling // 上一个兄弟节点parentElement // 父节点标签元素children // 所有子标签firstElementChild // 第一个子标签元素lastElementChild // 最后一个子标签元素nextElementtSibling // 下一个兄弟标签元素previousElementSibling // 上一个兄弟标签元素 |
二、操作
1、内容
|
1
2
3
4
5
|
innerText 文本outerTextinnerHTML HTML内容innerHTML value 值 |
2、属性
|
1
2
3
4
5
6
7
8
9
|
attributes // 获取所有标签属性setAttribute(key,value) // 设置标签属性getAttribute(key) // 获取指定标签属性/*var atr = document.createAttribute("class");atr.nodeValue="democlass";document.getElementById('n1').setAttributeNode(atr);*/ |
<!DOCTYPE html>

<html>

<head lang="en">

    <meta charset="UTF-8">

    <title></title>

</head>

<body>

    <input type="button" value="全选"  onclick="CheckAll();"/>

    <input type="button" value="取消" onclick="CancelAll();"/>

    <input type="button" value="反选" onclick="ReverseCheck();"/>

    <table border="" >

        <thead>

        </thead>

        <tbody id="tb">

            <tr>

                <td><input type="checkbox" /></td>

                <td>111</td>

                <td>222</td>

            </tr>

            <tr>

                <td><input type="checkbox" /></td>

                <td>111</td>

                <td>222</td>

            </tr>

            <tr>

                <td><input type="checkbox" /></td>

                <td>111</td>

                <td>222</td>

            </tr>

            <tr>

                <td><input type="checkbox" /></td>

                <td>111</td>

                <td>222</td>

            </tr>

        </tbody>

    </table>

    <script>

        function CheckAll(ths){

            var tb = document.getElementById('tb');

            var trs = tb.childNodes;

            for(var i =0; i<trs.length; i++){

                var current_tr = trs[i];

                if(current_tr.nodeType==1){

                    var inp = current_tr.firstElementChild.getElementsByTagName('input')[0];

                    inp.checked = true;

                }

            }

        }

        function CancelAll(ths){

            var tb = document.getElementById('tb');

            var trs = tb.childNodes;

            for(var i =0; i<trs.length; i++){

                var current_tr = trs[i];

                if(current_tr.nodeType==1){

                    var inp = current_tr.firstElementChild.getElementsByTagName('input')[0];

                    inp.checked = false;

                }

            }

        }

        function ReverseCheck(ths){

            var tb = document.getElementById('tb');

            var trs = tb.childNodes;

            for(var i =0; i<trs.length; i++){

                var current_tr = trs[i];

                if(current_tr.nodeType==1){

                    var inp = current_tr.firstElementChild.getElementsByTagName('input')[0];

                    if(inp.checked){

                        inp.checked = false;

                    }else{

                        inp.checked = true;

                    }

                }

            }

        }

    </script>

</body>

</html>
Demo
3、class操作
|
1
2
3
|
className // 获取所有类名classList.remove(cls) // 删除指定类classList.add(cls) // 添加类 |
4、标签操作
a.创建标签
|
1
2
3
4
5
6
7
8
|
// 方式一var tag = document.createElement('a')tag.innerText = "wupeiqi"tag.className = "c1"tag.href = "http://www.cnblogs.com/wupeiqi"// 方式二var tag = "<a class='c1' href='http://www.cnblogs.com/wupeiqi'>wupeiqi</a>" |
b.操作标签
|
1
2
3
4
5
6
7
8
9
10
11
|
// 方式一var obj = "<input type='text' />";xxx.insertAdjacentHTML("beforeEnd",obj);xxx.insertAdjacentElement('afterBegin',document.createElement('p'))//注意:第一个参数只能是'beforeBegin'、 'afterBegin'、 'beforeEnd'、 'afterEnd'// 方式二var tag = document.createElement('a')xxx.appendChild(tag)xxx.insertBefore(tag,xxx[1]) |
5、样式操作
|
1
2
3
4
|
var obj = document.getElementById('i1')obj.style.fontSize = "32px";obj.style.backgroundColor = "red"; |
    <input onfocus="Focus(this);" onblur="Blur(this);" id="search" value="请输入关键字" style="color: gray;" />

    <script>

        function Focus(ths){

            ths.style.color = "black";

            if(ths.value == '请输入关键字' || ths.value.trim() == ""){

                ths.value = "";

            }

        }

        function Blur(ths){

            if(ths.value.trim() == ""){

                ths.value = '请输入关键字';

                ths.style.color = 'gray';

            }else{

                ths.style.color = "black";

            }

        }

    </script>
Demo
6、位置操作
|
1
2
3
4
5
6
7
8
9
10
11
12
13
14
15
16
17
18
19
20
21
22
23
24
25
26
27
28
|
总文档高度document.documentElement.offsetHeight 当前文档占屏幕高度document.documentElement.clientHeight 自身高度tag.offsetHeight 距离上级定位高度tag.offsetTop 父定位标签tag.offsetParent 滚动高度tag.scrollTop/* clientHeight -> 可见区域:height + padding clientTop -> border高度 offsetHeight -> 可见区域:height + padding + border offsetTop -> 上级定位标签的高度 scrollHeight -> 全文高:height + padding scrollTop -> 滚动高度 特别的: document.documentElement代指文档根节点*/ |
<!DOCTYPE html>

<html>

<head lang="en">

    <meta charset="UTF-8">

    <title></title>

</head>

<body style="margin: 0;">

    <div style="height: 900px;">

    </div>

    <div style="padding: 10px;">

        <div id="i1" style="height:190px;padding: 2px;border: 1px solid red;margin: 8px;">

                <p>asdf</p>

                <p>asdf</p>

                <p>asdf</p>

                <p>asdf</p>

                <p>asdf</p>

        </div>

    </div>

    <script>

        var i1 = document.getElementById('i1');

        console.log(i1.clientHeight); // 可见区域:height + padding

        console.log(i1.clientTop);    // border高度

        console.log('=====');

        console.log(i1.offsetHeight); // 可见区域:height + padding + border

        console.log(i1.offsetTop);    // 上级定位标签的高度

        console.log('=====');

        console.log(i1.scrollHeight);   //全文高:height + padding

        console.log(i1.scrollTop);      // 滚动高度

        console.log('=====');

    </script>

</body>

</html>
test
<!DOCTYPE html>

<html>

<head lang="en">

    <meta charset="UTF-8">

    <title></title>

</head>

<style>

    body{

        margin: 0px;

    }

    img {

        border: 0;

    }

    ul{

        padding: 0;

        margin: 0;

        list-style: none;

    }

    .clearfix:after {

        content: ".";

        display: block;

        height: 0;

        clear: both;

        visibility: hidden;

    }

    .wrap{

        width: 980px;

        margin: 0 auto;

    }

    .pg-header{

        background-color: #303a40;

        -webkit-box-shadow: 0 2px 5px rgba(0,0,0,.2);

        -moz-box-shadow: 0 2px 5px rgba(0,0,0,.2);

        box-shadow: 0 2px 5px rgba(0,0,0,.2);

    }

    .pg-header .logo{

        float: left;

        padding:5px 10px 5px 0px;

    }

    .pg-header .logo img{

        vertical-align: middle;

        width: 110px;

        height: 40px;

    }

    .pg-header .nav{

        line-height: 50px;

    }

    .pg-header .nav ul li{

        float: left;

    }

    .pg-header .nav ul li a{

        display: block;

        color: #ccc;

        padding: 0 20px;

        text-decoration: none;

        font-size: 14px;

    }

    .pg-header .nav ul li a:hover{

        color: #fff;

        background-color: #425a66;

    }

    .pg-body{

    }

    .pg-body .catalog{

        position: absolute;

        top:60px;

        width: 200px;

        background-color: #fafafa;

        bottom: 0px;

    }

    .pg-body .catalog.fixed{

        position: fixed;

        top:10px;

    }

    .pg-body .catalog .catalog-item.active{

        color: #fff;

        background-color: #425a66;

    }

    .pg-body .content{

        position: absolute;

        top:60px;

        width: 700px;

        margin-left: 210px;

        background-color: #fafafa;

        overflow: auto;

    }

    .pg-body .content .section{

        height: 500px;

    }

</style>

<body onscroll="ScrollEvent();">

<div class="pg-header">

    <div class="wrap clearfix">

        <div class="logo">

            <a href="#">

                <img src="http://core.pc.lietou-static.com/revs/images/common/logo_7012c4a4.pn">

            </a>

        </div>

        <div class="nav">

            <ul>

                <li>

                    <a  href="#">首页</a>

                </li>

                <li>

                    <a  href="#">功能一</a>

                </li>

                <li>

                    <a  href="#">功能二</a>

                </li>

            </ul>

        </div>

    </div>

</div>

<div class="pg-body">

    <div class="wrap">

        <div class="catalog">

            <div class="catalog-item" auto-to="function1"><a>第1张</a></div>

            <div class="catalog-item" auto-to="function2"><a>第2张</a></div>

            <div class="catalog-item" auto-to="function3"><a>第3张</a></div>

        </div>

        <div class="content">

            <div menu="function1" class="section">

                <h1>第一章</h1>

            </div>

            <div menu="function2" class="section">

                <h1>第二章</h1>

            </div>

            <div menu="function3" class="section">

                <h1>第三章</h1>

            </div>

        </div>

    </div>

</div>

    <script>

        function ScrollEvent(){

            var bodyScrollTop = document.body.scrollTop;

            if(bodyScrollTop>50){

                document.getElementsByClassName('catalog')[0].classList.add('fixed');

            }else{

                document.getElementsByClassName('catalog')[0].classList.remove('fixed');

            }

        }

    </script>

</body>

</html>
Demo-滚动固定
<!DOCTYPE html>

<html>

<head lang="en">

    <meta charset="UTF-8">

    <title></title>

</head>

<style>

    body{

        margin: 0px;

    }

    img {

        border: 0;

    }

    ul{

        padding: 0;

        margin: 0;

        list-style: none;

    }

    h1{

        padding: 0;

        margin: 0;

    }

    .clearfix:after {

        content: ".";

        display: block;

        height: 0;

        clear: both;

        visibility: hidden;

    }

    .wrap{

        width: 980px;

        margin: 0 auto;

    }

    .pg-header{

        background-color: #303a40;

        -webkit-box-shadow: 0 2px 5px rgba(0,0,0,.2);

        -moz-box-shadow: 0 2px 5px rgba(0,0,0,.2);

        box-shadow: 0 2px 5px rgba(0,0,0,.2);

    }

    .pg-header .logo{

        float: left;

        padding:5px 10px 5px 0px;

    }

    .pg-header .logo img{

        vertical-align: middle;

        width: 110px;

        height: 40px;

    }

    .pg-header .nav{

        line-height: 50px;

    }

    .pg-header .nav ul li{

        float: left;

    }

    .pg-header .nav ul li a{

        display: block;

        color: #ccc;

        padding: 0 20px;

        text-decoration: none;

        font-size: 14px;

    }

    .pg-header .nav ul li a:hover{

        color: #fff;

        background-color: #425a66;

    }

    .pg-body{

    }

    .pg-body .catalog{

        position: absolute;

        top:60px;

        width: 200px;

        background-color: #fafafa;

        bottom: 0px;

    }

    .pg-body .catalog.fixed{

        position: fixed;

        top:10px;

    }

    .pg-body .catalog .catalog-item.active{

        color: #fff;

        background-color: #425a66;

    }

    .pg-body .content{

        position: absolute;

        top:60px;

        width: 700px;

        margin-left: 210px;

        background-color: #fafafa;

        overflow: auto;

    }

    .pg-body .content .section{

        height: 500px;

        border: 1px solid red;

    }

</style>

<body onscroll="ScrollEvent();">

<div class="pg-header">

    <div class="wrap clearfix">

        <div class="logo">

            <a href="#">

                <img src="http://core.pc.lietou-static.com/revs/images/common/logo_7012c4a4.pn">

            </a>

        </div>

        <div class="nav">

            <ul>

                <li>

                    <a  href="#">首页</a>

                </li>

                <li>

                    <a  href="#">功能一</a>

                </li>

                <li>

                    <a  href="#">功能二</a>

                </li>

            </ul>

        </div>

    </div>

</div>

<div class="pg-body">

    <div class="wrap">

        <div class="catalog" id="catalog">

            <div class="catalog-item" auto-to="function1"><a>第1张</a></div>

            <div class="catalog-item" auto-to="function2"><a>第2张</a></div>

            <div class="catalog-item" auto-to="function3"><a>第3张</a></div>

        </div>

        <div class="content" id="content">

            <div menu="function1" class="section">

                <h1>第一章</h1>

            </div>

            <div menu="function2" class="section">

                <h1>第二章</h1>

            </div>

            <div menu="function3" class="section">

                <h1>第三章</h1>

            </div>

        </div>

    </div>

</div>

    <script>

        function ScrollEvent(){

            var bodyScrollTop = document.body.scrollTop;

            if(bodyScrollTop>50){

                document.getElementsByClassName('catalog')[0].classList.add('fixed');

            }else{

                document.getElementsByClassName('catalog')[0].classList.remove('fixed');

            }

            var content = document.getElementById('content');

            var sections = content.children;

            for(var i=0;i<sections.length;i++){

                var current_section = sections[i];

                // 当前标签距离顶部绝对高度

                var scOffTop = current_section.offsetTop + 60;

                // 当前标签距离顶部,相对高度

                var offTop = scOffTop - bodyScrollTop;

                // 当前标签高度

                var height = current_section.scrollHeight;

                if(offTop<0 && -offTop < height){

                    // 当前标签添加active

                    // 其他移除 active

                    var menus = document.getElementById('catalog').children;

                    var current_menu = menus[i];

                    current_menu.classList.add('active');

                    for(var j=0;j<menus.length;j++){

                        if(menus[j] == current_menu){

                        }else{

                            menus[j].classList.remove('active');

                        }

                    }

                    break;

                }

            }

        }

    </script>

</body>

</html>
Demo-滚动菜单
<!DOCTYPE html>

<html>

<head lang="en">

    <meta charset="UTF-8">

    <title></title>

</head>

<style>

    body{

        margin: 0px;

    }

    img {

        border: 0;

    }

    ul{

        padding: 0;

        margin: 0;

        list-style: none;

    }

    h1{

        padding: 0;

        margin: 0;

    }

    .clearfix:after {

        content: ".";

        display: block;

        height: 0;

        clear: both;

        visibility: hidden;

    }

    .wrap{

        width: 980px;

        margin: 0 auto;

    }

    .pg-header{

        background-color: #303a40;

        -webkit-box-shadow: 0 2px 5px rgba(0,0,0,.2);

        -moz-box-shadow: 0 2px 5px rgba(0,0,0,.2);

        box-shadow: 0 2px 5px rgba(0,0,0,.2);

    }

    .pg-header .logo{

        float: left;

        padding:5px 10px 5px 0px;

    }

    .pg-header .logo img{

        vertical-align: middle;

        width: 110px;

        height: 40px;

    }

    .pg-header .nav{

        line-height: 50px;

    }

    .pg-header .nav ul li{

        float: left;

    }

    .pg-header .nav ul li a{

        display: block;

        color: #ccc;

        padding: 0 20px;

        text-decoration: none;

        font-size: 14px;

    }

    .pg-header .nav ul li a:hover{

        color: #fff;

        background-color: #425a66;

    }

    .pg-body{

    }

    .pg-body .catalog{

        position: absolute;

        top:60px;

        width: 200px;

        background-color: #fafafa;

        bottom: 0px;

    }

    .pg-body .catalog.fixed{

        position: fixed;

        top:10px;

    }

    .pg-body .catalog .catalog-item.active{

        color: #fff;

        background-color: #425a66;

    }

    .pg-body .content{

        position: absolute;

        top:60px;

        width: 700px;

        margin-left: 210px;

        background-color: #fafafa;

        overflow: auto;

    }

    .pg-body .content .section{

        height: 500px;

        border: 1px solid red;

    }

</style>

<body onscroll="ScrollEvent();">

<div class="pg-header">

    <div class="wrap clearfix">

        <div class="logo">

            <a href="#">

                <img src="http://core.pc.lietou-static.com/revs/images/common/logo_7012c4a4.pn">

            </a>

        </div>

        <div class="nav">

            <ul>

                <li>

                    <a  href="#">首页</a>

                </li>

                <li>

                    <a  href="#">功能一</a>

                </li>

                <li>

                    <a  href="#">功能二</a>

                </li>

            </ul>

        </div>

    </div>

</div>

<div class="pg-body">

    <div class="wrap">

        <div class="catalog" id="catalog">

            <div class="catalog-item" auto-to="function1"><a>第1张</a></div>

            <div class="catalog-item" auto-to="function2"><a>第2张</a></div>

            <div class="catalog-item" auto-to="function3"><a>第3张</a></div>

        </div>

        <div class="content" id="content">

            <div menu="function1" class="section">

                <h1>第一章</h1>

            </div>

            <div menu="function2" class="section">

                <h1>第二章</h1>

            </div>

            <div menu="function3" class="section" style="height: 200px;">

                <h1>第三章</h1>

            </div>

        </div>

    </div>

</div>

    <script>

        function ScrollEvent(){

            var bodyScrollTop = document.body.scrollTop;

            if(bodyScrollTop>50){

                document.getElementsByClassName('catalog')[0].classList.add('fixed');

            }else{

                document.getElementsByClassName('catalog')[0].classList.remove('fixed');

            }

            var content = document.getElementById('content');

            var sections = content.children;

            for(var i=0;i<sections.length;i++){

                var current_section = sections[i];

                // 当前标签距离顶部绝对高度

                var scOffTop = current_section.offsetTop + 60;

                // 当前标签距离顶部,相对高度

                var offTop = scOffTop - bodyScrollTop;

                // 当前标签高度

                var height = current_section.scrollHeight;

                if(offTop<0 && -offTop < height){

                    // 当前标签添加active

                    // 其他移除 active

                    // 如果已经到底部,现实第三个菜单

                    // 文档高度 = 滚动高度 + 视口高度

                    var a = document.getElementsByClassName('content')[0].offsetHeight + 60;

                    var b = bodyScrollTop + document.documentElement.clientHeight;

                    console.log(a+60,b);

                    if(a == b){

                        var menus = document.getElementById('catalog').children;

                        var current_menu = document.getElementById('catalog').lastElementChild;

                        current_menu.classList.add('active');

                        for(var j=0;j<menus.length;j++){

                            if(menus[j] == current_menu){

                            }else{

                                menus[j].classList.remove('active');

                            }

                        }

                    }else{

                        var menus = document.getElementById('catalog').children;

                        var current_menu = menus[i];

                        current_menu.classList.add('active');

                        for(var j=0;j<menus.length;j++){

                            if(menus[j] == current_menu){

                            }else{

                                menus[j].classList.remove('active');

                            }

                        }

                    }

                    break;

                }

            }

        }

    </script>

</body>

</html>
Demo-滚动高度
7、提交表单
|
1
|
document.geElementById('form').submit() |
8、其他操作
|
1
2
3
4
5
6
7
8
9
10
11
12
13
14
|
console.log 输出框alert 弹出框confirm 确认框 // URL和刷新location.href 获取URLlocation.href = "url" 重定向location.reload() 重新加载 // 定时器setInterval 多次定时器clearInterval 清除多次定时器setTimeout 单次定时器clearTimeout 清除单次定时器 |
三、事件
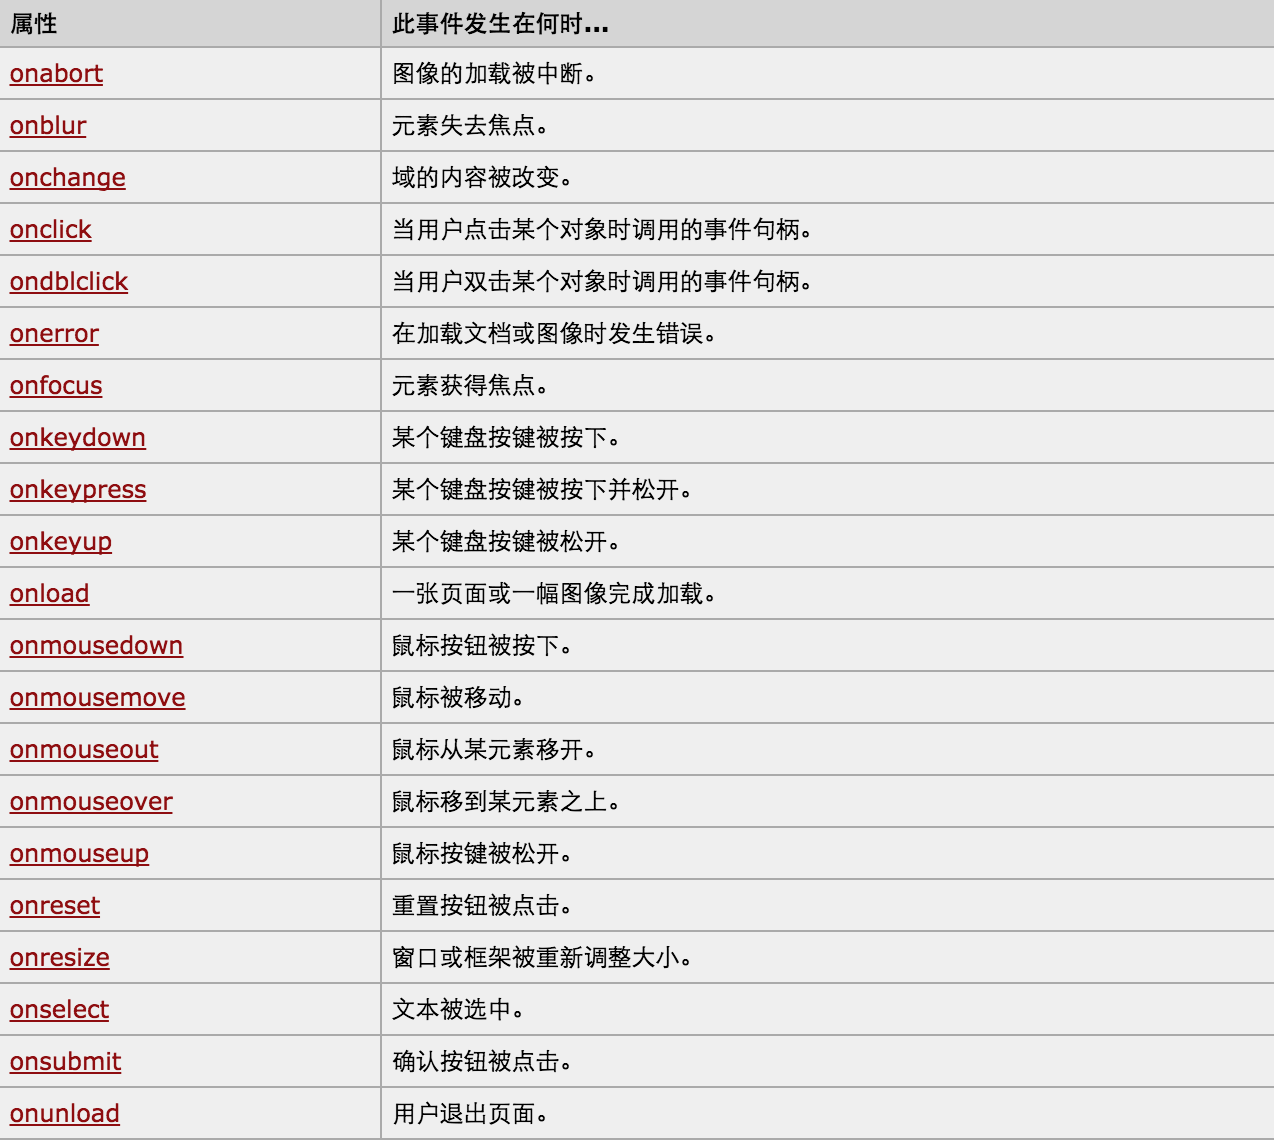
对于事件需要注意的要点:
- this
- event
- 事件链以及跳出
this标签当前正在操作的标签,event封装了当前事件的内容。
实例:
<!DOCTYPE html>

<html>

    <head>

        <meta charset='utf-8' />

        <title></title>

        <style>

            .gray{

                color:gray;

            }

            .black{

                color:black;

            }

        </style>

        <script type="text/javascript">

            function Enter(){

               var id= document.getElementById("tip")

               id.className = 'black';

               if(id.value=='请输入关键字'||id.value.trim()==''){

                    id.value = ''

               }

            }

            function Leave(){

                var id= document.getElementById("tip")

                var val = id.value;

                if(val.length==0||id.value.trim()==''){

                    id.value = '请输入关键字'

                    id.className = 'gray';

                }else{

                    id.className = 'black';

                }

            }

        </script>

    </head>

    <body>

        <input type='text' class='gray' id='tip' value='请输入关键字' onfocus='Enter();'  onblur='Leave();'/>

    </body>

</html>
搜索框
<!DOCTYPE html>
<html>
<head>
<meta charset='utf-8' >
<title>欢迎blue shit莅临指导 </title>
<script type='text/javascript'>
function Go(){
var content = document.title;
var firstChar = content.charAt(0)
var sub = content.substring(1,content.length)
document.title = sub + firstChar;
}
setInterval('Go()',1000);
</script>
</head>
<body>
</body>
</html>
跑马灯
Python全栈开发:DOM的更多相关文章
- Python 全栈开发【第0篇】:目录
Python 全栈开发[第0篇]:目录 第一阶段:Python 开发入门 Python 全栈开发[第一篇]:计算机原理&Linux系统入门 Python 全栈开发[第二篇]:Python基 ...
- Python全栈开发【面向对象进阶】
Python全栈开发[面向对象进阶] 本节内容: isinstance(obj,cls)和issubclass(sub,super) 反射 __setattr__,__delattr__,__geta ...
- Python全栈开发【面向对象】
Python全栈开发[面向对象] 本节内容: 三大编程范式 面向对象设计与面向对象编程 类和对象 静态属性.类方法.静态方法 类组合 继承 多态 封装 三大编程范式 三大编程范式: 1.面向过程编程 ...
- Python全栈开发【模块】
Python全栈开发[模块] 本节内容: 模块介绍 time random os sys json & picle shelve XML hashlib ConfigParser loggin ...
- Python全栈开发【基础四】
Python全栈开发[基础四] 本节内容: 匿名函数(lambda) 函数式编程(map,filter,reduce) 文件处理 迭代器 三元表达式 列表解析与生成器表达式 生成器 匿名函数 lamb ...
- Python全栈开发【基础三】
Python全栈开发[基础三] 本节内容: 函数(全局与局部变量) 递归 内置函数 函数 一.定义和使用 函数最重要的是减少代码的重用性和增强代码可读性 def 函数名(参数): ... 函数体 . ...
- Python全栈开发【基础二】
Python全栈开发[基础二] 本节内容: Python 运算符(算术运算.比较运算.赋值运算.逻辑运算.成员运算) 基本数据类型(数字.布尔值.字符串.列表.元组.字典) 其他(编码,range,f ...
- Python全栈开发【基础一】
Python全栈开发[第一篇] 本节内容: Python 的种类 Python 的环境 Python 入门(解释器.编码.变量.input输入.if流程控制与缩进.while循环) if流程控制与wh ...
- python 全栈开发之路 day1
python 全栈开发之路 day1 本节内容 计算机发展介绍 计算机硬件组成 计算机基本原理 计算机 计算机(computer)俗称电脑,是一种用于高速计算的电子计算机器,可以进行数值计算,又可 ...
- Python全栈开发
Python全栈开发 一文让你彻底明白Python装饰器原理,从此面试工作再也不怕了. 一.装饰器 装饰器可以使函数执行前和执行后分别执行其他的附加功能,这种在代码运行期间动态增加功能的方式,称之为“ ...
随机推荐
- faster-rcnn代码阅读-rpn-data层
这一节讲述rpn-data层,和这一层有关的结构图如下: rpn-data层的prototxt定义如下: layer { name: 'rpn-data' type: 'Python' bottom: ...
- KEIL, MDK 关于C99结构体变量初始化
C99:here 例如声明了这样的结构体 void test1() { tt_t t1 ={ .a = , .d = 'd', .b = , .c = }; static tt_t t2 = { ,, ...
- beaglebone black 与电脑互传文件(夹)
1. PSCP方法 PSCP,是putty的一个组件. 1.1 下载PSCP 先给连接http://www.chiark.greenend.org.uk/~sgtatham/putty/downloa ...
- CometOJ Contest #3 C
题目链接:https://cometoj.com/contest/38/problem/C?problem_id=1542&myself=0&result=0&page=1&a ...
- python包下载路径
python所有包.模块镜像站 https://www.lfd.uci.edu/~gohlke/pythonlibs/
- 12-MySQL-Ubuntu-数据表的查询-数据准备和基本查询(一)
一,数据准备 创建数据库.数据表 -- 创建数据库 create database python_test_1 charset=utf8; -- 使用数据库 use python_test_1; -- ...
- LightOJ 1341 - Aladdin and the Flying Carpet
题目链接:http://lightoj.com/volume_showproblem.php?problem=1341 题意:给你地毯面积和最小可能边的长度,让你求有几种组合的可能. 题解:这题就厉害 ...
- 【ArcObject】 AxTocControl:实现图层可移动
设置axTocControl属性:EnableLayerDragDrop 为true即可
- C puts,gets
1. char *gets(char *s); 从输入缓冲区中读取一个字符串存储到字符指针变量 str 所指向的内存空间 注意事项:空间不检查合理:要使用功能必须准备足够大的空间: #include ...
- 随笔记录 Linux基本操作命令 2019.7.27
临时关闭防火墙systemctl stop firewalld永久关闭防火墙systemctl disable firewalld 临时关闭selinux安全机制setenforce 0永久关闭sel ...