MySQL主从复制(一主两从)
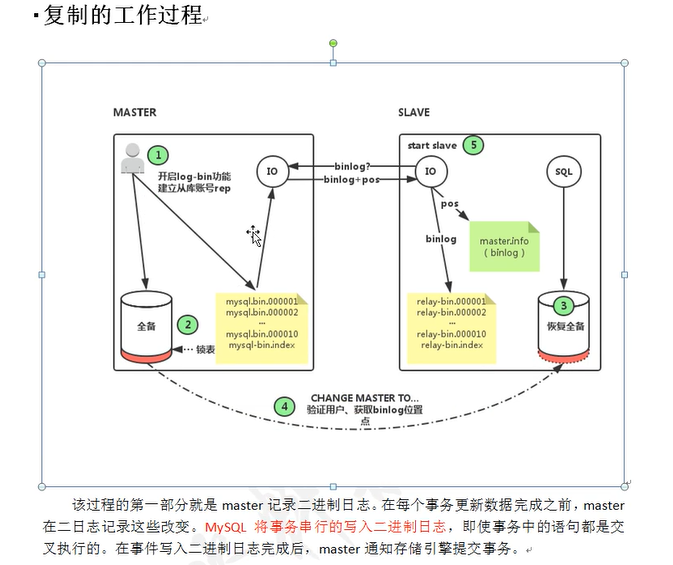
主库开启bin-log二进制日志功能,并建立slave账号,并授权从库连接主库,从库通过change master得到主库的相关同步信息,
然后连接主库进行验证,主库产生的新数据会导入到bin-log二进制文件中,同时主库会开启lo线程,从库也会开启lo线程以及
sql线程,从库中的lo线程与主库的lo线程连接一旦主库库数据有所变更则从库将变更的数据复制到relary-bin(中继日志)中,
sql线程会读取relay log(中继日志)文件中的日志,并解析成具体操作,至此整个同步过程完成
设备:
master:192.168.200.125
slave1:192.168.200.124
slave2:192.168.200.111
Master主操作:
关闭防火墙:
[root@localhost ~]# systemctl stop firewalld
[root@localhost ~]# iptables -F
[root@localhost ~]# setenforce 0
安装mariadbb:
[root@localhost ~]# yum install mariadb mariadb-server -y #此处安装了mariadb数据库系统
安装ntp时间同步软件:主要为了让主服务器和从服务器之间时间一致。那么从服务器中继日志和主的二进制日志数据一致
[root@localhost ~]# yum install ntp -y
[root@localhost ~]# vim /etc/ntp.conf
在末尾加入如下两行:主要让自己变成ntp的服务端使得从服务器能获取主服务器的时间

server 127.127.1.0

fudge 127.127.1.0 stratum
启动NTP服务:
[root@localhost ~]# systemctl start ntpd
[root@localhost ~]# systemctl enable ntpd
配置主配置文件开启二进制日志:
[root@localhost ~]# vim /etc/my.cnf
[mysqld]

server-id=1                           #server的id号

log-bin=mysql-binlog                  #前缀

log-slave-updates=true                #允许从对log_bin进行更新
重启服务器:
[root@localhost ~]# systemctl restart mariadb
[root@localhost ~]# netstat -anpt | grep 3306
tcp 0 0 0.0.0.0:3306 0.0.0.0:* LISTEN
创建Replication用户:
[root@localhost ~]# mysql -uroot -p123123
MariaDB [(none)]> grant replication slave on *.* to 'myslave'@'192.168.200.%' identified by '123123'; #允许192.168.200.网段的myslave连接数据库连接密码为123123
Query OK, 0 rows affected (0.00 sec)
MariaDB [(none)]> flush privileges;;
Query OK, 0 rows affected (0.00 sec)
ERROR: No query specified
MariaDB [(none)]> show master status; #获取masterDB的相关信息
+---------------------+----------+--------------+------------------+
| File | Position | Binlog_Do_DB | Binlog_Ignore_DB |
+---------------------+----------+--------------+------------------+
| mysql-binlog.000001 | 479 | | |
+---------------------+----------+--------------+------------------+
1 row in set (0.00 sec)
考虑问题有没有之前留下的老数据:备份master原有所有数据到两台slave上
[root@localhost ~]# mysqldump -uroot -p123123 --all-databases > /root/alldbbackup.sql
[root@localhost ~]# scp /root/alldbbackup.sql root@192.168.200.124:/root/
[root@localhost ~]# scp /root/alldbbackup.sql root@192.168.200.111:/root/
主服务器创建一个新的数据库用以给从数据库测试同步情况:
MariaDB [mysql]> create database liuxiang;
Query OK, 1 row affected (0.00 sec)
MariaDB [mysql]> show databases;
+--------------------+
| Database |
+--------------------+
| information_schema |
| liuxiang |
| mysql |
| performance_schema |
+--------------------+
4 rows in set (0.00 sec)
Slave1和Slave2操作:两台从服务器操作一致
关闭防火墙:
[root@localhost ~]# systemctl stop firewalld
[root@localhost ~]# iptables -F
[root@localhost ~]# setenforce 0
安装mariadbb:
[root@localhost ~]# yum install mariadb mariadb-server -y
安装ntpdate:
[root@localhost ~]# yum install ntpdate -y
在两个salve节点上配置与Master进行时间同步:
[root@localhost ~]# ntpdate 192.168.200.125
15 Oct 14:15:10 ntpdate[11932]: adjust time server 192.168.200.125 offset -0.018919 sec
做周期计划:
[root@localhost ~]# crontab -l
* */5 * * * /usr/sbin/ntpdate pool.ntp.org > /dev/null 2>&1 #pool.ntp.org是互联网上的时间同步器
导入master原数据脚本到mysql库中:
[root@localhost ~]# mysql -uroot -p123123 < /root/alldbbackup.sql
测试连接主数据库运行测试:连接成功配置正确
[root@localhost ~]# mysql -u myslave -p123123 -h 192.168.200.125
修改配置文件开启中继日志:
[root@localhost ~]# vim /etc/my.cnf
[mysqld]

server-id=2                               #slave2从服务器此处改为3

relay-log=relay-log-bin                   #前缀

relay-log-index=slave-relay-bin.index     #索引文件
重启mariadb服务:
[root@localhost ~]# systemctl restart mariadb
启动从库,运行从库数据同步:
[root@localhost ~]# mysql -uroot -p12
MariaDB [(none)]> stop slave; #停掉自己从的数据库角色
Query OK, 0 rows affected, 1 warning (0.09 sec)
MariaDB [(none)]> CHANGE MASTER TO
-> MASTER_HOST='192.168.200.125',
-> MASTER_USER='myslave',
-> MASTER_PASSWORD='123123',
-> MASTER_LOG_FILE='mysql-binlog.000001', #masterDB的相关信息
-> MASTER_LOG_POS=721; #masterDB的相关信息
Query OK, 0 rows affected (0.10 sec)
MariaDB [(none)]> start slave; #开启自己从的数据库角色
Query OK, 0 rows affected (0.00 sec)
MariaDB [(none)]> show slave status\G;
*************************** 1. row ***************************
Slave_IO_State: Waiting for master to send event
Master_Host: 192.168.200.125
Master_User: myslave
Master_Port: 3306
Connect_Retry: 60
Master_Log_File: mysql-binlog.000001
Read_Master_Log_Pos: 721
Relay_Log_File: relay-log-bin.000002
Relay_Log_Pos: 532
Relay_Master_Log_File: mysql-binlog.000001
Slave_IO_Running: Yes
Slave_SQL_Running: Yes
Replicate_Do_DB:
Replicate_Ignore_DB:
Replicate_Do_Table:
Replicate_Ignore_Table:
Replicate_Wild_Do_Table:
Replicate_Wild_Ignore_Table:
Last_Errno: 0
Last_Error:
Skip_Counter: 0
Exec_Master_Log_Pos: 721
Relay_Log_Space: 824
Until_Condition: None
Until_Log_File:
Until_Log_Pos: 0
Master_SSL_Allowed: No
Master_SSL_CA_File:
Master_SSL_CA_Path:
Master_SSL_Cert:
Master_SSL_Cipher:
Master_SSL_Key:
Seconds_Behind_Master: 0
Master_SSL_Verify_Server_Cert: No
Last_IO_Errno: 0 #报错编号
Last_IO_Error: #报错位置
Last_SQL_Errno: 0
Last_SQL_Error:
Replicate_Ignore_Server_Ids:
Master_Server_Id: 1
1 row in set (0.00 sec)
ERROR: No query specified
从测试与主数据库同步情况:
MariaDB [(none)]> show databases;
+--------------------+
| Database |
+--------------------+
| information_schema |
| auth |
| client |
| liuxiang |
| mydb |
| mysql |
| performance_schema |
| shuifei |
| test |
| var |
| yg |
+--------------------+
11 rows in set (0.00 sec)
MySQL主从复制(一主两从)的更多相关文章
- MySQL 主从复制一主两从环境配置实战
MySQL 初始化 MySQL 主从复制是指数据可以从一个 MySQL 数据库服务器主节点复制到一个或多个从节点.MySQL 默认采用异步复制方式;从节点可以复制主数据库中的所有数据库或者特定的数据库 ...
- MYSQL主从复制、主主复制、双主多从配置
一.如何配置MYSQL的主从复制? 1. 两台数据库服务器,IP分别为 192.168.216.128 和 192.168.216.129,在服务器上装MYSQL(我的配置版本为5.5.56) 2. ...
- MySQL主从复制与主主复制
1.简介 MySQL作为世界上使用最为广泛的数据库之一,免费是其原因之一.但不可忽略的是它本身的功能的确很强大.随着技术的发展,在实际的生产环境中,由单台MySQL数据库服务器不能满足实际的需求.此时 ...
- 基于Docker Compose搭建mysql主从复制(1主2从)
系统环境 * 3 Ubuntu 16.04 mysql 8.0.12 docker 18.06.1-ce docker-compose 1.23.0-rc3 *3 ==> PS ###我用的是 ...
- MySQL主从复制,主主复制,半同步复制
实验环境: 系统:CentOS Linux release 7.4.1708 (Core) mariadb:mariadb-server-5.5.56-2.el7.x86_64 node1:172.1 ...
- mysql主从复制,主主复制,级联复制,半同步复制
-------------------------------------------------------------------------------主从复制----------------- ...
- redis 主从复制(一主两从)
一.环境基本信息 系统 centos7 版本 redis 5.0.7 只用了一台机器,ip:192.168.64.123 master端口 6379,从机 端口 6380.6381 二.redis目录 ...
- 30.Mysql主从复制、读写分离
Mysql主从复制.读写分离 目录 Mysql主从复制.读写分离 读写分离 读写分离概述 为什么要读写分离 什么时候要读写分离 主从复制与读写分离 mysql支持的复制类型 主从复制的工作过程 初始环 ...
- 【转载】Mysql主从复制、和MySQL集群(主主复制)
转载:https://www.cnblogs.com/phpstudy2015-6/p/6485819.html 请同时参考和结合这篇文件进行处理:https://blog.csdn.net/envo ...
随机推荐
- 持续集成与自动化部署---代码流水线管理及Jenkins和gitlab集成
1.代码流水线管理 Pipeline名词顾名思义就是流水线的意思,因为公司可能会有很多项目.如果使用jenkins构建完成后,开发构建项目需要一项一项点击,比较麻烦.所以出现pipeline名词. 代 ...
- php基础系列之 数据的存储和读取
·文件处理 ·写入一个文件 1,打开这个文件.如果这个文件不存在,需要先创建它 2,将数据写入这个文件 3,关闭这个文件 ·从一个文件读出数据 1,打开这个文件.如果这个文件不能打开(例如,文件不存在 ...
- spring(二):体系结构&核心模块
Spring框架 帮助管理对象及其依赖关系 提供如通用日志记录.性能统计.安全控制.异常处理等面向切面的能力 帮助管理数据库事务,提供了一套简单的JDBC访问实现,提供与第三方数据访问框架集成(如Hi ...
- 在手机浏览器中判断App是否已安装
从网上搜到之前手机中判断App是否安装可以通过onblur事件+定时器来实现. 但现在要做这个功能时,按网上的说法已经不能实现了.因为现在浏览器中打开App,window不会触发onblur事件. 在 ...
- 数据存储 csv
# # 保存csv格式的数据import csv csvFile = open('test.csv','w+',newline='') #文本方式可读写 try: writer = csv.write ...
- hadoop学习笔记(九):mapReduce1.x和2.x
一.MapReduce1.0的数据分割到数据计算的过程 MapReduce是我们再进行离线大数据处理的时候经常要使用的计算模型,MapReduce的计算过程被封装的很好,我们只用使用Map和Reduc ...
- 面试题17.打印从1到最大的n位数
void print_n_number(int n){ if(n<=0){ cout<<"fuckyou"; return; } string s="1 ...
- 线索二叉树的详细实现(C++)
线索二叉树概述 二叉树虽然是非线性结构,但二叉树的遍历却为二又树的结点集导出了一个线性序列.希望很快找到某一结点的前驱或后继,但不希望每次都要对二叉树遍历一遍,这就需要把每个结点的前驱和后继信息记录下 ...
- configure: error: no acceptable C compiler found in $PATH 解决
在安装keepalived时报错 ./configure --prefix=/usr/local/ccbase/keepalived-2.0.15 && make && ...
- JQuery/JS插件 jsTree加载树,预先加载,初始化时加载前三级节点,当展开第三级节点时 就加载该节点下的所有子节点
jsTree加载树, 初始化时 加载前三级节点, 当展开第三级节点时 就加载该节点下的所有子节点 html: <!DOCTYPE html> <html> <head&g ...