导入testng管理测试用例
1.在pom.xml中增加testng的依赖,以导入testNG
2.在src-main-resources目录下新建xml文件,比如untitled.xml.
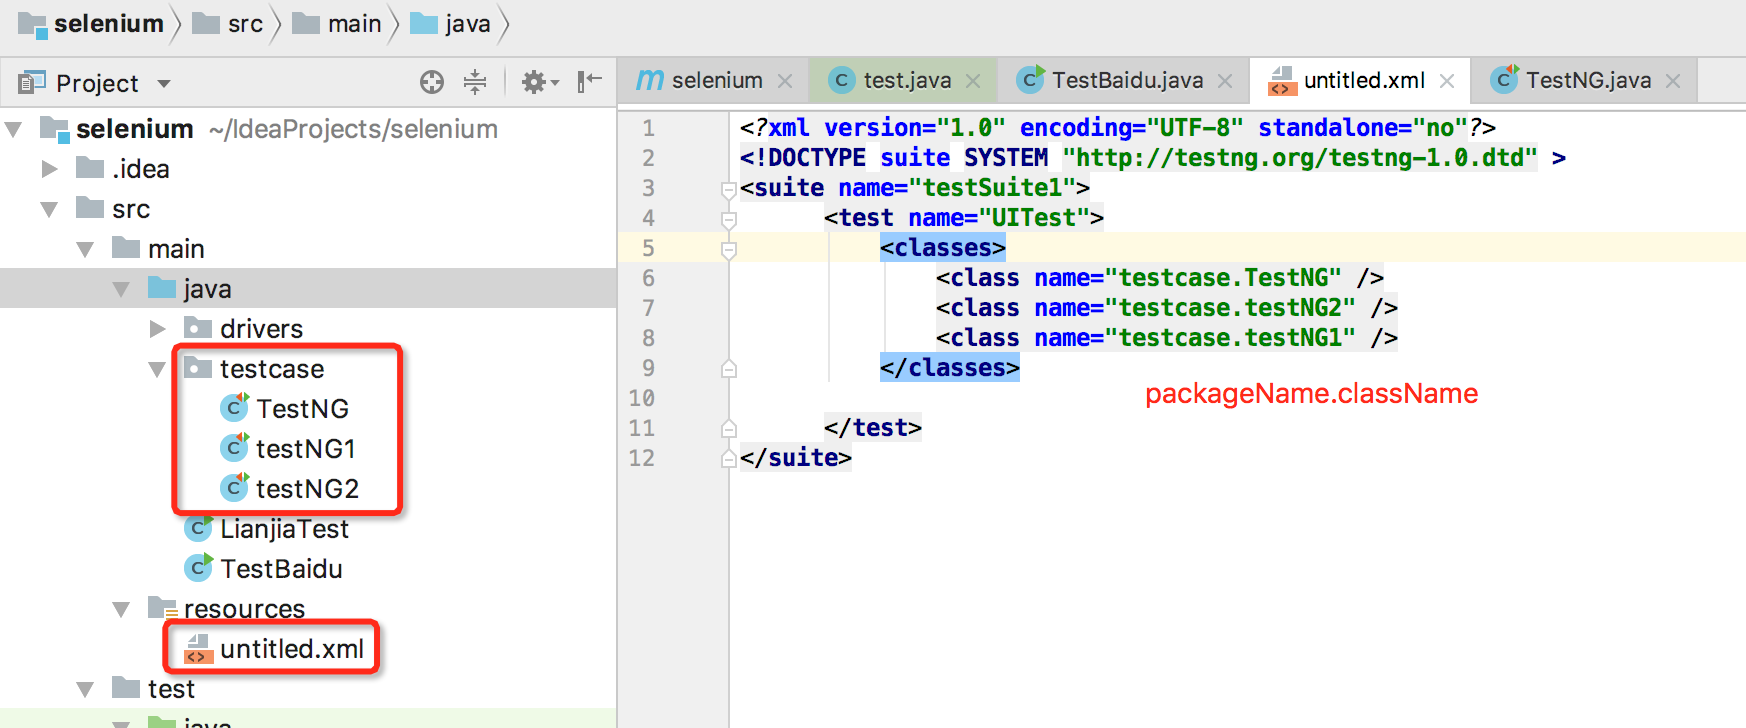
<?xml version="1.0" encoding="UTF-8" standalone="no"?>

<!DOCTYPE suite SYSTEM "http://testng.org/testng-1.0.dtd" >

<suite name="testSuite1">

      <test name="UITest">

          <classes>

              <class name="testcase.TestNG" />

              <class name="testcase.testNG2" />

              <class name="testcase.testNG1" />

          </classes>

      </test>

</suite>
3.BeforeTest AfterTest BeforeClass AfterClass的区别
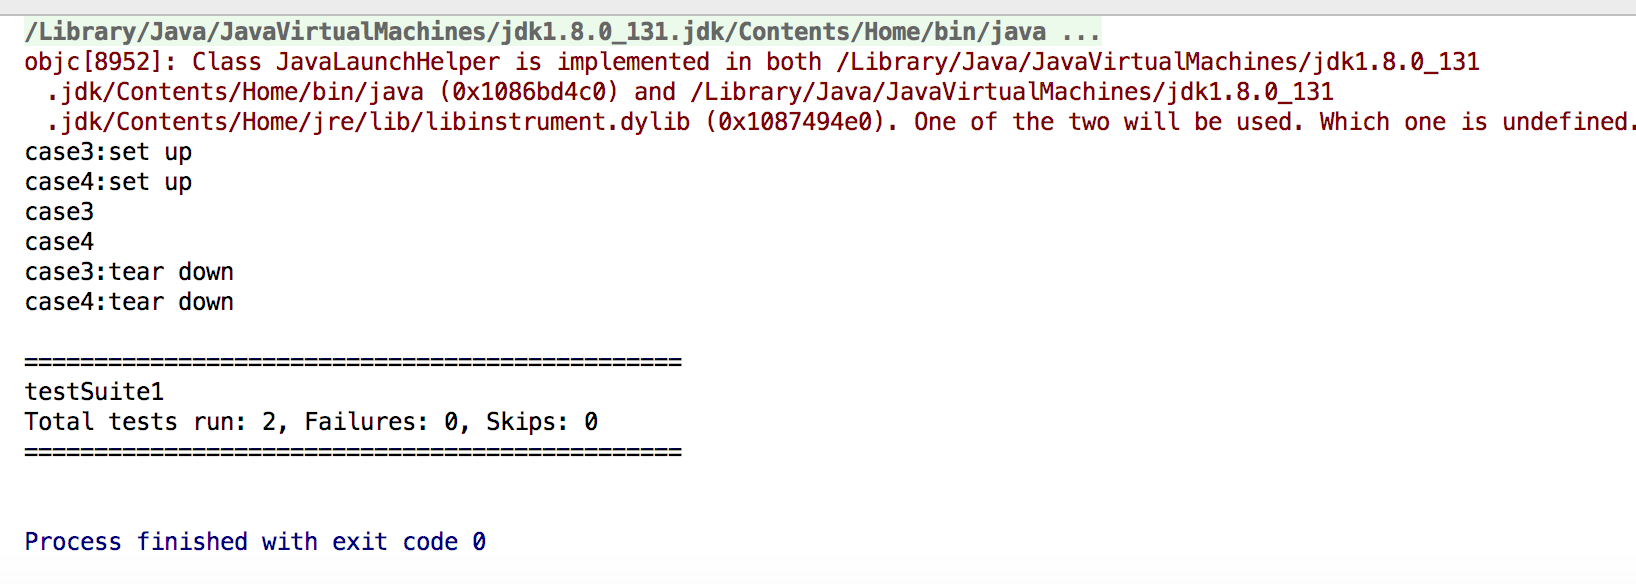
BeforeTest AfterTest
case1:
package testcase;

import org.testng.annotations.AfterTest;

import org.testng.annotations.BeforeTest;

import org.testng.annotations.Test;

public class testNG3 {

    @BeforeTest

    public void setup(){System.out.println("case3:set up");}

    @Test

    public void test1(){System.out.println("case3");}

    @AfterTest

    public void tearup(){System.out.println("case3:tear down");}

}
case2:
package testcase;

import org.testng.annotations.AfterTest;

import org.testng.annotations.BeforeTest;

import org.testng.annotations.Test;

public class testNG4 {

    @BeforeTest

    public void setup(){System.out.println("case4:set up");}

    @Test

    public void test1(){System.out.println("case4");}

    @AfterTest

    public void tearup(){System.out.println("case4:tear down");}

}
xml:
<?xml version="1.0" encoding="UTF-8" standalone="no"?>

<!DOCTYPE suite SYSTEM "http://testng.org/testng-1.0.dtd" >

<suite name="testSuite1">

      <test name="UITest">

          <classes>

              <!--<class name="testcase.TestNG" />

              <class name="testcase.testNG2" />

              <class name="testcase.testNG1" />-->

              <class name="testcase.testNG3"/>

              <class name="testcase.testNG4"/>

          </classes>

      </test>

</suite>
执行结果:
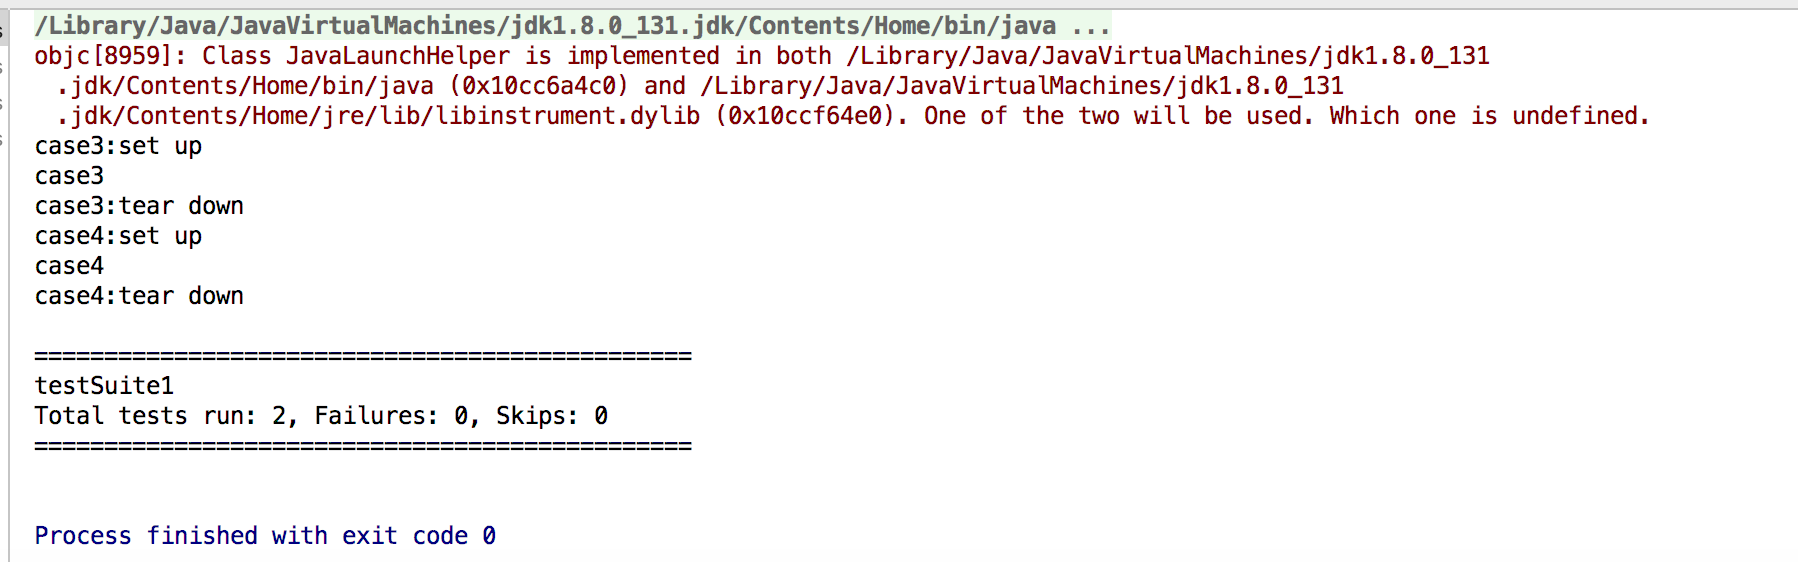
将BeforeTest替换为BeforeClass,AfterTest替换为AfterClass
case1:
package testcase;

import org.testng.annotations.*;

public class testNG3 {

    @BeforeClass

    public void setup(){System.out.println("case3:set up");}

    @Test

    public void test1(){System.out.println("case3");}

    @AfterClass

    public void tearup(){System.out.println("case3:tear down");}

}
case2:
package testcase;

import org.testng.annotations.*;

public class testNG4 {

    @BeforeClass

    public void setup(){System.out.println("case4:set up");}

    @Test

    public void test1(){System.out.println("case4");}

    @AfterClass

    public void tearup(){System.out.println("case4:tear down");}

}
xml:
<?xml version="1.0" encoding="UTF-8" standalone="no"?>

<!DOCTYPE suite SYSTEM "http://testng.org/testng-1.0.dtd" >

<suite name="testSuite1">

      <test name="UITest">

          <classes>

              <!--<class name="testcase.TestNG" />

              <class name="testcase.testNG2" />

              <class name="testcase.testNG1" />-->

              <class name="testcase.testNG3"/>

              <class name="testcase.testNG4"/>

          </classes>

      </test>

</suite>
执行结果:
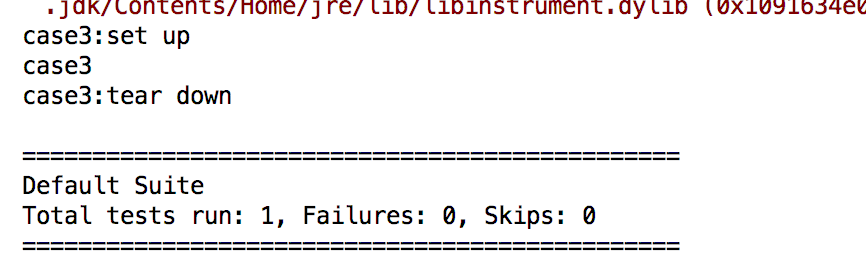
4.使用TestNg增加断言
package testcase;

import org.testng.Assert;

import org.testng.annotations.*;

public class testNG3 {

    @BeforeClass

    public void setup(){System.out.println("case3:set up");}

    @Test

    public void test1(){

        System.out.println("case3");

        String actureMessage="abc";

        String expectMessage="efg";

        Assert.assertTrue(actureMessage.equalsIgnoreCase(expectMessage),"Expect message is "+expectMessage+".But acture message is "+actureMessage);

    }

    @AfterClass

    public void tearup(){System.out.println("case3:tear down");}

}

将expectMessage修改为abc,结果为
5.编写基于TestNg的测试用例
Baidu.java
 package testcase;

 import org.openqa.selenium.By;

 import org.openqa.selenium.WebDriver;

 import org.openqa.selenium.chrome.ChromeDriver;

 import org.testng.annotations.AfterTest;

 import org.testng.annotations.BeforeTest;

 import org.testng.annotations.Test;

 import java.util.concurrent.TimeUnit;

 public class Baidu {

     private WebDriver driver;

     @BeforeTest

     public void setUp(){

         String chromepath = System.getProperty("user.dir")+"/src/main/java/drivers/chromedriver";

         System.setProperty("webdriver.chrome.driver",chromepath);

         driver = new ChromeDriver();

         driver.manage().timeouts().implicitlyWait(30,TimeUnit.SECONDS);

     }

     @Test

     public void test(){

         driver.get("https://www.baidu.com");

         driver.findElement(By.xpath("//input[@class='s_ipt' and @id='kw']")).sendKeys("selenium");

         driver.findElement(By.xpath("//input[@id='su']")).click();

         System.out.println(driver.findElement(By.xpath("//span[@class='nums_text']")).getText());

     }

     @AfterTest

     public void tearDown(){

         driver.quit();

     }

 }
test.xml
<?xml version="1.0" encoding="UTF-8" standalone="no"?>

<!DOCTYPE suite SYSTEM "http://testng.org/testng-1.0.dtd" >

<suite name="testSuite1">

    <test name="UITest">

        <classes>

            <class name="testcase.Baidu" />

        </classes>

    </test>

</suite>
测试结果:

导入testng管理测试用例的更多相关文章
- JAE京东云引擎Git上传管理代码教程和京东云数据库导入导出管理
文章目录 Git管理准备工作 Git工具上传代码 发布代码装程序 mywebsql管理 京东云引擎小结 JAE京东云引擎是京东推出的支持Java.Ruby.Python.PHP.Node.js多语 ...
- Webdriver+Testng实现测试用例失败自动截图功能
testng执行测试用例的时候,如果用例执行失败会自动截图,方便后续排查问题 1.首先定义一个截图类: package com.rrx.utils; import java.io.File;impor ...
- 【框架】用excel管理测试用例需要的参数数据(二)
一.总体思路 以类为excel名,测试方法名为sheet名,建立excel文件.用jxl包里的方法去读取excel文件里的内容,然后用testng里的dataprovider,将数据传递给测试用例 二 ...
- [Xcode 实际操作]一、博主领进门-(3)使用资源文件夹(Assets.xcassets)导入并管理图片素材
目录:[Swift]Xcode实际操作 本文将演示如何使用资源文件夹(Assets.xcassets)导入并管理图片素材. [Assets.xcassets]资源文件夹可以方便的进行图片的管理, 在读 ...
- excel+requests管理测试用例接口自动化框架
背景: 某项目有多个接口,之前使用的unittest框架来管理测试用例,将每个接口的用例封装成一个py文件,接口有数据或者字段变动后,需要去每个py文件中找出变动的接口测试用例,维护起来不方便,为了便 ...
- Jenkins+SVN+Maven+testNG管理项目
1.登录访问:http://localhost:8080/jenkins 2.系统管理 => 全局工具配置 => ADD JDK AND Add Maven 3.安装SVN插件:系统管 ...
- Robotium测试套管理测试用例
前提:已写好测试用例 新建个测试套MyTestSuite管理你需要跑的测试用例,或者将相同功能的测试用例归纳到一个测试套中 package com.robotium.test.testsuite; i ...
- TestNG执行测试用例的顺序
import org.openqa.selenium.By;import org.openqa.selenium.WebDriver;import org.openqa.selenium.WebEle ...
- TestNG设置测试用例执行优先级
@Test(priority = x)设置测试用例执行优先级.x默认为0,0的优先级最高,0>1>2>3... import org.testng.annotations.Test; ...
随机推荐
- Quartz表结构说明
一.表信息解析: 1.1. qrtz_blob_triggers : 以Blob 类型存储的触发器. 1.2. qrtz_calendars:存放日历信息, quartz可配置一个日历来指定一个时间范 ...
- js方法参数问题
大家都知道java是强类型语言,而js是弱类型语言,其实,它们之间的区别不止这一点,还有方法参数及调用问题,参看下例: js中:这里定义了一个query()方法 function query() { ...
- php session和cookie知识
- .Net Entity Framework Core 用 HasColumnType 配置浮点数精度
一.前言 前段时间用.Net Entity Framework core搭建框架,需要配置浮点数的精度,发现.Net Entity Framework core 并没有HasPrecision方法.在 ...
- dubbo支持的注册中心
dubbo支持的注册中心 Dubbo提供的注册中心有如下几种类型可供选择: Multicast注册中心 Zookeeper注册中心 Redis注册中心 Simple注册中心 ZooKeeper是一个开 ...
- 玩转TypeScript(5)--环境声明
环境声明为TypeScript引入了一个作用域,但是对于产生的javaScript程序不会有任何影响.程序员可以使用环境声明来告之TypeScript,一些其他的组将将提供变量的声明.比如,默认情况下 ...
- Android手机使用广播监听手机收到的短信
我们使用的Android手机在收到短信的时候会发出一条系统广播.该条广播中存放着接收到的短信的详细信息.本文将详细介绍如何通过动态注册广播来监听短信. 注册广播有两种方式,一种是动态注册,另一种是静态 ...
- JavaScript中实现最高效的数组乱序方法
数组乱序的意思是,把数组内的所有元素排列顺序打乱. 常用的办法是给数组原生的sort方法传入一个函数,此函数随机返回1或-1,达到随机排列数组元素的目的. 复制代码代码如下: arr.sort(fun ...
- 使用flex布局,垂直居中
要完成下面的样式: 1:绿色部分宽度固定,红色部分自适应宽度: 2:整体高度自适应,红色和绿色部分的内容垂直居中: html代码: <div class="main"> ...
- nuclio kubernetes 部署
一张参考架构图: 从图中可以看到nuclio可以运行到docker 以及kubernetes中 提供了kubernetes 部署的脚本 安装 创建命名空间 kubectl create namespa ...