转载自:http://my.oschina.net/amigos/blog/59261
实现RadioButton由两部分组成,也就是RadioButton和RadioGroup配合使用.RadioGroup是单选组合框,可以容纳多个RadioButton的容器.在没有RadioGroup的情况下,RadioButton可以全部都选中;当多个RadioButton被RadioGroup包含的情况下,RadioButton只可以选择一个。并用setOnCheckedChangeListener来对单选按钮进行监听
03 |
RadioGroup.getCheckedRadioButtonId ();--获取选中按钮的id |
05 |
RadioGroup.clearCheck ();//---清除选中状态 |
07 |
RadioGroup.check (int id);//---通过参入选项id来设置该选项为选中状态如果传递-1作为指定的选择标识符来清除单选按钮组的勾选状态,相当于调用clearCheck()操作 |
09 |
setOnCheckedChangeListener (RadioGroup.OnCheckedChangeListener listener); //--一个当该单选按钮组中的单选按钮勾选状态发生改变时所要调用的回调函数 |
11 |
addView (View child, int index, ViewGroup.LayoutParams params);//---使用指定的布局参数添加一个子视图 |
13 |
//参数 child 所要添加的子视图 index 将要添加子视图的位置 params 所要添加的子视图的布局参数 |
15 |
RadioButton.getText();//获取单选框的值 |
17 |
//此外,RadioButton的checked属性设置为true,代码里调用RadioButton的check(id)方法,不会触发onCheckedChanged事件 |
RadioButton和RadioGroup的关系:
1、RadioButton表示单个圆形单选框,而RadioGroup是可以容纳多个RadioButton的容器
2、每个RadioGroup中的RadioButton同时只能有一个被选中
3、不同的RadioGroup中的RadioButton互不相干,即如果组A中有一个选中了,组B中依然可以有一个被选中
4、大部分场合下,一个RadioGroup中至少有2个RadioButton
5、大部分场合下,一个RadioGroup中的RadioButton默认会有一个被选中,并建议您将它放在RadioGroup中的起始位置
看案例:
1.定义布局文件:
01 |
<?xml version="1.0" encoding="utf-8"?> |
02 |
<ScrollView xmlns:android="http://schemas.android.com/apk/res/android" |
03 |
android:layout_width="match_parent" |
04 |
android:layout_height="match_parent" > |
06 |
android:orientation="vertical" |
07 |
android:layout_width="match_parent" |
08 |
android:layout_height="wrap_content" |
09 |
android:layout_marginRight="5dp" > |
12 |
android:id="@+id/radiogroup_info_id" |
13 |
android:layout_width="228px" |
14 |
android:layout_height="wrap_content" |
15 |
android:text="我选择的是...?" |
16 |
android:textSize="30sp" |
20 |
android:id="@+id/radioGroup_sex_id" |
21 |
android:layout_width="match_parent" |
22 |
android:layout_height="match_parent" |
25 |
android:id="@+id/boy_id" |
26 |
android:layout_width="match_parent" |
27 |
android:layout_height="match_parent" |
31 |
android:id="@+id/girl_id" |
32 |
android:layout_width="match_parent" |
33 |
android:layout_height="match_parent" |
39 |
android:id="@+id/radio_clear" |
40 |
android:layout_width="match_parent" |
41 |
android:layout_height="match_parent" |
46 |
android:id="@+id/radio_add_child" |
47 |
android:layout_width="match_parent" |
48 |
android:layout_height="match_parent" |
2.java代码文件
01 |
package com.dream.app.start.first.radiobutton; |
03 |
import com.dream.app.start.R; |
04 |
import com.dream.app.start.R.id; |
05 |
import com.dream.app.start.R.layout; |
06 |
import com.dream.app.start.three.utils.PublicClass; |
08 |
import android.app.Activity; |
09 |
import android.os.Bundle; |
10 |
import android.view.View; |
11 |
import android.view.View.OnClickListener; |
12 |
import android.view.ViewGroup.LayoutParams; |
13 |
import android.widget.Button; |
14 |
import android.widget.RadioButton; |
15 |
import android.widget.RadioGroup; |
16 |
import android.widget.RadioGroup.OnCheckedChangeListener; |
17 |
import android.widget.TextView; |
18 |
import android.widget.ToggleButton; |
20 |
public class RadioButtonDemo extends PublicClass { |
21 |
private TextView textView=null; |
22 |
private RadioGroup radioGroup=null; |
23 |
private RadioButton radioButton_boy,radioButton_girl; |
24 |
private Button radio_clear,child; |
26 |
* <a href="http://my.oschina.net/u/244147" target="_blank" rel="nofollow">@see</a> android.app.Activity#onCreate(android.os.Bundle) |
29 |
protected void onCreate(Bundle savedInstanceState) { |
30 |
// TODO Auto-generated method stub |
31 |
super.onCreate(savedInstanceState); |
33 |
setContentView(R.layout.layout_frist_radiobuton); |
35 |
textView = (TextView)findViewById(R.id.radiogroup_info_id); |
38 |
radioGroup=(RadioGroup)findViewById(R.id.radioGroup_sex_id); |
39 |
radioButton_boy=(RadioButton)findViewById(R.id.boy_id); |
40 |
radioButton_girl=(RadioButton)findViewById(R.id.girl_id); |
41 |
child=(Button)findViewById(R.id.radio_add_child); |
43 |
radioGroup.setOnCheckedChangeListener(listen); |
44 |
radio_clear=(Button)findViewById(R.id.radio_clear); |
45 |
radio_clear.setOnClickListener(onClick); |
46 |
child.setOnClickListener(onClick); |
49 |
private OnCheckedChangeListener listen=new OnCheckedChangeListener() { |
52 |
public void onCheckedChanged(RadioGroup group, int checkedId) { |
53 |
int id= group.getCheckedRadioButtonId(); |
54 |
switch (group.getCheckedRadioButtonId()) { |
56 |
textView.setText("我选择的是:"+radioButton_girl.getText()); |
59 |
textView.setText("我选择的是:"+radioButton_boy.getText()); |
62 |
textView.setText("我选择的是:新增"); |
68 |
private OnClickListener onClick=new OnClickListener() { |
71 |
public void onClick(View v) { |
72 |
radio_clear=(Button)v; |
73 |
switch (radio_clear.getId()) { |
74 |
case R.id.radio_clear: |
75 |
radioGroup.check(-1);//清除选项 |
76 |
// radioGroup.clearCheck(); //清除选项 |
77 |
textView.setText("我选择的是...?"); |
79 |
case R.id.radio_add_child: |
81 |
RadioButton newRadio =new RadioButton(getApplicationContext()); |
82 |
newRadio.setText("新增"); |
83 |
radioGroup.addView(newRadio, radioGroup.getChildCount()); |
运行效果:
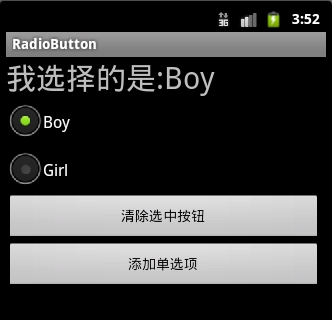
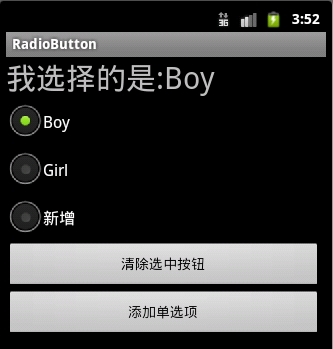
3.
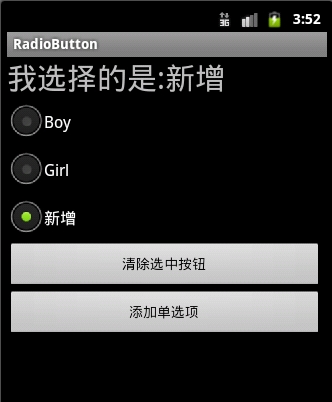
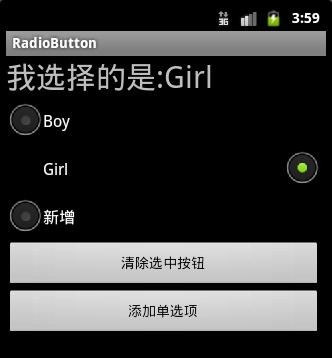
4:可以通过设置如下属性可以使单选按钮在显示文本的右边
android:button="@null"
android:drawableRight="@android:drawable/btn_radio"
效果:
RadioButton和CheckBox的区别:
1、单个RadioButton在选中后,通过点击无法变为未选中
单个CheckBox在选中后,通过点击可以变为未选中
2、一组RadioButton,只能同时选中一个
一组CheckBox,能同时选中多个
3、RadioButton在大部分UI框架中默认都以圆形表示
CheckBox在大部分UI框架中默认都以矩形表示
==================================================
☆定制RadioButton样式RadioButton长成什么样子是由其Background、Button等属性决定的,Android系统
使用style定义了默认的属性,在android源码
android/frameworks/base/core/res/res/values/styles.xml中可以看到默认的定义:
1 |
<style name="Widget.CompoundButton.RadioButton"> |
2 |
<item name="android:background">@android:drawable/btn_radio_label_background</item> |
3 |
<item name="android:button">@android:drawable/btn_radio</item> |
即其背景图是btn_radio_label_background,其button的样子是btn_radio
btn_radio_label_background是什么?
其路径是android/frameworks/base/core/res/res/drawable-mdpi/btn_radio_label_background.9.png
可以看到是一个NinePatch图片,用来做背景,可以拉伸填充。
btn_radio是什么?
其路径是android/frameworks/base/core/res/res/drawable/btn_radio.xml
是个xml定义的drawable,打开看其内容:
01 |
<selector xmlns:android="http://schemas.android.com/apk/res/android"> |
02 |
<item android:state_checked="true" android:state_window_focused="false" |
03 |
android:drawable="@drawable/btn_radio_on" /> |
04 |
<item android:state_checked="false" android:state_window_focused="false" |
05 |
android:drawable="@drawable/btn_radio_off" /> |
07 |
<item android:state_checked="true" android:state_pressed="true" |
08 |
android:drawable="@drawable/btn_radio_on_pressed" /> |
09 |
<item android:state_checked="false" android:state_pressed="true" |
10 |
android:drawable="@drawable/btn_radio_off_pressed" /> |
12 |
<item android:state_checked="true" android:state_focused="true" |
13 |
android:drawable="@drawable/btn_radio_on_selected" /> |
14 |
<item android:state_checked="false" android:state_focused="true" |
15 |
android:drawable="@drawable/btn_radio_off_selected" /> |
17 |
<item android:state_checked="false" android:drawable="@drawable/btn_radio_off" /> |
18 |
<item android:state_checked="true" android:drawable="@drawable/btn_radio_on" /> |
<item android:state_checked="true" android:state_pressed="true"
android:drawable="@drawable/btn_radio_on_pressed" />
意思即为当radiobutton被选中时,并且被按下时,其Button应该长成btn_radio_on_pressed这个样子。

文件是android/frameworks/base/core/res/res/drawable-mdpi/btn_radio_on_pressed.png
drawable的item中可以有以下属性:
1 |
android:drawable="@[package:]drawable/drawable_resource" |
2 |
android:state_pressed=["true" | "false"] |
3 |
android:state_focused=["true" | "false"] |
4 |
android:state_selected=["true" | "false"] |
5 |
android:state_active=["true" | "false"] |
6 |
android:state_checkable=["true" | "false"] |
7 |
android:state_checked=["true" | "false"] |
8 |
android:state_enabled=["true" | "false"] |
9 |
android:state_window_focused=["true" | "false"] |
当按钮的状态和某个item匹配后,就会使用此item定义的drawable作为按钮图片。
从上面分析我们如果要修改RadioButton的外观,
自定义有三种方式:
1.方式一:
01 |
<?xml version="1.0" encoding="utf-8"?> |
02 |
<selector xmlns:android="http://schemas.android.com/apk/res/android"> |
05 |
android:state_checked="false" |
06 |
android:drawable="@drawable/tabswitcher_long" /> |
09 |
android:state_checked="true" |
10 |
android:drawable="@drawable/tabswitcher_short" /> |
在布局文件中使用
7 |
android:background="@drawable/radio" |
android:button="@null" 去除RadioButton前面的圆点
2.方式二:在JAVA代码中定义
2 |
public boolean onTouchEvent(MotionEvent event) { |
3 |
if(event.getActionMasked() == MotionEvent.ACTION_DOWN){ |
4 |
this.setBackgroundResource(com.wxg.tab.R.drawable.main_bg); |
5 |
}else if(event.getActionMasked()== MotionEvent.ACTION_DOWN) { |
6 |
this.setBackgroundResource(com.wxg.tab.R.drawable.hui); |
8 |
return super.onTouchEvent(event); |
去除RadioButton前面的圆点adioButton.setButtonDrawable(android.R.color.transparent);
3. 方式三
使用XML文件定义,在JAVA代码中使用 radioButton.setBackgroundResource(R.drawable.radio);调用
==============================================================
设置RadioButton在文字的右边
2 |
android:id="@+id/button2" |
3 |
android:layout_width="fill_parent" |
4 |
android:layout_height="50dip" |
6 |
android:drawableRight="@android:drawable/btn_radio" //在右边 |
7 |
android:paddingLeft="30dip" |
8 |
android:text="Android高手" |
9 |
android:textSize="20dip" /> </b> |
================================================================
自定义 radiobutton 文字颜色随选中状态而改变
主要是写一个 color selector
在res/建一个文件夹取名color
res/color/color_radiobutton.xml
1 |
<?xml version="1.0" encoding="utf-8"?> |
2 |
<selector xmlns:android="http://schemas.android.com/apk/res/android"> |
4 |
<item android:state_checked="true" |
5 |
android:color="@color/color_text_selected"/> |
7 |
<item android:color="@color/color_text_normal"/> |
布局文件定义控件:
02 |
android:id="@+id/radiobutton_1" |
03 |
android:layout_width="wrap_content" |
04 |
android:layout_height="wrap_content" |
05 |
android:background="@drawable/selector_radio" |
06 |
android:button="@null" |
07 |
android:checked="true" |
08 |
android:gravity="center" |
11 |
android:textColor="@color/color_radiobutton" |
12 |
android:textSize="@dimen/font_size" |
13 |
android:textStyle="bold" /> |
============================================================
RadioButton上显示图片和文字
使用XML文件很简单就可以实现,但是有时必须要使用java code 的方式动态实现,这就有些复杂了,这需要继承RadioButton并覆盖其中的onDraw方法。
在代码中的image是Bitmap对象。
03 |
protected void onDraw(Canvas canvas) { |
09 |
Paint pt = new Paint(); |
11 |
pt.setARGB(255,66,66,66); |
15 |
pt.setAntiAlias(true); |
19 |
int imageX=(int)(this.getWidth()-image.getWidth())/2; |
21 |
canvas.drawBitmap(image,imageX,5,pt); |
23 |
pt.setARGB(255,255,255,255); |
27 |
int strX=(int)(this.getWidth()-name.getBytes().length*5.5)/2; |
29 |
canvas.drawText(name,strX,(image.getHeight()+15),pt); |
- React Native之(支持iOS与Android)自定义单选按钮(RadioGroup,RadioButton)
React Native之(支持iOS与Android)自定义单选按钮(RadioGroup,RadioButton) 一,需求与简单介绍 在开发项目时发现RN没有给提供RadioButton和Rad ...
- Android下利用RadioGroup和RadioButton实现Tabbar的效果
本实现方法主要使用RadioGroup和RadioButton的组合方式来实现Tabbar的效果. 其中选中的Tab的切换的动作可以通过RadioGroup的OnCheckedChangeListen ...
- Android控件之RadioGroup与RadioButton(单选控件)
一.RadioGroup与RadioButton 1.什么是RadioGroup: RadioButton的一个集合,提供多选机制 2.什么是RadioButton: RadioButton包裹在Ra ...
- Android入门(八):使用RadioGroup 和RadioButton组件建立单选清单
这一章,我们学习RadioGroup 和RadioButton组件,我们新建一个项目,编码过程与前几章的项目类似. 1.建立字符串资源文件strings.xml: <resources> ...
- Android控件系列之RadioButton&RadioGroup(转)
学习目的: 1.掌握在Android中如何建立RadioGroup和RadioButton 2.掌握RadioGroup的常用属性 3.理解RadioButton和CheckBox的区别 4.掌握Ra ...
- android学习日记03--常用控件checkbox/radiobutton
常用控件3.checkbox 复选框,确定是否勾选,点击一下勾选,点击第二下取消,当有一系列备选项时适合用checkbox控件,方便用户提交数据. 贴上例子Activity的java代码 packag ...
- Android控件系列之RadioButton&RadioGroup
学习目的: 1.掌握在Android中如何建立RadioGroup和RadioButton 2.掌握RadioGroup的常用属性 3.理解RadioButton和CheckBox的区别 4.掌握Ra ...
- Android RadioGroup和RadioButton详解
实现RadioButton由两部分组成,也就是RadioButton和RadioGroup配合使用.RadioGroup是单选组合框,可以容纳多个RadioButton的容器.在没有RadioGrou ...
- 3.Android之单选按钮RadioGroup和复选框Checkbox学习
单选按钮和复选框在实际中经常看到,今天就简单梳理下. 首先,我们在工具中拖进单选按钮RadioGroup和复选框Checkbox,如图: xml对应的源码: <?xml version=&quo ...
随机推荐
- 解救小哈——DFS算法举例
一.问题引入 有一天,小哈一个人去玩迷宫.但是方向感不好的小哈很快就迷路了.小哼得知后便去解救无助的小哈.此时的小哼已经弄清楚了迷宫的地图,现在小哼要以最快的速度去解救小哈.那么,问题来了... 二. ...
- MySQL存储过程、触发器 小例子
一.存储过程 语法: CREATE PROCEDURE([[IN |OUT |INOUT ] 参数名 数据类形...]) BEGIN ... END 参数: IN 输入参数 表示该参数的值必须在调用存 ...
- AFNetWorking能做什么
AFNetwork是一个轻量级的网络请求api类库.是以NSURLConnection, NSOperation和其它方法为基础的. 以下这个样例是用来处理json请求的: NSURL *url = ...
- Java虚拟机性能管理神器 - VisualVM(4) - JDK版本与VisualVM版本对应关系
Java虚拟机性能管理神器 - VisualVM(4) - JDK版本与VisualVM版本对应关系 JDK版本与VisualVM版本对应关系说明 JDK版本与VisualVM版本对应关系 参 ...
- R语言在柱状图上添加文字
代码示例: data <- data.frame(A = 1:2, B = 1:2, C = 1:2) data <- data.matrix(data) par(font = 2, lw ...
- Mybatis中#和$区别(带脑图)
零.引言 使用 #{name} 的时候,MyBatis会进行预编译,防止SQL注入的问题(官方话) 用一个通俗一点的例子来解释,比如有如下MyBatis的SQL语句 21.#{}和${}的区别.png ...
- u3d animation运用明细
u3d的动作legacy模式,经测试得出 using UnityEngine; using System.Collections; public class AnimateCon : MonoBeha ...
- Apache TomEE 入门指南
介绍 Apache TomEE(发音同“tommy”)是一个新的JavaEE服务器,由Apache软件基金会开发,你大概能够从它的名字猜到,它是从Tomcat而来, 同时加入的JavaEE的特征:To ...
- 使用FileZilla解决从Windows上传文件到Linux vsftpd的乱码问题!
日前将golang的开发环境从windows转移到了CentOS6上,为了把以前写得项目代码上传到centos,架设了vsftpd服务,设置为本地用户登录,然后用惯用的ftp软件flashfxp上传了 ...
- (转)Java程序员应该知道的10个调试技巧
(转自 酷勤网 – 程序员的那点事!http://www.kuqin.com/) 试可以帮助识别和解决应用程序缺陷,在本文中,作者将使用大家常用的的开发工具Eclipse来调试Java应用程序.但这里 ...
