
js canvas 粒子动画 电子表
前言
从我接触canvas的第一天就觉得canvas很有趣,想搞点事情,这几天终于忍不住了,于是他来了。
先看效果

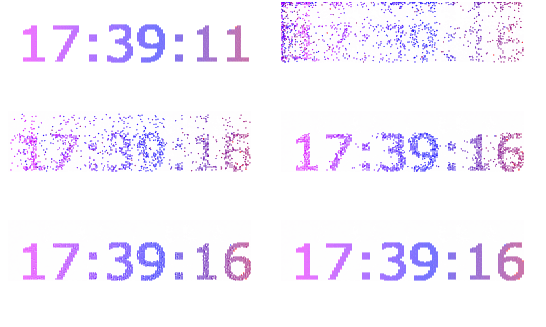
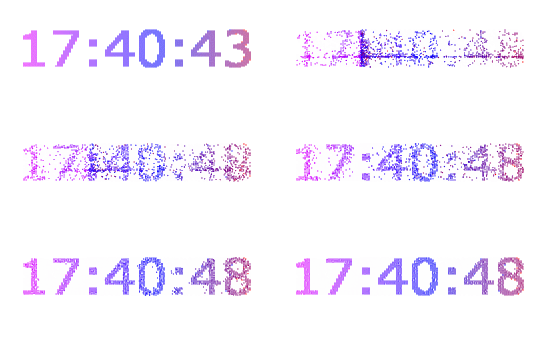
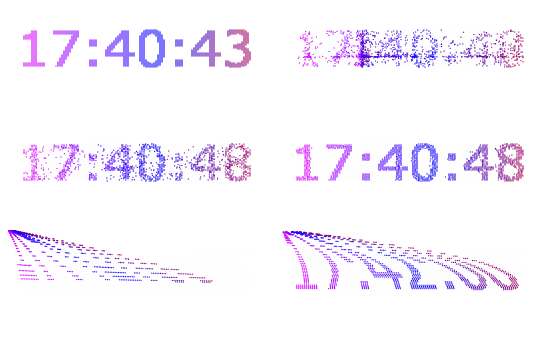
这里我做了四个大家有兴趣可以看完文章,做一个自己喜欢的动画。
思路
开始做之前,我们先分析一下这种粒子动画实现的原理,绘制的内容是由许多个带有颜色像素点构成,每个像素点在画布上都有自己的坐标。首先获取到要绘制的内容的像素点信息的数组(目标数组)例如
[

    {x:10, y:20, color: 'rgba(255, 122, 122)'},

    {x:11, y:20, color: 'rgba(255, 122, 122)'},

    {x:12, y:20, color: 'rgba(255, 122, 122)'},

]
然后我们就可以让这些像素点从某些特定的位置,以某种特定的方式,移动到目标位置,动画就完成了。
实现
1.获取目标数组
我们先说一下 canvas 的 getImageData() ,该方法返回 ImageData 对象,该对象拷贝了画布指定矩形的像素数据。
对于 ImageData 对象中的每个像素,都存在着四方面的信息,即 RGBA 值:
- R - 红色 (0-255)
- G - 绿色 (0-255)
- B - 蓝色 (0-255)
- A - alpha 通道 (0-255; 0 是透明的,255 是完全可见的)
真实样子是这个样子的
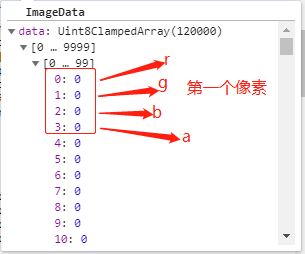
| 0,1,2,3 | 4,5,6,7 | 8,9,10,11 |
| 12,13,14,15 | 16,17,18,19 | 20,21,22,23 |
每四个值为一组,用来表示一个像素点的信息,每一个单元格代表一个像素。
先在一个canvas中绘制想要的内容,通过getImageData()获得像素信息,我们发现ImageData 对象的信息和我们想象中的目标数组不大一样,我们要将ImageData对象处理一下,我们将其每四个划分为一组,重新定义索引,例如我们在一个12px宽的画布中,经过分析不难发现坐标与索引之间的关系,分两种情况 n<12(画布的宽度) 时坐标为((n+1)%12, n+1),n>12时坐标为((n+1)%12, parseInt((n+1)/ 12))
| 0(0,0) | 1(0,1) | .. | n((n+1)%12, n+1) | 11(0,11) |
| .. | .. | .. | .. | .. |
|
n((n+1)%12, parseInt((n+1)/ 12)) |
到这里功能是实现了,但是如果操作的内容很大,像素点很多,后期操作的像素点越多性能就越差,有没有什么办法可以稀释一下这些像素呢,当然有!我们可以隔一个像素取一个像素,这样像素点瞬间就减少了一倍,同理我们隔两个隔三个隔n个,这样我们就可以定义一个参数用来控制像素的稀释度
下面的事情就简单了,用代码实来现这一步
/*

* @ ImageDataFormat

* @ param { pixels 需要格式化的ImageData对象, n 稀释度 }

* @ return { Array }

*/

 function ImageDataFormat(pixels, n){
    n = n*4

      var arr = [], //目标数组

    temPixel = {}, //目标数组中存放像素信息的对象

    x = 0, //像素的x坐标

    y = 0  //像素的y坐标

      for (var i=0;i<pixels.data.length;i+=n){

      //过滤纯色背景提高性能,如背景色不可去掉可省略判断

        if(pixels.data[i] !== 0 ||  pixels.data[i+1] !== 0 || pixels.data[i+2] !== 0 ){

          var index = (i+1) / 4 //每四个划分为一组,重新定义索引

          if(index > timeDom.width){

            x = index % timeDom.width

            y = parseInt(index / timeDom.width)

          }else{

            x = index

            y = 0

          }

          temPixel = {

            R: pixels.data[i],

            G: pixels.data[i+1],

            B: pixels.data[i+2],

            A: pixels.data[i+3],

            I:i,

            X:x,

            Y:y

          }

          arr.push(temPixel)

        }

      }
    return arr

  }
2.将目标数组绘制到画布上
2.1在画布的指定位置画一个圆(一个像素点)
  /**

 * @ drawArc

 * @ param{ ctx 画布,,x x坐标,y y坐标,color 颜色}

 */

function drawArc(ctx, x, y, color){

  x = x

  y = y

  ctx.beginPath();

  ctx.fillStyle = color

  ctx.strokeStyle = color

  ctx.arc(x,y,0.5,0,2*Math.PI);

  ctx.closePath()

  ctx.fill()

}
2.1将点连成线,线构成面
  /**

 * 画路径

 * @param { points 格式化好的目标数组, crx 画布}

 */

function draw_path(points, ctx){

  for(var i=0;i < points.length-1;i++){

    var color = 'rgba(' + points[i].R + ',' +  points[i].G + ','  + points[i].B + ')', x, y

      drawArc(ctx,points[i].X,points[i].Y, color)

    }

}
到此我们就画出了动画的其中一帧,下面我们就要让这一帧动起来
2.2动起来
我们的动画进行其实很简单
1.画第一帧
2.清空画布
3.画下一帧
4.在清空
....
但是想让这个动画流畅的进行起来我们还要在了解一下tween(缓动动画), window.requestAnimationFrame()
tween 我们值列举一种其他 形式感兴趣的可以自己查一下
/*

* @ 参数描述

* @ t 动画执行到当前帧所经过的时间

* @ b 起始值

* @ c 总位移值

* @ d 持续时间

*/

function easeInOutExpon(t,b,c,d){

    if (t==0) return b;

    if (t==d) return b+c;

    if ((t/=d/2) < 1) return c/2 * Math.pow(2, 10 * (t - 1)) + b;

    return c/2 * (-Math.pow(2, -10 * --t) + 2) + b;

}
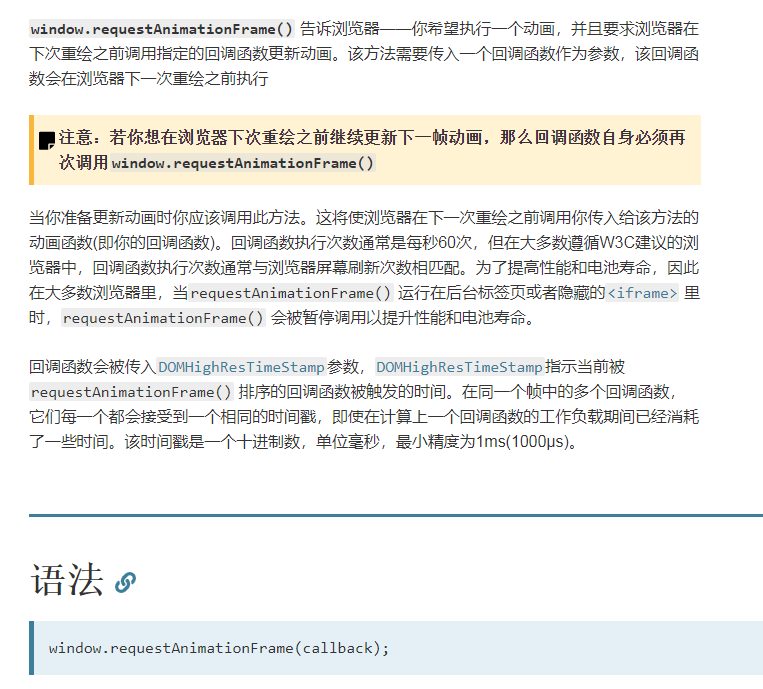
window.requestAnimationFrame()
准备工作做好了可以开工了
我么只需要将前面的函数稍微改动一下他就动起来了
  function ShowTimeInit(pixels, n){

        n = 4*n

      var arr = [], temPixel = {}, x = 0, y = 0

      for (var i=0;i<pixels.data.length;i+=n){

        if(pixels.data[i] !== 0 ||  pixels.data[i+1] !== 0 || pixels.data[i+2] !== 0 ){

          var index = parseInt ((i+1) / 4)

          if(index > timeDom.width){

            x = index % timeDom.width

            y = parseInt(index / timeDom.width)

          }else{

            x = index

            y = 0

          }

          temPixel = {

            R: pixels.data[i],

            G: pixels.data[i+1],

            B: pixels.data[i+2],

            A: pixels.data[i+3],

            I:i,

            X:x,

            Y:y

          }

          arr.push(temPixel)

        }

      }

      var step = requestAnimationFrame(function(){draw_path(arr, ShowTime, step)})

  }

  /**

 * 画路径

 * @param path 路径

 */

function draw_path(points, ctx, step){

    ShowTime.clearRect(0,0,ShowTimeDom.width,ShowTimeDom.height);

    var pointX, pointY, randomX, randomY

    for(var i=0;i < points.length-1;i++){

        switch (mode){

            case 'left':

                pointX = randomNum(0,0)

                pointY = randomNum(0,100)

                randomX = 0

                randomY = Math.random() + Math.random()*3000

                break;

            case 'center':

                pointX = 80

                pointY = 50

                randomX = Math.random() + Math.random()*3000

                randomY = Math.random() + Math.random()*3000

                break;

            case 'random':

                pointX = 0

                pointY = 0

                randomX = Math.random() + Math.random()*3000

                randomY = Math.random() + Math.random()*3000

                break;

            case 'flow':

                pointX = 0

                pointY = 0

                randomX = i

                randomY = i

                break;

        }

      var color = 'rgba(' + points[i].R + ',' +  points[i].G + ','  + points[i].B + ')', x, y

       x = easeInOutExpon(nowDuration + randomX, pointX, points[i].X-pointX, duration)

       y = easeInOutExpon(nowDuration + randomY, pointY, points[i].Y-pointY, duration)

      drawArc(ctx,x, y, color)

    }

    nowDuration += 1000/60

        if(duration <= nowDuration){

        window.cancelAnimationFrame(step);

    }else{

        requestAnimationFrame(function(){draw_path(points, ctx, step)})

    }

}
附上完整代码
<!DOCTYPE html>

<html lang="en">

<head>

  <meta charset="UTF-8">

  <meta name="viewport" content="width=device-width, initial-scale=1.0">

  <meta http-equiv="X-UA-Compatible" content="ie=edge">

  <style>

  </style>

  <title>电子时钟</title>

</head>

<body>

  <canvas id="HidenTime" width="300" height="100" style="display: none"> </canvas>

  <canvas id="ShowTime" width="300" height="100"> </canvas>

</body>

<script>

  function GetTime(){

    this._Hours = ''

    this._Minutes = ''

    this._Seconds = ''

  }

  GetTime.prototype = {

    constructor: GetTime,

    get Hours(){

      this._Hours = new Date().getHours()

      if(this._Hours > 9){

        return this._Hours

      }else{

        return "0" + this._Hours

      }

    },

    get Minutes(){

      this._Minutes = new Date().getMinutes()

      if(this._Minutes > 9){

        return this._Minutes

      }else{

        return "0" + this._Minutes

      }

    },

    get Seconds(){

      this._Seconds = new Date().getSeconds()

      if(this._Seconds > 9){

        return this._Seconds

      }else{

        return "0" + this._Seconds

      }

    },

    formTime:function(){

        return this.Hours + ':' + this.Minutes + ':' + this.Seconds

    }

  }

  var requestAnimationFrame = window.requestAnimationFrame || window.mozRequestAnimationFrame ||

                            window.webkitRequestAnimationFrame || window.msRequestAnimationFrame;

  var cancelAnimationFrame = window.cancelAnimationFrame || window.mozCancelAnimationFrame;

  var duration = 3000, nowDuration = 0

  var timeDom = document.getElementById("HidenTime")

  var time = timeDom.getContext('2d')

  var ShowTimeDom = document.getElementById("ShowTime")

  var ShowTime = ShowTimeDom.getContext('2d')

  time.clearRect(0,0,timeDom.width,timeDom.height);

  var nowTime = new GetTime()

  var showTime = nowTime.formTime()

  var modes = ['left', 'random', 'center', 'flow']

  var mode = modes[0]

  time.font="50px Verdana";

  // 创建渐变

  var gradient=time.createLinearGradient(0,0,timeDom.width,0);

  gradient.addColorStop("0","magenta");

  gradient.addColorStop("0.5","blue");

  gradient.addColorStop("1.0","red");

  // 用渐变填色

  time.fillStyle=gradient;

  time.fillText(showTime,10,60);

  var pixels = time.getImageData(0,0,300,100)

  ShowTimeInit(pixels, 2)

  setInterval(function(){

    mode = modes[randomNum(0,3)]

    //mode = modes[3]

    time.clearRect(0,0,timeDom.width,timeDom.height);

    nowDuration = 0

    showTime = nowTime.formTime()

    time.fillText(showTime,10,60);

    pixels = time.getImageData(0,0,300,100)

    ShowTimeInit(pixels, 2)

  }, 5000)

  function ShowTimeInit(pixels, n){

        n = 4*n

      var arr = [], temPixel = {}, x = 0, y = 0

      for (var i=0;i<pixels.data.length;i+=n){

        if(pixels.data[i] !== 0 ||  pixels.data[i+1] !== 0 || pixels.data[i+2] !== 0 ){

          var index = parseInt ((i+1) / 4)

          if(index > timeDom.width){

            x = index % timeDom.width

            y = parseInt(index / timeDom.width)

          }else{

            x = index

            y = 0

          }

          temPixel = {

            R: pixels.data[i],

            G: pixels.data[i+1],

            B: pixels.data[i+2],

            A: pixels.data[i+3],

            I:i,

            X:x,

            Y:y

          }

          arr.push(temPixel)

        }

      }

      var step = requestAnimationFrame(function(){draw_path(arr, ShowTime, step)})

  }

  /**

 * 画路径

 * @param path 路径

 */

function draw_path(points, ctx, step){

    ShowTime.clearRect(0,0,ShowTimeDom.width,ShowTimeDom.height);

    var pointX, pointY, randomX, randomY

    for(var i=0;i < points.length-1;i++){

        switch (mode){

            case 'left':

                pointX = randomNum(0,0)

                pointY = randomNum(0,100)

                randomX = 0

                randomY = Math.random() + Math.random()*3000

                break;

            case 'center':

                pointX = 80

                pointY = 50

                randomX = Math.random() + Math.random()*3000

                randomY = Math.random() + Math.random()*3000

                break;

            case 'random':

                pointX = 0

                pointY = 0

                randomX = Math.random() + Math.random()*3000

                randomY = Math.random() + Math.random()*3000

                break;

            case 'flow':

                pointX = 0

                pointY = 0

                randomX = i

                randomY = i

                break;

        }

      var color = 'rgba(' + points[i].R + ',' +  points[i].G + ','  + points[i].B + ')', x, y

       x = easeInOutExpon(nowDuration + randomX, pointX, points[i].X-pointX, duration)

       y = easeInOutExpon(nowDuration + randomY, pointY, points[i].Y-pointY, duration)

      drawArc(ctx,x, y, color)

    }

    nowDuration += 1000/60

        if(duration <= nowDuration){

        window.cancelAnimationFrame(step);

    }else{

        requestAnimationFrame(function(){draw_path(points, ctx, step)})

    }

}

  /**

 * 画圆

 */

function drawArc(ctx, x, y, color){

  x = x

  y = y

  ctx.beginPath();

  ctx.fillStyle = color

  ctx.strokeStyle = color

  ctx.arc(x,y,0.5,0,2*Math.PI);

  ctx.closePath()

  ctx.fill()

}

/*

* 参数描述

* t 动画执行到当前帧所经过的时间

* b 起始值

* c 总位移值

* d 持续时间

*/

function easeInOutExpon(t,b,c,d){

    if (t==0) return b;

    if (t==d) return b+c;

    if ((t/=d/2) < 1) return c/2 * Math.pow(2, 10 * (t - 1)) + b;

    return c/2 * (-Math.pow(2, -10 * --t) + 2) + b;

}

//生成从minNum到maxNum的随机数

function randomNum(minNum, maxNum) {

  switch (arguments.length) {

    case 1:

      return parseInt(Math.random() * minNum + 1, 10);

      break;

    case 2:

      return parseInt(Math.random() * ( maxNum - minNum + 1 ) + minNum, 10);

      break;

    default:

      return 0;

      break;

  }

}

</script>

</html>
总结
当一个新想法出现时,先去github和博客上找一找,看看有没有大佬做过,大佬们的的思路是什么,有什么自己没想到的细节,感觉差不多了在动手去做。
js canvas 粒子动画 电子表的更多相关文章
- 打造高大上的Canvas粒子(一)
HTML5 Canvas <canvas>标签定义图形,比如图表和其他图像,必须用脚本(javascript)绘制图形. 举例:绘制矩形 <script> var c = do ...
- canvas学习之粒子动画
项目地址:http://pan.baidu.com/s/1ccTptc 粒子动画意思就是把一个图片粒子画,然后使用粒子作出动画效果,主要两个问题:一个图片如何粒子化,这里面我们使用canvas的get ...
- 带着canvas去流浪系列之九 粒子动画【华为云技术分享】
版权声明:本文为博主原创文章,遵循CC 4.0 BY-SA版权协议,转载请附上原文出处链接和本声明. 本文链接:https://blog.csdn.net/devcloud/article/detai ...
- 带着canvas去流浪系列之九 粒子动画
[摘要] canvas实现粒子动画 示例代码托管在:http://www.github.com/dashnowords/blogs 一. 粒子特效 粒子特效一般指密集点阵效果,它并不是canvas独有 ...
- 【带着canvas去流浪(9)】粒子动画
目录 一. 粒子特效 二. 开发中遇到的问题 2.1 卡顿 2.2 轨迹 2.3 复位 2.4 防护层 2.5 二维向量类 三. 实现讲解 3.1 粒子类的update方法 3.2 粒子群的绘制 3. ...
- CodePen 作品秀:Canvas 粒子效果文本动画
作品名称——Shape Shifter,基于 Canvas 的粒子图形变换实验.在页面下方的输入框输入文本,上面就会进行变换出对应的粒子效果文本动画. CodePen 作品秀系列向大家展示来自 Cod ...
- css3动画和JS+DOM动画和JS+canvas动画比较
css3兼容:IE10+.FF.oprea(animation):safari.chrome(-webkit-animation) js+dom:没有兼容问题: js+canvas:IE9+:(性能最 ...
- 基于canvas与原生JS的H5动画引擎
前一段时间项目组里有一些H5动画的需求,由于没有专业的前端人员,便交由我这个做后台的研究相关的H5动画技术. 通过初步调研,H5动画的实现大概有以下几种方式: 1.基于css实现 这种方式比较简单易学 ...
- canvas粒子时钟
前面的话 本文将使用canvas实现粒子时钟效果 效果展示 点阵数字 digit.js是一个三维数组,包含的是0到9以及冒号(digit[10])的二维点阵.每个数字的点阵表示是7*10大小的二维数组 ...
随机推荐
- Codeforces Fix a Tree
Fix a Tree time limit per test2 seconds A tree is an undirected connected graph without cycles. Let' ...
- WPFの触发器详解
例子1 简单触发器Triggers——满足简答的条件,触发 <Window x:Class="Styles.SimpleTriggers" xmlns="http: ...
- 阿里云安装Cloudera Manager(草稿)
选择三台同一局域网的阿里云服务器 最初使用阿里云.京东云.百度云的三台不同的服务器,遇到一些问题,没有解决,公网速度也没有保障,还是选择同一局域网的服务器吧 CM有三种不同的安装方式: 通过 Clou ...
- 云数据库POLARDB产品解读之二:如何做到高性价比
现在做任何事情都要看投入产出比,对应到数据库上其实就是性价比.POLARDB作为一款阿里自研数据库,经常被问的问题是:性能怎么样?能不能支撑我的业务?价格贵不贵?很显然,在早期调研阶段,对稳定性.可靠 ...
- Java虚拟机解析篇之---垃圾回收器
上一篇说了虚拟机的内存模型,在说到堆内存的时候我们提到了,堆内存是Java内存中区域最大的一部分,而且垃圾回收器主要就是回收这部分的内容.那么这篇就来介绍一下垃圾回收器的原理以及回收的算法. Java ...
- Android中软键盘弹出时关于布局的问题
当在Android的layout设计里面如果输入框过多,则在输入弹出软键盘的时候,下面的输入框会有一部分被软件盘挡住,从而不能获取焦点输入. 解决办法: 方法一:在你的activity中的oncre ...
- Python每日一题 003
将 002 题生成的 200 个激活码(或者优惠券)保存到 MySQL 关系型数据库中. 代码 import pymysql import uuid def get_id(): for i in ra ...
- javascript 对象的设计模式
1.为什么学习设计模式:http://www.iteye.com/news/32092 或 https://blog.csdn.net/pigpigpig4587/article/details ...
- Python面向对象 杂篇(后记)
异常处理 什么是异常: 我们在调试程序时,常常会因为各种报错信息导致程序无法运行,异常也是一个对象,用来表示错误.我们可以捕捉异常,并做相应处理,从而增加代码的友好程度. 异常处理: ...
- HTML 文档流,设置元素浮动,导致父元素高度无法自适应的解决方法(高度欺骗)
元素浮动定义 float 属性定义元素在哪个方向浮动.以往这个属性总应用于图像,使文本围绕在图像周围,不过在 CSS 中,任何元素都可以浮动.浮动元素会生成一个块级框,而不论它本身是何种元素. 如果浮 ...