
CentOS 7.x and RHEL 7.x Install qemu-kvm
ref: https://www.linuxtechi.com/install-kvm-hypervisor-on-centos-7-and-rhel-7/
https://www.thegeekstuff.com/2014/10/linux-kvm-create-guest-vm/
KVM is an open source hardware virtualization software through which we can create and run multiple Linux based and windows based virtual machines simultaneously. KVM is known as Kernel based Virtual Machine because when we install KVM package then KVM module is loaded into the current kernel and turns our Linux machine into a hypervisor.
In this post first we will demonstrate how we can install KVM hypervisor on CentOS 7.x and RHEL 7.x and then we will try to install virtual machines.
Before proceeding KVM installation, let’s check whether your system’s CPU supports Hardware Virtualization.
Run the beneath command from the console.
[root@linuxtechi ~]# grep -E '(vmx|svm)' /proc/cpuinfo
We should get the word either vmx or svm in the output, otherwise CPU doesn’t support virtualization.
Step:1 Install KVM and its associate packages
Run the following yum command to install KVM and its associated packages.
[root@linuxtechi ~]# yum install qemu-kvm qemu-img virt-manager libvirt libvirt-python libvirt-client virt-install virt-viewer bridge-utils
Start and enable the libvirtd service
[root@linuxtechi ~]# systemctl start libvirtd

[root@linuxtechi ~]# systemctl enable libvirtd
Run the beneath command to check whether KVM module is loaded or not
[root@linuxtechi ~]# lsmod | grep kvm

kvm_intel             162153  0

kvm                   525409  1 kvm_intel

[root@linuxtechi ~]#
In Case you have Minimal CentOS 7 and RHEL 7 installation , then virt-manger will not start for that you need to install x-window package.
[root@linuxtechi ~]# yum install "@X Window System" xorg-x11-xauth xorg-x11-fonts-* xorg-x11-utils -y
Reboot the Server and then try to start virt manager.
Step:2 Start the Virt Manager
Virt Manager is a graphical tool through which we can install and manage virtual machines. To start the virt manager type the ‘virt-manager‘ command from the terminal.
[root@linuxtechi ~]# virt-manager
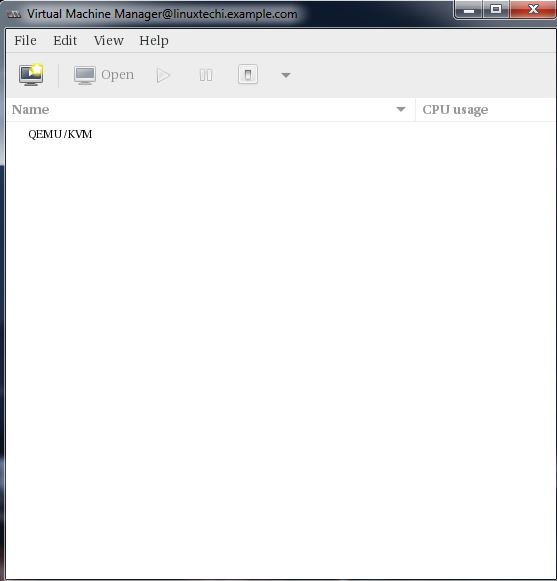
Step:3 Configure Bridge Interface
Before Start creating VMs , let’s first create the bridge interface. Bridge interface is required if you want to access virtual machines from outside of your hypervisor network.
[root@linuxtechi ~]# cd /etc/sysconfig/network-scripts/

[root@linuxtechi network-scripts]# cp ifcfg-eno49 ifcfg-br0

[root@linuxtechi network-scripts]#
Edit the Interface file and set followings:
[root@linuxtechi network-scripts]# vi ifcfg-eno49

TYPE=Ethernet

BOOTPROTO=static

DEVICE=eno49

ONBOOT=yes

BRIDGE=br0
Edit the Bridge file (ifcfg-br0) and set the followings:
[root@linuxtechi network-scripts]# vi ifcfg-br0

TYPE=Bridge

BOOTPROTO=static

DEVICE=br0

ONBOOT=yes

IPADDR=192.168.10.21

NETMASK=255.255.255.0

GATEWAY=192.168.10.1

DNS1=192.168.10.11
Replace the IP address and DNS server details as per your setup.
Restart the network Service to enable the bridge interface.
[root@linuxtechi ~]# systemctl restart network

[root@linuxtechi ~]#
Check the Bridge interface using below command :
[root@linuxtechi ~]# ip addr show br0
Step:4 Start Creating Virtual Machines.
Now Create Virtual Machine either from the command line using ‘virt-install‘ command or from GUI (virt-manager )
Let’s Create a virtual machine of “Windows Server 2012 R2” using virt-manager.
Start the “virt-manager”
Go to the File Option, click on “New Virtual Machine”
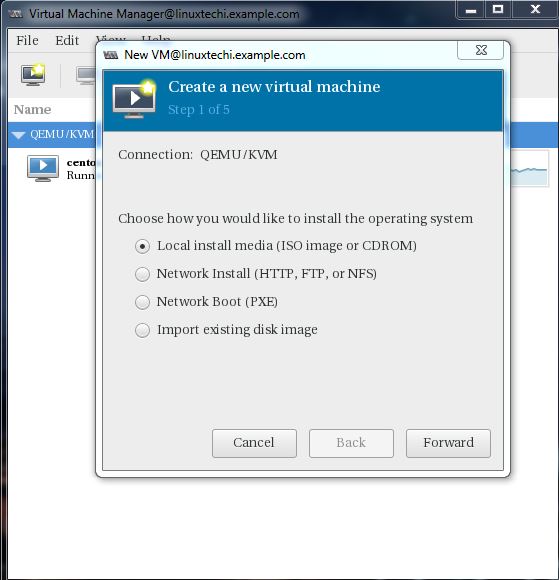
We will be using ISO file as installation media. In the next step Specify the path of ISO file.
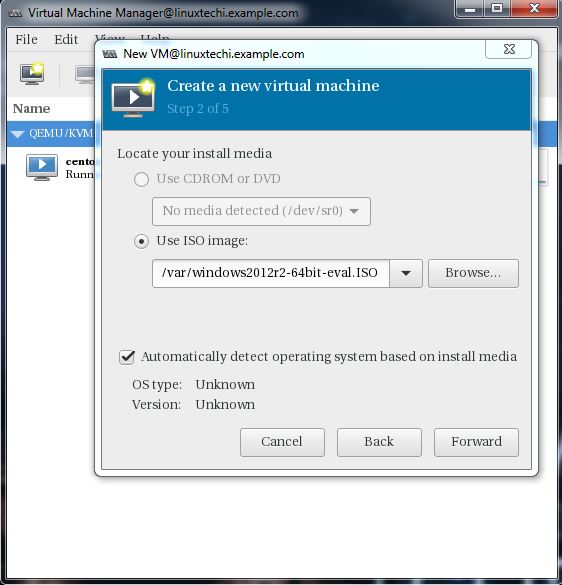
Click on Forward.
Specify the Compute Resources : RAM and CPU as per your setup.
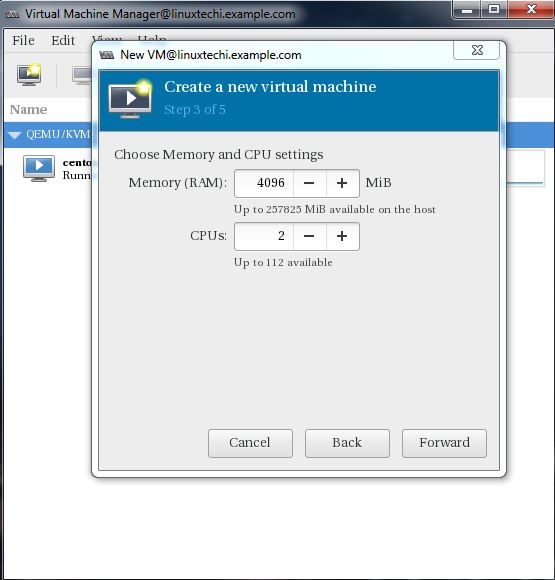
Click on Forward to proceed further.
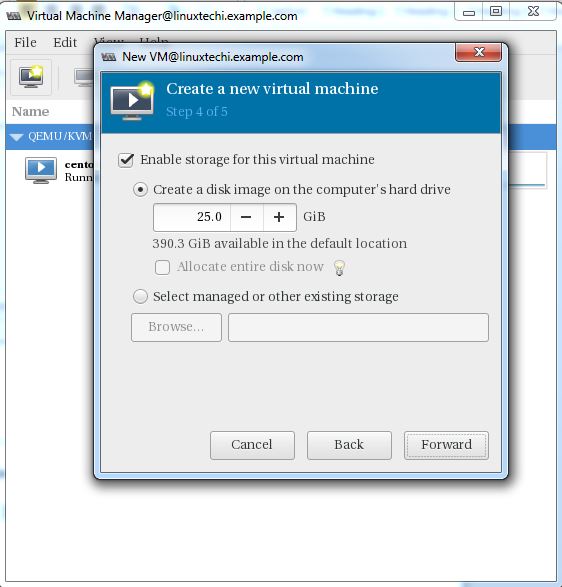
Specify the storage Size of Virtual Machine, In my case I am using 25G.
In the Next step Specify the Name of Virtual Machine and select network as ‘ Bridge bro’
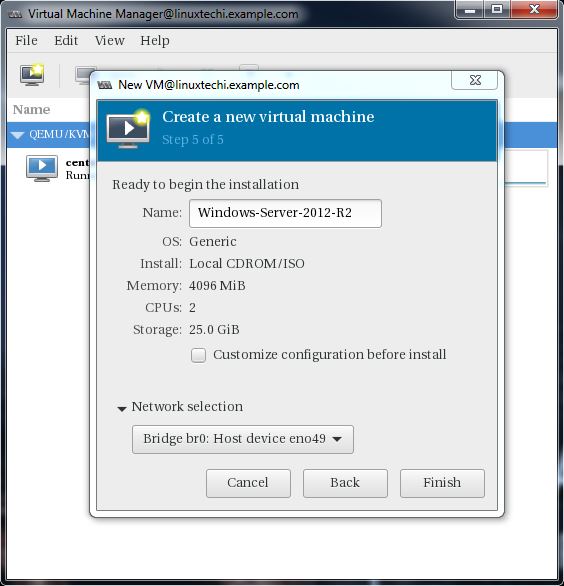
Click on Finish to start the installation.
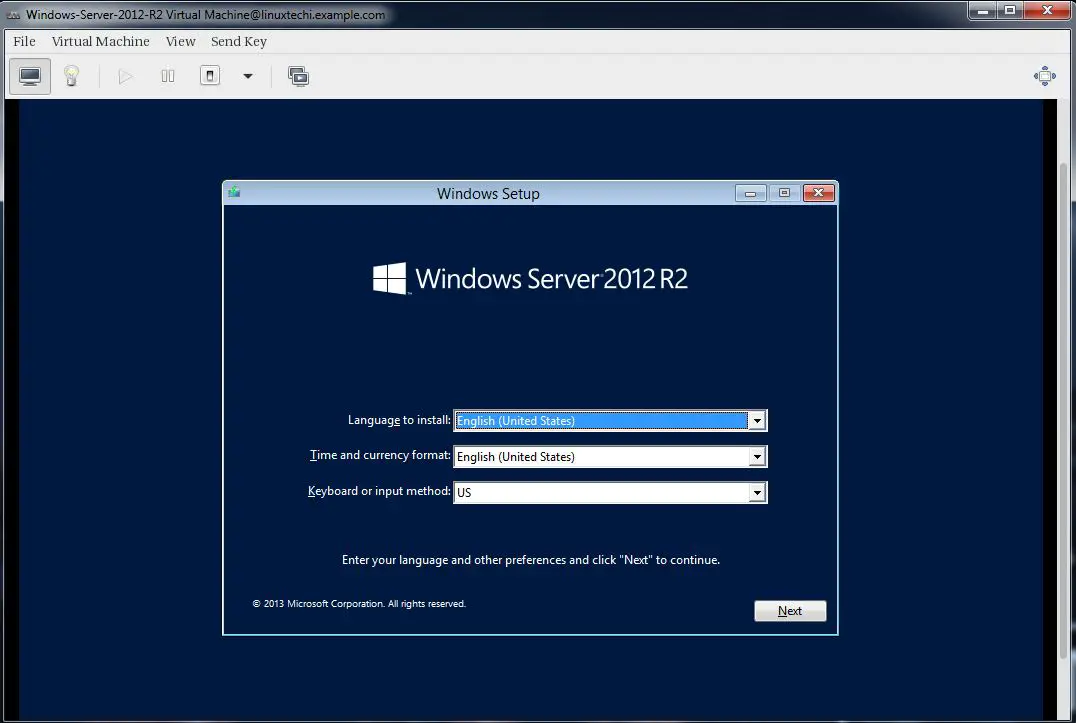
Follow the screen instructions and complete the installation.
Creating a virtual Machine from Command Line:
Virtual Machines can be created from the console as well using ‘virt-install’ command. In the following example i going to virtual machine of Ubuntu 16.04 LTS.
[root@linuxtechi ~]# virt-install --name=Ubuntu-16-04 --file=/var/lib/libvirt/images/ubuntu16-04.dsk --file-size=20 --nonsparse --graphics spice --vcpus=2 --ram=2048 --cdrom=ubuntu-16.04-server-amd64.iso --network bridge=br0 --os-type=linux --os-variant=generic

Starting install...

Allocating 'ubuntu16-04.dsk'               | 20 GB 00:00:00

Creating domain...
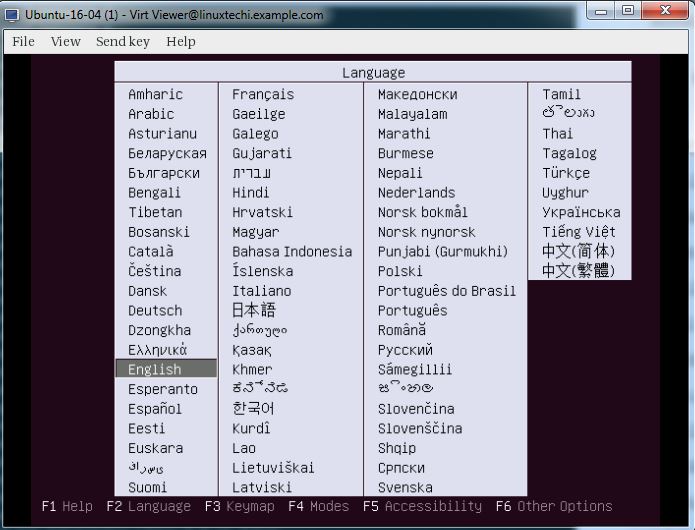
Follow the instruction now and complete the installation.
In the above ‘virt-install’ command we have used following options :
- –name = <Name of the Virtual Machine>
- –file = <Location where our virtual machine disk file will be stored >
- –file-size = < Size of the Virtual Machine, in my case it is 20GB >
- –nonsparse = < Allocate the whole storage while creating>
- –graphics = < Specify the graphical tool for interactive installation, in above example I am using spice >
- –vcpu = < Number of virtual CPU for the Machine >
- –ram = < RAM size for the virtual Machine >
- –cdrom = < Virtual CD ROM which specify the installation media like ISO file >
- –network = < it is used to specify which network we will use for the virtual machine, in this example I am bridge interface>
- –os-type = < Operating system type like linux and window>
- –os-variant= <KVM maintains the OS variants like ‘fedora18′, ‘rhel6’ and ‘winxp’ , this option is optional and if you not sure about OS variant you can mentioned it as generic>
Once the Installation is completed we can access the Virtual Machine console from ‘virt-manager‘ as shown below.
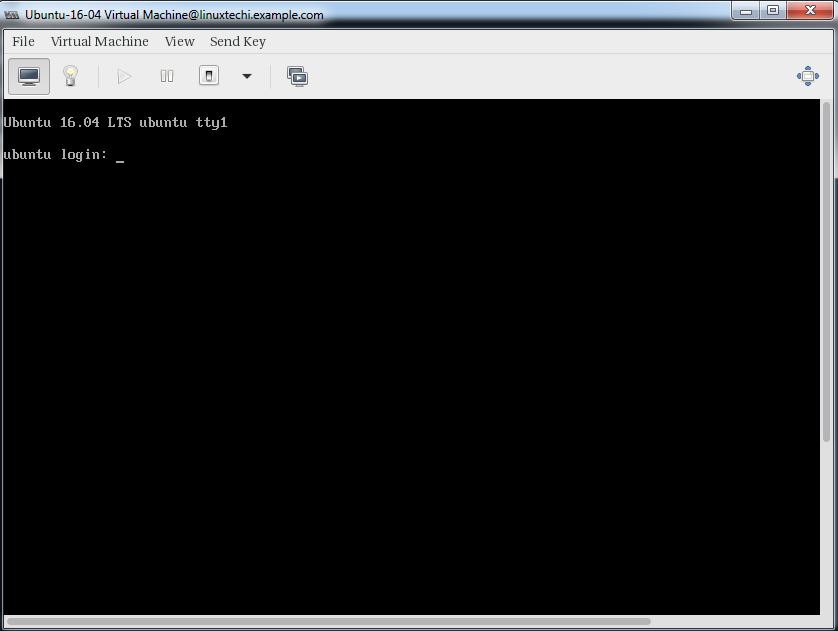
That’s it, basic installation and configuration of KVM hypervisor is completed.
CentOS 7.x and RHEL 7.x Install qemu-kvm的更多相关文章
- 如何在 CentOS 7 / RHEL 7 终端服务器上安装 KVM
如何在 CnetOS 7 或 RHEL 7(Red Hat 企业版 Linux)服务器上安装和配置 KVM(基于内核的虚拟机)?如何在 CentOS 7 上设置 KVM 并使用云镜像 / cloud- ...
- CentOS中实现与Ubuntu下apt-get install build-essential功能类似的命令
CentOS中实现与Ubuntu下apt-get install build-essential功能类似的命令 在Ubuntu中安装完系统后,可以直接使用apt-get install build-e ...
- [RPM,YUM]RHEL Centos mount local source / RHEL CentOS挂载本地源
RHEL: 使用YUM安装Oracle必要软件包,将操作系统ISO文件“rhel-server-6.5-x86_64.iso”分别上传至两个节点主机“/root”目录,以root用户登录,执行以下命令 ...
- CentOS 6.5/6.6 安装(install)mysql 5.7 最完整版教程
Step1: 检测系统是否自带安装mysql # yum list installed | grep mysql Step2: 删除系统自带的mysql及其依赖命令: # yum -y remove ...
- vm安装centos后unknown host问题和yum install安装不成功问题
网上差了很多说要在vi /etc/sysconfig/network新增GATEWAY=192.168.0.1 还有vi /etc/sysconfig/network-scripts/ifcfg-et ...
- [qemu][cloud][centos][ovs][sdn] centos7安装高版本的qemu 以及 virtio/vhost/vhost-user咋回事
因为要搭建ovs-dpdk,所以需要vhost-user的qemu centos默认的qemu与qemu-kvm都不支持vhost-user,qemu最高版本是2.0.0, qemu-kvm最高版本是 ...
- CentOS 7下宿主机使用virsh console访问KVM的设置
在CentOS 6下要实现宿主机使用virsh console访问KVM可以说是非常麻烦,但这一问题在CentOS 7已经解决了,只需要两条命令在KVM下即可实现. 1.在KVM(客户机)下开机启动并 ...
- How to install 64-bit Google Chrome 28+ on 64-bit RHEL/CentOS 6 or 7
How to install 64-bit Google Chrome 28+ on 64-bit RHEL/CentOS 6 or 7 The problem Google developers s ...
- Install MySQL 5.7 on Fedora 25/24, CentOS/RHEL 7.3/6.8/5.11
MySQL is a relational database management system (RDBMS) that runs as a server providing multi-user ...
随机推荐
- JavaScript日常学习2
JavaScript 数据类型 字符串(String).数字(Number).布尔(Boolean).数组(Array).对象(Object).空(Null).未定义(Undefined). e ...
- 在 Ubuntu 14.10 Server 上安装 Jetty
Jetty提供了一个Web服务器和javax.servlet容器,为SPDY.WebSocket.OSGi.JMX.JNDI.JAAS以及许多其它集成套件添加了支持.这些组件都是开源的,也可用于商业用 ...
- Linux Openssh源码升级
telnet服务 yum install -y telnet-server xinetd systemctl start xinetd systemctl start telnet.socket #监 ...
- 2019.12.24 【ABAP随笔】smartforms 打印及PDF转化
冬至已过,又临平安夜和圣诞,又是一年的末尾,闲暇时间需要静下心来温故而知新. 许久未碰打印,知识于脑子又有几分糊涂,遂整理些许知识,记录. 数据随便取于物料表 report Z_smartforms ...
- ES5与ES6常用语法教程之 ③模板字符串、判断字符串是否包含其它字符串
这部分教程我们主要讲解以下几个常用语法 模板字符串 带标签的模板字符串 判断字符串中是否包含其他字符串 给函数设置默认值 模板字符串 老式的拼接字符串方法 let dessert = '
- 导包、时间模块【TIME、CALENDAR DATETIME】、SYS、OS, OS.PATH模块、项目开放周期&规范
导包 1.不考虑包的情况下直接from...直接导入文件夹下的具体模块 2. if __name__ == '__ma__' # 自执行 if __name__ == '模块名' # ...
- ASP.NET Core WebApi使用Swagger
先在项目中引用Nuget包 Install-Package Swashbuckle.AspNetCore 安装之后需要在Startup.cs文件加入如下代码 public void Configure ...
- Js 执行上下文和作用域
1.执行上下文和执行栈 执行上下文就是当前 JavaScript 代码被解析和执行时所在环境的抽象概念, JavaScript 中运行任何的代码都是在执行上下文中运行. 执行上下文的生命周期包括三个阶 ...
- gzip 命令
NAME gzip -- compression/decompression tool using Lempel-Ziv coding (LZ77) SYNOPSIS gzip [-cdfhkLlNn ...
- MSF魔鬼训练营-3.2.2 操作系统辨识
利用操作系统视频进行社会工程学攻击.例如在探测到目标用户所使用的网络设备.服务器设备厂家型号等信息后.可伪装成相关厂家的技术人员通过电话.邮件等方式与系统管理员取得联系得到信任.NMAP 示例: 使用 ...