ELK-全文检索技术-elasticsearch集群及sde_restful
1 搭建ES集群
集群的说明
我们计划集群名称为:leyou-elastic,部署3个elasticsearch节点,分别是:
node-01:http端口9201,TCP端口9301
node-02:http端口9202,TCP端口9302
node-03:http端口9203,TCP端口9303
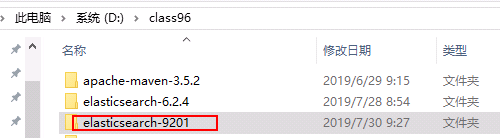
第一步:直接复制前天准备好的ES,但是复制之前一定要把之前的数据清理
清理的方式就是 删除data文件夹
第二步:复制完后文件夹改名为
第三步:修改配置文件elasticsearch.yml
内容为:
http.cors.enabled: true
http.cors.allow-origin: "*"
network.host: 127.0.0.1
# 集群的名称
cluster.name: leyou-elastic
#当前节点名称 每个节点不一样
node.name: node-01
#数据的存放路径 每个节点不一样
path.data: d:\class96\elasticsearch-9201\data
#日志的存放路径 每个节点不一样
path.logs: d:\class96\elasticsearch-9201\log
# http协议的对外端口 每个节点不一样
http.port: 9201
# TCP协议对外端口 每个节点不一样
transport.tcp.port: 9301
#三个节点相互发现
discovery.zen.ping.unicast.hosts: ["127.0.0.1:9301","127.0.0.1:9302","127.0.0.1:9303"]
#声明大于几个的投票主节点有效,请设置为(nodes / 2) + 1
discovery.zen.minimum_master_nodes: 2
# 是否为主节点
node.master: true
修改完成后使用utf-8的方式另存为一下,不然不认中文
第四步:再复制两份,总共三份,修改按照上述配置文件修改
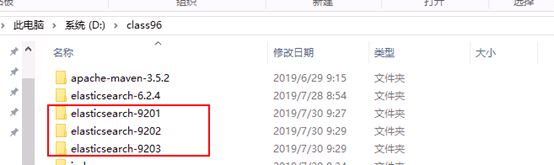
第五步:分别启动三个ES
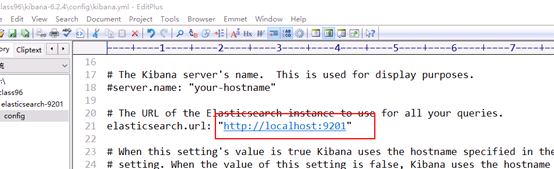
第六步:修改kibana指向的ES集群,然后启动
这里指向9201 9202 9303是没有区别的
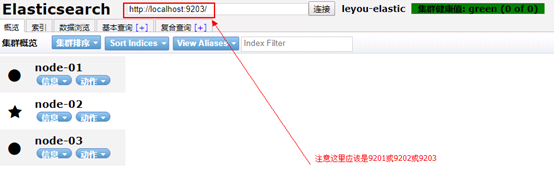
第七步:使用elasticsearch-head插件可以看集群的情况
2 使用kibana操作
指定索引库的分片数量和副本数,默认分片5,副本数是1
put heima
{
"settings":{
"number_of_shards":3,
"number_of_replicas":1
}
}
使用head插件查看

原生的API
RestAPI
SpringDataElasticSearch方式
3 RestAPI操作ES
1.1 使用kibana创建一个索引库
PUT /item
{
"settings":{
"number_of_shards":3,
"number_of_replicas":1
},
"mappings": {
"docs": {
"properties": {
"id": {
"type": "keyword"
},
"title": {
"type": "text",
"analyzer": "ik_max_word"
},
"category": {
"type": "keyword"
},
"brand": {
"type": "keyword"
},
"images": {
"type": "keyword",
"index": false
},
"price": {
"type": "double"
}
}
}
}
}
1.2 创建maven项目
第一步:创建maven项目
第二步:导入依赖
<parent>
<groupId>org.springframework.boot</groupId>
<artifactId>spring-boot-starter-parent</artifactId>
<version>2.1.3.RELEASE</version>
</parent>
<dependencies>
<dependency>
<groupId>org.springframework.boot</groupId>
<artifactId>spring-boot-starter-test</artifactId>
</dependency>
<dependency>
<groupId>org.springframework.boot</groupId>
<artifactId>spring-boot-starter-logging</artifactId>
</dependency>
<dependency>
<groupId>com.google.code.gson</groupId>
<artifactId>gson</artifactId>
<version>2.8.5</version>
</dependency>
<dependency>
<groupId>org.apache.commons</groupId>
<artifactId>commons-lang3</artifactId>
<version>3.8.1</version>
</dependency>
<dependency>
<groupId>org.elasticsearch.client</groupId>
<artifactId>elasticsearch-rest-high-level-client</artifactId>
<version>6.4.3</version>
</dependency>
</dependencies>
<build>
<plugins>
<plugin>
<groupId>org.springframework.boot</groupId>
<artifactId>spring-boot-maven-plugin</artifactId>
</plugin>
</plugins>
</build>
1.3 代码操作
1.3.1 初始化client
private RestHighLevelClient client = null;
private Gson gson
= new Gson();
@Before
public void init(){
client
= new RestHighLevelClient(
RestClient.builder(
new HttpHost("localhost",
9201, "http"),
new HttpHost("localhost",
9202, "http"),
new HttpHost("localhost",
9203, "http")));
}
1.3.2 添加文档数据
准备一个pojo类
@Data
@AllArgsConstructor //全参构造方法
@NoArgsConstructor //无参构造方法
public class Item implements Serializable{
private Long
id;
private String
title; //标题
private String category;// 分类
private String brand; // 品牌
private Double price; // 价格
private String images; // 图片地址
}
// 新增或修改 IndexRequest
Item
item = new Item(1L,"大米6X手机","手机","小米",1199.0,"http.jpg");
String jsonStr = gson.toJson(item);
IndexRequest request = new IndexRequest("item","docs",item.getId().toString());
request.source(jsonStr,
XContentType.JSON);
client.index(request,
RequestOptions.DEFAULT);
1.3.3 修改文档数据
就是使用上面的新增方法,它既是新增也是修改
1.3.4 根据id获取文档数据
GetRequest request = new
GetRequest("item","docs","1");
GetResponse getResponse = client.get(request,
RequestOptions.DEFAULT);
String sourceAsString = getResponse.getSourceAsString();
Item item = gson.fromJson(sourceAsString,
Item.class);
System.out.println(item);
1.3.5 删除文档数据
DeleteRequest deleteRequest = new
DeleteRequest("item","docs","1");
client.delete(deleteRequest,RequestOptions.DEFAULT);
1.3.6 批量新增文档数据
// 准备文档数据:
List<Item> list = new ArrayList<>();
list.add(new Item(1L, "小米手机7", "手机", "小米", 3299.00,"http://image.leyou.com/13123.jpg"));
list.add(new Item(2L, "坚果手机R1", "手机", "锤子", 3699.00,"http://image.leyou.com/13123.jpg"));
list.add(new Item(3L, "华为META10", "手机", "华为", 4499.00,"http://image.leyou.com/13123.jpg"));
list.add(new Item(4L, "小米Mix2S", "手机", "小米", 4299.00,"http://image.leyou.com/13123.jpg"));
list.add(new Item(5L, "荣耀V10", "手机", "华为", 2799.00,"http://image.leyou.com/13123.jpg"));
BulkRequest bulkRequest = new BulkRequest();
for (Item item : list) {
bulkRequest.add(new IndexRequest("item","docs",item.getId().toString()).source(JSON.toJSONString(item),XContentType.JSON)) ;
}
client.bulk(bulkRequest,RequestOptions.DEFAULT);
1.3.7 各种查询
@Test
public void testQuery() throws Exception{
SearchRequest searchRequest = new SearchRequest("item");
SearchSourceBuilder
searchSourceBuilder = new SearchSourceBuilder();
searchSourceBuilder.query(QueryBuilders.matchAllQuery());
searchSourceBuilder.query(QueryBuilders.termQuery("title","小米"));
searchSourceBuilder.query(QueryBuilders.matchQuery("title","小米手机"));
searchSourceBuilder.query(QueryBuilders.fuzzyQuery("title","大米").fuzziness(Fuzziness.ONE));
searchSourceBuilder.query(QueryBuilders.rangeQuery("price").gte(3000).lte(4000));
searchSourceBuilder.query(QueryBuilders.boolQuery().must(QueryBuilders.termQuery("title","手机"))
.must(QueryBuilders.rangeQuery("price").gte(3000).lte(3500)));
searchRequest.source(searchSourceBuilder);
SearchResponse searchResponse = client.search(searchRequest, RequestOptions.DEFAULT);
SearchHits searchHits =
searchResponse.getHits();
long total
= searchHits.getTotalHits();
System.out.println("总记录数:"+total);
SearchHit[] hits = searchHits.getHits();
for (SearchHit
hit : hits) {
String sourceAsString =
hit.getSourceAsString();
Item item = JSON.parseObject(sourceAsString,
Item.class);
System.out.println(item);
}
}
1.3.8 过滤
1、属性字段显示的过滤
searchSourceBuilder.fetchSource(new String[]{"title","category"},null);
searchSourceBuilder.query(QueryBuilders.matchAllQuery());
2、查询结果的过滤
searchSourceBuilder.query(QueryBuilders.termQuery("title","手机"));
searchSourceBuilder.postFilter(QueryBuilders.termQuery("brand","小米"));
1.3.9 分页
searchSourceBuilder.query(QueryBuilders.matchAllQuery());
searchSourceBuilder.from(0); //起始位置
searchSourceBuilder.size(3); //每页显示条数
1.3.10 排序
searchSourceBuilder.sort("id", SortOrder.ASC);
// 参数1:排序的域名 参数2:顺序
1.3.11 高亮
构建高亮的条件
searchSourceBuilder.query(QueryBuilders.termQuery("title","小米"));
HighlightBuilder highlightBuilder = new HighlightBuilder();
highlightBuilder.preTags("<font
style='color:red'>");
highlightBuilder.postTags("</font>");
highlightBuilder.field("title");
searchSourceBuilder.highlighter(highlightBuilder);
解析高亮的结果
for (SearchHit hit : hits) {
Map<String, HighlightField>
highlightFields = hit.getHighlightFields();
HighlightField highlightField =
highlightFields.get("title");
String title =
highlightField.getFragments()[0].toString();
String sourceAsString =
hit.getSourceAsString();
Item item = JSON.parseObject(sourceAsString,
Item.class);
item.setTitle(title);
System.out.println(item);
}
1.3.12 聚合
需求:根据品牌统计数量
构建的条件代码
searchSourceBuilder.query(QueryBuilders.matchAllQuery());
searchSourceBuilder.aggregation(AggregationBuilders.terms("brandAvg").field("brand"));
解析结果:
Aggregations aggregations =
searchResponse.getAggregations();
Terms terms = aggregations.get("brandAvg");
List<? extends Terms.Bucket>
buckets = terms.getBuckets();
for (Terms.Bucket bucket : buckets) {
System.out.println(bucket.getKeyAsString()+":"+bucket.getDocCount());
}
4
SpringDataElasticSearch框架的使用
1.4
准备环境
1、添加依赖
<dependency>
<groupId>org.springframework.boot</groupId>
<artifactId>spring-boot-starter-data-elasticsearch</artifactId>
</dependency>
2、创建引导类
@SpringBootApplication
public class EsApplication {
public
static void main(String[] args) {
SpringApplication.run(EsApplication.class,args);
}
}
3、添加配置文件
application.yml
spring:
data:
elasticsearch:
cluster-name: leyou-elastic
cluster-nodes: 127.0.0.1:9301,127.0.0.1:9302,127.0.0.1:9303
4、创建一个测试类,注入SDE提供的一个模板
@RunWith(SpringRunner.class)
@SpringBootTest
public class SpringDataEsManager {
@Autowired
private ElasticsearchTemplate
elasticsearchTemplate;
}
Kibana:http
原始的api:tcp
RestAPI:http
Sde: tcp
1.5
操作索引库和映射
第一步:准备一个pojo,并且构建和索引的映射关系
@Data
@AllArgsConstructor
@NoArgsConstructor
@Document(indexName="leyou",type
= "goods",shards = 3,replicas = 1)
public class Goods implements Serializable{
@Field(type
= FieldType.Long)
private Long
id;
@Field(type
= FieldType.Text,analyzer = "ik_max_word",store = true)
private String
title; //标题
@Field(type = FieldType.Keyword,index = true,store = true)
private String
category;//
分类
@Field(type = FieldType.Keyword,index = true,store = true)
private String
brand; //
品牌
@Field(type = FieldType.Double,index = true,store
= true)
private Double
price; //
价格
@Field(type = FieldType.Keyword,index = false,store = true)
private String
images; //
图片地址
}
第二步:创建索引库和映射
@Test
public void addIndexAndMapping(){
// elasticsearchTemplate.createIndex(Goods.class);
//根据pojo中的注解创建索引库
elasticsearchTemplate.putMapping(Goods.class); //根据pojo中的注解创建映射
}
1.6
操作文档
// 新增或修改
// Goods goods = new
Goods(1L,"大米6X手机","手机","小米",1199.0,"http.jpg");
// goodsRespository.save(goods);
//save or update
// 根据id查询
// Optional<Goods> optional
= goodsRespository.findById(1L);
// Goods goods = optional.get();
// System.out.println(goods);
// 删除
// goodsRespository.deleteById(1L);
// 批量新增
/* List<Goods> list = new
ArrayList<>();
list.add(new Goods(1L, "小米手机7", "手机", "小米",
3299.00,"http://image.leyou.com/13123.jpg"));
list.add(new Goods(2L, "坚果手机R1", "手机", "锤子",
3699.00,"http://image.leyou.com/13123.jpg"));
list.add(new Goods(3L, "华为META10", "手机", "华为",
4499.00,"http://image.leyou.com/13123.jpg"));
list.add(new Goods(4L, "小米Mix2S", "手机", "小米",
4299.00,"http://image.leyou.com/13123.jpg"));
list.add(new Goods(5L, "荣耀V10", "手机", "华为",
2799.00,"http://image.leyou.com/13123.jpg"));
goodsRespository.saveAll(list);*/
1.7
查询
1.7.1 goodsRespository自带的查询
//
Iterable<Goods> goodsList = goodsRespository.findAll(); //查询所有
// Iterable<Goods> goodsList
= goodsRespository.findAll(Sort.by(Sort.Direction.ASC,"price")); //排序
Iterable<Goods>
goodsList = goodsRespository.findAll(PageRequest.of(0,3)); //分页 page页码是从0开始代表第一页 size 5
for (Goods goods : goodsList) {
System.out.println(goods);
}
1.7.2 自定义查询方法
可以在接口中根据规定定义一些方法就可以直接使用
public interface GoodsRespository extends ElasticsearchRepository<Goods,Long>{
public List<Goods>
findByTitle(String title);
public List<Goods>
findByBrand(String brand);
public List<Goods>
findByTitleOrBrand(String title,String brand);
public List<Goods>
findByPriceBetween(Double low,Double high);
public List<Goods>
findByBrandAndCategoryAndPriceBetween(String title,String categoty,Double
low,Double high);
}
使用:
// List<Goods> goodsList =
goodsRespository.findByTitle("手机");
List<Goods>
goodsList = goodsRespository.findByBrandAndCategoryAndPriceBetween("小米","手机",4000.0,5000.0);
for (Goods
goods : goodsList) {
System.out.println(goods);
}
1.8
SpringDataElasticSearch结合原生api查询
1、结合native查询
@Test
public void testQuery(){
NativeSearchQueryBuilder
nativeSearchQueryBuilder = new NativeSearchQueryBuilder();
nativeSearchQueryBuilder.withQuery(QueryBuilders.termQuery("title", "小米"));
//
nativeSearchQueryBuilder.withQuery(QueryBuilders.matchAllQuery());
//
nativeSearchQueryBuilder.withPageable(PageRequest.of(0,3,Sort.by(Sort.Direction.DESC,"price")));
nativeSearchQueryBuilder.addAggregation(AggregationBuilders.terms("brandAvg").field("brand"));
AggregatedPage<Goods> aggregatedPage
= elasticsearchTemplate.queryForPage(nativeSearchQueryBuilder.build(),
Goods.class,new
GoodsHighLightResultMapper());
Aggregations aggregations =
aggregatedPage.getAggregations();
Terms terms = aggregations.get("brandAvg");
List<? extends Terms.Bucket> buckets = terms.getBuckets();
for (Terms.Bucket
bucket : buckets) {
System.out.println(bucket.getKeyAsString()+bucket.getDocCount());
}
List<Goods> content =
aggregatedPage.getContent();
for (Goods
goods : content) {
System.out.println(goods);
}
}
2、自己处理高亮
需要自定一个用来处理高亮的实现类
class GoodsHighLightResultMapper implements SearchResultMapper{
@Override
public <T> AggregatedPage<T> mapResults(SearchResponse
searchResponse, Class<T> aClass, Pageable pageable) {
List<T> content = new ArrayList<>();
Aggregations aggregations =
searchResponse.getAggregations();
String scrollId =
searchResponse.getScrollId();
SearchHits searchHits =
searchResponse.getHits();
long total
= searchHits.getTotalHits();
float maxScore
= searchHits.getMaxScore();
for (SearchHit
searchHit : searchHits) {
String sourceAsString =
searchHit.getSourceAsString();
T t =
JSON.parseObject(sourceAsString, aClass);
Map<String,
HighlightField> highlightFields = searchHit.getHighlightFields();
HighlightField
highlightField = highlightFields.get("title");
String title =
highlightField.getFragments()[0].toString();
try {
BeanUtils.setProperty(t,"title",title);
} catch (Exception e) {
e.printStackTrace();
}
content.add(t);
}
return new AggregatedPageImpl<T>(content,pageable,total,aggregations,scrollId,maxScore);
// List<T> content, Pageable
pageable, long total, Aggregations aggregations, String scrollId, float
maxScore
}
}
3、使用

ELK-全文检索技术-elasticsearch集群及sde_restful的更多相关文章
- 日志分析平台ELK之搜索引擎Elasticsearch集群
一.简介 什么是ELK?ELK是Elasticsearch.Logstash.Kibana这三个软件的首字母缩写:其中elasticsearch是用来做数据的存储和搜索的搜索引擎:logstash是数 ...
- ELK 中的elasticsearch 集群的部署
本文内容 背景 ES集群中第一个master节点 ES slave节点 本文总结 Elasticsearch(以下简称ES)搭建集群的经验.以 Elasticsearch-rtf-2.2.1 版本为例 ...
- Centos8 部署 ElasticSearch 集群并搭建 ELK,基于Logstash同步MySQL数据到ElasticSearch
Centos8安装Docker 1.更新一下yum [root@VM-24-9-centos ~]# yum -y update 2.安装containerd.io # centos8默认使用podm ...
- Centos8 Docker部署ElasticSearch集群
ELK部署 部署ElasticSearch集群 1.拉取镜像及批量生成配置文件 # 拉取镜像 [root@VM-24-9-centos ~]# docker pull elasticsearch:7. ...
- ELK 性能(3) — 在 Docker 上运行高性能容错的 Elasticsearch 集群
ELK 性能(3) - 在 Docker 上运行高性能容错的 Elasticsearch 集群 介绍 在 Docker 上运行高性能容错的 Elasticsearch 集群 内容 通常熟悉的开发流程是 ...
- ELK 性能(2) — 如何在大业务量下保持 Elasticsearch 集群的稳定
ELK 性能(2) - 如何在大业务量下保持 Elasticsearch 集群的稳定 介绍 如何在大业务量下保持 Elasticsearch 集群的稳定? 内容 当我们使用 Elasticsearch ...
- ELK 性能(4) — 大规模 Elasticsearch 集群性能的最佳实践
ELK 性能(4) - 大规模 Elasticsearch 集群性能的最佳实践 介绍 集群规模 集群数:6 整体集群规模: 300 Elasticsearch 实例 141 物理服务器 4200 CP ...
- 【ELK】【docker】6.Elasticsearch 集群启动多节点 + 解决ES节点集群状态为yellow
本章其实是ELK第二章的插入章节. 本章ES集群的多节点是docker启动在同一个虚拟机上 ====================================================== ...
- 01篇ELK日志系统——升级版集群之elasticsearch集群的搭建
[ 前言:以前搭了个简单的ELK日志系统,以我个人的感觉来说,ELK日志系统还是非常好用的.以前没有弄这个ELK日志系统的时候,线上的项目出了bug,报错了,要定位错误是什么,错误出现在哪个java代 ...
随机推荐
- Elastic-Job介绍
1 什么是分布式任务调度 什么是分布式?当前软件的架构正在逐步转变为分布式架构,将单体结构分为若干服务,服务之间通过网络交互来完成用户的业务处理,如下图,电商系统为分布式架构,由订单服务.商品服务.用 ...
- PCL智能指针疑云 <三> 智能指针作为函数的传值参数和传引用参数
一 函数的参数传递可以简单分类为“传值”和“传引用”. 声明函数时,形参带引用“&”,则函数调用时,是把实参所在的内存直接传给函数所开辟的栈内存.在函数内对形参的修改相当于对实参也进行修改. ...
- 微信小程序访问后台出现 对应的服务器证书无效。控制台输入 showRequestInfo() 可以获取更详细信息。
检查微信开发者平台配置 https 服务端 nginx 配置 ssl 协议是否有效 在开发者工具中可以使用(详情 > 不校验合法域名.web-view(业务域名).TLS 版本以及 HTTPS ...
- FP回写阶段卡住或报错
FP在autosap阶段往往会因各种各样的因素导致回写报错,卡住等异常: 本次由于一个视图的性能突然下降导致回写长期卡住没有完成: 这时如果要重新执行回写的话就要检查哪部分的数据回写到SAP端,一般有 ...
- Win7,win10(部分机型) 安装appscan9.0.3.10(可升级)实操流程
Win10部分机型不能很好的兼容appscan,建议使用者用win7系统安装appscan 写于:2018.12.2 IBM Security AppScan Standard 可通过自动执行应用安全 ...
- AndroidStudio设置SVN忽略文件
方法一: 在SVN中进行设置: 在空白处右键单击,选择TortoiseSVN -> Settings ->General:在General界面找到Global ignore pattern ...
- jQuery file upload callback options
autoUpload By default, files added to the widget are uploaded as soon as the user clicks on the star ...
- c/c++二级指针动态开辟内存
c版: #include <stdio.h> #include <stdlib.h> #define row 4 #define col 8 int main() { int ...
- AAAI 2018 分析
AAAI 2018 分析 word embedding Learning Sentiment-Specific Word Embedding via Global Sentiment Represen ...
- 基于DRF的图书增删改查
功能演示 信息展示 添加功能 编辑功能 删除功能 DRF构建后台数据 本例的Model如下 from django.db import models class Publish(models.Mode ...