
android 开发 使用自定义布局实现标题栏复用(标题栏内容自定义:使用代码实现和xml布局自定义属性2种办法实现)
在个人学习的情况下可能很少使用自定义布局去实现大量复用的情况下,但是在一个开发工作的环境下就会使用到大量复用的自定义控件。
实现思维:
1.写一个xml的布局,用于标题栏的样式,并且添加在标题栏中你想要的其他控件Button、TextView、Image
View 等等
2.单独写一个class去继承LinearLayout 或者 View 等等其他布局都行。(下面代码中我使用的是继承LinearLayout,其他布局可能需要复写的方法都有所不同)
3.将写好的xml布局到class中用LayoutInflater 布局膨胀器获得布局。
4.隐藏原来系统的标题栏(两种办法:代码实现和AndroidManifest中实现)
5.在其他布局中导入这个class的布局路径,实现标题栏的导入。
6.自定义标题栏内容,比如标题栏名称(两种办法:代码实现和添加自定义布局属性实现)
7.添加点击事件,在布局类中添加布局控件的点击事件,一次添加就可以不用后续复写需要重复使用的点击事件
1.写一个xml的布局,用于标题栏的样式,并且添加在标题栏中你想要的其他控件Button、TextView、Image
View 等等
<?xml version="1.0" encoding="utf-8"?>

<LinearLayout xmlns:android="http://schemas.android.com/apk/res/android"

    android:orientation="horizontal"

    android:layout_width="match_parent"

    android:layout_height="match_parent"

    android:background="@color/colorBlue">

    <ImageView

        android:id="@+id/title_left_Image"

        android:layout_width="0dp"

        android:layout_weight="1"

        android:layout_height="wrap_content"

        android:src="@mipmap/ic_left"

        android:layout_gravity="center"/>

    <TextView

        android:id="@+id/title_text"

        android:layout_width="0dp"

        android:layout_weight="5"

        android:layout_height="wrap_content"

        android:text="标题"

        android:textColor="@color/colorWhite"

        android:textSize="@dimen/BigTextSize"

        android:gravity="left"

        android:layout_gravity="center"

        android:layout_marginLeft="10dp"/>

    <ImageView

        android:id="@+id/title_add"

        android:layout_width="0dp"

        android:layout_weight="1"

        android:layout_height="wrap_content"

        android:src="@mipmap/ic_add"

        android:layout_gravity="center"

        android:visibility="gone"/>

</LinearLayout>
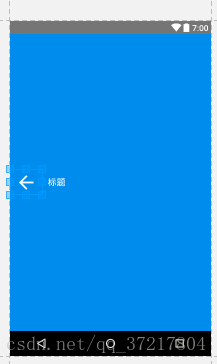
备注:在上面的xml中在id是title_add的这ImageView控件里,我写了隐藏此控件。说明一下为什么隐藏,因为在个别的activity里标题栏需要一些不同的控件出现,比如菜单栏图标或者加号图标,这些图标可以预先添加到布局中,在不使用的情况下隐藏它(android:visibility="gone" 其他:visible 显示 gone不显示且取消布局站位 invisible 不显示但是依然在布局上占据位置),在需要使用的时候在代码上或者自定义属性里显示这个控件。
效果图:
2.单独写一个class去继承LinearLayout 或者 View 等等其他布局都行。(下面代码中我使用的是继承LinearLayout,其他布局可能需要复写的方法都有所不同)
3.将写好的xml布局到class中用LayoutInflater 布局膨胀器获得布局。
package com.example.lenovo.mydemoapp.myLayout;

import android.app.Activity;

import android.content.Context;

import android.content.res.TypedArray;

import android.support.annotation.Nullable;

import android.util.AttributeSet;

import android.view.LayoutInflater;

import android.view.View;

import android.widget.ImageView;

import android.widget.LinearLayout;

import android.widget.TextView;

import com.example.lenovo.mydemoapp.R;

/**

 * Created by lenovo on 2018/5/17.

 */

public class TitleLayout extends LinearLayout {

	public TitleLayout(Context context, @Nullable AttributeSet attrs) {

		super(context, attrs);

        LayoutInflater.from(context).inflate(R.layout.title_layout,this);

		}

	}
4.隐藏原来系统的标题栏(两种办法:代码实现和AndroidManifest中实现)
4.1首先是代码上实现隐藏:
若是继承Activity,则使用:
requestWindowFeature(Window.FEATURE_NO_TITLE);
public class Main2Activity extends Activity {

    @Override

    protected void onCreate(Bundle savedInstanceState) {

        super.onCreate(savedInstanceState);

        /***

         * 若是继承Activity,那么此时requestWindowFeature(Window.FEATURE_NO_TITLE);有效;

         * 此时的Activity是不支持getSupportActionBar().hide()这个方法的;

         * **/

        requestWindowFeature(Window.FEATURE_NO_TITLE);

        setContentView(R.layout.activity_main2);

    }

}
若是继承AppCompatActivity,则只需加入一条语句:
getSupportActionBar().hide();
示例如下:
public class MainActivity extends AppCompatActivity {

 protected void onCreate(Bundle savedInstanceState) {

    super.onCreate(savedInstanceState);

	setContentView(R.layout.activity_main);

		ActionBar actionBar = getSupportActionBar();

        if (actionBar!=null){

            //隐藏标题栏

            actionBar.hide();

        }

	}

 }
4.2
在布局文件中进行设置
整个应用都不显示标题栏:
如果是想让标题栏在整个应用中都不显示,那么,则可在AndroidManifest.xml中的<application>节点上
设定其属性android:theme为带有NoActionBar的值,这样所创建的所有activity都不会带有标题栏了;如:
<?xml version="1.0" encoding="utf-8"?>

<manifest xmlns:android="http://schemas.android.com/apk/res/android"

    package="com.example.lenovo.mydemoapp">

    <!-- 此处添加静态权限 -->

    <uses-permission android:name="android.permission.WRITE_EXTERNAL_STORAGE" />

    <uses-permission android:name="android.permission.READ_EXTERNAL_STORAGE" />

    <uses-permission android:name="android.permission.CAMERA" />

    <!--隐藏标题栏 android:theme="@style/Theme.AppCompat.Light.NoActionBar"-->

    <application

        android:name=".myAppCompatActivity.MyApplication"

        android:allowBackup="true"

        android:icon="@mipmap/ic_launcher"

        android:label="@string/app_name"

        android:roundIcon="@mipmap/ic_launcher_round"

        android:supportsRtl="true"

        android:theme="@style/Theme.AppCompat.Light.NoActionBar">
注:由于<application>节点的android:theme指定为了@style/Theme.AppCompat.Light.NoActionBar,
与此同时,又由于其所有的子节点<activity>的属性android:theme都并未指定,这样所有的activity就都不会带有标题栏
4.3
某一个activity不显示标题栏:
若是想让应用中的某一个activity不显示标题栏,则可设定对应的activity的属性android:theme为带有NoActionBar的值,如:
<application

    android:allowBackup="true"

    android:icon="@mipmap/ic_launcher"

    android:label="@string/app_name"

    android:supportsRtl="true"

    android:theme="@style/Theme.AppCompat">

    <activity android:name=".MainActivity">

        <intent-filter>

            <action android:name="android.intent.action.MAIN" />

            <category android:name="android.intent.category.LAUNCHER" />

        </intent-filter>

    </activity>

    <activity android:name=".Main2Activity"

        android:theme="@style/Theme.AppCompat.Light.NoActionBar"

        ></activity>

</application>
5.解决了标题栏隐藏的问题,现在我们在其他布局中导入这个class的布局路径,实现自定义标题栏的使用。
<?xml version="1.0" encoding="utf-8"?>

<LinearLayout xmlns:android="http://schemas.android.com/apk/res/android"

    android:orientation="vertical"

    android:layout_width="match_parent"

    android:layout_height="match_parent">

    <com.example.lenovo.mydemoapp.myLayout.TitleLayout

        android:id="@+id/ManualBinding_title"

        android:layout_width="match_parent"

        android:layout_height="wrap_content">

    </com.example.lenovo.mydemoapp.myLayout.TitleLayout>
导入很简单只需要在布局里直接写全路径就行,注意以下标题栏的位置就行。
6.自定义标题栏内容,比如标题栏名称(两种办法:代码实现和添加自定义布局属性实现)
6.1 代码上实现修改标题栏中指定控件的内容修改
在代码上实现修改标题栏内容,一定要给我们我们添加布局中的标题栏布局一个id,我们需要这个id去定位想要修改的标题栏是那一个
<com.example.lenovo.mydemoapp.myLayout.TitleLayout

        android:id="@+id/ManualBinding_title"

        android:layout_width="match_parent"

        android:layout_height="wrap_content">

    </com.example.lenovo.mydemoapp.myLayout.TitleLayout>
然后是代码上:
public class ManualBinding extends AppCompatActivity {

    private TitleLayout mTitleLayout;

    private TextView mTitle;

    @Override

    protected void onCreate(Bundle savedInstanceState) {

        super.onCreate(savedInstanceState);

        setContentView(R.layout.activity_manual_binding);

        mTitleLayout = (TitleLayout)findViewById(R.id.ManualBinding_title);

        mTitle = (TextView)mTitleLayout.findViewById(R.id.title_text);

        mTitle.setText("手动绑定");

    }

}
可以看到很简单,找到布局里的标题栏控件,在用标题栏控件找到要修改的TextView,当然代码上实现不单单只有这些,还可以修改ImageView 等等其他控件的属性参数,这个请自行查找更详细的代码修改布局的方式。
6.2 用自定义布局属性的方法实现标题栏自定义内容的修改:
6.2.1 第一步我们先要实现自定义属性的注册,进入values项目创建一个attrs.xml文件
<resources>

    <!-- Declare custom theme attributes that allow changing which styles are

         used for button bars depending on the API level.

         ?android:attr/buttonBarStyle is new as of API 11 so this is

         necessary to support previous API levels. -->

    <declare-styleable name="ButtonBarContainerTheme">

        <attr name="metaButtonBarStyle" format="reference" />

        <attr name="metaButtonBarButtonStyle" format="reference" />

    </declare-styleable>

    <!--注意下面的name写的TitleLayout 类名,另外注意添加属性之间的空格-->

    <declare-styleable name="TitleLayout">

        <!--字符串-->

        <attr name="titleNameText" format="string"/>

        <!--颜色-->

        <attr name="a" format="color"/>

        <!--尺寸-->

        <attr name="b" format="dimension"/>

        <!--枚举-->

        <attr name="c" format="enum"/>

        <!--常量或者变量值-->

        <attr name="d" format="flag"/>

        <!--分数-->

        <attr name="e" format="fraction"/>

        <!--整数int值-->

        <attr name="f" format="integer"/>

        <!--参数值-->

        <attr name="g" format="reference"/>

        <!--浮点小数-->

        <attr name="h" format="float"/>

        <!--布尔值-->

        <attr name="i" format="boolean"/>

    </declare-styleable>

</resources>
请关注<declare-styleable name="TitleLayout"> 的内容,首先要注意name="TitleLayout" 的名称要与我们布局class的名称一致。
然后就是添加自定义布局的属性,属性名称 与 值的属性,我现在只需要一个string的自定义布局属性,不过为了节约看官们的时间,我标准了其他值的属性。大家可以参考参考
6.2.2 以上添加完成后,我们要回到布局的class中,去添加自定义属性的调用
public class TitleLayout extends LinearLayout {

    private ImageView mTitleLeftImage,mTitle;

    private TextView mTitleText;

    private String mTitleName = "标题";

    public TitleLayout(Context context, @Nullable AttributeSet attrs) {

        super(context, attrs);

        LayoutInflater.from(context).inflate(R.layout.title_layout,this);

        mTitleText = (TextView)findViewById(R.id.title_text);

        /*

        添加自定义标题

         */

        //TypedArray键入数组    obtainStyledAttributes获取样式属性 得到attrs.xml里的name名称

        TypedArray typedArray = context.obtainStyledAttributes(attrs,R.styleable.TitleLayout);

        //从对应name名称的数组下面得到自定义属性

        mTitleName = typedArray.getText(R.styleable.TitleLayout_titleNameText).toString();

        //将自定义属性与布局匹配

        mTitleText.setText(mTitleName);

	}

}
6.2.2 最后是标题栏布局里添加需要的属性参数
PS:这里需要注意的一点!在父类布局中一定要添加xmlns:app="http://schemas.android.com/apk/res-auto" 这条属性 我们才能使用自定义属性前关键字app:
<?xml version="1.0" encoding="utf-8"?>

<LinearLayout xmlns:android="http://schemas.android.com/apk/res/android"

    android:orientation="vertical"

    xmlns:tools="http://schemas.android.com/tools"

    xmlns:app="http://schemas.android.com/apk/res-auto"

    android:layout_width="match_parent"

    android:layout_height="match_parent"

    tools:context="com.example.lenovo.mydemoapp.AboutUs">

    <com.example.lenovo.mydemoapp.myLayout.TitleLayout

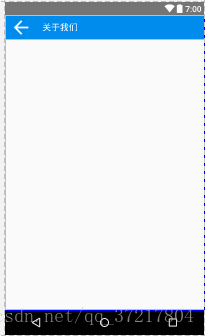
        app:titleNameText="关于我们"

        android:layout_width="match_parent"

        android:layout_height="wrap_content">

    </com.example.lenovo.mydemoapp.myLayout.TitleLayout>

    <LinearLayout

        android:orientation="vertical"

        android:layout_width="match_parent"

        android:layout_height="match_parent"></LinearLayout>

</LinearLayout>
运行效果:
7.添加点击事件,在布局类中添加布局控件的点击事件,一次添加就可以不用后续复写需要重复使用的点击事件
package com.example.lenovo.mydemoapp.myLayout;

import android.app.Activity;

import android.content.Context;

import android.content.res.TypedArray;

import android.support.annotation.Nullable;

import android.util.AttributeSet;

import android.view.LayoutInflater;

import android.view.View;

import android.widget.ImageView;

import android.widget.LinearLayout;

import android.widget.TextView;

import com.example.lenovo.mydemoapp.R;

/**

 * Created by lenovo on 2018/5/17.

 */

public class TitleLayout extends LinearLayout {

    private ImageView mTitleLeftImage,mTitle;

    private TextView mTitleText;

    private String mTitleName = "标题";

    public TitleLayout(Context context, @Nullable AttributeSet attrs) {

        super(context, attrs);

        LayoutInflater.from(context).inflate(R.layout.title_layout,this);

        mTitleText = (TextView)findViewById(R.id.title_text);

        /*

        添加自定义标题

         */

        //TypedArray键入数组    obtainStyledAttributes获取样式属性 得到attrs.xml里的name名称

        TypedArray typedArray = context.obtainStyledAttributes(attrs,R.styleable.TitleLayout);

        //从对应name名称的数组下面得到自定义属性

        mTitleName = typedArray.getText(R.styleable.TitleLayout_titleNameText).toString();

        //将自定义属性与布局匹配

        mTitleText.setText(mTitleName);

        /*

        添加返回键点击事件

         */

        mTitleLeftImage = (ImageView)findViewById(R.id.title_left_Image);

        mTitleLeftImage.setOnClickListener(new OnClickListener() {

            @Override

            public void onClick(View v) {

                ((Activity)getContext()).finish();

            }

        });

    }

}
android 开发 使用自定义布局实现标题栏复用(标题栏内容自定义:使用代码实现和xml布局自定义属性2种办法实现)的更多相关文章
- Android开发3:Intent、Bundle的使用和ListView的应用 、RelativeLayout(相对布局)简述(简单通讯录的实现)
前言 啦啦啦~博主又来骚扰大家啦~大家是不是感觉上次的Android开发博文有点长呢~主要是因为博主也是小白,在做实验的过程中查询了很多很多概念,努力去理解每一个知识点,才完成了最终的实验.还有就是随 ...
- Android开发教程 - 使用Data Binding(八)使用自定义Interface
本系列目录 使用Data Binding(一)介绍 使用Data Binding(二)集成与配置 使用Data Binding(三)在Activity中的使用 使用Data Binding(四)在Fr ...
- Android开发如何在4.0及以上系统中自定义TitleBar
本文将通过一个实例讲解怎么实现在4.0及以上系统版本中实现自定义TitleBar,这只是我自己找到的一种方法; xml布局文件 activity_main.xml <RelativeLayout ...
- Android开发问题集锦-Button初始为disable状态时自定义的selector不生效问题
1.下面是不生效的布局: selector_btn_red.xml: <?xml version="1.0" encoding="utf-8"?> ...
- 仿酷狗音乐播放器开发日志二十四 选项设置窗体的实现(附328行xml布局源码)
转载请说明原出处,谢谢~~ 花了两天时间把仿酷狗的选项设置窗体做出来了,当然了只是做了外观.现在开学了,写代码的时间减少,所以整个仿酷狗的工程开发速度减慢了.今天把仿酷狗的选项设置窗体的布局代码分享出 ...
- android 开发 ScrollView 控件的一些api描述与自定义ScrollView接口回调方法
1.正常使用ScrollView控件的一些api详解. package com.example.lenovo.mydemoapp.scrollViewDemo; import android.supp ...
- Android开发之创建App Widget和更新Widget内容
App WidgetsApp Widgets are miniature application views that can be embedded in other applications (s ...
- Android开发(30)--AutoCompleteTextView和MultiAutoCompleteTextView自动提示输入内容
首先大家都见过类似这种效果, AutoCompleteTextView是实现动态匹配输入的内容 下面就通过一个实例来说明AutoCompleteTextView,同样,AutoCompleteText ...
- Android开发1——查找所需要出示权限的内容
一.发现问题 用户在执行一些如拨打电话.发送短信等关系用户隐私的功能时,Android需要出示权限,权限在AndroidManifest.xml中配置 拨打电话的权限 发送短信的权限 那么这些权限信息 ...
随机推荐
- 需要序列化的类中没有写serialVersionUID的解决办法
由于没赋值serialVersionUID 只是警告,不是错误,造成先前没留意设定serialVersionUID,网络两端上线运行一段时间也感觉正常.如果再增减修改field,没赋值好serialV ...
- 阿里巴巴Dubbo实现的源码分析
1. Dubbo概述 Dubbo是阿里巴巴开源出来的一个分布式服务框架,致力于提供高性能和透明化的RPC远程服务调用方案,以及作为SOA服务治理的方案.它的核心功能包括: #remoting ...
- Mysql binlog日志的介绍
mysql的复制功能是 大规模,高性能应用的基础. 分担读负载.水平扩展 是通过二进制日志进行复制,是异步的. 只记录成功执行的修改事件,出现错误的和回滚的是不会纪录的. 日志路径 查看日志 RO ...
- PREV-5_蓝桥杯_错误票据
问题描述 某涉密单位下发了某种票据,并要在年终全部收回. 每张票据有唯一的ID号.全年所有票据的ID号是连续的,但ID的开始数码是随机选定的. 因为工作人员疏忽,在录入ID号的时候发生了一处错误,造成 ...
- Zookeeper的集群安装
Zookeeper的集群安装 关闭防火墙 安装jdk 下载Zookeeper的安装包 解压Zookeeper的安装包 进入Zookeeper的安装目录中conf目录 将zoo_sample.cfg复制 ...
- get和post的解析
get 直接获取数据 post 将数据发送到服务端缓存下来,当无法缓存数据或用户输入未知字符时用post, get:常用于数据 post:不想缓存数据,不再浏览器中缓存数据,在服务端可以,因为取数据及 ...
- Ring0创建事件Ring3设置事件
同步事件(synchronizationEvent)当事件对象为激发时,如遇到KeWaitForXX等内核函数,事件对象则自动变回未激发态通知事件(NotificationEvent)当事件对象为激发 ...
- redis问题:redis-server.exe双击闪退 win10系统
转:https://blog.csdn.net/qq_40361770/article/details/80454248 解决方法: 1-win+R 打开命令行 2-cd至redis目录,例如 D:\ ...
- Java集合类分析,初始化
Java集合是常用的数据类型,在此详细分析接口和实现类.整个集合框架就围绕一组标准接口而设计,学习集合框架有助开发实践. 框架体系图 1.Collection 接口Collection 是最基本的集合 ...
- echart line 初始化隐藏legend
echart line,当line很多,且各line的取值区间相关非常大时,多条line同时显示,其实是没有太大的可读性的,因此需要在初始化时,把部分不太重要的legend隐藏起来. 具体做法如下: ...