
2.2.3 TableLayout(表格布局)
3.如何确定行数与列数
- ①如果我们直接往TableLayout中添加组件的话,那么这个组件将占满一行!!!
- ②如果我们想一行上有多个组件的话,就要添加一个TableRow的容器,把组件都丢到里面!
- ③tablerow中的组件个数就决定了该行有多少列,而列的宽度由该列中最宽的单元格决定
- ④tablerow的layout_width属性,默认是fill_parent的,我们自己设置成其他的值也不会生效!!! 但是layout_height默认是wrapten——content的,我们却可以自己设置大小!
- ⑤整个表格布局的宽度取决于父容器的宽度(占满父容器本身)
- ⑥有多少行就要自己数啦,一个tablerow一行,一个单独的组件也一行!多少列则是看tableRow中 的组件个数,组件最多的就是TableLayout的列数
4.三个常用属性
android:collapseColumns:设置需要被隐藏的列的序号
android:shrinkColumns:设置允许被收缩的列的列序号
android:stretchColumns:设置运行被拉伸的列的列序号
以上这三个属性的列号都是从0开始算的,比如shrinkColunmns = "2",对应的是第三列!
可以设置多个,用逗号隔开比如"0,2",如果是所有列都生效,则用"*"号即可
除了这三个常用属性,还有两个属性,分别就是跳格子以及合并单元格,这和HTML中的Table类似:
android:layout_column="2":表示的就是跳过第二个,直接显示到第三个格子处,从1开始算的!
android:layout_span="4":表示合并4个单元格,也就说这个组件占4个单元格
属性使用示例:
①collapseColumns(隐藏列)
流程:在TableRow中定义5个按钮后,接着在最外层的TableLayout中添加以下属性: android:collapseColumns = "0,2",就是隐藏第一与第三列,代码如下:
<TableLayout

    android:id="@+id/TableLayout2"

    android:layout_width="fill_parent"

    android:layout_height="wrap_content"

    android:collapseColumns="0,2" >

    <TableRow>

        <Button

            android:layout_width="wrap_content"

            android:layout_height="wrap_content"

            android:text="one" />

        <Button

            android:layout_width="wrap_content"

            android:layout_height="wrap_content"

            android:text="two" />

        <Button

            android:layout_width="wrap_content"

            android:layout_height="wrap_content"

            android:text="three" />

        <Button

            android:layout_width="wrap_content"

            android:layout_height="wrap_content"

            android:text="four" />

        <Button

            android:layout_width="wrap_content"

            android:layout_height="wrap_content"

            android:text="five" />

    </TableRow>

</TableLayout>
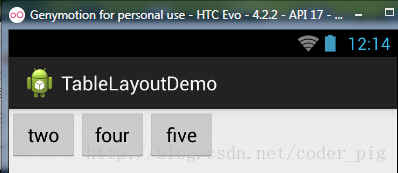
②stretchColumns(拉伸列)
流程:在TableLayout中设置了四个按钮,接着在最外层的TableLayout中添加以下属性: android:stretchColumns = "1"
设置第二列为可拉伸列,让该列填满这一行所有的剩余空间,代码如下:
<TableLayout

    android:id="@+id/TableLayout2"

    android:layout_width="fill_parent"

    android:layout_height="wrap_content"

    android:stretchColumns="1" >

    <TableRow>

        <Button

            android:layout_width="wrap_content"

            android:layout_height="wrap_content"

            android:text="one" />

        <Button

            android:layout_width="wrap_content"

            android:layout_height="wrap_content"

            android:text="two" />

        <Button

            android:layout_width="wrap_content"

            android:layout_height="wrap_content"

            android:text="three" />

        <Button

            android:layout_width="wrap_content"

            android:layout_height="wrap_content"

            android:text="four" />

    </TableRow>

</TableLayout>
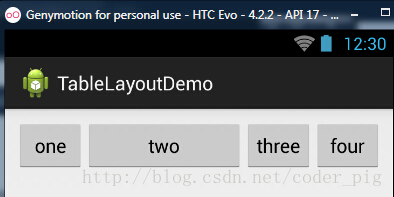
③shrinkColumns(收缩列)
步骤:这里为了演示出效果,设置了5个按钮和一个文本框,在最外层的TableLayout中添加以下属性: android:shrinkColumns = "1"
设置第二个列为可收缩列,代码如下:
<TableLayout

    android:id="@+id/TableLayout2"

    android:layout_width="fill_parent"

    android:layout_height="wrap_content"

    android:shrinkColumns="1" >

    <TableRow>

        <Button

            android:layout_width="wrap_content"

            android:layout_height="wrap_content"

            android:text="one" />

        <Button

            android:layout_width="wrap_content"

            android:layout_height="wrap_content"

            android:text="two" />

        <Button

            android:layout_width="wrap_content"

            android:layout_height="wrap_content"

            android:text="three" />

        <Button

            android:layout_width="wrap_content"

            android:layout_height="wrap_content"

            android:text="four" />

        <Button

            android:layout_width="wrap_content"

            android:layout_height="wrap_content"

            android:text="five" />

        <TextView

            android:layout_width="wrap_content"

            android:layout_height="wrap_content"

            android:text="文本XX" />

    </TableRow>

</TableLayout>
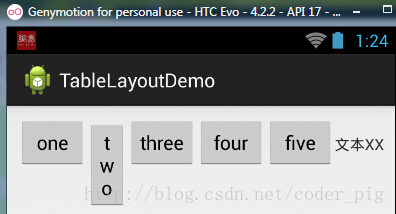
从图中我们可以看到two这个按钮被挤压成条条状,这个就是收缩,为了保证表格能适应 父容器的宽度!至于另外两个属性就不讲解了,用法和HTML相同!有兴趣的可以研究下!
5.使用实例
使用TableLayout来完成简单的登录界面,运行效果图如下:
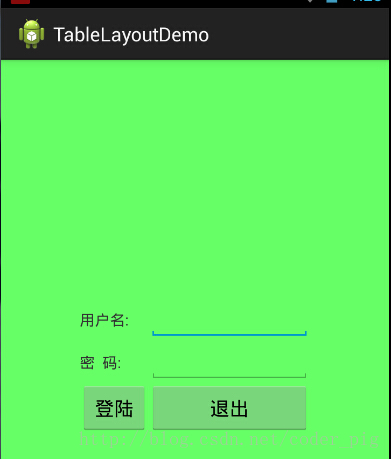
①调用gravity属性,设置为center_vertical,让布局里面的组件在竖直方向上居中
②将TableLayout中的第一和第四列设置为可拉伸
③在每个TableRow中添加两个TextView,用于拉伸填满该行,这样可以让表格水平居中
android:stretchColumns="0,3" 设置为0.3,是为了让两边都充满,那么中间部分就可以居中了
详细代码如下:
<TableLayout xmlns:android="http://schemas.android.com/apk/res/android"

    xmlns:tools="http://schemas.android.com/tools"

    android:id="@+id/TableLayout1"

    android:layout_width="match_parent"

    android:layout_height="match_parent"

    tools:context=".MainActivity"

    android:stretchColumns="0,3"

    android:gravity="center_vertical"

    android:background="#66FF66"

    >

    <TableRow>

        <TextView />

        <TextView

            android:layout_width="wrap_content"

            android:layout_height="wrap_content"

            android:text="用户名:"/>

        <EditText

            android:layout_width="wrap_content"

            android:layout_height="wrap_content"

            android:minWidth="150dp"/>

        <TextView />

    </TableRow>

    <TableRow>

        <TextView />

        <TextView

            android:layout_width="wrap_content"

            android:layout_height="wrap_content"

            android:text="密  码:"

        />

        <EditText

            android:layout_width="wrap_content"

            android:layout_height="wrap_content"

            android:minWidth="150dp"

        />

        <TextView />

    </TableRow>

    <TableRow>

        <TextView />

        <Button

            android:layout_width="wrap_content"

            android:layout_height="wrap_content"

            android:text="登陆"/>

        <Button

            android:layout_width="wrap_content"

            android:layout_height="wrap_content"

            android:text="退出"/>

        <TextView />

    </TableRow>

</TableLayout>
2.2.3 TableLayout(表格布局)的更多相关文章
- 【转】TableLayout(表格布局)
转自:http://www.cnblogs.com/zhangs1986/archive/2013/01/17/2864536.html TableLayout(表格布局) 表格布局模型以行列的形式管 ...
- Android零基础入门第29节:善用TableLayout表格布局,事半功倍
原文:Android零基础入门第29节:善用TableLayout表格布局,事半功倍 前面学习了线性布局和相对布局,线性布局虽然方便,但如果遇到控件需要排列整齐的情况就很难达到要求,用相对布局又比较麻 ...
- Android布局-TableLayout表格布局
一.表格布局-TableLayout 1.概念 表格布局采用行列的形式来管理UI的控件.表格布局适合于有规则的布局. TableRow,用来管理行,TableRow中的一个空间占据该行的一列.若不用T ...
- 案例:TableLayout表格布局——迷你计算器
计算器可以常用线性布局(LinearLayout)和表格布局(tableLayout).Gridlayout 今天我用的是表格布局 效果如下: 代码如下: <TableLayout xmlns: ...
- TableLayout(表格布局)
表格布局模型以行列的形式管理子控件,每一行为一个TableRow的对象,当然也可以是一个View的对象.TableRow可以添加子控件,每添加一个为一列. TableLayout属性: android ...
- android的布局-----TableLayout(表格布局)
学习导图 (1)TableLayout的相关简介 java的swing编程和html中经常会使用到表格,可见表格的应用开发中使用还是比较多的,同样android也为我们提供这样的布局方式. (2)如何 ...
- TableLayout表格布局
1.本节学习路线图 路线图分析: 从上面的路线图,可以看出TableLayout的用法还是很简单的,无非就是确定表格的行数,以及使用 那三个属性来设置每一行中的第某列的元素隐藏,拉伸,或者收缩即可! ...
- Android之TableLayout表格布局
1.相关属性 1.1.常用属性 android:collapseColumns 设置需要被隐藏的列的序列号 android:shrinkColumns 设置允许被收缩的列的序列号 android:st ...
- TableLayout表格布局详解
一.Tablelayout简介 Tablelayout类以行和列的形式对控件进行管理,每一行为一个TableRow对象,或一个View控件.当为TableRow对象时,可在TableRow下添加子控件 ...
随机推荐
- VS2017 IIS 部署.net core web项目
1.点击IIS,查看模块 查看是否安装了 AspNetCoreModule 模块,如果没有安装可下载:https://dotnet.microsoft.com/download 下载安装后,即可部署项 ...
- Computer - 在VM7虚拟机中使用主机打印机
在VM7虚拟机中使用主机打印机 在VMware Workstation 7中提供了一项新的功能:虚拟机可以直接使用主机的打印机.在以前的版本中,如果想在虚拟机中使用主机的打印机,一般是在主机创建“打印 ...
- MyCat安装配置
Mycat : 数据库分库分表中间件 http://www.mycat.io/ mycat运行需要JVM,所以先安装java环境,JDK1.7以上.数据库采用mysql5.7,或者8.0 下载 下载地 ...
- oracle 备份数据库,导出数据库
导出数据库 exp hljslfh2/hljslfh@dbsvr file=d:\hljslfh2Of0426.dmp 导入数据库 imp hljslfh2/hljslfh@localhost/dbs ...
- Java基础——Servlet(六)分页相关
前面写了Servlet(一)到(五),主要是在网上搜罗的视频.对分页这块还是不太清楚.于是有找到一些视频,重新学习了一下.主要是对分页的认识和设计思路.也是为了方便我以后回忆一下.. 一.分页常识 p ...
- python MRO及c3算法
1. 了解python2和python3类的区别 python2在2.3之前使用的是经典类, 2.3之后, 使用的是新式类 2. 经典类的MRO 树形结构的深度优先遍历 -> 树形结构遍历 cl ...
- js-ES6学习笔记-Class(3)
1.Class之间可以通过extends关键字实现继承. class ColorPoint extends Point { constructor(x, y, color) { super(x, y) ...
- drupal常用api
最短的函数 // 语言字串,除了可以获取对应语言外,还可以设置字串变量.可以是!var, @var或 %var,%var就添加元素外层.@var会过滤HTML,!var会原样输出HTML,%var会添 ...
- 除虫记之C#调用C函数出现的诡异错误
作者:朱金灿 来源:http://blog.csdn.net/clever101 同事反映在在项目中使用C#程序调用我们部门编写的C++模块出现一个诡异错误:在调用A算法失败后,其它算法均不能调 ...
- Maven学习(四)eclipse创建maven项目
eclipse创建Maven web项目 1.创建新项目 选择File -> New ->Project 选择New Project窗口中选择 Maven -> Maven Proj ...