SpringBoot在Kotlin中的实现(二)
根据现在的开发模式和网上的一些资料,SpringBoot需要对业务和操作进行分层,通常分为controller、entity、service、respository等结构。下面以Kotlin官网的例子,讲解在分层的时候,需要做什么配置。
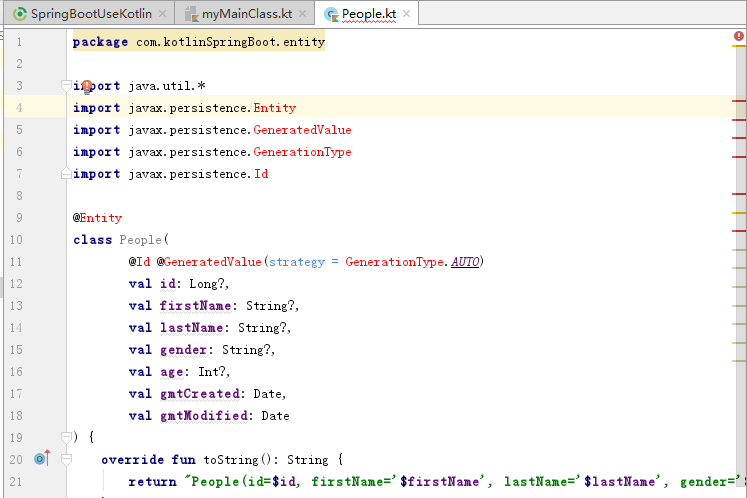
1、在包com.SpringBootUseKotlin中新建包entity,添加新的class,命名为People
package com.kotlinSpringBoot.entity

import java.util.*
import javax.persistence.Entity
import javax.persistence.GeneratedValue
import javax.persistence.GenerationType
import javax.persistence.Id

@Entity
class People(
        @Id @GeneratedValue(strategy = GenerationType.AUTO)
        val id: Long?,
        val firstName: String?,
        val lastName: String?,
        val gender: String?,
        val age: Int?,
        val gmtCreated: Date,
        val gmtModified: Date
) {
    override fun toString(): String {
        return "People(id=$id, firstName='$firstName', lastName='$lastName', gender='$gender', age=$age, gmtCreated=$gmtCreated, gmtModified=$gmtModified)"
    }
}
根据官网写的代码,结果却标红了:
因为上面的代码使用了JPA,但是没有引入相关的文件,在build.gradle中的dependencies添加相应的依赖即可解决该错误:
compile 'org.springframework.boot:spring-boot-starter-data-jpa:1.3.3.RELEASE'
2、在包com.SpringBootUseKotlin中新建包respository,新增class,命名为:PeopleRepository
package com.kotlinSpringBoot.repository

import com.kotlinSpringBoot.entity.People
import org.springframework.data.repository.CrudRepository

interface PeopleRepository : CrudRepository<People, Long> {
    fun findByLastName(lastName: String): List<People>?
}
3、在包com.SpringBootUseKotlin中新建包service,新增class,命名为:PeopleService
package com.kotlinSpringBoot.service

import com.kotlinSpringBoot.entity.People
import com.kotlinSpringBoot.repository.PeopleRepository
import org.springframework.beans.factory.annotation.Autowired
import org.springframework.stereotype.Service

class PeopleService {
    @Autowired
    val peopleRepository: PeopleRepository? = null

    fun findByLastName(lastName: String): List<People>? {
        return peopleRepository?.findByLastName(lastName)
    }

    fun <S : People?> save(entity: S): S? {
        return peopleRepository?.save(entity)
    }

    fun <S : People?> save(entities: MutableIterable<S>?): MutableIterable<S>? {
        return peopleRepository?.save(entities)
    }

    fun delete(entities: MutableIterable<People>?) {
    }

    fun delete(entity: People?) {
    }

    fun delete(id: Long?) {
    }

    fun findAll(ids: MutableIterable<Long>?): MutableIterable<People>? {
        return peopleRepository?.findAll(ids)
    }

    fun findAll(): MutableIterable<People>? {
        return peopleRepository?.findAll()
    }

    fun exists(id: Long?): Boolean {
        return peopleRepository?.exists(id)!!
    }

    fun count(): Long {
        return peopleRepository?.count()!!
    }

    fun findOne(id: Long?): People? {
        return peopleRepository?.findOne(id)
    }

    fun deleteAll() {
    }
}
4、在包com.SpringBootUseKotlin中新建包controller,新增class,命名为:PeopleController
package com.kotlinSpringBoot.controller

import com.kotlinSpringBoot.service.PeopleService
import org.springframework.beans.factory.annotation.Autowired
import org.springframework.stereotype.Controller
import org.springframework.web.bind.annotation.GetMapping
import org.springframework.web.bind.annotation.RequestParam
import org.springframework.web.bind.annotation.ResponseBody

@Controller
class PeopleController {
    @Autowired
    val peopleService: PeopleService? = null

    @GetMapping(value = "/hello")
    @ResponseBody
    fun hello(@RequestParam(value = "lastName") lastName: String): Any {
        val peoples = peopleService?.findByLastName(lastName)
        val map = HashMap<Any, Any>()
        map.put("hello", peoples!!)
        return map
    }
}
在controller包内新增类HelloWorldController
package com.kotlinSpringBoot.controller

import org.springframework.web.bind.annotation.GetMapping
import org.springframework.web.bind.annotation.RestController

@RestController
class HelloWorldController {
    @GetMapping(value = *arrayOf("/helloworld", "/"))
    fun helloworld(): Any {
        return "Hello,World!"
    }
}
分层结束,下面说一下执行主类的另一种方法

点击图中的bootrun运行程序,报错:没有指定的主类myMainClass。上一节中我们建立了主类,如下:
package com.SpringBootUseKotlin.Code

import org.springframework.boot.SpringApplication
import org.springframework.boot.autoconfigure.SpringBootApplication

@SpringBootApplication
open class myMainClass{

}

fun main(args:Array<String>){
    SpringApplication.run(myMainClass::class.java, *args)
}
我们在build.gradle里加上mainClassName属性。注意,mainClassName依赖于插件application,如果报错说该属性未定义,则在build.gradle中添加:
apply plugin: 'application'
那么这个属性的值是多少呢?这个类名是myMainClass,那么mainClassName的值是否为:com.SpringBootUseKotlin.Code.MyMainClass ?其实并不是。
我们可以通过下面的操作查看到类的名称(点击主类,在Run的菜单中选择设置):
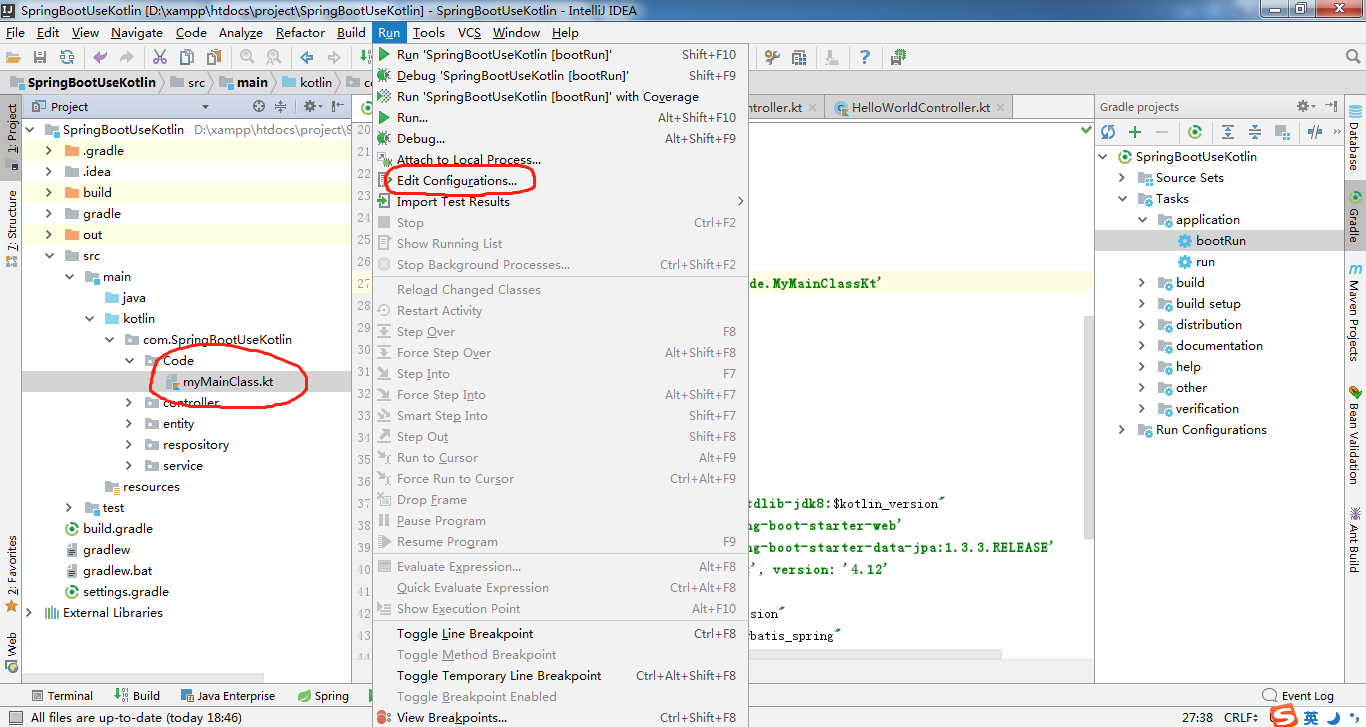
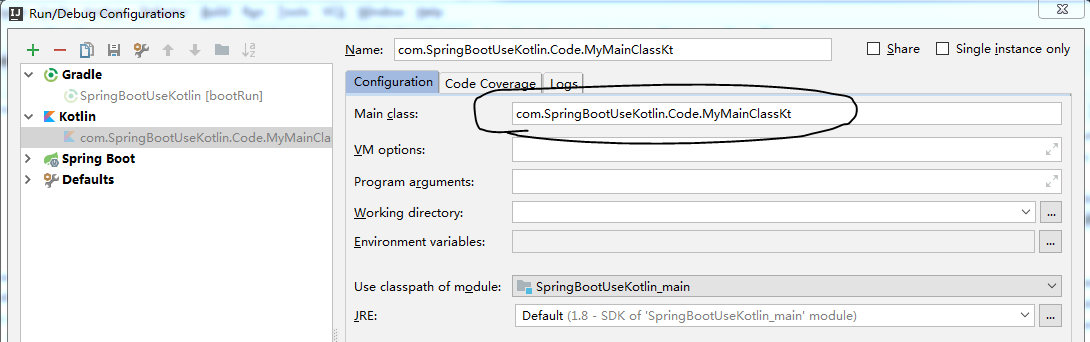
所以真正的mainClassName应该设置为com.SpringBootUseKotlin.Code.MyMainClassKt,注意,后面多了个Kt。
设了类名之后,需要在主类中加上注解:
package com.kotlinSpringBoot

import org.springframework.boot.SpringApplication
import org.springframework.boot.autoconfigure.SpringBootApplication

//注解MapperScan需要import该jar包import org.mybatis.spring.annotation.MapperScan;

@SpringBootApplication @MapperScan("com.kotlinSpringBoot.mapper") //这个是刚加的注解,以便主类可以被扫描到 open class Application {

 } fun main(args: Array<String>) {     SpringApplication.run(Application::class.java, *args) }
上面的代码中,需要引入org.mybatis.spring.annotation.MapperScan,因此需要在build.gradle的配置文件中增加下面的配置:
buildscript {
    ext.mybatisVersion = '3.3.1'
    ext.mybatis_spring = '1.2.5'
}

dependencies {
    compile "org.mybatis:mybatis:$mybatisVersion"
    compile "org.mybatis:mybatis-spring:$mybatis_spring"
}
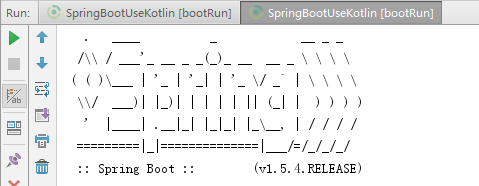
配置完成后再点击一次gradle的bootrun,则可以看到下面的输出了:
SpringBoot在Kotlin中的实现(二)的更多相关文章
- SpringBoot在Kotlin中的实现(一)
本节记录如何用Kotlin初步搭建一个SpringBoot的环境(使用Gradle自动化构建工具). 1.新建一个Gradle的Kotlin 配置完成后,build.gradle的配置如下: buil ...
- springboot 与 mybatis 中事务特性讲解
1 MyBatis自动参与到 spring 事务管理中,无需额外配置,只要org.mybatis.spring.SqlSessionFactoryBean引用的数据源与 DataSourceTrans ...
- Kotlin中的object 与companion object的区别
之前写了一篇Kotlin中常量和静态方法的文章,最近有人提出一个问题,在companion object中调用外部的成员变量会调用不到,这才意识到问题,本篇文章会带着这个疑问来解决问题. 一. obj ...
- DB数据源之SpringBoot+MyBatis踏坑过程(二)手工配置数据源与加载Mapper.xml扫描
DB数据源之SpringBoot+MyBatis踏坑过程(二)手工配置数据源与加载Mapper.xml扫描 liuyuhang原创,未经允许进制转载 吐槽之后应该有所改了,该方式可以作为一种过渡方式 ...
- Kotlin——中级篇(二): 属性与字段详解
在前面的章节中,详细的为大家讲解到了Kotlin中对类的类的定义.使用.初始化.初始化.类继承等内容,但是在一个类中,几乎上是不可能不出现属性与字段(field)的,这一篇文章就为大家奉上Kotlin ...
- Kotlin——高级篇(二):高阶函数详解与标准的高阶函数使用
在上面一个章节中,详细的讲解了Kotlin中关于Lambda表达式的语法以及运用,如果还您对其还不甚理解,请参见Kotlin--高级篇(一):Lambda表达式详解.在这篇文章中,多次提到了Kotli ...
- Kotlin——初级篇(二):变量、常量、注释
在Kotlin中的变量.常量以及注释多多少少和Java语言是有着不同之处的.不管是变量.常量的定义方式,还是注释的使用.下面详细的介绍Kotlin中的变量.常量.注释的使用.以及和Java的对比. 如 ...
- SpringBoot初始教程之日志处理(二)
SpringBoot初始教程之日志处理(二) 1.介绍 SpringBoot默认是采用logback进行日志处理.Logback是由log4j创始人设计的又一个开源日志组件.Logback是由log4 ...
- Kotlin 中文文档
Kotlin 中文文档 标签: Kotlinkotlin中文文档 2017-02-14 18:14 4673人阅读 评论(0) 收藏 举报 分类: kotlin 转载地址:http://www.tu ...
随机推荐
- MySQL 术语
MySQL 术语: MySQL 术语 含义 B-树 英文:Balance Tree:读音:B树(中间的横线,是分隔符的意思:注意:不读"B减树")
- 2、visualBox虚拟机扩容
1.找到VBoxManager工具 1)打开Finder,找到[应用程序],在右侧找到VirtualBox.app,然后打开右键,找到[显示包内容],点击打开 2.打开终端,来到这个目录下 cd /A ...
- CentOS6.x 下安装Python pyyaml模块
Python中使用yaml时候,需要安装下组件pyyaml,直接安装pyyaml时提示“ext/_yaml.c:4:20: error: Python.h: No such file or direc ...
- Idea 无法显示mybatis-generator插件
Idea在pom.xml中添加了mybatis-generator插件后,右侧的maven projects中并未显示这个插件? 解决方法: 新建一个plugins标签和pluginManager同级 ...
- NET设计模式 第二部分 创建型模式(5):原型模式(Prototype Pattern)
原型模式(Prototype Pattern) ——.NET设计模式系列之六 Terrylee,2006年1月 概述 在软件系统中,有时候面临的产品类是动态变化的,而且这个产品类具有一定的等级结构.这 ...
- C# MD5位加密
/// <summary> /// 方法一:通过使用 new 运算符创建对象 /// </summary> /// <param name="strSource ...
- system.Data.Entity.Infrastructure.DbUpdateConcurrencyException: Store update, insert, or delete statement affected an unexpected number of rows (0) 问题
页面控件没有做限制.提交后还可以继续点击,造成了在短时间内的多次请求.查看日志两次错误在200ms之内. 错误信息 system.Data.Entity.Infrastructure.DbUpdate ...
- 有了Jenkins,为什么还需要一个独立的部署系统
需不需要一个独立的部署系统是很多企业用户在构建持续交付流程中经常困惑的一个问题.也经常有用户会问我们,现在已经有Jenkins,它自身提供了丰富的部署插件(如WebSphere部署插件.Tomcat部 ...
- PREV-2_蓝桥杯_打印十字图
问题描述 小明为某机构设计了一个十字型的徽标(并非红十字会啊),如下所示: ..$$$$$$$$$$$$$....$...........$..$$$.$$$$$$$$$.$$$$...$...... ...
- 统计apk或jar中方法数量
一.apk中方法数量 ./android-sdk-linux/build-tools/23.0.2/dexdump -f apk路径 | grep method_ids_size 二.jar中方法数 ...