cocos源码分析--用Sprite加载自定义着色器
本文写一个使用动态更新属性变量的自定义着色器。在这个例子中,小图标的位置根据手指的触摸而移动,以屏幕重点为参照物,屏幕中向下的部分根据手指的点击乘以一个绿色的颜色值,向上的部分乘以一个红色的颜色值。
可以把计算过程分为三个步骤
1 利用手指的点击计算出小图标当前的位置,并将位置传入到顶点着色器中,因为他对每个顶点都是一样的,所以我们可以使用一个全局变量u_center
2 顶点着色器根据顶点与小球的距离,计算出一个-1~1的权重值,这个值作为易变变量v_high 传递给片段着色器。大于0表示手指向上点击,小于0表示向下倾斜
3 经过光栅化插值的权重值在片段着色器中用来修改片段的颜色,大于0表示向上倾斜,乘以一个红色的颜色值,反之,乘以一个绿色的颜色值。
我们把自定义着色器作用在一个Sprite元素中,因为Sprite执行过程中会对顶点属性,全局变量的值或者回调方法进行访问。
首先我们新建名为dynamic_shader.vert和dynamic_shader.frag
const char* dynamic_shader_vert = STRINGIFY(

attribute vec4 a_position;

attribute vec4 a_color;

uniform vec3 u_center;//小图标坐标

varying vec4 v_fragmentColor;

varying float v_high;//权重值

void main()

{

    gl_Position = CC_MVPMatrix * a_position;

    v_fragmentColor=a_color;

    //求四个顶点与center的距离dis

    vec2 disV=vec2(a_position.x-u_center.x,a_position.y-u_center.y);

    float dis=sqrt(disV.x*disV.x+disV.y*disV.y);

    //u_center.z为斜对角距离的一半,通过这样计算出-1~1的权重值

    float high=(dis-u_center.z)/u_center.z;

    v_high=high;

}
const char* dynamic_shader_frag = STRINGIFY(

\n#ifdef GL_ES\n

precision lowp float;

\n#endif\n

varying vec4 v_fragmentColor;

varying float v_high;

uniform vec4 u_highColor;//向上偏移颜色 红色

uniform vec4 u_lowColor;

void main()

{

    if(v_high>0.0)//权重值大于0,比如小图标在右上角,左下角的顶点的权重值是大于0的

        gl_FragColor=v_fragmentColor*u_highColor*v_high;

    else

        gl_FragColor=v_fragmentColor*u_lowColor*-v_high;

    vec4 white=vec4(.,.,.,.);

    //gl_FragColor=gl_FragColor+white*(1. -gl_FragColor.a)*white;

    //如果不加白色,中心的权重值为0,他的位置的gl_FragColor就会是黑色,加上一个白色的底,更好看

    gl_FragColor=gl_FragColor+white*(1.0 -gl_FragColor.a);//最边缘的 .a为1 ,中心的.a为0,所以中心为白色

   // gl_FragColor=vec4(gl_FragColor.r,gl_FragColor.g,gl_FragColor.b,0.4);

}

);
我们这里要把这个作为sprite的着色器,但是里面没有纹理,其实这个sprite的作用就和LayerColor差不多了,但是sprite在执行着色过程中会执行我们后期赋值的顶点属性和全局属性,或者回调函数,而LayerColor不会执行这些,体现不出如何使用自定义着色器,所以这里把sprite作为演示对象。
以下是代码
 //小图标

    auto size=Size(, );

    auto dot=Sprite::create("aaa.png");

    scene->addChild(dot,);

    dot->setScale(0.2);

    dot->setPosition(size.width/,size.height/);

    //自定义着色器的sprite

    auto sprite=Sprite::create("aaa.png");

    scene->addChild(sprite,);

    sprite->setContentSize(designSize);

    sprite->setColor(Color3B::WHITE);

    sprite->setPosition(size.width/,size.height/);

    auto _halfDis=sqrtf(size.width*size.width+size.height*size.height)/;

    auto _center=Vec2(size.width/,size.height/);

    // 创建GLProgram,传递我们自定义的着色器

    auto program=GLProgram::createWithByteArrays(dynamic_shader_vert, dynamic_shader_frag);

    auto pstate=GLProgramState::create(program);

    // 把sprite的着色器设置为创建的pstate

    sprite->setGLProgramState(pstate);

    auto _highColor=Color4B::RED;

    auto _lowColor=Color4B::GREEN;

    /*

     opengl对顶点属性值的归一化是按照数据类型计算的,他并不能识别颜色值的意义,因此利用GL

     的归一化会导致错误的颜色值,所以这里将颜色值在客户端归一化

     */
    //赋值全局变量,这两个颜色在过程中是不变的,所以我们可以这样设置

    pstate->setUniformVec4("u_highColor",Vec4(_highColor.r/255.0,_highColor.g/255.0,_highColor.b/255.0,_highColor.a/255.0));

    pstate->setUniformVec4("u_lowColor",Vec4(_lowColor.r/255.0,_lowColor.g/255.0,_lowColor.b/255.0,_lowColor.a/255.0));

    //u_center代码手指的移动,过程中是变化的,所以我们用setCallback的形式设置。
    //这里的回调是在 _glProgramState->apply(_mv);中执行

    pstate->setUniformCallback("u_center",[&_center,&_halfDis](GLProgram* glProgram, Uniform* uniform){

       glProgram->setUniformLocationWith3f(uniform->location, _center.x, _center.y, _halfDis);

       // CCLog(">>>>>>>>%f",_halfDis);

       // CCLog(">>>>>>>>========%f %f",_center.x,_center.y);

});

    auto touchListener = EventListenerTouchOneByOne::create();

    touchListener->onTouchBegan =[this,size,dot,&_center,scene](Touch*touch, Event*event)->bool{

        // auto location = scene->convertToNodeSpace(touch->getLocation());

        auto location = touch->getLocation();

        _center.x=location.x;

        _center.y=location.y;

        if(_center.x<)_center.x=;

        else if (_center.x>size.width)_center.x=size.width;

        if(_center.y<)_center.y=;

        else if (_center.y>size.height)_center.y=size.height;

        dot->setPosition(_center);

        return false;

    };

    Director::sharedDirector()->getEventDispatcher()->addEventListenerWithSceneGraphPriority(touchListener, scene);
这里关键的一点就是对U_center属性的设置。在callback中对其进行重新赋值,原理是在以下代码中
void GLProgramState::apply(const Mat4& modelView)

{

    //使用当前程序

    applyGLProgram(modelView);

    //执行顶点的相关操作

    applyAttributes();

    //执行全局变量的相关操作

    applyUniforms();

}

void GLProgramState::applyUniforms()

{

    // set uniforms

    for(auto& uniform : _uniforms) {

        uniform.second.apply();

    }

}

void UniformValue::apply()

{

    if(_useCallback) {

        (*_value.callback)(_glprogram, _uniform);

    }

    else

    {

        switch (_uniform->type) {

            case GL_SAMPLER_2D:

                _glprogram->setUniformLocationWith1i(_uniform->location, _value.tex.textureUnit);

                GL::bindTexture2DN(_value.tex.textureUnit, _value.tex.textureId);

                break;

            case GL_INT:

                _glprogram->setUniformLocationWith1i(_uniform->location, _value.intValue);

                break;

            case GL_FLOAT:

                _glprogram->setUniformLocationWith1f(_uniform->location, _value.floatValue);

                break;

            case GL_FLOAT_VEC2:

                _glprogram->setUniformLocationWith2f(_uniform->location, _value.v2Value[], _value.v2Value[]);

                break;

            case GL_FLOAT_VEC3:

                _glprogram->setUniformLocationWith3f(_uniform->location, _value.v3Value[], _value.v3Value[], _value.v3Value[]);

                break;

            case GL_FLOAT_VEC4:

                _glprogram->setUniformLocationWith4f(_uniform->location, _value.v4Value[], _value.v4Value[], _value.v4Value[], _value.v4Value[]);

                break;

            case GL_FLOAT_MAT4:

                _glprogram->setUniformLocationWithMatrix4fv(_uniform->location, (GLfloat*)&_value.matrixValue, );

                break;

            default:

                CCASSERT(false, "Invalid UniformValue");

                break;

        }

    }

}
_value是一个联合体,可以是float数组,可以是纹理结构体,也可以是lamada函数,如下
 union U{  //联合,U可能是下面任何一个值

        float floatValue;

        int intValue;

        float v2Value[];

        float v3Value[];

        float v4Value[];

        float matrixValue[];

        struct {

            GLuint textureId;

            GLuint textureUnit;

        } tex;

        std::function<void(GLProgram*, Uniform*)> *callback;

        U() { memset( this, , sizeof(*this) ); }

        ~U(){}

        U& operator=( const U& other ) {

            memcpy(this, &other, sizeof(*this));

            return *this;

        }

    } _value;
如果运行没有问题的话,效果如图所示:

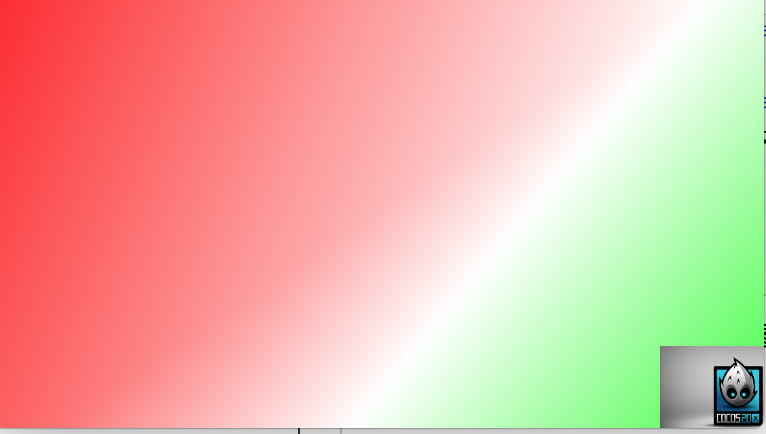

以上就是自定义着色器的使用过程,以及怎样对已有元素使用自定义的着色器程序。这种着色器子系统是开发者不需要继承就可以使用自定义着色器。
cocos源码分析--用Sprite加载自定义着色器的更多相关文章
- 从SpringBoot源码分析 配置文件的加载原理和优先级
本文从SpringBoot源码分析 配置文件的加载原理和配置文件的优先级 跟入源码之前,先提一个问题: SpringBoot 既可以加载指定目录下的配置文件获取配置项,也可以通过启动参数( ...
- 【MyBatis源码分析】Configuration加载(下篇)
元素设置 继续MyBatis的Configuration加载源码分析: private void parseConfiguration(XNode root) { try { Properties s ...
- 【Spring源码分析】Bean加载流程概览
代码入口 之前写文章都会啰啰嗦嗦一大堆再开始,进入[Spring源码分析]这个板块就直接切入正题了. 很多朋友可能想看Spring源码,但是不知道应当如何入手去看,这个可以理解:Java开发者通常从事 ...
- 【Spring源码分析】Bean加载流程概览(转)
转载自:https://www.cnblogs.com/xrq730/p/6285358.html 代码入口 之前写文章都会啰啰嗦嗦一大堆再开始,进入[Spring源码分析]这个板块就直接切入正题了. ...
- Dubbo源码分析之ExtensionLoader加载过程解析
ExtensionLoader加载机制阅读: Dubbo的类加载机制是模仿jdk的spi加载机制: Jdk的SPI扩展加载机制:约定是当服务的提供者每增加一个接口的实现类时,需要在jar包的META ...
- Android 7.0 Gallery图库源码分析3 - 数据加载及显示流程
前面分析Gallery启动流程时,说了传给DataManager的data的key是AlbumSetPage.KEY_MEDIA_PATH,value值,是”/combo/{/local/all,/p ...
- Spring源码分析:Bean加载流程概览及配置文件读取
很多朋友可能想看Spring源码,但是不知道应当如何入手去看,这个可以理解:Java开发者通常从事的都是Java Web的工作,对于程序员来说,一个Web项目用到Spring,只是配置一下配置文件而已 ...
- 【MyBatis源码分析】Configuration加载(上篇)
config.xml解析为org.w3c.dom.Document 本文首先来简单看一下MyBatis中将config.xml解析为org.w3c.dom.Document的流程,代码为上文的这部分: ...
- 【Spring源码分析系列】加载Bean
/** * Create a new XmlBeanFactory with the given input stream, * which must be parsable using DOM. * ...
随机推荐
- LDAP服务器的概念和原理简单介绍
LDAP服务器的概念和原理简单介绍 1. 目录服务 目录是一个为查询.浏览和搜索而优化的专业分布式数据库,它呈树状结构组织数据,就好象Linux/Unix系统中的文件目录一样.目录数据库和关系数据库不 ...
- Linux 下的三种时间介绍
Linux 下的三种时间介绍: Access Time:简写为atime,表示文件访问的时间,当文件内容被访问时,更新atime时间 Modify Time:简写为mtime,表示文件内容修改的时间, ...
- Hadoop数据分析实例:P2P借款人信用风险实时监控模型设计
Hadoop数据分析实例:P2P借款人信用风险实时监控模型设计 一提到hadoop相信熟悉IT领域或者经常关注互联网新闻的朋友都应该很熟悉了,当然,这种熟悉可能也只是听着名字耳熟,但并不知道它具体是什 ...
- ML: 降维算法-LDA
判别分析(discriminant analysis)是一种分类技术.它通过一个已知类别的“训练样本”来建立判别准则,并通过预测变量来为未知类别的数据进行分类.判别分析的方法大体上有三类,即Fishe ...
- C# DataAdapter.Update() 无法更新数据表中删除的数据行
用DataAdapter.Update() 方法更新删除了部分DataRow 的 DataTable .但是数据库中的数据没有随着更新而变化. 原因:DataTable 删除 DataRow 时,使用 ...
- Git常见使用方法
图参考:http://www.ruanyifeng.com/blog/2014/06/git_remote.html 1.GitLab配置 git config --global user.name ...
- js中input文本框设置和移除默认值
这里想实现的效果是:设置和移除文本框默认值,如下图鼠标放到文本框中的时候,灰字消失. 1.可以用简单的方式,就是给input文本框加上onfocus属性,如下代码: <input id=&quo ...
- 测试教程网.unittest教程.4. 实例: 读取测试数据并测试弱密码
From: http://www.testclass.net/pyunit/test_example_2/ 背景 接上一节的弱密码例子,我们的用例尽管运行的不错,但还是有点问题. 假如我们需要增加一些 ...
- 【maven】之打包war依赖子项目jar
比如 p-common p-core p-dao p-service p-web service项目依赖dao,dao依赖core和common,web依赖service 在使用maven tomca ...
- 在64位平台上的Lucene,应该使用MMapDirectory[转]
http://blog.thetaphi.de/2012/07/use-lucenes-mmapdirectory-on-64bit.html 从3.1版本开始,Lucene和Solr开始在64位的W ...