
spring boot 系列之六:深入理解spring boot的自动配置
我们知道,spring boot自动配置功能可以根据不同情况来决定spring配置应该用哪个,不应该用哪个,举个例子:
- Spring的JdbcTemplate是不是在Classpath里面?如果是,并且DataSource也存在,就自动配置一个JdbcTemplate的Bean
- Thymeleaf是不是在Classpath里面?如果是,则自动配置Thymeleaf的模板解析器、视图解析器、模板引擎
那个这个是怎么实现的呢?原因就在于它利用了Spring的条件化配置,条件化配置允许配置存在于应用中,但是在满足某些特定条件前会忽略这些配置。
要实现条件化配置我们要用到@Conditional条件化注解。
本篇随便讲从如下三个方面进行展开:
- @Conditional小例子,来说明条件化配置的实现方式
- spring boot 的条件化配置详解
- spring boot 自动配置源码分析
- 自己动手实现spring boot starter pom
一、@Conditional小例子
我们知道在windows下显示列表的命令是dir,而在linux系统下显示列表的命令是ls,基于条件配置,我们可以实现在不同的操作系统下返回不同的值。
- 判断条件定义
- )windows下的判定条件

/**
* 实现spring 的Condition接口,并且重写matches()方法,如果操作系统是windows就返回true
*
*/
public class WindowsCondition implements Condition{ @Override
public boolean matches(ConditionContext context, AnnotatedTypeMetadata metadata) { return context.getEnvironment().getProperty("os.name").contains("Windows");
} } - )linux下的判定条件
/**

 * 实现spring 的Condition接口,并且重写matches()方法,如果操作系统是linux就返回true

 *

 */

public class LinuxCondition implements Condition{

    @Override

    public boolean matches(ConditionContext context, AnnotatedTypeMetadata metadata) {

        return context.getEnvironment().getProperty("os.name").contains("Linux");

    }

}
- )windows下的判定条件
- 不同系统下的Bean的类
- )接口
public interface ListService {

    public String showListLine();

} - )windows下的Bean类
public class WindowsListService implements ListService{ @Override
public String showListLine() {
return "dir";
} } - )linux下的Bean的类
public class LinuxListService implements ListService{

    @Override

    public String showListLine() {

        return "ls";

    }

}
- )接口
- 配置类
@Configuration

public class ConditionConfig {

    /**

     * 通过@Conditional 注解,符合windows条件就返回WindowsListService实例

     *

     */

    @Bean

    @Conditional(WindowsCondition.class)

    public ListService windonwsListService() {

        return new WindowsListService();

    }

    /**

     * 通过@Conditional 注解,符合linux条件就返回LinuxListService实例

     *

     */

    @Bean

    @Conditional(LinuxCondition.class)

    public ListService linuxListService() {

        return new LinuxListService();

    }

} - 测试类
public class ConditionTest {

    public static void main(String[] args) {

        AnnotationConfigApplicationContext context = new AnnotationConfigApplicationContext(ConditionConfig.class);

        ListService listService = context.getBean(ListService.class);

        System.out

                .println(context.getEnvironment().getProperty("os.name") + " 系统下的列表命令为: " + listService.showListLine());

    }

} - 运行测试类,由于我的是windows7 系统,因此结果是
Windows 7 系统下的列表命令为: dir
如果你的是linux系统,则结果就会是
Linux 系统下的列表命令为: ls
二、spring boot 的条件化配置
在spring boot项目中会存在一个名为spring-boot-autoconfigure的jar包

条件化配置就是在这个jar里面实现的,它用到了如下的条件化注解,这些注解都是以@ConditionalOn开头的,他们都是应用了@Conditional的组合注解:
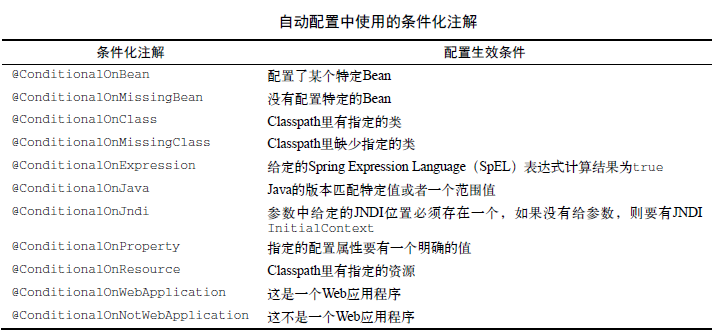
接下来我们看个源码的列子:
以JdbcTemplateAutoConfiguration为例,它里面有这段代码:
@Bean

    @Primary

    @ConditionalOnMissingBean(JdbcOperations.class)

    public JdbcTemplate jdbcTemplate() {

        return new JdbcTemplate(this.dataSource);

    }
只有在不存在JdbcOperations(如果查看JdbcTemplate的源码,你会发现JdbcTemplate类实现了JdbcOperations接口)实例的时候,才会初始化一个JdbcTemplate 的Bean。
基于以上内容,我们就可以阅读自动配置相关的源码了。
三、spring boot 自动配置源码分析
spring boot项目的启动类用的注解--@SpringBootApplication是一个组合注解,其中@EnableAutoConfiguration是自动配置相关的。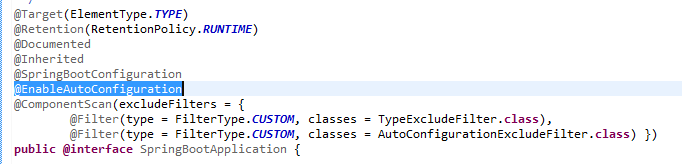
而这个@EnableAutoConfiguration注解里面有个@Import注解导入了EnableAutoConfigurationImportSelector用来实现具体的功能
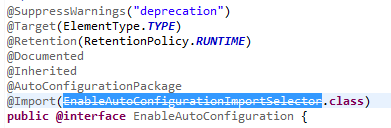
(注:由于我本地的spring boot版本不是最新的,这里的EnableAutoConfigurationImportSelector已经不建议使用了,新版本可能已经换成了其他类,但是不影响我们看代码)
这个类继承了AutoConfigurationImportSelector

进入父类,里面有个方法selectImports()调用了方法getCandidateConfigurations(),进而调用了SpringFactoriesLoader.loadFactoryNames()方法
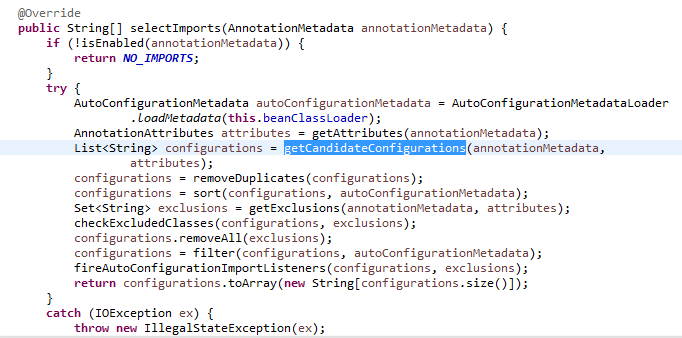
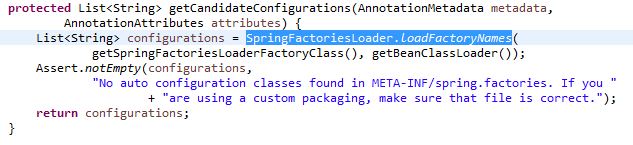
在SpringFactoriesLoader.loadFactoryNames()方法里面,我们看到会查询META-INF/spring.factories这个配置文件
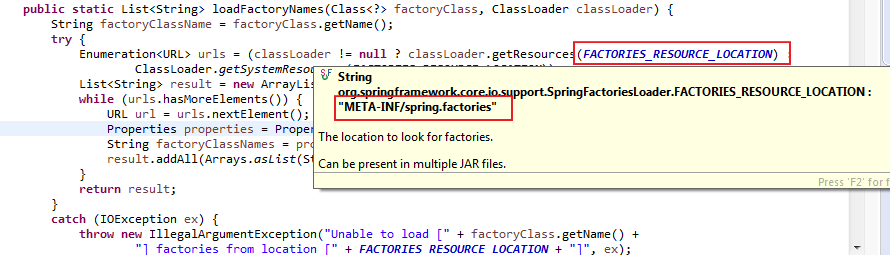
SpringFactoriesLoader.loadFactoryNames方法会扫描具有META-INF/spring.factories文件的jar包,而我们的spring-boot-autoconfigure.jar里面就有一个这样的文件,此文件中声明了具体有哪些自动配置:
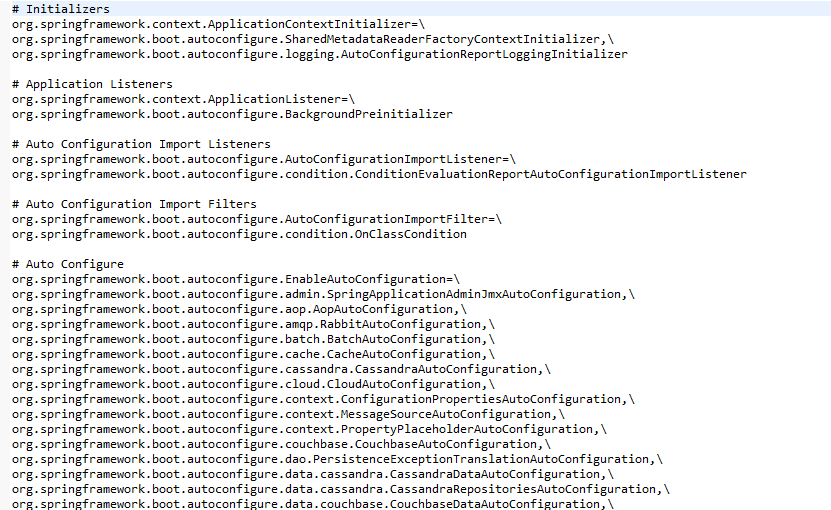
我们上面提到的JdbcTemplateAutoConfiguration自动配置类就在里面。
四、编写自己的spring boot starter pom
接下来,我们就来写一个简单的spring boot starter pom。
步骤如下:
- 新建starter maven项目spring-boot-starter-hello
- 修改pom文件
<project xmlns="http://maven.apache.org/POM/4.0.0"

    xmlns:xsi="http://www.w3.org/2001/XMLSchema-instance"

    xsi:schemaLocation="http://maven.apache.org/POM/4.0.0 http://maven.apache.org/xsd/maven-4.0.0.xsd">

    <modelVersion>4.0.0</modelVersion>

    <groupId>com.sam</groupId>

    <artifactId>spring-boot-starter-hello</artifactId>

    <version>0.0.1-SNAPSHOT</version>

    <packaging>jar</packaging>

    <dependencies>

        <!-- 这里需要引入spring boot的自动配置作为依赖 -->

        <dependency>

            <groupId>org.springframework.boot</groupId>

            <artifactId>spring-boot-autoconfigure</artifactId>

            <version>1.5.1.RELEASE</version>

        </dependency>

    </dependencies>

</project> - 属性配置
/**
* @ConfigurationProperties
* 自动匹配application.properties文件中hello.msg的值,然后赋值给类属性msg,这里的msg默认值为“spring boot”
*
*/
@ConfigurationProperties(prefix="hello")
public class HelloServiceProperties { private static final String MSG = "spring boot"; private String msg = MSG; public String getMsg() {
return msg;
} public void setMsg(String msg) {
this.msg = msg;
} } - 判定依据类
/**

 * 后面的代码会依据此类是否存在,来决定是否生产对应的Bean

 *

 */

public class HelloService {

    private String msg;

    public String getMsg() {

        return msg;

    }

    public void setMsg(String msg) {

        this.msg = msg;

    }

    public String sayHello() {

        return "hello " + msg;

    }

} - 自动配置类
@Configuration

@EnableConfigurationProperties(HelloServiceProperties.class)

@ConditionalOnClass(HelloService.class)

@ConditionalOnProperty(prefix = "hello", matchIfMissing = true, value = "enabled")

public class HelloServiceAutoConfiguration {

    @Autowired

    HelloServiceProperties helloServiceProperties;

    @Bean

    @ConditionalOnMissingBean(HelloService.class)

    public HelloService helloService() {

        HelloService service = new HelloService();

        service.setMsg(helloServiceProperties.getMsg());

        return service;

    }

}
根据HelloServiceProperties提供的参数,并通过@ConditionalOnClass(HelloService.class)判定HelloService这个类在Classpath中是否存在,存在并且还没有对应的Bean,就生成对应的helloService Bean
- 注册配置,需要到META-INF/spring.factories文件中注册改自动配置类:在src/main/source目录下新建改文件,然后进行配置。
org.springframework.boot.autoconfigure.EnableAutoConfiguration=\

com.sam.spring_boot_starter_hello.HelloServiceAutoConfiguration - 对该工程进行mvn clean install,将jar推送到本地maven仓库,供后续使用。
- )修改pom,引入上述的依赖
<dependency>

            <groupId>com.sam</groupId>

            <artifactId>spring-boot-starter-hello</artifactId>

            <version>0.0.1-SNAPSHOT</version>

</dependency> - )实现controller
@RestController

public class HelloController {

  //代码中没有配置这个helloService Bean,但是自动配置能够帮忙实例化,因此可以直接注入

    @Autowired

    HelloService helloService;

    @RequestMapping(value="/helloService")

    public String sayHello() {

        return helloService.sayHello();

    }

} - )页面访问/helloService接口

- )在application.properties里面配置hello.msg=sam,然后再次访问/helloService接口
使用starter ,使用我们这个starter 需要新建一个或使用既存的一个spring boot工程(这里我用的是既存的),然后

spring boot 系列之六:深入理解spring boot的自动配置的更多相关文章
- Spring Boot2 系列教程(三)理解 Spring Boot 项目中的 parent
前面和大伙聊了 Spring Boot 项目的三种创建方式,这三种创建方式,无论是哪一种,创建成功后,pom.xml 坐标文件中都有如下一段引用: <parent> <groupId ...
- Spring Boot2 系列教程(四)理解Spring Boot 配置文件 application.properties
在 Spring Boot 中,配置文件有两种不同的格式,一个是 properties ,另一个是 yaml . 虽然 properties 文件比较常见,但是相对于 properties 而言,ya ...
- Spring Boot2 系列教程(二十)Spring Boot 整合JdbcTemplate 多数据源
多数据源配置也算是一个常见的开发需求,Spring 和 SpringBoot 中,对此都有相应的解决方案,不过一般来说,如果有多数据源的需求,我还是建议首选分布式数据库中间件 MyCat 去解决相关问 ...
- spring boot系列(五)spring boot 配置spring data jpa (查询方法)
接着上面spring boot系列(四)spring boot 配置spring data jpa 保存修改方法继续做查询的测试: 1 创建UserInfo实体类,代码和https://www.cnb ...
- spring boot系列01--快速构建spring boot项目
最近的项目用spring boot 框架 借此学习了一下 这里做一下总结记录 非常便利的一个框架 它的优缺点我就不在这背书了 想了解的可以自行度娘谷歌 说一下要写什么吧 其实还真不是很清楚,只是想记录 ...
- Spring Boot2 系列教程(三十)Spring Boot 整合 Ehcache
用惯了 Redis ,很多人已经忘记了还有另一个缓存方案 Ehcache ,是的,在 Redis 一统江湖的时代,Ehcache 渐渐有点没落了,不过,我们还是有必要了解下 Ehcache ,在有的场 ...
- Spring Boot2 系列教程(六)自定义 Spring Boot 中的 starter
我们使用 Spring Boot,基本上都是沉醉在它 Stater 的方便之中.Starter 为我们带来了众多的自动化配置,有了这些自动化配置,我们可以不费吹灰之力就能搭建一个生产级开发环境,有的小 ...
- Spring Boot2 系列教程(十八)Spring Boot 中自定义 SpringMVC 配置
用过 Spring Boot 的小伙伴都知道,我们只需要在项目中引入 spring-boot-starter-web 依赖,SpringMVC 的一整套东西就会自动给我们配置好,但是,真实的项目环境比 ...
- spring boot系列(一)spring boot 初识
什么是spring boot Spring Boot是由Pivotal团队提供的全新框架,其设计目的是用来简化新Spring应用的初始搭建以及开发过程.该框架使用了特定的方式来进行配置,从而使开发人员 ...
随机推荐
- jqgrid 获取远端数据失败时,弹出错误提示
有时,我们给jqgrid绑定的远端数据获取失败,此时,需要把错误信息反馈给用户展示,如何实现? 可通过jqgrid的 loadError 来处理错误数据的返回.详细如下: $("#jqGri ...
- CSS之Header--我的头部我做主
<div class='header'> <div class="header-left"> <span class='iconfont back-i ...
- 20155226 Exp2 后门原理与实践
20155226 Exp2 后门原理与实践 第一次实验博客交了蓝墨云未在博客园提交,链接 1.Windows获得Linux Shell 在windows下,打开CMD,使用ipconfig指令查看本机 ...
- 20155339 Exp3 免杀原理与实践
20155339 Exp3 免杀原理与实践 基础问题 (1)杀软是如何检测出恶意代码的? 基于特征码的检测(杀软的特征库中包含了一些数据或者数据段,杀软会尽可能的更新这个特征库,以包括尽可能多的恶意代 ...
- mfc Edit控件属性
设置Edit控件属性 窗口创建顺序 初始化Edit控件数据 一.设置Edit控件属性 .Align Text :Right 二.窗口创建顺序 CMywindowdlg: 窗口构造函数 OnCreate ...
- Hadoop日记Day14---MapReduce源代码回顾总结
一.回顾单词统计源码 package counter; import java.net.URI; import org.apache.hadoop.conf.Configuration; import ...
- CS229笔记:线性回归
线性回归问题 首先做一些符号上的说明: \(x^{(i)}\):特征(feature) \(y^{(i)}\):目标变量(target variables) \(\mathcal{X}\):特征空间 ...
- markdown 笔记二
Markdown 语法笔记==============================1,头部欢迎# 欢迎使用flaskBlog ------ flask对于我来说,适合快速开发一些小网页,自己也想整 ...
- Microsoft Dynamics CRM 增删改子表汇总子表的某个字段到主表的某个字段(通用插件)
背景 经常有某个汇总子表的数量到主表的总数量,或者汇总子表的总价到主表的总价这种需求. 传统的做法: 1.就是为每个子表实体单独写成一个插件,但是这样不好复用. 2.主表的汇总字段是汇总货币类型,但是 ...
- JVM源码---教你傻瓜式编译openjdk7(JAVA虚拟机爱好者必看)
LZ经过一个星期断断续续的研究,终于成功的搞定了JDK的成功编译与调试.尽管网络上的教程也有不少,包括源码中也有自带的编译步骤说明,但真正自己动手的话,还是会遇到不少意料之外的错误. 为了方便各位猿友 ...