
在EditText中限制输入,自定义样式,监听输入的字符,自动换行
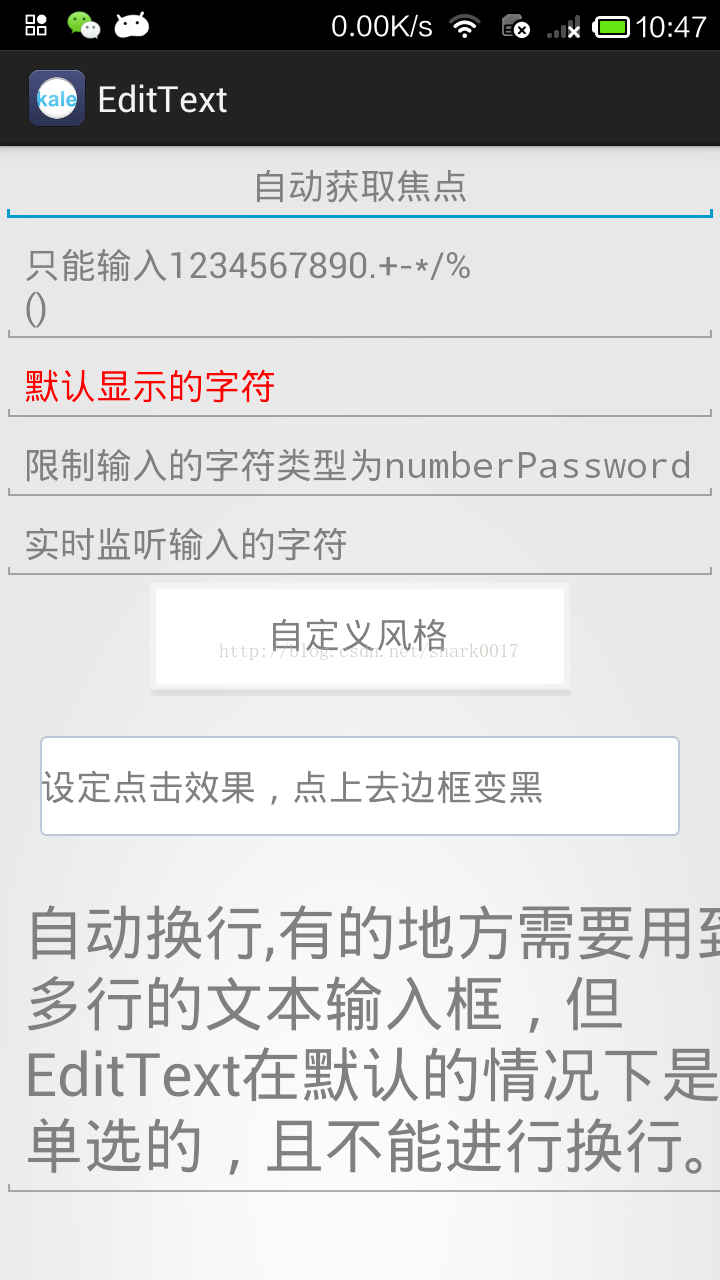
自动获取焦点
<!-- 添加:<requestFocus /> 会自动获取焦点 -->

    <EditText

        android:layout_width="match_parent"

        android:layout_height="wrap_content"

        android:ems="10"

        android:gravity="center_horizontal"

        android:hint="自动获取焦点">

        <requestFocus />

    </EditText>
限制输入的字符
<!-- android:digits="1234567890.+-*/%\n()" 限制输入的字符类型 -->

    <EditText

        android:layout_width="match_parent"

        android:layout_height="wrap_content"

        android:ems="10"

        android:hint="只能输入1234567890.+-*/%\n()"

        android:digits="1234567890.+-*/%\n()" />
设定颜色
    <!-- android:textColorHint="#FF0000"设定输入后的文字颜色 -->

    <EditText

        android:layout_width="match_parent"

        android:layout_height="wrap_content"

        android:hint="默认显示的字符"

        android:textColorHint="#FF0000"

        android:textColor="#00ff00"

        android:ems="10" />
监听输入的字符
    <EditText

        android:id="@+id/editText_id"

        android:imeOptions="actionSend"

        android:layout_width="match_parent"

        android:layout_height="wrap_content"

        android:hint="实时监听输入的字符"

        android:ems="10" />
package com.kale.edittext;

import android.app.Activity;

import android.os.Bundle;

import android.text.Editable;

import android.text.TextWatcher;

import android.view.KeyEvent;

import android.view.inputmethod.EditorInfo;

import android.widget.EditText;

import android.widget.TextView;

import android.widget.TextView.OnEditorActionListener;

import android.widget.Toast;

import com.kale.edittext.R;

public class MainActivity extends Activity {

    @Override

    protected void onCreate(Bundle savedInstanceState) {

        super.onCreate(savedInstanceState);

        setContentView(R.layout.activity_main);

        EditText eT = (EditText)findViewById(R.id.editText_id);

        eT.addTextChangedListener(new TextWatcher() {

            @Override

            public void onTextChanged(CharSequence s, int start, int before, int count) {

                // TODO 输入过程中,还在内存里,没到屏幕上

            }

            @Override

            public void beforeTextChanged(CharSequence s, int start, int count,

                    int after) {

                // TODO 在输入之前会触发的

            }

            @Override

            public void afterTextChanged(Editable s) {

                // TODO 输入完将要显示到屏幕上时会触发

                Toast.makeText(MainActivity.this, s.toString(), 0).show();

            }

        });

        /*阻止一进入Activity,editText就获得焦点弹出输入法对话框,

         * 只需要在AndroidManifest.xml相应的activity标签中加入下面这句话即可实现。

        android:windowSoftInputMode="stateHidden|adjustResize"

        <activity

            android:name=".booking.FlightOrderInfoActivity"

            android:screenOrientation="portrait"

            android:label="@string/app_name"

            android:windowSoftInputMode="stateHidden|adjustResize"/>*/

    }

}
自定义风格
<EditText

        android:layout_width="wrap_content"

        android:layout_height="wrap_content"

        android:hint="自定义风格"

        android:layout_gravity="center"

        android:gravity="center"

        style="@style/my_edittext_style"

        android:ems="10" />
styles.xml
    <!-- 先继承系统的editText风格,自己重写 -->

    <style name="my_edittext_style" parent="@android:style/Widget.EditText">

        <item name="android:background">@drawable/input_box_bg</item>

    </style>
设定点击效果,点上去后边框变黑。这里没用图片,是自己画的圆角
 <EditText

        android:id="@+id/editText1"

        android:layout_width="match_parent"

        android:layout_margin="20dp"

        android:layout_height="50dp"

        android:textColor="#FFFAFA"

        android:hint="设定点击效果,点上去边框变黑"

        android:background=<strong>"@drawable/bg_edittext"  </strong>

        android:ems="10" />
bg_edittext_focused.xml
<?xml version="1.0" encoding="utf-8"?>

<!-- 获得焦点的时候 -->

<shape xmlns:android="http://schemas.android.com/apk/res/android">

    <solid android:color="#FFFFFF" />

    <corners android:radius="3dip"/>

    <stroke

        android:width="1dip"

        android:color="#728ea3" />

</shape>
bg_edittext_normal.xml
<?xml version="1.0" encoding="utf-8"?>

<!-- 没有被选中的时候的背景图 -->

<shape xmlns:android="http://schemas.android.com/apk/res/android">

    <solid android:color="#FFFFFF" />

    <corners android:radius="3dip"/>

    <stroke

        android:width="1dip"

        android:color="#BDC7D8" />

</shape>
bg_edittext.xml
<?xml version="1.0" encoding="utf-8"?>

<selector xmlns:android="http://schemas.android.com/apk/res/android">

       <item

           android:state_window_focused="false"

           android:drawable="@drawable/bg_edittext_normal" />

       <item

           android:state_focused="true"

           android:drawable="@drawable/bg_edittext_focused" />

</selector>
自动换行
    <!-- 我们只要确保singleLine为false的话,并且设置宽度一定,就可以自动换行,注意在这里不要设置inputType -->

    <EditText

        android:layout_width="400dp"

        android:layout_height="wrap_content"

        android:hint="自动换行,有的地方需要用到多行的文本输入框,但EditText在默认的情况下是单选的,且不能进行换行。"

        android:textSize="30sp"

        android:singleLine="false"

        android:ems="10" />
整个的布局文件:
<LinearLayout xmlns:android="http://schemas.android.com/apk/res/android"

    android:layout_width="match_parent"

    android:layout_height="match_parent"

    android:orientation="vertical">

    <!-- 添加:<requestFocus /> 会自动获取焦点 -->

    <EditText

        android:layout_width="match_parent"

        android:layout_height="wrap_content"

        android:ems="10"

        android:gravity="center_horizontal"

        android:hint="自动获取焦点">

        <requestFocus />

    </EditText>

    <!-- android:digits="1234567890.+-*/%\n()" 限制输入的字符类型 -->

    <EditText

        android:layout_width="match_parent"

        android:layout_height="wrap_content"

        android:ems="10"

        android:hint="只能输入1234567890.+-*/%\n()"

        android:digits="1234567890.+-*/%\n()" />

    <!-- android:textColorHint="#FF0000"设定输入后的文字颜色 -->

    <EditText

        android:layout_width="match_parent"

        android:layout_height="wrap_content"

        android:hint="默认显示的字符"

        android:textColorHint="#FF0000"

        android:textColor="#00ff00"

        android:ems="10" />

    <!-- android:phoneNumber="true"被inputType替换了,现在用inputType来限制输入字符的类型 -->

    <EditText

        android:layout_width="match_parent"

        android:layout_height="wrap_content"

        android:ems="10"

        android:hint="限制输入的字符类型为numberPassword"

        android:inputType="numberPassword" />

    <EditText

        android:id="@+id/editText_id"

        android:imeOptions="actionSend"

        android:layout_width="match_parent"

        android:layout_height="wrap_content"

        android:hint="实时监听输入的字符"

        android:ems="10" />

    <EditText

        android:layout_width="wrap_content"

        android:layout_height="wrap_content"

        android:hint="自定义风格"

        android:layout_gravity="center"

        android:gravity="center"

        style="@style/my_edittext_style"

        android:ems="10" />

    <EditText

        android:id="@+id/editText1"

        android:layout_width="match_parent"

        android:layout_margin="20dp"

        android:layout_height="50dp"

        android:textColor="#FFFAFA"

        android:hint="设定点击效果,点上去边框变黑"

        android:background="@drawable/bg_edittext"

        android:ems="10" />

    <!-- 我们只要确保singleLine为false的话,并且设置宽度一定,就可以自动换行,注意在这里不要设置inputType -->

    <EditText

        android:layout_width="300dp"

        android:layout_height="wrap_content"

        android:hint="自动换行,有的地方需要用到多行的文本输入框,但EditText在默认的情况下是单选的,且不能进行换行。"

        android:textSize="30sp"

        android:singleLine="false"

        android:ems="10" />

</LinearLayout>
源码下载:http://download.csdn.net/detail/shark0017/7593127
在EditText中限制输入,自定义样式,监听输入的字符,自动换行的更多相关文章
- EditText 限制输入,自定义样式,监听输入的字符,自动换行
自动获取焦点 <!-- 添加:<requestFocus /> 会自动获取焦点 --> <EditText android:layout_width="matc ...
- Android EditText截获与监听输入事件
Android EditText截获与监听输入事件共有2种方法: 1.第一种方法:使用setOnKeyListener(),不过这种方式只能监听硬键盘事件. edittext.setOnKeyLi ...
- Unity3D热更新之LuaFramework篇[04]--自定义UI监听方法
时隔一个多月我又回来啦! 坚持真的是很难的一件事,其它事情稍忙,就很容易说服自己把写博客的计划给推迟了. 好在终于克服了自己的惰性,今天又开始了. 本篇继续我的Luaframework学习之路. 一. ...
- JavaEE开发之Spring中的事件发送与监听以及使用@Profile进行环境切换
本篇博客我们就来聊一下Spring框架中的观察者模式的应用,即事件的发送与监听机制.之前我们已经剖析过观察者模式的具体实现,以及使用Swift3.0自定义过通知机制.所以本篇博客对于事件发送与监听的底 ...
- EditTextUtil 监听输入字数
package com.toge.ta.utils; import android.text.Editable;import android.text.Selection;import android ...
- Android中Button的五种监听事件
简单聊一下Android中Button的五种监听事件: 1.在布局文件中为button添加onClick属性,Activity实现其方法2.匿名内部类作为事件监听器类3.内部类作为监听器4.Activ ...
- [问题贴]mui.openWindow+自定义事件监听操作让alert()执行两次
仔细看,Alert函数执行了两次 共两个页面:index.html和detail.html, detail.html为按钮设置了自定义事件监听(newsId),触发alert. 在index.html ...
- 用jquery监听输入数字的变化
<!DOCTYPE html><html> <head> <meta charset="UTF-8"> <title>& ...
- Android TV开发中所有的遥控器按键监听及注意事项,新增home键监听
原文:Android TV开发中所有的遥控器按键监听及注意事项,新增home键监听 简单记录下android 盒子开发遥控器的监听 ,希望能帮到新入门的朋友们 不多说,直接贴代码 public cla ...
随机推荐
- .NetCore Cap 注册 Consul 服务发现
注册服务发现 需要使用Cap中的UseDiscovery方法 具体用法如下 var capConsulConfig = Configuration.GetSection("CapConsul ...
- 解决连不上dl.google.com和dl-ssl.google.com
http://ping.chinaz.com/ 开发android遇到的最大问题就是Google被墙了,而我们的sdk又需要通过dl.google.com和dl-ssl.google.com去下载一些 ...
- 【AtCoder】AGC028 (A-E)题解
A - Two Abbreviations 如果有最小答案的话这个答案一定是N和M的lcm 我们考虑一下什么情况下 \(k \frac{L}{N} = h \frac{L}{M}\)且\(k,g\)互 ...
- 【Java】 大话数据结构(2) 线性表之单链表
本文根据<大话数据结构>一书,实现了Java版的单链表. 每个结点中只包含一个指针域的链表,称为单链表. 单链表的结构如图所示: 单链表与顺序存储结构的对比: 实现程序: package ...
- 使用SOCKET获取网页的内容
使用fsockopen()函数来实现获取页面信息,完整代码如下 //设置字符集(由于要抓取的网易网站字符集编码是gbk编码) header("content-type:text/html;c ...
- 移动端h5需要注意的一些事
1.移动端点击a标签出现的背景色 a, a:hover, a:active, a:visited, a:link, a:focus { -webkit-tap-highlight-color: rgb ...
- spring-boot集成Springfox-Swagger2
import org.springframework.context.annotation.Bean; import org.springframework.context.annotation.Co ...
- 基于jquery的垂直滚动触发器,多参数可设置。
最近闲来无事,多封装些功能性组件.后期会有更多放出来,大家可以多关注一下. 先上参数: type:"show", 默认为“show”,“show”意为当能够在可 ...
- C#开发Unity游戏教程之游戏对象的行为逻辑方法
C#开发Unity游戏教程之游戏对象的行为逻辑方法 游戏对象的行为逻辑——方法 方法(method),读者在第1章新建脚本时就见过了,而且在第2章对脚本做整体上的介绍时也介绍过,那么上一章呢,尽管主要 ...
- android 地图
========= Y:\AMap_Android_API_3DMap_Demo\android_studio\AMap3DDemo>keytool -v -list -keystore C:\ ...