基于Jquery插件Uploadify实现实时显示进度条上传图片
先了解了解Uploadify,具体内容如下
Uploadify是一个简单易用的多文件上传方案。作为一个Jquery插件,Uploadify使用简单,并具有高度的定制性。
Uploadify特性:
Uploadify简单说来,是基于Jquery的一款文件上传插件。它的功能特色总结如下:
1)、支持单文件或多文件上传,可控制并发上传的文件数
2)、在服务器端支持各种语言与之配合使用,诸如PHP,.NET,Java……
3)、通过参数可配置上传文件类型及大小限制
4)、通过参数可配置是否选择文件后自动上传
5)、易于扩展,可控制每一步骤的回调函数(onSelect, onCancel……)
6)、通过接口参数和CSS控制外观
7)、提供上传进度的事件回调,实时显示上传进度
8)、开始之前要先下载插件安装包到本地并引用,详细实现请看代码注释,下面开始代码。
1、html代码
|
1
2
3
4
5
6
7
8
9
10
11
12
13
14
15
16
17
18
19
20
21
22
23
24
25
26
27
28
29
30
31
32
33
34
35
36
37
38
|
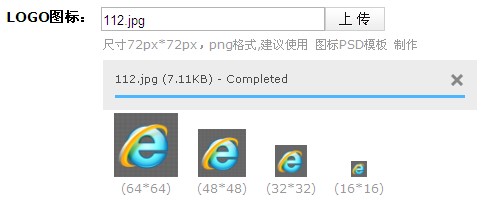
<div id="webApplogo_file" style="display: block; width: 800px; "> <ul> <li style="margin-left: 213px;"><span class="black_blod14">LOGO图标:</span></li> <li style="margin-left: 3px;"> <input type="text" readonly="readonly" id="text_webApplogo" name="app_logo" class="appipt1" value="<%=applogo %>" /></li> <li style="padding-top: 1px;"> <input type="file" id="webApplogo" name="webApplogo" /> </li> <li><span style="display: none; margin-left: 5px; padding-left: 20px; color: #EA5200; font-size: 12px; background: url('Images/icon_03.gif' ) no-repeat 0px 0px;" id="textporApplogo"> 请上传LOGO图标!</span></li> <li style="margin-left: 220px;"><span class="grey999" style="margin-left: 90px; float: left;"> 尺寸72px*72px,png格式,建议使用 图标PSD模板 制作</span> <div id="QID_webApplogo" class="fileQueue"></div> <table id="webApplogo_tab" width="50%" border="0" cellspacing="0" cellpadding="0" align="center" class="grey999" style="display: none; margin-left: 90px; float: left;"> <tr> <td align="center" valign="bottom"> <img style="width: 64px; height: 64px;" id="img_64" src="images/icon_02.gif" border="0" /><br /> (64*64) </td> <td align="center" valign="bottom"> <img style="width: 48px; height: 48px;" id="img_48" src="images/icon_02.gif" border="0" /><br /> (48*48) </td> <td align="center" valign="bottom"> <img style="width: 32px; height: 32px;" id="img_32" src="images/icon_02.gif" border="0" /><br /> (32*32) </td> <td align="center" valign="bottom"> <img style="width: 16px; height: 16px;" id="img_16" src="images/icon_02.gif" border="0" /><br /> (16*16) </td> </tr> </table> </li> </ul> </div> |
2、Javascript代码(关键部分)
|
1
2
3
4
5
6
7
8
9
10
11
12
13
14
15
16
17
18
19
20
21
22
23
24
25
26
27
28
29
30
31
32
33
34
35
36
37
38
39
40
41
42
43
44
|
$("#webApplogo").uploadify({ 'uploader': 'js/uploadify-v2.1.4/uploadify.swf',//进度条,Uploadify里面含有 'script': 'UploadApplogo.ashx',//一般处理程序 'cancelImg': 'js/uploadify-v2.1.4/cancel.png',//取消图片路径 'folder': 'Imagelogo',//上传文件夹名 'auto': true, //文件添加到上传队列后,自动进行上传。默认为false 'multi': false,//是否允许多文件上传。默认为false 'fileExt':'*.gif;*.jpg;*.jpeg;*.png',//允许上传的文件类型,使用分号(”;)”分割 例如:*.jpg;*.gif,默认为null(所有文件类型) 'fileDesc':'不超过2M的图片 (*.gif;*.jpg;*.png)', 'sizeLimit': 2048000, //允许上传的文件大小(kb) 此为2M 'onSelectOnce': function(event,data) { //在单文件或多文件上传时,选择文件时触发 //event 事件对象(the event object) //data 选择的操作信息 //data.filesSelected 选择文件操作中选中的文件数量 $('#status-message').text(data.filesSelected + ' 文件正在等待上传…….'); }, 'onComplete': function(event, queueID, fileObj, response, data) {//当单个文件上传完成后触发 //event:事件对象(the event object) //ID:该文件在文件队列中的唯一表示 //fileObj:选中文件的对象,他包含的属性列表 //response:服务器端返回的Response文本,我这里返回的是处理过的文件名称 //data:文件队列详细信息和文件上传的一般数据 alert("文件:" + fileObj.name + " 上传成功!"); //设置图片名称 $("#applogo").attr("value",response); //设置输入框的值 $("#text_webApplogo").attr("value",fileObj.name); //设置图片路径 $("#img_64").attr("src","Imagelogo/64_"+response); $("#img_48").attr("src","Imagelogo/48_"+response); $("#img_32").attr("src","Imagelogo/32_"+response); $("#img_16").attr("src","Imagelogo/16_"+response); //图片路径设置完成后,显示图片 $("#webApplogo_tab").css("display","block"); }, 'onError': function(event, queueID, fileObj) {//当单个文件上传出错时触发 alert("文件:" + fileObj.name + " 上传失败!"); }, 'buttonImg':'Images/bn_04.gif',//浏览按钮的图片路径 'width':60,//浏览按钮的宽和高 'height':24 ,'queueID':'QID_webApplogo'//页面上作为文件上传队列的元素的ID }); |
3、服务器端处理文件上传
|
1
2
3
4
5
6
7
8
9
10
11
12
13
14
15
16
17
18
19
20
21
22
23
24
25
26
27
28
29
30
31
32
33
34
35
36
37
38
39
40
41
42
43
44
45
46
47
48
49
50
51
52
53
54
55
56
57
58
59
60
61
62
63
64
65
66
67
68
69
70
71
72
73
74
75
76
77
78
79
80
81
82
83
84
85
86
87
88
89
90
91
92
93
94
95
|
/// <summary> /// 上传文件 /// </summary> public class UploadApplogo : IHttpHandler { System.Drawing.Image image, image64, image48, image32, image16; //定义image类的对象 protected string imagePath;//图片路径 protected string imageType;//图片类型 protected string imageName;//图片名称 protected string fileName;//图片名称 //提供一个回调方法,用于确定Image对象在执行生成缩略图操作时何时提前取消执行 //如果此方法确定 GetThumbnailImage 方法应提前停止执行,则返回 true;否则返回 false System.Drawing.Image.GetThumbnailImageAbort callb = null; public void ProcessRequest(HttpContext context) { context.Response.ContentType = "text/plain"; HttpPostedFile UploadImage = context.Request.Files["FileData"]; //物理路径 string uploadpath = HttpContext.Current.Server.MapPath(context.Request["folder"] + "\\"); if (UploadImage != null) { //是否有目录,如没有就创建 if (!Directory.Exists(uploadpath)) { Directory.CreateDirectory(uploadpath); } //客户端文件完全名称 string filename = UploadImage.FileName; string extname = filename.Substring(filename.LastIndexOf(".") + 1); //为不重复,设置文件名 fileName = Guid.NewGuid().ToString() + "." + extname; //context.Response.Write("1"); context.Response.Write(fileName); } else { context.Response.Write("0"); } string mPath; imagePath = UploadImage.FileName; //取得图片类型 imageType = imagePath.Substring(imagePath.LastIndexOf(".") + 1); //取得图片名称 imageName = imagePath.Substring(imagePath.LastIndexOf("\\") + 1); Stream imgStream = UploadImage.InputStream;//流文件,准备读取上载文件的内容 int imgLen = UploadImage.ContentLength;//上载文件大小 //建立虚拟路径 mPath = HttpContext.Current.Server.MapPath(context.Request["folder"]); //保存到虚拟路径 UploadImage.SaveAs(mPath + "\\" + fileName); ////显示原图 //imageSource.ImageUrl = "upFile/" + imageName; //为上传的图片建立引用 image = System.Drawing.Image.FromFile(mPath + "\\" + fileName); //生成缩略图 image64 = image.GetThumbnailImage(64, 64, callb, new System.IntPtr()); //把缩略图保存到指定的虚拟路径 image64.Save(HttpContext.Current.Server.MapPath(context.Request["folder"]) + "\\64_" + fileName); //释放image64对象的资源 image64.Dispose(); //生成缩略图 image48 = image.GetThumbnailImage(48, 48, callb, new System.IntPtr()); image48.Save(HttpContext.Current.Server.MapPath(context.Request["folder"]) + "\\48_" + fileName); image48.Dispose(); //生成缩略图 image32 = image.GetThumbnailImage(32, 32, callb, new System.IntPtr()); image32.Save(HttpContext.Current.Server.MapPath(context.Request["folder"]) + "\\32_" + fileName); image32.Dispose(); //生成缩略图 image16 = image.GetThumbnailImage(16, 16, callb, new System.IntPtr()); image16.Save(HttpContext.Current.Server.MapPath(context.Request["folder"]) + "\\16_" + fileName); image16.Dispose(); //释放image对象占用的资源 image.Dispose(); } public bool IsReusable { get { return false; } } } |
4、效果如下
更多精彩内容,请点击《jQuery上传操作汇总》,进行深入学习和研究。
以上就是本文的全部内容,希望对大家的学习有所帮助。
基于Jquery插件Uploadify实现实时显示进度条上传图片的更多相关文章
- 使用Uploadify实现上传图片生成缩略图例子,实时显示进度条
不了解Uploadify的,先看看前一篇详细说明 http://www.cnblogs.com/XuebinDing/archive/2012/04/26/2470995.html Uploadify ...
- Jquery.Uploadify实现批量上传显示进度条 取消 上传后缩略图显示 可删除
<%@ Page Language="C#" AutoEventWireup="true" CodeFile="UpLoad.aspx.cs&q ...
- jQuery文件上传插件jQuery Upload File 有上传进度条
jQuery文件上传插件jQuery Upload File 有上传进度条 jQuery文件上传插件jQuery Upload File,插件使用简单,支持单文件和多文件上传,支持文件拖拽上传,有进度 ...
- 基于jQuery悬停弹出遮罩显示按钮代码
今天给大家分享一款基于jQuery悬停弹出遮罩显示按钮代码.这是是一款当鼠标悬停在图片上后,会出现一系列的按钮,文字等弹性动画效果.效果图如下: 在线预览 源码下载 实现的代码. html代码: ...
- 一款基于jquery带百分比的响应式进度加载条
今天要给大家带来一款基于jquery带百分比的响应式进度加载条.这款加载条非常漂亮,而且带有进度的百度比,且在不同的百分比用的是不同的颜色.而且这款加载条采用了响应式设计,在不同的分辨率的显示器下完美 ...
- ASP.NET Jquery+ajax上传文件(带进度条)
效果图 支持ie6+,chrome,ie6中文文件名会显示乱码. 上传时候会显示进度条. 需要jquery.uploadify.js插件,稍后会给出下载 前台代码 <%@ Page Langua ...
- HTML5 + AJAX ( jQuery版本 ) 文件上传带进度条
页面技术:HTML5 + AJAX ( jQuery) 后台技术:Servlet 3.0 服务器:Tomcat 7.0 jQuery版本:1.9.1 Servlet 3.0 代码 package or ...
- Asp.Net实现无刷新文件上传并显示进度条(非服务器控件实现)(转)
Asp.Net实现无刷新文件上传并显示进度条(非服务器控件实现) 相信通过Asp.Net的服务器控件上传文件在简单不过了,通过AjaxToolkit控件实现上传进度也不是什么难事,为什么还要自己辛辛苦 ...
- (委托事件处理)关于多线程执行显示进度条的实例(转)&&线程间操作无效: 从不是创建控件“rtxtEntryNO”的线程访问它。
关于多线程执行显示进度条的实例! 之前回答了一篇关于怎么在线程中操作进度条的帖子,估计有人看的不是很明白今天没事,写了一个小小的实例,很简单,就2个文件权当抛砖引玉,希望有更好解决方案的人发表一下意见 ...
随机推荐
- Groovy常用语法汇总
基本语法 1.Grovvy的注释分为//和/**/和java的一样. 2.Grovvy语法可以不已分号结尾. 3.单引号,里面的内容严格的对应java中的String,不对$符号进行转义. def s ...
- 配置jdk环境变量和配置的作用
对于JDK要配置三个环境变量,分别是JAVA_HOME.path.classpath 对于我本人电脑来说,配置如下: JAVA_HOME:C:\Program Files\Java\jdk1.8.0_ ...
- 零基础入门学习Python(2)--用Python设计第一个游戏
前言 小甲鱼的Python课程都是围绕着一个个小游戏,进行Python的讲解,由易入难. 小游戏流程图 Created with Raphaël 2.1.2Startprint('---------- ...
- PHP经典算法集锦【经典收藏】
本文实例总结了PHP经典算法.分享给大家供大家参考,具体如下: 1.首先来画个菱形玩玩,很多人学C时在书上都画过,咱们用PHP画下,画了一半. 思路:多少行for一次,然后在里面空格和星号for一次. ...
- python字符串,常用编码
Python的字符串和编码 1.常用编码 与python有关的编码主要有:ASCII.Unicode.UTF-8 其中ASCII如今可以视作UTF-8的子集 内存中统一使用Unicode编码(如记事本 ...
- 13Spring通过注解配置Bean(1)
配置Bean的形式:基于XML文件的方式:基于注解的方式(基于注解配置Bean:基于注解来装配Bean的属性) 下面介绍基于注解的方式来配置Bean. ——组件扫描(component scannin ...
- Linux基础命令回顾
前言 说到linux基础命令,网上一搜一箩筐,想学也有很多教程,如果你不幸看到此篇文章,想看就认真看完,毕竟你点进来了不是嘛? 我每次写的文章都是为了分享自己的学习成果或重要知识点,希望能帮助更多的人 ...
- linux中的命令
1,ln-链接 功能是为某一个文件在另外一个位置建立一个同步的链接,这个命令最常用的参数是-s,具体用法是: ln -s 源文件 目标文件 // -s 是 symbolic(符号,象征)的意思. l ...
- nyoj 96 n-1位数(处理前导 0 的情况)(string)
n-1位数 时间限制:3000 ms | 内存限制:65535 KB 难度:1 描述 已知w是一个大于10但不大于1000000的无符号整数,若w是n(n≥2)位的整数,则 ...
- 7-10 公路村村通(30 分)(最小生成树Prim算法)
7-10 公路村村通(30 分) 现有村落间道路的统计数据表中,列出了有可能建设成标准公路的若干条道路的成本,求使每个村落都有公路连通所需要的最低成本. 输入格式: 输入数据包括城镇数目正整数N(≤1 ...