ES--在windows上快速安装
环境准备
java环境部署:
Java安装的时候,我使用的是默认安装,一路下一步即可;亦可自定义安装路径;
ES下载路径:
https://www.elastic.co/downloads/past-releases/elasticsearch-5-2-0
Kinaba下载路径
https://www.elastic.co/downloads/past-releases/kibana-5-2-0
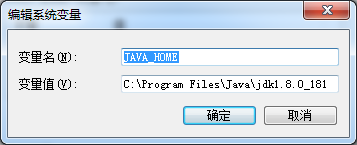
Java安装完成后,接下来设置Java环境变量
我这里使用的是默认安装路径:C:\Program Files\Java\jdk1.8.0_181
设置步骤:如下图所示(右键单击计算机,打开属性)
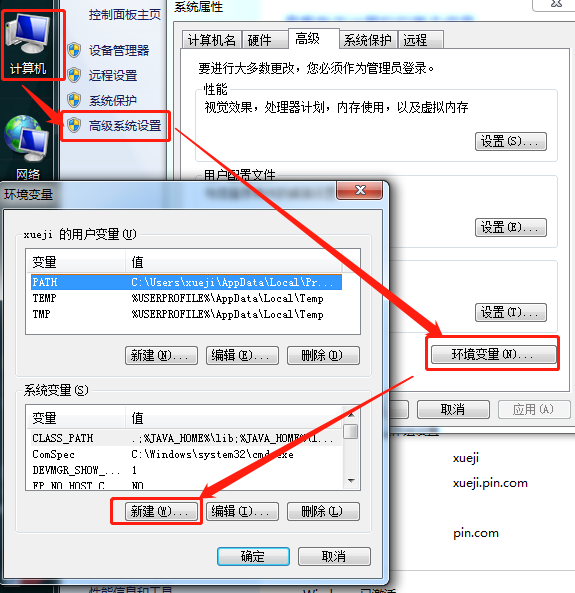
新建内容:
再次新建
变量名:CLASS_PATH
变量值:.;%JAVA_HOME%\lib;%JAVA_HOME%\lib\dt.jar;%JAVA_HOME%\lib\tools.jar;(一定要注意;前面的“.”)
设置PATH:
在PATH的值中,前面加上:%JAVA_HOME%\bin;%JAVA_HOME%\jre\bin;
设置完成后的path的变量内容如下图:

验证:

安装ES及kinaba
将下载下来的压缩包解压(我这里解压的是在D:\ES\elasticsearch-5.2.0),kinaba解压的目录是在(D:\ES\kibana-5.2.0-windows-x86)
在dos命令行下查看并启动ES及kinaba

启动成功的时候看下图:

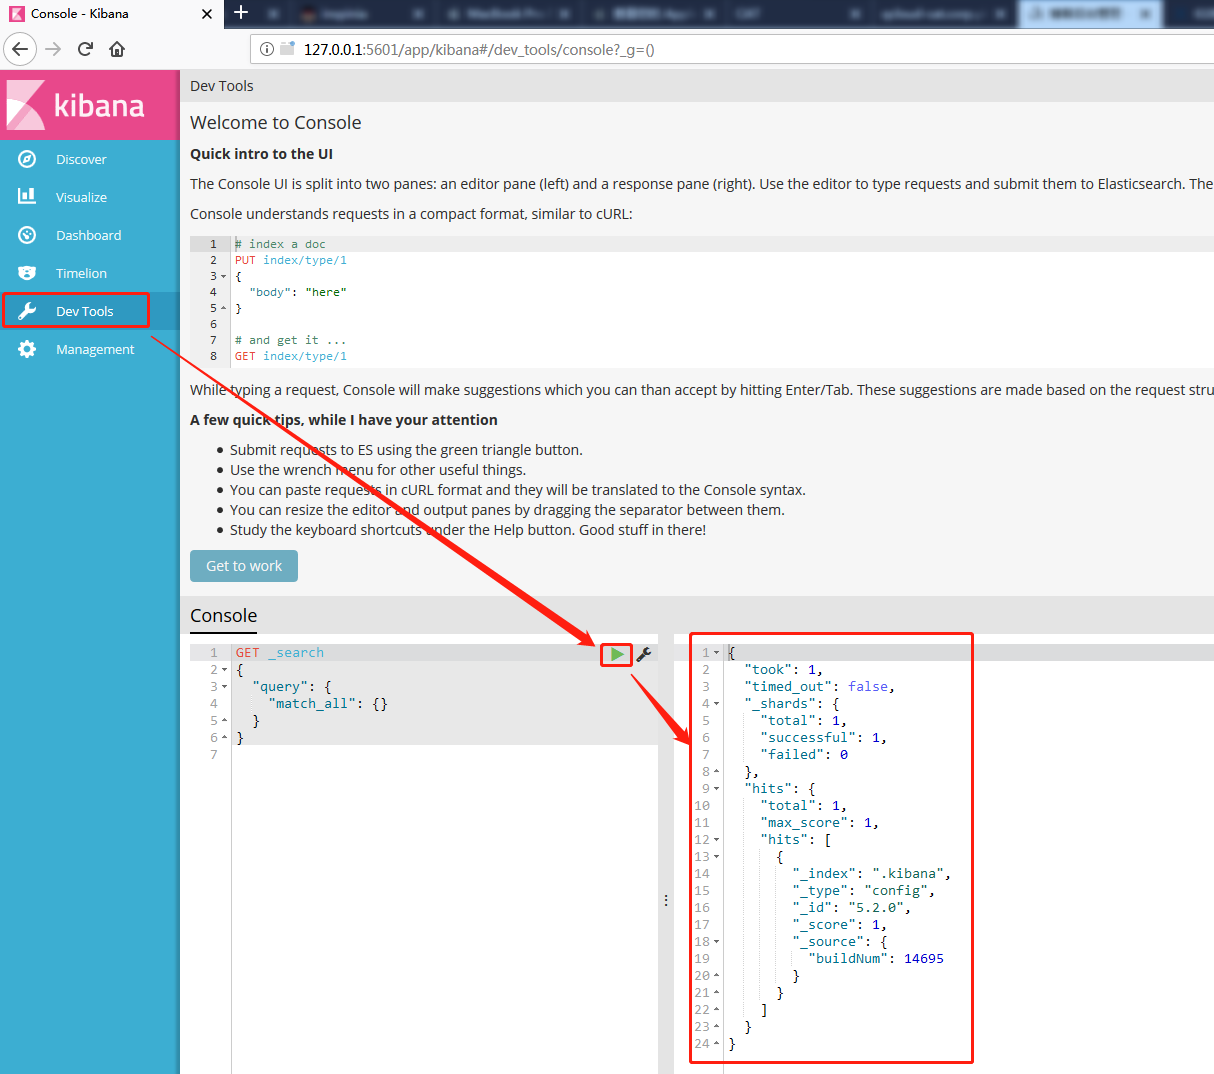
启动kinaba

浏览器访问
Elsticsearch的网页状态

kinaba的网页状态
到此安装结束,接下来顺便说下ES及kinaba的一些操作和配置文件
首先在kinaba上可以查看ES集群的健康状态

ES的配置文件
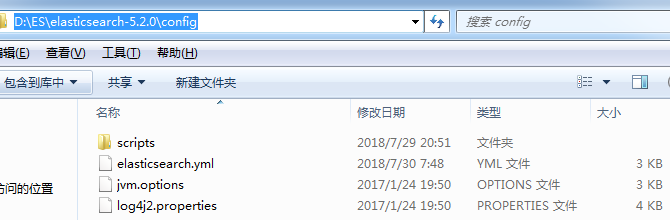
elasticsearch.yml的内容
# ======================== Elasticsearch Configuration =========================

#

# NOTE: Elasticsearch comes with reasonable defaults for most settings.

#       Before you set out to tweak and tune the configuration, make sure you

#       understand what are you trying to accomplish and the consequences.

#

# The primary way of configuring a node is via this file. This template lists

# the most important settings you may want to configure for a production cluster.

#

# Please consult the documentation for further information on configuration options:

# https://www.elastic.co/guide/en/elasticsearch/reference/index.html

#

# ---------------------------------- Cluster -----------------------------------

#

# Use a descriptive name for your cluster:

#

#cluster.name: my-application #这里可以修改集群的名字

cluster.name: ES-Test-application

#

# ------------------------------------ Node ------------------------------------

#

# Use a descriptive name for the node:

#

#node.name: node-1  #节点的名字

#

# Add custom attributes to the node:

#

#node.attr.rack: r1

#

# ----------------------------------- Paths ------------------------------------

#

# Path to directory where to store the data (separate multiple locations by comma):

#

#path.data: /path/to/data #数据存放路径

#

# Path to log files:

#

#path.logs: /path/to/logs #日志路径

#

# ----------------------------------- Memory -----------------------------------

#

# Lock the memory on startup:

#

#bootstrap.memory_lock: true

#

# Make sure that the heap size is set to about half the memory available

# on the system and that the owner of the process is allowed to use this

# limit.

#

# Elasticsearch performs poorly when the system is swapping the memory.

#

# ---------------------------------- Network -----------------------------------

#

# Set the bind address to a specific IP (IPv4 or IPv6):

#

#network.host: 192.168.0.1

#

# Set a custom port for HTTP:

#

#http.port: 9200   #端口号

#

# For more information, consult the network module documentation.

#

# --------------------------------- Discovery ----------------------------------

#

# Pass an initial list of hosts to perform discovery when new node is started:

# The default list of hosts is ["127.0.0.1", "[::1]"]

#

#discovery.zen.ping.unicast.hosts: ["host1", "host2"]

#

# Prevent the "split brain" by configuring the majority of nodes (total number of master-eligible nodes / 2 + 1):

#

#discovery.zen.minimum_master_nodes: 3

#

# For more information, consult the zen discovery module documentation.

#

# ---------------------------------- Gateway -----------------------------------

#

# Block initial recovery after a full cluster restart until N nodes are started:

#

#gateway.recover_after_nodes: 3

#

# For more information, consult the gateway module documentation.

#

# ---------------------------------- Various -----------------------------------

#

# Require explicit names when deleting indices:

#

#action.destructive_requires_name: true
其他配置及操作见下一篇!
ES--在windows上快速安装的更多相关文章
- 在 Windows 上快速安装并运行 Laravel 5.x
安装 PHP 注意一:Laravel 5.0 开始对 PHP 版本的要求是 >=5.4,Laravel 5.1 要求 PHP 版本>=5.5.9,所以,建议大家尽量安装 5.5.x 的最新 ...
- laravel5.2/laravel5.3入门指南 Windows 上快速安装并运行 Laravel 5.x
1 首先要搭建本地服务器环境推荐phpstudy2016及wampServer3.0.6 下载链接可参考 http://www.cnblogs.com/zzcit/p/5823742.html 注意一 ...
- Windows上快速编译caffe CPU版本
windows上快速安装配置Caffe的 cpu_only环境. 一:安装环境: 1.windows10: 2.Visual Studio2013: 3.Caffe版本:http://github.c ...
- WAMP Server助你在Windows上快速搭建PHP集成环境
WAMP Server助你在Windows上快速搭建PHP集成环境 原文地址 我想只要爬过几天网的同学都会知道PHP吧,异次元的新版本就是基于PHP的WordPress程序制造出来的,还有国内绝大部分 ...
- Windows下快速安装CACTI流量监控
Windows下快速安装CACTI流量监控 原文 http://os.51cto.com/art/201111/300977.htm CACTI是一套PHP程序,它利用SNMPGET采集数据,使用R ...
- jinkins在windows上的安装 配置C#编译
首先jinkins在windows上的安装就不说,安装只需要下载相应安装包就可以了,后有些时候经常需要修改端口号.修改如下: 然后重启jenkins服务 首次运行界面 个人建议插件按需安装. 建立一个 ...
- (转)windows上virtualenv 安装及使用
[注意]要在某个含有空格的目录下面创建virtualenv环境,就要安装 win32api . 原文地址:http://blog.csdn.net/liuchunming033/article/det ...
- 一步步实现windows版ijkplayer系列文章之六——SDL2源码分析之OpenGL ES在windows上的渲染过程
一步步实现windows版ijkplayer系列文章之一--Windows10平台编译ffmpeg 4.0.2,生成ffplay 一步步实现windows版ijkplayer系列文章之二--Ijkpl ...
- git在windows上的安装和简单使用
git在windows上的安装和简单使用. 参考: https://git-scm.com/book/zh/v1/Git-%E5%9F%BA%E7%A1%80-%E8%BF%9C%E7%A8%8B%E ...
- Windows上PostgreSQL安装配置教程
Windows上PostgreSQL安装配置教程 这篇文章主要为大家详细介绍了Windows上PostgreSQL安装配置教程,具有一定的参考价值,感兴趣的小伙伴们可以参考一下 PostgreSQL的 ...
随机推荐
- debian iptables持久化
1 保存iptables iptables-save > /etc/iptables.rules 2 创建启动文件 touch /etc/network/if-pre-up.d/iptabl ...
- PHP获取类名及所有函数名
PHP获取当前类名.方法名 __CLASS__ 获取当前类名 __FUNCTION__ 当前函数名(confirm) __METHOD__ 当前方法名 (bankcard::confirm) _ ...
- 如何去掉idea里mybatis的.xml文件 sql 语句背景色
点击有背景的地方 Alt+Enter选择 un-inject Language/refence 即可去掉
- codeforces 690C1 C1. Brain Network (easy)(水题)
题目链接: C1. Brain Network (easy) time limit per test 2 seconds memory limit per test 256 megabytes inp ...
- Ubuntu bitnami gitlab 安装
/************************************************************************************** * Ubuntu bit ...
- bzoj2839
容斥原理+组合数学 看见这种恰有k个的题一般都是容斥原理,因为恰有的限制比较强,一般需要复杂度较高的方法枚举,而容斥就是转化为至少有k个,然后通过容斥原理解决 我们先选出k个元素作为交集,有C(n,k ...
- 【旧文章搬运】超级无敌大炉子的LzOpenProcess
原文发表于百度空间,2008-11-20========================================================================== 这个东西嘛 ...
- 通过链接将JSP页面中一变量传到另一JSP界面中
A.jsp 发送 <a herf="B.jsp?name=<%=name%>">传递到B页面</a> B.jsp 接收 <%String ...
- git stash和git stash pop(转载)
转自:http://www.cnblogs.com/highriver/archive/2012/01/05/2313808.html zz: http://blog.csdn.net/herbert ...
- 786. K-th Smallest Prime Fraction
A sorted list A contains 1, plus some number of primes. Then, for every p < q in the list, we co ...