
python笔记之发送邮件
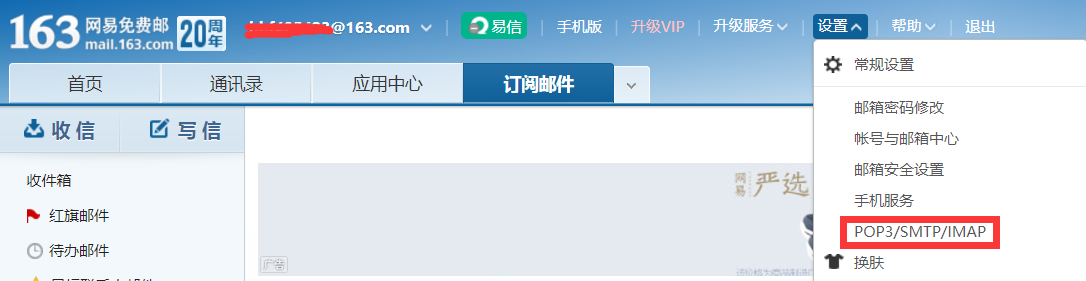

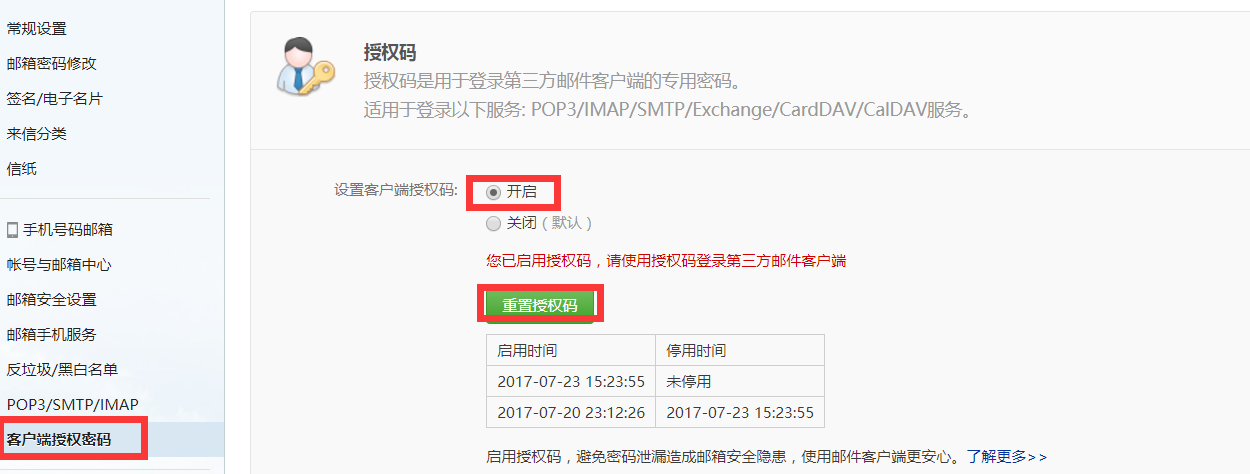
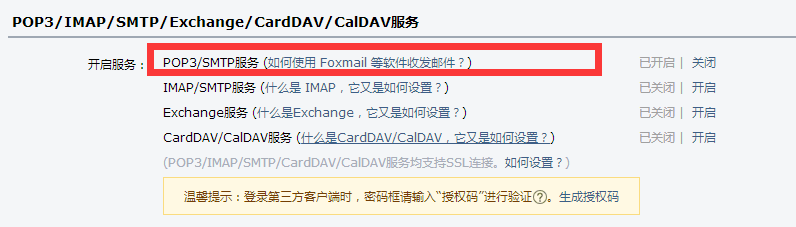

设置完成之后一定要记得保存
import smtplib

from email.mime.text import MIMEText

def send_mail(username, passwd, recv, title, content, mail_host='smtp.163.com', port=25):

    '''

    发送邮件函数,默认使用163smtp

    :param username: 邮箱账号 xx@163.com

    :param passwd: 邮箱授权码,不是邮箱密码

    :param recv: 邮箱接收人地址,多个账号以逗号隔开

    :param title: 邮件标题

    :param content: 邮件内容

    :param mail_host: 邮箱服务器

    :param port: 端口号

    :return:

    '''

    msg = MIMEText(content)  # 邮件内容

    msg['Subject'] = title  # 邮件主题

    msg['From'] = username  # 发送者账号

    msg['To'] = recv  # 接收者账号列表

    smtp = smtplib.SMTP(mail_host, port=port)  # 连接邮箱,传入邮箱地址,和端口号,smtp的端口号是25

    smtp.login(username, passwd)  # 发送者的邮箱账号,密码

    smtp.sendmail(username, recv, msg.as_string())

    # 参数分别是发送者,接收者,第三个是把上面的发送邮件的内容变成字符串

    smtp.quit()  # 发送完毕后退出smtp

    print('email send success.')

if __name__ =="__main__":

    email_user = 'xxxxx@163.com'  # 发送者账号

    email_pwd = 'xxxxx'  # 发送者邮箱授权码

    maillist = 'xxxx@qq.com'#收件邮箱

    title = '测试邮件标题'

    content = '这里是邮件内容'

    send_mail(email_user, email_pwd, maillist, title, content)
2.qq邮箱发送邮件
import smtplib

from email.mime.text import MIMEText

'''

:param mail_host: 邮箱服务器,qq邮箱host:  smtp.qq.com

:param port: 端口号,qq邮箱的默认端口是: 465

:param username: 邮箱账号 xx@qq.com

:param passwd: 邮箱密码(不是邮箱的登录密码,是邮箱的授权码)

:param recv: 邮箱接收人地址,多个账号以逗号隔开

:param title: 邮件标题

:param content: 邮件内容

:return:

'''

#qq邮箱发送邮件

def send_mail(username, passwd, recv, title, content, mail_host='smtp.qq.com', port=465):

    msg = MIMEText(content)    # 邮件内容

    msg['Subject'] = title     # 邮件主题

    msg['From'] = username     # 发送者账号

    msg['To'] = recv           # 接收者账号列表

    smtp = smtplib.SMTP_SSL(mail_host, port=port)      # 连接邮箱,传入邮箱地址,和端口号,smtp的端口号是465

    smtp.login(username, passwd)                   # 登录发送者的邮箱账号,密码

    # 参数分别是 发送者,接收者,第三个是把上面的发送邮件的 内容变成字符串

    smtp.sendmail(username, recv, msg.as_string())

    smtp.quit()  # 发送完毕后退出smtp

    print('email send success.')

if __name__ == '__main__':

    email_user = 'xxx@qq.com'  # 发送者账号

    email_pwd = 'xxxx'  # 发送者密码,授权码

    maillist = 'xxx@qq.com'

    title = '测试邮件标题'

    content = '这里是邮件内容'

    send_mail(email_user, email_pwd, maillist, title, content)
3.发送给多人带多个附件的邮件
import smtplib

from email.mime.text import MIMEText

from email.mime.multipart import MIMEMultipart

class SendMail(object):

    def __init__(self, username, passwd, recv, title, content, file=None, email_host='smtp.163.com', port=25):

        self.username = username

        self.passwd = passwd

        self.recv = recv

        self.title = title

        self.content = content

        self.file = file

        self.email_host = email_host

        self.port = port

    def send_mail(self):

        msg = MIMEMultipart()

        #发送内容的对象

        if self.file:#处理附件的

            att = MIMEText(open(self.file, encoding='utf-8').read())#如果图片,指定一下打开模式'rb'

            att["Content-Type"] = 'application/octet-stream'

            att["Content-Disposition"] = 'attachment; filename="%s"'%self.file

            att2 = MIMEText(open(self.file, encoding='utf-8').read())

            att2["Content-Type"] = 'application/octet-stream'

            att2["Content-Disposition"] = 'attachment; filename="%s"' % self.file

            msg.attach(att)

            msg.attach(att2)

        msg.attach(MIMEText(self.content))#邮件正文的内容

        msg['Subject'] = self.title  # 邮件主题

        msg['From'] = self.username  # 发送者账号

        #将多个账号'xxx@qq.com;xxx@163.com' 以分号分割,分割为list

        self.recv = self.recv.split(';')

        if isinstance(self.recv, list):

            msg['To'] = ','.join(self.recv)

        else:

            msg['To'] = self.recv  # 接收者账号列表

        if self.username.endswith('qq.com'):  #如果发送者是qq邮箱

            self.smtp = smtplib.SMTP_SSL(self.email_host, port=self.port)

        else:

            self.smtp = smtplib.SMTP(self.email_host, port=self.port)

        #发送邮件服务器的对象

        self.smtp.login(self.username, self.passwd)

        try:

            self.smtp.sendmail(self.username, self.recv, msg.as_string())

        except Exception as e:

            print('出错了。。', e)

        else:

            print('发送成功!')

        self.smtp.quit()

if __name__ == '__main__':

    m = SendMail(

        username='xxx@163.com', passwd='xxx',file='hhf.txt', recv='xx@qq.com;xx@qq.com',

        title='多个收件人', content='eee', email_host='smtp.163.com', port=25

    )

    m.send_mail()
python笔记之发送邮件的更多相关文章
- python笔记- 发送邮件
依赖: Python代码实现发送邮件,使用的模块是smtplib.MIMEText,实现代码之前需要导入包: import smtplib from email.mime.text import MI ...
- Python笔记之不可不练
如果您已经有了一定的Python编程基础,那么本文就是为您的编程能力锦上添花,如果您刚刚开始对Python有一点点兴趣,不怕,Python的重点基础知识已经总结在博文<Python笔记之不可不知 ...
- python笔记 - day3
python笔记 - day3 参考:http://www.cnblogs.com/wupeiqi/articles/5453708.html set特性: 1.无序 2.不重复 3.可嵌套 函数: ...
- boost.python笔记
boost.python笔记 标签: boost.python,python, C++ 简介 Boost.python是什么? 它是boost库的一部分,随boost一起安装,用来实现C++和Pyth ...
- 20.Python笔记之SqlAlchemy使用
Date:2016-03-27 Title:20.Python笔记之SqlAlchemy使用 Tags:python Category:Python 作者:刘耀 博客:www.liuyao.me 一. ...
- Python笔记——类定义
Python笔记——类定义 一.类定义: class <类名>: <语句> 类实例化后,可以使用其属性,实际上,创建一个类之后,可以通过类名访问其属性 如果直接使用类名修改其属 ...
- 13.python笔记之pyyaml模块
Date:2016-03-25 Title:13.Python笔记之Pyymal模块使用 Tags:Python Category:Python 博客地址:www.liuyao.me 作者:刘耀 YA ...
- 8.python笔记之面向对象基础
title: 8.Python笔记之面向对象基础 date: 2016-02-21 15:10:35 tags: Python categories: Python --- 面向对象思维导图 (来自1 ...
- python笔记 - day8
python笔记 - day8 参考: http://www.cnblogs.com/wupeiqi/p/4766801.html http://www.cnblogs.com/wupeiqi/art ...
随机推荐
- Snail—UI学习之自己定义通知NSNotification
背景是:一个界面跳转到第二个界面 然后 第一个界面发了一个通知 然后第二个界面收到这个通知后 把里面的数据取出来 在RootViewController.m中写入以下代码 #import " ...
- python 除法总返回浮点
python 除法总返回浮点,要返回整型需要用//: print(type(4/2),type(4//2)) #<class 'float'> <class 'int'>
- 新博客有了,文章转移到 http://www.iosxxx.com/
文章转移到 http://www.iosxxx.com/ ,敬请大家关注
- 我的CSDN博客停止更新通告
我的CSDN博客停止更新通告 自从2001年在CSDN发表第一篇博客開始,至今天(2014年6月11日)为止,算起来我己经在CSDN博客上"呆"了13年.共发表251篇原创文章,有 ...
- H5端调起百度地图、腾讯地图app
来自一个需求的总结: 在微信公众号中根据地图上的marker和label,或者搜索结果点击调起地图APP进行导航. 一开始是使用百度地图进行开发,后面转腾讯是因为微信不允许不是自家或者合作方的APP在 ...
- UVA 23 out of 5
题目例如以下: Problem I 23 Out of 5 Input: standard input Output: standardoutput Time Limit: 1 second Memo ...
- LeetCode 970. Powerful Integers (强整数)
题目标签:HashMap 题目让我们找出所有独一的powerful integers 小于bound的情况下. 把 x^i 看作 a:把 y^j 看作b, 代入for loop,把所有的情况都遍历一遍 ...
- 阿里大数据比赛sesson2_RF&GBRT(下)
-----------__-----------接上文---------__---------- 2.Xlab RF上手 2.1.训练特征表准备 训练的特征表gbrt_offline_section_ ...
- 【Aladdin Unity3D Shader编程】之四 贴图纹理
关于纹理贴图介绍 纹理坐标也叫UV坐标,UV坐标都是0~1,并不是我们所理解的像素坐标,相当于是一个百分比. 编写shader映射纹理 将纹理的颜色取代漫反射的颜色 Shader "Alad ...
- 【POJ 3263】 Tallest Cow
[题目链接] http://poj.org/problem?id=3263 [算法] 若A和B两头牛可以互相看见,那么说明中间的牛的高度都至少比它们少1,因此,我们可以引入一个差分数组c 对于每组关系 ...