yum 安装nginx(配置开机启动)
yum install -y nginx通过yum安装的时候提示下面的错误
[root@localhost yum.repos.d]# yum install nginx

已加载插件:fastestmirror, langpacks

Loading mirror speeds from cached hostfile

没有可用软件包 nginx。

错误:无须任何处理
需要添加nginx的源
[root@localhost yum.repos.d]# rpm -ivh http://nginx.org/packages/centos/7/noarch/RPMS/nginx-release-centos-7-0.el7.ngx.noarch.rpm该命令执行之后,会在/etc/yum.respos.d下面多出一个nginx.repo
[root@localhost yum.repos.d]# ll

总用量 40

-rw-r--r--. 1 root root 1572 12月  1 2016 CentOS-Base.repo

-rw-r--r--. 1 root root 1572 12月  1 2016 CentOS-Base.repo.backup

-rw-r--r--. 1 root root 1664 10月 24 10:36 CentOS-Base.repo.bak

-rw-r--r--. 1 root root 1309 8月  30 2017 CentOS-CR.repo

-rw-r--r--. 1 root root  649 8月  30 2017 CentOS-Debuginfo.repo

-rw-r--r--. 1 root root  314 8月  30 2017 CentOS-fasttrack.repo

-rw-r--r--. 1 root root  630 8月  30 2017 CentOS-Media.repo

-rw-r--r--. 1 root root 1331 8月  30 2017 CentOS-Sources.repo

-rw-r--r--. 1 root root 3830 8月  30 2017 CentOS-Vault.repo

-rw-r--r--. 1 root root  113 7月  15 2014 nginx.repo
然后再执行安装命令
yum install -y nginx安装之后,可以查看nginx的默认安装目录
[root@localhost yum.repos.d]# whereis nginx

nginx: /usr/sbin/nginx /usr/lib64/nginx /etc/nginx /usr/share/nginx /usr/share/man/man8/nginx.8.gz

[root@localhost yum.repos.d]# pwd

/etc/yum.repos.d
以下是Nginx的默认路径:
(1) Nginx配置路径:/etc/nginx/
(2) PID目录:/var/run/nginx.pid
(3) 错误日志:/var/log/nginx/error.log
(4) 访问日志:/var/log/nginx/access.log
(5) 默认站点目录:/usr/share/nginx/html
事实上,只需知道Nginx配置路径,其他路径均可在/etc/nginx/nginx.conf 以及/etc/nginx/conf.d/default.conf 中查询到
nginx相关的验证命令及启动命令
[root@localhost yum.repos.d]# nginx

[root@localhost yum.repos.d]# nginx -t

nginx: the configuration file /etc/nginx/nginx.conf syntax is ok

nginx: configuration file /etc/nginx/nginx.conf test is successful

[root@localhost yum.repos.d]# nginx -s reload
nginx 启动
nginx -t 测试命令
nginx -s relaod 修改nginx.conf之后,可以重载
有些源经常失效,下面放上最新链接 直接去里面下载 rpm -Uvh 下载的rpm 就好了
http://nginx.org/packages/centos/7/noarch/RPMS/(源链接)
 http://nginx.org/packages/centos/7/noarch/RPMS/nginx-release-centos-7-0.el7.ngx.noarch.rpm
进入到/etc/init.d/目录下,创建文件nginx
cd /etc/init.d/
vim nginx
nginx文件具体配置信息如下:

#!/bin/bash

# nginx Startup script for the Nginx HTTP Server

# it is v.0.0.2 version.

# chkconfig: - 85 15

# description: Nginx is a high-performance web and proxy server.

#              It has a lot of features, but it's not for everyone.

# processname: nginx

# pidfile: /var/run/nginx.pid

# config: /usr/local/nginx/conf/nginx.conf

nginxd=/usr/local/nginx/sbin/nginx        # 你的nginx真实启动文件路径

nginx_config=/usr/local/nginx/conf/nginx.conf    # nginx相关配置文件路径

nginx_pid=/var/run/nginx.pid

RETVAL=0

prog="nginx"

# Source function library.

. /etc/rc.d/init.d/functions

# Source networking configuration.

. /etc/sysconfig/network

# Check that networking is up.

[ ${NETWORKING} = "no" ] && exit 0

[ -x $nginxd ] || exit 0

# Start nginx daemons functions.

start() {

    if [ -e $nginx_pid ];then

       echo "nginx already running...."

   exit 1

    fi

       echo -n $"Starting $prog: "

       daemon $nginxd -c ${nginx_config}

   RETVAL=$?

   echo

       [ $RETVAL = 0 ] && touch /var/lock/subsys/nginx

   return $RETVAL

}

# Stop nginx daemons functions.

stop() {

    echo -n $"Stopping $prog: "

    killproc $nginxd

    RETVAL=$?

    echo

    [ $RETVAL = 0 ] && rm -f /var/lock/subsys/nginx /var/run/nginx.pid

}

# reload nginx service functions.

reload() {

    echo -n $"Reloading $prog: "

    #kill -HUP `cat ${nginx_pid}`

    killproc $nginxd -HUP

    RETVAL=$?

    echo

}

# See how we were called.

    case "$1" in

start)

    start

    ;;

stop)

    stop

    ;;

reload)

    reload

    ;;

restart)

    stop

    start

    ;;

status)

    status $prog

    RETVAL=$?

    ;;

*)

    echo $"Usage: $prog {start|stop|restart|reload|status|help}"

    exit 1

esac

exit $RETVAL

保存nginx文件并赋权

chmod 755 nginx

将nginx权限设置为自己可以read、write、exec,其他用户只能有read、exec权限,没有write权限

为nginx加上service相关命令权限

chkconfig --add nginx

chkconfig nginx on

开启nginx的service命令
校验nginx的service命令是否成功
service nginx start 执行不报错表示nginx已经启动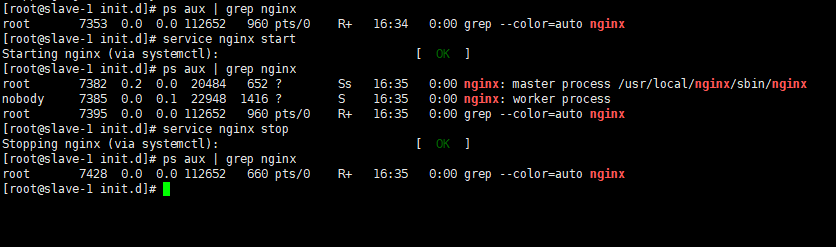
重启centos服务器再次验证是否nginx已经启动

重启之前service nginx stop停止nginx服务,之后执行reboot,开机之后执行ps aux | grep nginx如果后台显示nginx已经启动,那么表示nginx的安装和开机自启动已经成功配置

本文章旨在记录自己的平时学习过程,有不正确的和值得改进的真诚希望园友提出意见或建议,一起学习一起进步。yum 安装nginx(配置开机启动)的更多相关文章
- Windows 安装nginx并开机启动
Win安装nginx并 开机启动 下载nginx安装包 nginx-1.12.2.zip,解压到D盘. https://pan.baidu.com/s/1InQa527yq35Q68c73RBb-A# ...
- CentOS7.3编译安装Nginx设置开机启动
起因 最近想玩nginx了,本来用yum -y install nginx安装也启动好了,但是买了本<Nginx高性能Web服务器详解>,我咋能辜负我的书费呢?于是我就直接ps -ef | ...
- nginx配置开机启动及配置sudo授权启动
1.https://www.cnblogs.com/whatmiss/p/7091220.html 配置开机启动nginx 2.sudo授权其它用户启动 (1)root用户编辑 visu ...
- 【Web】Nginx配置开机启动
在添加nginx服务之后,大家会希望开机伴随启动nginx,避免手动路径输入启动: nginx官方提供了启动脚本:https://www.nginx.com/resources/wiki/start/ ...
- linux下安装nginx后开机启动篇
众所周知nginx安装后需要手动去启动,每次开机之后都要执行nginx的启动命令很蛋疼.那么我们来让nginx开机启动吧 1.先創建一個nginx文件把 [root@localhost ~]# vi ...
- Ubuntu安装sysv-rc-conf配置开机启动服务
ubuntu下chkconfig的替代方案: 第一步:在终端键入sudo apt-get install sysv-rc-conf安装sysv-rc-conf服务. 第二步:检查设置系统开机自启动服务 ...
- 【RabbitMQ】 RabbitMQ配置开机启动
环境 系统:Linux(CentOS 7.2) Erlang环境:21.1(安装参考[Erlang]源码安装) RabbitMQ:3.7.9(安装参考[RabbitMQ] RabbitMQ安装) 配置 ...
- [转]CENTOS 6.5 配置YUM安装NGINX+服务器负载均衡
原文连接: CENTOS 6.5 配置YUM安装NGINX http://blog.sina.com.cn/s/blog_69f467b70102uyux.html 参考博文: Centos下安装. ...
- centos7系统下nginx安装并配置开机自启动操作
准备工作 我的centos7系统是最小化安装的, 缺很多库, 首先安装必须的运行库 ? 1 2 3 4 5 6 7 8 9 10 11 yum install wget gcc gcc-c++ pcr ...
随机推荐
- html绑定点击事件传值
1.方法1function radioSelect(event){ var valueRadio=event.value; if(valueRadio =='目的口岸'){ return '目的口岸' ...
- Java基础学习总结(39)——Log4j 1使用教程
1. 配置文件 Log4J配置文件的基本格式如下: #配置根Logger log4j.rootLogger = [ level ] , appenderName1 , appenderN ...
- 利用echarts做图表统计
以项目中的扇形统计图为例: 首先,第一步: 引入外部echarts.js文件 其次,第二步: HTML代码块 <div class="count-body-con count-tj&q ...
- 洛谷 P2056 BZOJ 2743 [HEOI2012]采花
//表示真的更喜欢洛谷的题面 题目描述 萧芸斓是 Z国的公主,平时的一大爱好是采花. 今天天气晴朗,阳光明媚,公主清晨便去了皇宫中新建的花园采花.花园足够大,容纳了 n 朵花,花有 c 种颜色(用整数 ...
- Thread和ThreadGroup
Thread和ThreadGroup 学习了:https://www.cnblogs.com/yiwangzhibujian/p/6212104.html 这个里面有Thread的基本内容: htt ...
- 新安装的wampserver怎么使用本机已有的mysql作为数据库
一般在一台没有安装mysql的机器上安装好wamp后,能够直接在wamp的phpMyAdmin中打开集成的mysql并设置用户信息. 而假设之前已经安装配置好mysql(实usernamepasswo ...
- DeepLearning to digit recognizer in kaggle
DeepLearning to digit recongnizer in kaggle 近期在看deeplearning,于是就找了kaggle上字符识别进行练习.这里我主要用两种工具箱进行求解.并比 ...
- bzoj4887: [Tjoi2017]可乐
一眼暴力宽搜(最近比赛想暴力想疯了... 很明显的矩乘,然后自爆可以看作走向向一个无出边的点 然后没啥难的了吧. #include<cstdio> #include<iostream ...
- 我的spark python 决策树实例
from numpy import array from pyspark.mllib.regression import LabeledPoint from pyspark.mllib.tree im ...
- 【BZOJ3218】【UOJ#77】a + b Problem
题目 题目在这里 思路&做法 明显的最小割(其实是之前做过一道类似的题) S向每一个格子连容量为\(b_i\)的边 每一个格子向T连容量为\(w_i\)的边 对于格子\(i\)向满足条件的格子 ...