
springboot学习入门简易版三---springboot2.0启动方式
2.4使用@componentscan方式启动
2.4.1 @EnableAutoConfiguration 默认只扫描当前类
@EnableAutoConfiguration 默认只扫描当前类,如果再新建一个indexcontroller类,将无法被扫描。
新建indexcontroller类:
/**
* 测试index类
* @author admin
*
*/
@RestController
public class IndexController {
@RequestMapping("/index")
public String index() {
return "index info";
}
}
启动TestController类中的main函数,首先访问http://localhost:8080/test
没有问题,再访问http://localhost:8080/index
报错信息如下:
Whitelabel Error Page
This application has no explicit mapping for /error, so you are seeing this as a fallback.
Sun Apr 14 22:25:20 CST 2019
There was an unexpected error (type=Not Found, status=404).
No message available
2.4.2 @ComponentScan指定扫描范围(7)
为了方便维护和规范化,将启动类和controller类分离开,新建一个IndexController类。启动类修改如下:
//@RestController

//@SpringBootApplication //或使用@EnableAutoConfiguration配置

@EnableAutoConfiguration //自动配置,根据pom文件引入的依赖信息,自动配置对应的组件;扫包范围,默认在当前类中

@ComponentScan("com.springboot2demo") //指定扫描范围

public class FirstApplication {

    /**

     * 程序入口

     *  SpringApplication.run 相当于java代码创建内置tomcat,加载springmvc注解启动

     * @param args

     */

    public static void main(String[] args) {

        SpringApplication.run(FirstApplication.class, args);

    }

}
IndexController为:
/**

 * 仅 @EnableAutoConfiguration注解方式下启动(默认只扫描当前类),/index 访问报错

 * @author admin

 */

@RestController

public class IndexController {

    @RequestMapping("/index")

    public String index() {

        return "index info";

    }

    @RequestMapping("/test")

    public String test(){

        return "springboot2.0 first application";

    }

}
启动springboot启动类
访问http://localhost:8080/index 成功返回:index info
访问http://localhost:8080/test成功返回:springboot2.0 first application
2.4.3 @SpringBootApplication方式启动(8)
1多个controller包的@componentscan多包扫描
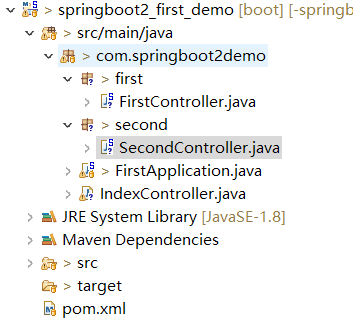
FirstController类:
@RestController

public class FirstController {

    @RequestMapping("/firstIndex")

    public String index() {

        return "firstIndex info";

    }

}
SecondController类:
@RestController

public class SecondController {

    @RequestMapping("/secondIndex")

    public String index() {

        return "secondIndex info";

    }

}
启动类修改为:
//@RestController

//@SpringBootApplication //或使用@EnableAutoConfiguration配置

@EnableAutoConfiguration //自动配置,根据pom文件引入的依赖信息,自动配置对应的组件;扫包范围,默认在当前类中

//@ComponentScan("com.springboot2demo") //指定扫描范围

@ComponentScan(basePackages= {"com.springboot2demo.first","com.springboot2demo.second"}) //多包扫描

public class FirstApplication {
2 @SpringbootApplication注解启动
等同于@EnableAutoConfiguation+@ComponentScan
且扫描范围默认为类所在当前包下所有包(包括子包)
在原有代码基础上修改启动类
//@RestController

//@EnableAutoConfiguration //自动配置,根据pom文件引入的依赖信息,自动配置对应的组件;扫包范围,默认在当前类中

//@ComponentScan("com.springboot2demo") //指定扫描范围

//@ComponentScan(basePackages= {"com.springboot2demo.first","com.springboot2demo.second"}) //多包扫描

@SpringBootApplication //或使用@EnableAutoConfiguration+@ComponentScan配置

public class FirstApplication {
git代码:https://github.com/cslj2013/-springboot2.0_first_demo.git
springboot学习入门简易版三---springboot2.0启动方式的更多相关文章
- springboot学习入门简易版二---springboot2.0项目创建
2 springboot项目创建(5) 环境要求:jdk1.8+ 项目结构: 2.1创建maven工程 Group id :com.springbootdemo Artifact id: spring ...
- springboot学习入门简易版八---springboot2.0多环境配置、整合mybatis mysql8+(19-20)
2.11 SpringBoot多环境配置(19) application.properties中配置 Spring.profiles.active=prd 配置环境: Application-dev ...
- springboot学习入门简易版六---springboot2.0整合全局捕获异常及log4j日志(12-13)
使用Aop实现 1创建异常请求 在原有项目基础上,jspController中创建一个可能发生异常的请求: /** * 全局捕获异常测试 * @param i * @return */ @Reques ...
- springboot学习入门简易版五---springboot2.0整合jsp(11)
springboot对jsp支持不友好,内部tomcat对jsp不支持,需要使用外部tomcat,且必须打包为war包. 1 创建maven项目 注意:必须为war类型,否则找不到页面. 且不要把js ...
- springboot学习入门简易版九---springboot2.0整合多数据源mybatis mysql8+(22)
一个项目中配置多个数据源(链接不同库jdbc),无限大,具体多少根据内存大小 项目中多数据源如何划分:分包名(业务)或注解方式.分包名方式类似多个不同的jar,同业务需求放一个包中. 分包方式配置多数 ...
- springboot学习入门简易版四---springboot2.0静态资源访问及整合freemarker视图层
2.4.4 SpringBoot静态资源访问(9) Springboot默认提供静态资源目录位置需放在classpath下,目录名需要符合如下规则 /static /public /resourc ...
- springboot学习入门简易版一---springboot2.0介绍
1.1为什么用springboot(2) 传统项目,整合ssm或ssh,配置文件,jar冲突,整合麻烦.Tomcat容器加载web.xml配置内容 springboot完全采用注解化(使用注解方式启动 ...
- springboot学习入门简易版七---springboot2.0使用@Async异步执行方法(17)
1启动类开启异步调用注解 @SpringBootApplication @EnableAsync //开启异步调用 public class StartApplication { 不开启则异步调用无效 ...
- SpringBoot学习入门之Hello项目的构建、单元测试和热部署等(配图文,配置信息详解,附案例源码)
前言: 本文章主要是个人在学习SpringBoot框架时做的一些准备,参考老师讲解进行完善对SpringBoot构建简单项目的学习汇集成本篇文章,作为自己对SpringBoot框架的总结与笔记. 你将 ...
随机推荐
- java IO 文件批量重命名
java IO 文件批量重命名 package com.vfsd.renamefile; import java.io.File; import java.io.FileInputStream; im ...
- Java Class与反射相关的一些工具类
package com.opslab.util; import org.apache.log4j.Logger; import java.io.File;import java.io.IOExcept ...
- Android webview 写入cookie的解决方法以及一些属性设置
原文地址:https://www.2cto.com/kf/201703/616868.html Android webview 写入cookie的解决方法以及一些属性设置,webview怎么设置写入C ...
- Python - Django - 命名 URL 和反向解析 URL
命名 URL: test.html: <!DOCTYPE html> <html lang="en"> <head> <meta char ...
- 0010.Regular Expression Matching(H)
jjc . Regular Expression Matching(hard) Given an input string (s) and a pattern (p), implement regul ...
- bootstrap模态框怎么传递参数
bootstrap参数传递可以用 data-参数名 <!DOCTYPE html> <html xmlns="http://www.w3.org/1999/xhtml&qu ...
- Github克隆代码慢问题解决办法
参考:https://blog.csdn.net/stone8761/article/details/79072148 https://blog.csdn.net/github_37847975/ar ...
- Juniper总结
Juniper的路由器分为两个部分——RE和PFE.不过貌似大部分路由器都分为这两个部分.... Routing Engine: 当密码授权通过之后,用户就进入了RoutingEngine中,在其中可 ...
- nnexus3 破解密码
主要步骤如下: 1.停服 2.进入OrientDB控制台:java -jar /usr/local/nexus/lib/support/nexus-orient-console.jar 3.在控制台执 ...
- Dotmemory 内存分析工具的操作手册
教程一.开始学习dotmemory 在本教程中,我们将学习如何运行dotMemory内存快照.此外,我们将简要地看看dotMemory的用户界面和基本分析的概念.考虑dotMemory本教程作为起点 ...