vim + oh-my-zsh + git搭建开发环境
vim + oh-my-zsh + git配置开发环境
vim配置
安装vundle
使用vundle作为插件管理器,使用前先安装vundle
mkdir -p ~/.vim/bundle

git clone https://github.com/gmarik/Vundle.vim.git ~/.vim/bundle/Vundle.vim
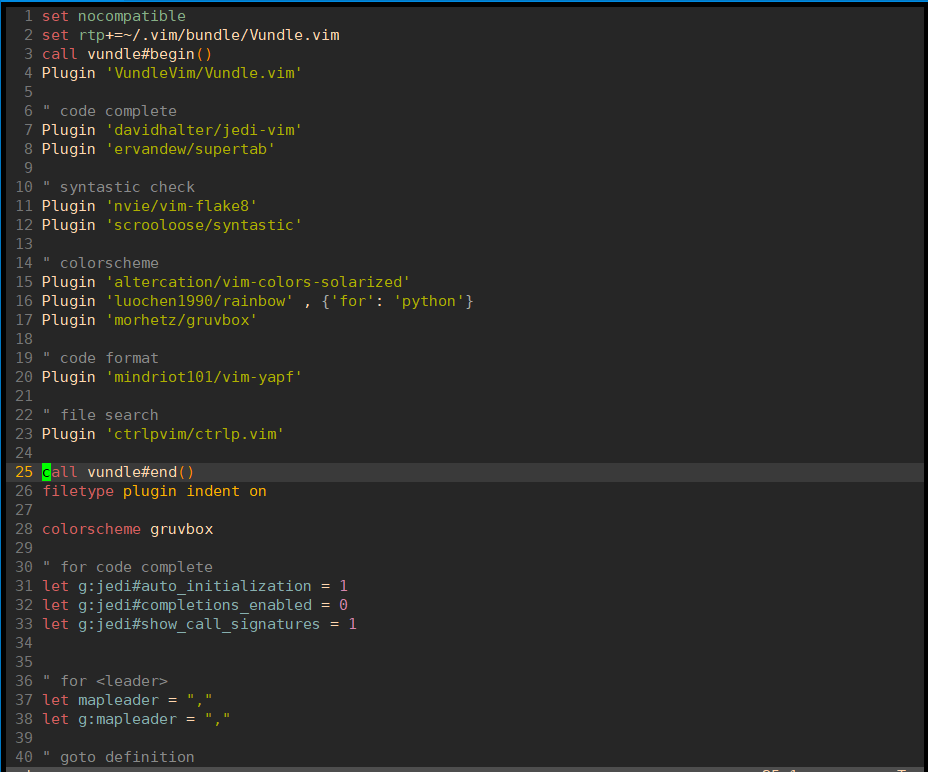
#### 配置 .vimrc
编辑~/.vimrc文件,写入以下内容
set nocompatible

set rtp+=~/.vim/bundle/Vundle.vim

call vundle#begin()

Plugin 'VundleVim/Vundle.vim'

" code complete

Plugin 'davidhalter/jedi-vim'

Plugin 'ervandew/supertab'

" syntastic check

Plugin 'nvie/vim-flake8'

Plugin 'scrooloose/syntastic'

" colorscheme

Plugin 'altercation/vim-colors-solarized'

Plugin 'luochen1990/rainbow' , {'for': 'python'}

Plugin 'morhetz/gruvbox'

" code format

Plugin 'mindriot101/vim-yapf'

" file search

Plugin 'ctrlpvim/ctrlp.vim'

call vundle#end()

filetype plugin indent on

colorscheme gruvbox

" for code complete

let g:jedi#auto_initialization = 1

let g:jedi#completions_enabled = 0

let g:jedi#show_call_signatures = 1

" for <leader>

let mapleader = ","

let g:mapleader = ","

" goto definition

let g:jedi#goto_definitions_command = ""

let g:jedi#goto_assignments_command = "<leader>g"

let g:jedi#goto_command = "<leader>d"

" file search

let g:ctrlp_map = '<c-p>'

let g:ctrlp_cmd = 'CtrlP'

" serach file in MRU

nmap <Leader>f :CtrlPMRUFiles<CR>

" search file in BUffer

nmap <Leader>b :CtrlPBuffer<CR>

set number

set cursorline

set fileencoding=utf-8

set fencs=ucs-bom,utf-8,cp936,gb18030,big5,euc-jp,euc-kr,latin1

set history=500

let python_highlight_all=1

set background=dark

set t_Co=256

set laststatus=2

set viminfo+=!

set showmatch

set matchtime=5

set ignorecase

set hlsearch

set autoindent

set cindent

set tabstop=4

set expandtab

set softtabstop=4

set shiftwidth=4

set autochdir

set autoread

highlight OverLength ctermbg=red ctermfg=white guibg=#592929

autocmd! FileType python match OverLength /\%89v.\+/
保存后打开vim,在normal模式下输入
:PluginInstall
vundle会自动安装配置的插件,之后就可以愉快地使用啦~
使用
配置后的效果如图
使用比较简单,主要是flake8和jedi的使用
flake8用于检查代码,编辑完后按快捷键F7进行检查
jedi用于代码补全和跳转,在函数名或者类名处按下, + d会跳转到定义处
ctrp用于文件搜索和跳转,按下, + f 调出搜索框,输入文件名进行搜索,按下, + b调出缓冲区文件,此快捷键配合
, + d可以在定义处和调用处来回跳转,非常好用
zsh配置
zsh是区别于bash的一种shell,比bash更好用
安装zsh
yum install zsh
oh-my-zsh是基于zsh的一个主题,可以在其官网上下载,地址:
以下两种方式任选一种安装
# 选择其一即可

sh -c "$(curl -fsSL https://raw.github.com/ohmyzsh/ohmyzsh/master/tools/install.sh)"

sh -c "$(wget https://raw.github.com/ohmyzsh/ohmyzsh/master/tools/install.sh -O -)"
配置.zshrc
# If you come from bash you might have to change your $PATH.

# export PATH=$HOME/bin:/usr/local/bin:$PATH

# Path to your oh-my-zsh installation.

export ZSH="/root/.oh-my-zsh"

# Set name of the theme to load --- if set to "random", it will

# load a random theme each time oh-my-zsh is loaded, in which case,

# to know which specific one was loaded, run: echo $RANDOM_THEME

# See https://github.com/ohmyzsh/ohmyzsh/wiki/Themes

ZSH_THEME="robbyrussell"

# Set list of themes to pick from when loading at random

# Setting this variable when ZSH_THEME=random will cause zsh to load

# a theme from this variable instead of looking in ~/.oh-my-zsh/themes/

# If set to an empty array, this variable will have no effect.

# ZSH_THEME_RANDOM_CANDIDATES=( "robbyrussell" "agnoster" )

# Uncomment the following line to use case-sensitive completion.

# CASE_SENSITIVE="true"

# Uncomment the following line to use hyphen-insensitive completion.

# Case-sensitive completion must be off. _ and - will be interchangeable.

# HYPHEN_INSENSITIVE="true"

# Uncomment the following line to disable bi-weekly auto-update checks.

# DISABLE_AUTO_UPDATE="true"

# Uncomment the following line to automatically update without prompting.

# DISABLE_UPDATE_PROMPT="true"

# Uncomment the following line to change how often to auto-update (in days).

# export UPDATE_ZSH_DAYS=13

# Uncomment the following line if pasting URLs and other text is messed up.

# DISABLE_MAGIC_FUNCTIONS=true

# Uncomment the following line to disable colors in ls.

# DISABLE_LS_COLORS="true"

# Uncomment the following line to disable auto-setting terminal title.

# DISABLE_AUTO_TITLE="true"

# Uncomment the following line to enable command auto-correction.

# ENABLE_CORRECTION="true"

# Uncomment the following line to display red dots whilst waiting for completion.

# COMPLETION_WAITING_DOTS="true"

# Uncomment the following line if you want to disable marking untracked files

# under VCS as dirty. This makes repository status check for large repositories

# much, much faster.

# DISABLE_UNTRACKED_FILES_DIRTY="true"

# Uncomment the following line if you want to change the command execution time

# stamp shown in the history command output.

# You can set one of the optional three formats:

# "mm/dd/yyyy"|"dd.mm.yyyy"|"yyyy-mm-dd"

# or set a custom format using the strftime function format specifications,

# see 'man strftime' for details.

# HIST_STAMPS="mm/dd/yyyy"

# Would you like to use another custom folder than $ZSH/custom?

# ZSH_CUSTOM=/path/to/new-custom-folder

# Which plugins would you like to load?

# Standard plugins can be found in ~/.oh-my-zsh/plugins/*

# Custom plugins may be added to ~/.oh-my-zsh/custom/plugins/

# Example format: plugins=(rails git textmate ruby lighthouse)

# Add wisely, as too many plugins slow down shell startup.

plugins=(

    git

    history

    zsh-syntax-highlighting

    zsh-completions

    extract

    )

export LC_ALL=en_US.UTF-8

export LANG=en_US.UTF-8

source ~/.zsh/zsh-autosuggestions/zsh-autosuggestions.zsh

bindkey ',' autosuggest-accept

source $ZSH/oh-my-zsh.sh

unsetopt share_history

# User configuration

# export MANPATH="/usr/local/man:$MANPATH"

# You may need to manually set your language environment

# export LANG=en_US.UTF-8

# Preferred editor for local and remote sessions

# if [[ -n $SSH_CONNECTION ]]; then

#   export EDITOR='vim'

# else

#   export EDITOR='mvim'

# fi

# Compilation flags

# export ARCHFLAGS="-arch x86_64"

# Set personal aliases, overriding those provided by oh-my-zsh libs,

# plugins, and themes. Aliases can be placed here, though oh-my-zsh

# users are encouraged to define aliases within the ZSH_CUSTOM folder.

# For a full list of active aliases, run `alias`.

#

# Example aliases

# alias zshconfig="mate ~/.zshrc"

# alias ohmyzsh="mate ~/.oh-my-zsh"

export TERM=xterm-256color

ZSH_AUTOSUGGEST_HIGHLIGHT_STYLE='fg=247'

# for autojump

[[ -s ~/.autojump/etc/profile.d/autojump.sh ]] && . ~/.autojump/etc/profile.d/autojump.sh
上面我们自己配置了一些插件,需要手动下载
安装zsh-autosuggestions
git clone git://github.com/zsh-users/zsh-autosuggestions /root/.zsh/zsh-autosuggestions
安装zsh-syntax-highlighting和zsh-completions
cd ~/.oh-my-zsh/plugins

git clone https://github.com/zsh-users/zsh-syntax-highlighting.git

git clone https://github.com/zsh-users/zsh-completions.git
刷新.zshrc文件
source ~/.zshrc
#### 使用
上面步骤完成后,就可以愉快地使用啦,效果如下图

提示符会显示当前的仓库和分支名,命令行也会自动补全,非常好用
### git配置
原始的git没有颜色区分,看着不舒服,在~/.gitconfig里可以配置颜色,这样git status和git diff就能很容易地看出修改来了
[user]

	email = handsome@gmail.com

	name = handsome

[alias]

	br = branch

[color]

	branch = auto

	diff = auto

	status = auto

[color "branch"]

	current = green

	local = white

	remote = green

[color "diff"]

	meta = yellow bold

	frag = magenta bold

	old = red bold

	new = green bold

[color "status"]

	added = green

	changed = red

	untracked = red
git的使用效果留给大家自己去体验哈哈
这就是我自己的配置,如果大家有更好的配置可以告知我~
vim + oh-my-zsh + git搭建开发环境的更多相关文章
- python Day 1 - 搭建开发环境
搭建开发环境 首先,确认系统安装的Python版本是2.7.x: $ python --version Python 2.7.5 然后,安装开发Web App需要的第三方库: 前端模板引擎jinja2 ...
- Sublime Text3 + Golang搭建开发环境
Sublime Text3 + Golang搭建开发环境 http://blog.csdn.net/aqiang912/article/details/46775409 1.安装git 因为golan ...
- 一、React Native 搭建开发环境(1)(Mac OS - IOS项目)
React Native是Facebook推出的一个开发IOS和安卓APP的技术.至于更多的详情,这里不再描述,大家可以自行百度它的定义. 目的: 由于我想在一台电脑上同时开发IOS和Android两 ...
- 深入浅出Docker(五):基于Fig搭建开发环境
概述 在搭建开发环境时,我们都希望搭建过程能够简单,并且一劳永逸,其他的同事可以复用已经搭建好的开发环境以节省开发时间.而在搭建开发环境时,我们经常会被复杂的配置以及重复的下载安装所困扰.在Docke ...
- 一、React Native 搭建开发环境(1)(Mac OS - IOS项目篇)
React Native是Facebook推出的一个开发IOS和安卓APP的技术.至于更多的详情,这里不再描述,大家可以自行百度它的定义. 原因:由于我想在一台电脑上同时开发IOS和Android两个 ...
- React Native从零到一搭建开发环境
React Native从零到一搭建开发环境 ReactNative环境搭建 安装Homebrew 安装rvm 安装nvm 安装node 安装react-native-cli 安装watchman i ...
- ESP32 LyraT音频开发板试玩(一):搭建开发环境
我是卓波,很高兴你来看我的博客. 系列文章: ESP32 LyraT音频开发板试玩(一):搭建开发环境 ESP32 LyraT音频开发板试玩(二):播放音乐 关于ESP32的开发环境搭建,官方有教程, ...
- PYTHON --WebAPP项目转载(廖雪峰) -- Day 1 -- 搭建开发环境
Day 1 - 搭建开发环境 搭建开发环境 首先,确认系统安装的Python版本是3.5.x: $ python3 --version Python 3.5.1 然后,用pip安装开发Web Ap ...
- Linux程序设计(搭建开发环境--curses)
看官们.咱们今天要说的内容.是前面内容的一点小补充,详细的内容是:安装curses开发包.以搭建 开发环境.闲话休说,言归正转. 我们在前面说过搭建开发环境的内容,主要说了开发环境中的GCC和VIM, ...
随机推荐
- 获取 request 中用POST方式"Content-type"是"application/x-www-form-urlencoded;charset=utf-8"发送的 json 数据
request中发送json数据用post方式发送Content-type用application/json;charset=utf-8方式发送的话,直接用springMVC的@RequestBody ...
- 【静态延迟加载】self关键字和static关键字的区别
先来看下代码,从代码中发现问题.解决问题 //先实现一个手机工厂类 class Phone{ public static function setBrand(){ echo "Main Ph ...
- 【AC自动机】最短母串
[题目链接] https://loj.ac/problem/10061 [题意] 给定 n 个字符串 S1-Sn,要求找到一个最短的字符串 T,使得这 n 个字符串都是 T 的子串. [题解] 类似于 ...
- Nginx用法详解
nginx作为一个高性能的web服务器,想必大家垂涎已久,蠢蠢欲动,想学习一番了吧,语法不多说,网上一大堆.下面博主就nginx的非常常用的几个功能做一些讲述和分析,学会了这几个功能,平常的开发和部署 ...
- Pattern Recognition and Machine Learning-02-1.0-Introduction
Introduction The problem of searching for patterns in data is a fundamental one and has a long and s ...
- 1.DOS常用命令
d:+ 回车:盘符切换,进入D:盘 dir(directory):列出当前目录下的文件及文件夹md(make director):创建目录rd(remove director):删除目录(不能删除非空 ...
- JDialog
JDialog继承Dialog,Dialog继承Window,所以可以用setLocationRelativeTo(Component c)来实现Dialog的显示,当c为空时,直接显示在屏幕前,为组 ...
- Vue.prototype详解
参考地址:Vue.prototype详解 如果需要设置 全局变量,在main.js中,Vue实例化的代码里添加. 不想污染全局作用域.这种情况下,你可以通过在 原型 上定义它们使其在每个Vue实例中可 ...
- 忘记root密码,修改方法
Linux的root密码修改不像Windows的密码修改找回,Windows的登录密码忘记需要介入工具进行解决.CentOS6和CentOS7的密码方法也是不一样的,具体如下: 首先是CentOS 6 ...
- SQL学习——IN运算符
IN的作用 IN运算符允许您在WHERE子句中指定多个值. IN运算符是多个OR条件的简写. IN的语法 SELECT column_name(s) FROM table_name WHERE col ...