TensorFlowSharp入门使用C#编写TensorFlow人工智能应用
TensorFlowSharp入门使用C#编写TensorFlow人工智能应用学习。
TensorFlow简单介绍
TensorFlow 是谷歌的第二代机器学习系统,按照谷歌所说,在某些基准测试中,TensorFlow的表现比第一代的DistBelief快了2倍。
TensorFlow 内建深度学习的扩展支持,任何能够用计算流图形来表达的计算,都可以使用TensorFlow。任何基于梯度的机器学习算法都能够受益于TensorFlow的自动分化(auto-differentiation)。通过灵活的Python接口,要在TensorFlow中表达想法也会很容易。
TensorFlow 对于实际的产品也是很有意义的。将思路从桌面GPU训练无缝搬迁到手机中运行。
示例Python代码:
import tensorflow as tf

import numpy as np

# Create 100 phony x, y data points in NumPy, y = x * 0.1 + 0.3

x_data = np.random.rand(100).astype(np.float32)

y_data = x_data * 0.1 + 0.3

# Try to find values for W and b that compute y_data = W * x_data + b

# (We know that W should be 0.1 and b 0.3, but TensorFlow will

# figure that out for us.)

W = tf.Variable(tf.random_uniform([1], -1.0, 1.0))

b = tf.Variable(tf.zeros([1]))

y = W * x_data + b

# Minimize the mean squared errors.

loss = tf.reduce_mean(tf.square(y - y_data))

optimizer = tf.train.GradientDescentOptimizer(0.5)

train = optimizer.minimize(loss)

# Before starting, initialize the variables.  We will 'run' this first.

init = tf.global_variables_initializer()

# Launch the graph.

sess = tf.Session()

sess.run(init)

# Fit the line.

for step in range(201):

    sess.run(train)

    if step % 20 == 0:

        print(step, sess.run(W), sess.run(b))

# Learns best fit is W: [0.1], b: [0.3]
使用TensorFlowSharp
GitHub:https://github.com/migueldeicaza/TensorFlowSharp
官方源码库,该项目支持跨平台,使用Mono。
可以使用NuGet 安装TensorFlowSharp,如下:
Install-Package TensorFlowSharp
编写简单应用
使用VS2017新建一个.NET Framework 控制台应用 tensorflowdemo,接着添加TensorFlowSharp 引用。
TensorFlowSharp 包比较大,需要耐心等待。
然后在项目属性中生成->平台目标 改为 x64。
打开Program.cs 写入如下代码:
static void Main(string[] args)
{
using (var session = new TFSession())
{
var graph = session.Graph;
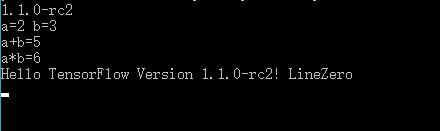
Console.WriteLine(TFCore.Version);
var a = graph.Const();
var b = graph.Const();
Console.WriteLine("a=2 b=3"); // 两常量加
var addingResults = session.GetRunner().Run(graph.Add(a, b));
var addingResultValue = addingResults[].GetValue();
Console.WriteLine("a+b={0}", addingResultValue); // 两常量乘
var multiplyResults = session.GetRunner().Run(graph.Mul(a, b));
var multiplyResultValue = multiplyResults[].GetValue();
Console.WriteLine("a*b={0}", multiplyResultValue);
var tft = new TFTensor(Encoding.UTF8.GetBytes($"Hello TensorFlow Version {TFCore.Version}! LineZero"));
var hello = graph.Const(tft);
var helloResults = session.GetRunner().Run(hello);
Console.WriteLine(Encoding.UTF8.GetString((byte[])helloResults[].GetValue()));
}
Console.ReadKey();
}
运行程序结果如下:
TensorFlow C# image recognition
图像识别示例体验
https://github.com/migueldeicaza/TensorFlowSharp/tree/master/Examples/ExampleInceptionInference
下面学习一个实际的人工智能应用,是非常简单的一个示例,图像识别。
新建一个 imagerecognition .NET Framework 控制台应用项目,接着添加TensorFlowSharp 引用。
然后在项目属性中生成->平台目标 改为 x64。
接着编写如下代码:
class Program
{
static string dir, modelFile, labelsFile;
public static void Main(string[] args)
{
dir = "tmp";
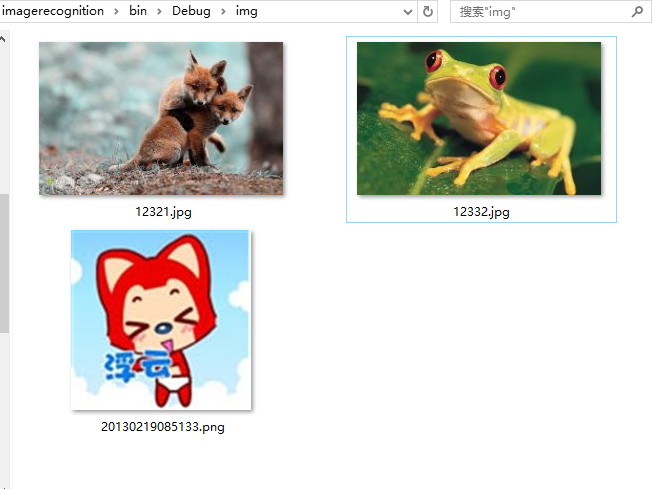
List<string> files = Directory.GetFiles("img").ToList();
ModelFiles(dir);
var graph = new TFGraph();
// 从文件加载序列化的GraphDef
var model = File.ReadAllBytes(modelFile);
//导入GraphDef
graph.Import(model, "");
using (var session = new TFSession(graph))
{
var labels = File.ReadAllLines(labelsFile);
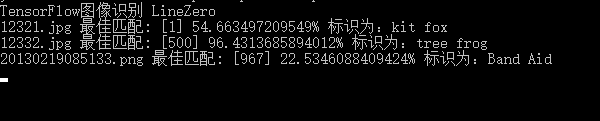
Console.WriteLine("TensorFlow图像识别 LineZero");
foreach (var file in files)
{
// Run inference on the image files
// For multiple images, session.Run() can be called in a loop (and
// concurrently). Alternatively, images can be batched since the model
// accepts batches of image data as input.
var tensor = CreateTensorFromImageFile(file); var runner = session.GetRunner();
runner.AddInput(graph["input"][], tensor).Fetch(graph["output"][]);
var output = runner.Run();
// output[0].Value() is a vector containing probabilities of
// labels for each image in the "batch". The batch size was 1.
// Find the most probably label index. var result = output[];
var rshape = result.Shape;
if (result.NumDims != || rshape[] != )
{
var shape = "";
foreach (var d in rshape)
{
shape += $"{d} ";
}
shape = shape.Trim();
Console.WriteLine($"Error: expected to produce a [1 N] shaped tensor where N is the number of labels, instead it produced one with shape [{shape}]");
Environment.Exit();
} // You can get the data in two ways, as a multi-dimensional array, or arrays of arrays,
// code can be nicer to read with one or the other, pick it based on how you want to process
// it
bool jagged = true; var bestIdx = ;
float p = , best = ; if (jagged)
{
var probabilities = ((float[][])result.GetValue(jagged: true))[];
for (int i = ; i < probabilities.Length; i++)
{
if (probabilities[i] > best)
{
bestIdx = i;
best = probabilities[i];
}
} }
else
{
var val = (float[,])result.GetValue(jagged: false); // Result is [1,N], flatten array
for (int i = ; i < val.GetLength(); i++)
{
if (val[, i] > best)
{
bestIdx = i;
best = val[, i];
}
}
} Console.WriteLine($"{Path.GetFileName(file)} 最佳匹配: [{bestIdx}] {best * 100.0}% 标识为:{labels[bestIdx]}");
}
}
Console.ReadKey();
} // Convert the image in filename to a Tensor suitable as input to the Inception model.
static TFTensor CreateTensorFromImageFile(string file)
{
var contents = File.ReadAllBytes(file); // DecodeJpeg uses a scalar String-valued tensor as input.
var tensor = TFTensor.CreateString(contents); TFGraph graph;
TFOutput input, output; // Construct a graph to normalize the image
ConstructGraphToNormalizeImage(out graph, out input, out output); // Execute that graph to normalize this one image
using (var session = new TFSession(graph))
{
var normalized = session.Run(
inputs: new[] { input },
inputValues: new[] { tensor },
outputs: new[] { output }); return normalized[];
}
} // The inception model takes as input the image described by a Tensor in a very
// specific normalized format (a particular image size, shape of the input tensor,
// normalized pixel values etc.).
//
// This function constructs a graph of TensorFlow operations which takes as
// input a JPEG-encoded string and returns a tensor suitable as input to the
// inception model.
static void ConstructGraphToNormalizeImage(out TFGraph graph, out TFOutput input, out TFOutput output)
{
// Some constants specific to the pre-trained model at:
// https://storage.googleapis.com/download.tensorflow.org/models/inception5h.zip
//
// - The model was trained after with images scaled to 224x224 pixels.
// - The colors, represented as R, G, B in 1-byte each were converted to
// float using (value - Mean)/Scale. const int W = ;
const int H = ;
const float Mean = ;
const float Scale = ; graph = new TFGraph();
input = graph.Placeholder(TFDataType.String); output = graph.Div(
x: graph.Sub(
x: graph.ResizeBilinear(
images: graph.ExpandDims(
input: graph.Cast(
graph.DecodeJpeg(contents: input, channels: ), DstT: TFDataType.Float),
dim: graph.Const(, "make_batch")),
size: graph.Const(new int[] { W, H }, "size")),
y: graph.Const(Mean, "mean")),
y: graph.Const(Scale, "scale"));
} /// <summary>
/// 下载初始Graph和标签
/// </summary>
/// <param name="dir"></param>
static void ModelFiles(string dir)
{
string url = "https://storage.googleapis.com/download.tensorflow.org/models/inception5h.zip"; modelFile = Path.Combine(dir, "tensorflow_inception_graph.pb");
labelsFile = Path.Combine(dir, "imagenet_comp_graph_label_strings.txt");
var zipfile = Path.Combine(dir, "inception5h.zip"); if (File.Exists(modelFile) && File.Exists(labelsFile))
return; Directory.CreateDirectory(dir);
var wc = new WebClient();
wc.DownloadFile(url, zipfile);
ZipFile.ExtractToDirectory(zipfile, dir);
File.Delete(zipfile);
}
}
这里需要注意的是由于需要下载初始Graph和标签,而且是google的站点,所以得使用一些特殊手段。
最终我随便下载了几张图放到bin\Debug\img
然后运行程序,首先确保bin\Debug\tmp文件夹下有tensorflow_inception_graph.pb及imagenet_comp_graph_label_strings.txt。
人工智能的魅力非常大,本文只是一个入门,复制上面的代码,你没法训练模型等等操作。所以道路还是很远,需一步一步来。
更多可以查看 https://github.com/migueldeicaza/TensorFlowSharp 及 https://github.com/tensorflow/models
参考文档:
TensorFlow 官网:https://www.tensorflow.org/get_started/
TensorFlow 中文社区:http://www.tensorfly.cn/
TensorFlow 官方文档中文版:http://wiki.jikexueyuan.com/project/tensorflow-zh/
如果你觉得本文对你有帮助,请点击“推荐”,谢谢。
TensorFlowSharp入门使用C#编写TensorFlow人工智能应用的更多相关文章
- C# 编写 TensorFlow 人工智能应用
TensorFlowSharp入门使用C#编写TensorFlow人工智能应用学习. TensorFlow简单介绍 TensorFlow 是谷歌的第二代机器学习系统,按照谷歌所说,在某些基准测试中,T ...
- C#编写TensorFlow人工智能应用
C#编写TensorFlow人工智能应用 TensorFlowSharp入门使用C#编写TensorFlow人工智能应用学习. TensorFlow简单介绍 TensorFlow 是谷歌的第二代机器学 ...
- JAVA WEB快速入门之从编写一个基于SpringBoot+Mybatis快速创建的REST API项目了解SpringBoot、SpringMVC REST API、Mybatis等相关知识
JAVA WEB快速入门系列之前的相关文章如下:(文章全部本人[梦在旅途原创],文中内容可能部份图片.代码参照网上资源) 第一篇:JAVA WEB快速入门之环境搭建 第二篇:JAVA WEB快速入门之 ...
- Hadoop基础-MapReduce入门篇之编写简单的Wordcount测试代码
Hadoop基础-MapReduce入门篇之编写简单的Wordcount测试代码 作者:尹正杰 版权声明:原创作品,谢绝转载!否则将追究法律责任. 本文主要是记录一写我在学习MapReduce时的一些 ...
- Tensorflow人工智能入门(一)
前言: 作为一个程序员,已经离开开发岗好多年,最近突然迷茫了,不知道自己何去何从.互联网技术发展的速度已快得难以想象,许久不码代码的手也越来越僵直,需求沟通中的套话和空话却越发的熟练,这和当年入行时的 ...
- SLAM+语音机器人DIY系列:(二)ROS入门——4.如何编写ROS的第一个程序hello_world
摘要 ROS机器人操作系统在机器人应用领域很流行,依托代码开源和模块间协作等特性,给机器人开发者带来了很大的方便.我们的机器人“miiboo”中的大部分程序也采用ROS进行开发,所以本文就重点对ROS ...
- JAVA WEB快速入门之从编写一个基于SpringMVC框架的网站了解Maven、SpringMVC、SpringJDBC
接上篇<JAVA WEB快速入门之通过一个简单的Spring项目了解Spring的核心(AOP.IOC)>,了解了Spring的核心(AOP.IOC)后,我们再来学习与实践Maven.Sp ...
- JAVA WEB快速入门之从编写一个JSP WEB网站了解JSP WEB网站的基本结构、调试、部署
接上篇<JAVA WEB快速入门之环境搭建>,在完成了环境搭建后(JDK.Tomcat.IDE),现在是万事具备,就差写代码了,今天就来从编写一个JSP WEB网站了解JSP WEB网站的 ...
- 02基于python玩转人工智能最火框架之TensorFlow人工智能&深度学习介绍
人工智能之父麦卡锡给出的定义 构建智能机器,特别是智能计算机程序的科学和工程. 人工智能是一种让计算机程序能够"智能地"思考的方式 思考的模式类似于人类. 什么是智能? 智能的英语 ...
随机推荐
- Android多渠道打包
项目需要,简单2步实现(由于简单,所以对大量渠道打包不是最优的),比如1000个渠道同时打包的话可能花费的时间会过长.不过目前该方法能满足绝大需求了...根据截图一步一步走: 第一步 设置配置清单文件 ...
- WebService基础学习(三)—CXF
一.什么是CXF? Apache CXF = Celtix + Xfire,开始叫 Apache CeltiXfire,后来更名为 Apache CXF 了,以下简称为 CXF.Apache ...
- JavaScript中的6种运算符总结
JavaScript 运算符主要包括: 算术运算符 赋值运算符 比较运算符 三元运算符 逻辑运算符 字符串连接运算符 运算符 说明 例子 运算结果 + 加 y = 2+1 y = 3 - 减 y = ...
- require.js入门
小颖目前所在的公司在用require.js,小颖一只说要写个小demo,今天抽空把自己写的小demo分享出来,希望对初学者有一些帮助,嘻嘻 学习资料: CSDN上的一篇文章:使用RequireJS优化 ...
- 给我的cnblogs主页做一个响应式布局模板
在cnblogs,一直都是使用官方自带的那些模板,而且感觉也一直很良好!不过最近用手机搜索一些相关的技术资料,很多都来自cnblogs,有些博主的页面在和机端显得很好,有些则展示得不那么友好了……忽然 ...
- 转账示例(二):service层面实现(本例采用QueryRunner来执行sql语句,数据源为C3P0)
缺点:Service层面把Dao层面的开启事务操作完成了1.自行创建C3P0Uti,account数据库,导入Jar包 2.Dao层面 接口: package com.learning.dao; im ...
- MySQL索引统计信息更新相关的参数
MySQL统计信息相关的参数: 1. innodb_stats_on_metadata(是否自动更新统计信息),MySQL 5.7中默认为关闭状态 仅在统计信息配置为非持久化的时候生效. 也就是说在i ...
- Unity C# const与static readonly的区别与联系
using System; namespace Test { class MainClass { //懒人写法的单例 class Weapon { public static readonly Wea ...
- CF #356 div1 A. Bear and Prime 100
题目链接:http://codeforces.com/contest/679/problem/A CF有史以来第一次出现交互式的题目,大致意思为选择2到100中某一个数字作为隐藏数,你可以询问最多20 ...
- [Day03] 循环语句、list相关练习题
用户输入两个数,求平均值. 让用户一直输入数字,如果输入的是'0',终止程序打印所有数字之和. 让用户一直输入数字(只输入数字),如果没输入任何值,终止程序打印所有输入数字的平均值. 求出这个list ...