centos7的网络管理(参考使用)
How to Setup network on centos 7
After installing Centos 7, You may not able to connect network in that machine. This will happen because Ethernet interfaces are not enabled by default.This guide will help you to setup network on centos 7 .
This guide contains network configuration steps both in GUI and command mode.
Setup network on centos 7
let’s start, Type “nmcli d” command in your terminal for quick identification of Ethernet cards installed in your machine.

Here we have 2 interfaces named “enp0s17” and “enp0s18” . it might be different in your case ( Eg: em1 or p4p1 ).
GUI Mode
Recommended for beginners
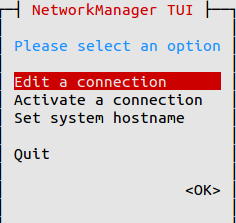
Step 1 » Type this command “nmtui” to open Network manager and press enter after choosing ” Edit a connection” ( Use TAB for choosing options ) .
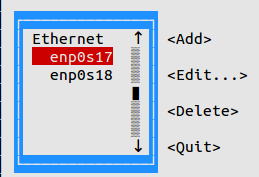
Step 2 » Now you can see all network interfaces, choose one and click “Edit“.
» DHCP configuration
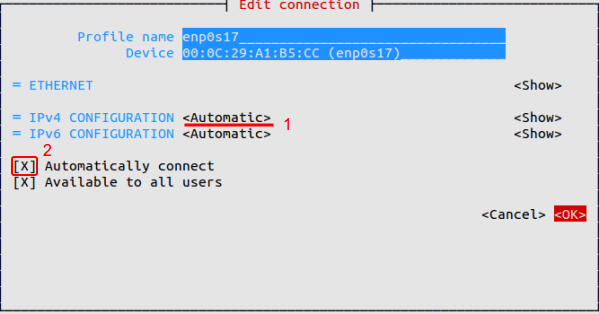
Step 3 » For DHCP,
1. Choose “Automatic” in IPv4 CONFIGURATION.
2. Choose Automatic Connect check box.
3. Press OK and quit Network manager.
Now Restart network service by typing below command.
systemctl restart network Now your server will get IP Address from DHCP .
» Static configuration
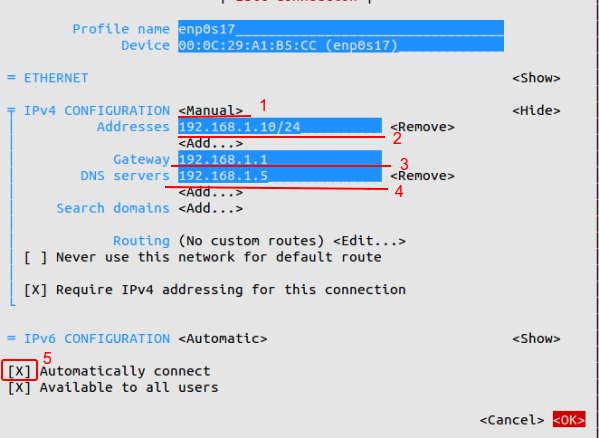
Step 4 » For manual IP address,
1. Choose “Manual” in IPv4 CONFIGURATION.
2. Add IP Address with Subnet , Gateway and DNS server ( Refer below image ).
3. Choose Automatic Connect check box.
4. Press OK and quit Network manager.
Now Restart network service by typing below command.
systemctl restart network That’s it, Interface will have static IP.
Command Mode
Step 1 » Network interface config files are located in /etc/sysconfig/network-scripts/ directory. Open ifcfg-enp0s17 file ( For interface enp0s17 ) and you can see the content like below.
[root@krizna ~]# vi /etc/sysconfig/network-scripts/ifcfg-enp0s17
 TYPE=Ethernet
 BOOTPROTO=none
 DEFROUTE=yes
 IPV4_FAILURE_FATAL=no
 IPV6INIT=yes
 IPV6_AUTOCONF=yes
 IPV6_DEFROUTE=yes
 IPV6_FAILURE_FATAL=no
 NAME=enp0s17
 UUID=7f1aff2d-b154-4436-9497-e3a4dedddcef
 ONBOOT=no
 HWADDR=00:0C:29:A1:B5:D6
 PEERDNS=yes
 PEERROUTES=yes
 IPV6_PEERDNS=yes
 IPV6_PEERROUTES=yes
» DHCP configuration
Step 2 » For DHCP
Find the below lines in config File.
BOOTPROTO=none and replace with
ONBOOT=no
BOOTPROTO=dhcpNow Restart network service by typing below command.
ONBOOT=yes
systemctl restart network Now your server will get IP Address from DHCP
» Static configuration
Step 3 » For Static IP.
Find the below lines in config File.
BOOTPROTO=none and replace with
ONBOOT=no
BOOTPROTO=static And add the below lines at the end of the file.
ONBOOT=yes
IPADDR=172.27.0.32File will look like below after changes.
NETMASK=255.255.255.0
GATEWAY=172.27.0.1
DNS1=172.27.0.5
TYPE=Ethernet
 BOOTPROTO=static
 DEFROUTE=yes
 IPV4_FAILURE_FATAL=no
 IPV6INIT=yes
 IPV6_AUTOCONF=yes
 IPV6_DEFROUTE=yes
 IPV6_FAILURE_FATAL=no
 NAME=enp0s17
 UUID=f0c5b37d-299a-43cb-b74b-618bb252d129
 ONBOOT=yes
 HWADDR=00:0C:29:A1:B5:CC
 IPV6_PEERDNS=yes
 IPV6_PEERROUTES=yes
 IPADDR=192.168.1.10
 NETMASK=255.255.255.0
 GATEWAY=192.168.1.1
 DNS1=192.168.1.5
Now Restart network service by typing below command.
systemctl restart networkNow Interface will have static IP.
Additionally you can use /etc/sysconfig/network file for hostname and DNS .
HOSTNAME=server.krizna.com
 DNS1=192.168.1.5
 DNS2=8.8.8.8
 SEARCH=krizna.com
centos7的网络管理(参考使用)的更多相关文章
- CENTOS7 使用网络管理器配置静态IP地址
CENTOS7 的网络配置和CENTOS6有些不同. 如果你想要使用网络管理器来管理该接口,你可以使用nmtui(网络管理器文本用户界面),它提供了在终端环境中配置配置网络管理器的方式. 在使用nmt ...
- linux的服务管理(centos6和Centos7)和网络管理(网卡配置),计划服务cron
服务和网络 管理 init ifcfg ens33 1.服务: Linux系统中提供的功能,统称为服务,如:at服务.cron服务.web服务.FTP服务.sshd服务等. 服务是由已经在运行的进程 ...
- 使用cobbler批量安装操作系统(基于Centos7.x )
1.1 cobbler简介 Cobbler是一个Linux服务器安装的服务,可以通过网络启动(PXE)的方式来快速安装.重装物理服务器和虚拟机,同时还可以管理DHCP,DNS等. Cobbler可以使 ...
- Django Linux环境下部署CentOS7+Python3+Django+uWSGI+Nginx(含Nginx返回400问题处理、防火墙管理)
本文将介绍如何在Linux系统上部署Django web项目,本次部署基于下面的架构: CentOS7+ Python3.5 + Django1.11 + uWSGI + Nginx 亲测可行!!按照 ...
- vmware centos7 minimal 配置共享文件夹
使用的是VMware安装CentOS7 minimal版,系统镜像是CentOS-7-x86_64-DVD-1708.iso. 宿主机系统为win10,CentOS7 minimal过程省略,可参考h ...
- 嵌入式开发 centos7 交叉编译环境准备
1. 安装centos7,启动图像化界面. 参考:https://blog.csdn.net/qq_23014435/article/details/74347925 # systemctl get- ...
- vmware安装centos7.5、配置网卡、环境配置
1.vmware安装centos7.5虚拟机 参考连接: https://blog.csdn.net/guo_ridgepole/article/details/78973763 可能遇到的问题 ...
- 006-(成功环境记录)基于Centos7系统部署cobbler批量安装系统
1.1 cobbler简介 Cobbler是一个Linux服务器安装的服务,可以通过网络启动(PXE)的方式来快速安装.重装物理服务器和虚拟机,同时还可以管理DHCP,DNS等. Cobbler可以使 ...
- Rancher安装 - CentOS7(Docker)环境
Rancher安装 - CentOS7(Docker)环境 对于开发和测试环境,我们建议通过运行单个Docker容器来安装Rancher.在此安装场景中,您将在单个Linux主机上安装Docker,然 ...
随机推荐
- 银行T0理财怎么选
## 从现金管理说开去 现金是资产配置中的基石,买股票需要花掉现金,吃饭消费也要花掉现金.现金和我们的生活息息相关,需要慎重地管理起来,因此现金管理应运而生. 现金管理需要兼顾 *流动性* 和 *收益 ...
- Python - CentOS 下 yum 安装 python3
1. 概述 CentOS 7 自带 python2(python 以下正文简写为 py, 命令行中依然是 python) 尝试用 yum 安装 py3 2. 环境 os centos7 3. 步骤 1 ...
- CentOS7中Tomcat的安装和配置以及启动配置tomcat。启动过程中的易错点
Tomcat运行需要设置JRE目录,全局变量配置,请参见: Linux下JDK的安装和配置 当然也可以直接修改Tomcat的配置文件,请自行度娘 1.下载并解压 请先去官网找到需要下载的tom ...
- 妙用python之编码转换
转自i春秋 文章难易度:★★ 知识点:python.编码转换 前 言 在日常渗透,漏洞挖掘,甚至是CTF比赛中,会遇到各种编码,常常伴随着这些编码之间的各种转换.记得刚入门那个时候,自己处理编码转换问 ...
- Hadoop3.1.1源码Client详解 : 写入准备-RPC调用与流的建立
该系列总览: Hadoop3.1.1架构体系——设计原理阐述与Client源码图文详解 : 总览 关于RPC(Remote Procedure Call),如果没有概念,可以参考一下RMI(Remot ...
- php 接口获取公网ip并获取天气接口信息
<?php function get_ip(){ //判断服务器是否允许$_SERVER if(isset($_SERVER)){ if(isset($_SERVER['HTTP_X_FORWA ...
- 【原】移动端vue页面点透事件 - 分析与解决
近期项目遇到了vue页面事件被带到下一个页面的问题,也就是我们常说的点透事件,主要表现在android机器上,花了不少时间折腾,简单做下总结~ vue页面之间的切换通过Vue Router的route ...
- js 设计模式:观察者和发布订阅模式
总是把这两个当作同一个模式,但其实是不太一样的,现在重温一下. 观察者模式 观察者直接订阅目标,当目标触发事件时,通知观察者进行更新 简单实现 class Observer { constructor ...
- Django框架之ORM常用字段
一.ORM介绍 1.ORM概念 对象关系映射(Object Relational Mapping,简称ORM)模式是一种为了解决面向对象与关系数据库存在的互不匹配的现象的技术. 简单的说,ORM是通过 ...
- js递归生成树形下拉菜单
需求:我需要把一个单表的数据转换成类似菜单那种如图所示:我呢需要把这个菜单树放入到下框里面去如图所示: 下面是实现思路:1.第一步1.1var afTypeJson=${afTypeJson}// 这 ...