动手学Transformer
动手实现Transformer,所有代码基于tensorflow2.0,配合illustrated-transformer更香。
- 模型架构
- Encoder+Decoder
- Encoder
- Decoder
- Attention
- Add&Norm
- FeedForward
- Embedding
- Position Encoding
- Encoder+Decoder
模型架构
transformer使用经典的编码器-解码器框架,编码器接受一个输入序列 \((x_1,…,x_n)\),经过Embedding转化为词向量,和位置编码相加作为Encoder的输入,在一顿操作后输入被映射到\(z=(z_1,…,z_n)\),Decoder基于\(z\)在一顿操作后生成输出序列\((y_1,…,y_m)\)。

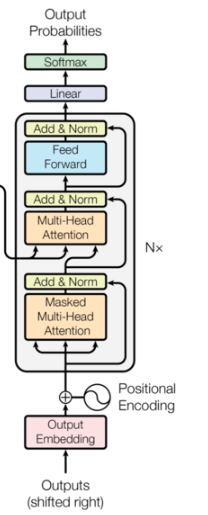
看图说话
- 左边是Encoder,输入为词ID序列,对应形状\([batch\ size,max\ input\ sentense\ length]\),如果embedding维度设置为512,输出形状为\([batch\ size, max\ input\ sentence\ length, 512]\),\(Nx\)表示将Encoder模块堆叠\(N\)次(论文中\(N=6\))
- 右边是Decoder,训练阶段,Decoder输入包括目标句子的词ID序列和最后一个Encoder部分的输出,测试阶段,Decoder的输入为上一次输出的词。Decoder同样被堆叠\(N\)次,最后一个Encoder的输出被接到每一个Decoder块的输入。Decoder输出下一个词的概率,输出形状为\([batch\ size, max\ output\ sentence\ length, \ vocabulary\ length])\) 。
我们先盖房子在装修
class Transformer(tf.keras.Model):

    '''

    Transformer架构,Encoder-Decoder;softmax

    params:

    num_layers:堆叠层数

    dim_model:embedding 维度

    num_heads:multihead attention

    dim_ff:FeedForWard 维度

    input_vocab_size:输入词典大小

    target_vocab_size:输出词典大小

    rate:dropout rate

    '''

    def __init__(self,num_layers, dim_model, num_heads, dim_ff, input_vocab_size,target_vocab_size, rate=0.1):

        super(Transformer, self).__init__()

        self.encoder = Encoder(num_layers, dim_model, num_heads,dim_ff, input_vocab_size, rate)#Encoder

        self.decoder = Decoder(num_layers, dim_model, num_heads,dim_ff, target_vocab_size, rate)#Decoder

        self.output_layer = tf.keras.layers.Dense(target_vocab_size)

    def call(self, inputs, targets, training, enc_padding_mask, look_ahead_mask, dec_padding_mask):

        encoder_output = self.encoder(inputs, training, enc_padding_mask)  # (batch_size, inputs_seq_len, d_model)

        decoder_output, attention_weights = self.decoder(targets, encoder_output, training, look_ahead_mask, dec_padding_mask)

        output = self.output_layer(decoder_output)  # (batch_size, tar_seq_len, target_vocab_size)

        return output, attention_weights
- Encoder

Encoder接受输入token的embedding和位置编码,经过N次Encoder layer 堆叠,代码如下所示
class Encoder(tf.keras.layers.Layer):

    '''

    Encoder 部分,input embedding ;Encoder layer stack

    '''

    def __init__(self, num_layers, dim_model, num_heads,dim_ff, input_vocab_size, rate=0.1):

        super(Encoder, self).__init__()

        self.dim_model = dim_model

        self.num_layers = num_layers

        self.embedding = tf.keras.layers.Embedding(input_vocab_size, self.dim_model)#输入Embedding

        self.pos_encoding = positional_encoding(input_vocab_size, self.dim_model)#位置编码

        self.enc_layers = [EncoderLayer(dim_model, num_heads, dim_ff, rate) for _ in range(num_layers)]#创建Encoder layer

        self.dropout = tf.keras.layers.Dropout(rate)

    def call(self, x, training, mask):

        seq_len = tf.shape(x)[1]

        # adding embedding and position encoding.

        x = self.embedding(x)  # (batch_size, input_seq_len, dim_model)

    #     x *= tf.math.sqrt(tf.cast(self.dim_model, tf.float32))

        x += self.pos_encoding[:, :seq_len, :]

        x = self.dropout(x, training=training)

        for layer in self.enc_layers:

            x = layer(x, training, mask)

        return x  # (batch_size, input_seq_len, d_model)
单个Encoder layer 有两个子层: attention层和point wise feed forward network.
class EncoderLayer(tf.keras.layers.Layer):

    '''

    Encoder layer:

    multihead attention;add&layer norm;FeedForward;add&layer norm

    '''

    def __init__(self, dim_model, num_heads, dim_ff, rate=0.1):

        super(EncoderLayer, self).__init__()

        self.mha = MultiHeadAttention(dim_model, num_heads)

        self.ffn = point_wise_feed_forward_network(dim_model, dim_ff)

        self.layernorm1 = tf.keras.layers.LayerNormalization(epsilon=1e-6)

        self.layernorm2 = tf.keras.layers.LayerNormalization(epsilon=1e-6)

        self.dropout1 = tf.keras.layers.Dropout(rate)

        self.dropout2 = tf.keras.layers.Dropout(rate)

    def call(self, x, training, mask):

        attn_output, _ = self.mha(x, x, x, mask)  # (batch_size, input_seq_len, d_model)

        attn_output = self.dropout1(attn_output, training=training)

        out1 = self.layernorm1(x + attn_output)  # (batch_size, input_seq_len, d_model)

        ffn_output = self.ffn(out1)  # (batch_size, input_seq_len, d_model)

        ffn_output = self.dropout2(ffn_output, training=training)

        out2 = self.layernorm2(out1 + ffn_output)  # (batch_size, input_seq_len, d_model)

        return out2
- Decoder
Decoder和Encoder类似,由N个Decoder layer 堆叠而成, 接受输入有三部分:token embedding、位置编码、 最后一个Encoder的输出
class Decoder(tf.keras.layers.Layer):

    '''

    Decoder 部分:

    input embedding;Decoder layer stack;

    '''

    def __init__(self,num_layers,dim_model, num_heads, dim_ff, target_vocab_size, rate=0.1):

        super(Decoder, self).__init__()

        self.dim_model = dim_model

        self.num_layers = num_layers

        self.embedding = tf.keras.layers.Embedding(target_vocab_size, self.dim_model)

        self.pos_encoding = positional_encoding(target_vocab_size, self.dim_model)

        self.dec_layers = [DecoderLayer(dim_model, num_heads, dim_ff, rate) for _ in range(num_layers)]#创建Decoder layer

        self.dropout = tf.keras.layers.Dropout(rate)

    def call(self,x,enc_output,training,look_ahead_mask,padding_mask):

        seq_len = tf.shape(x)[1]

        attention_weights = {}

        x = self.embedding(x)# (batch_size, target_seq_len, d_model)

        x += self.pos_encoding[:,:seq_len,:]

        for i,layer in enumerate(self.dec_layers):

            x,block1,block2 = layer(x,enc_output,training,look_ahead_mask, padding_mask)

            attention_weights['decoder_layer{}_block1'.format(i+1)] = block1

            attention_weights['decoder_layer{}_block2'.format(i+1)] = block2

        # x.shape == (batch_size, target_seq_len, d_model)

        return x, attention_weights
单个Decoder层有三个子层:masked attention层、attention层和point wise feed forward network. masked attention层会掩盖掉序列中还没看到的位置,attention层以target token 为query,Encoder输出为 key和value
class DecoderLayer(tf.keras.layers.Layer):

    '''

    Decoder layer:

    masked multihead attention;add&norm;multihead attention;add&norm;FeedForward;add&norm

    '''

    def __init__(self, dim_model, num_heads,dim_ff,rate=0.1):

        super(DecoderLayer,self).__init__()

        self.mask_mha = MultiHeadAttention(dim_model, num_heads)

        self.mha = MultiHeadAttention(dim_model, num_heads)

        self.ffn = point_wise_feed_forward_network(dim_model, dim_ff)

        self.layernorm1 = tf.keras.layers.LayerNormalization(epsilon=1e-6)

        self.layernorm2 = tf.keras.layers.LayerNormalization(epsilon=1e-6)

        self.layernorm3 = tf.keras.layers.LayerNormalization(epsilon=1e-6)

        self.dropout1 = tf.keras.layers.Dropout(rate)

        self.dropout2 = tf.keras.layers.Dropout(rate)

        self.dropout3 = tf.keras.layers.Dropout(rate)

    def call(self,x,enc_output, training, look_ahead_mask, padding_mask):

        #masked multi-head attention

        mask_attn_output, attn_weights_block1 = self.mask_mha(x,x,x,look_ahead_mask)

        mask_attn_output = self.dropout1(mask_attn_output,training)

        out1 = self.layernorm1(x + mask_attn_output)

        #multi-head attention

        attn_output,attn_weights_block2 = self.mha(out1,enc_output,enc_output,padding_mask)

        attn_ouput = self.dropout2(attn_output, training=training)

        out2 = self.layernorm2(attn_output + out1)  # (batch_size, target_seq_len, d_model)

        # feed-forward

        ffn_output = self.ffn(out2)  # (batch_size, input_seq_len, d_model)

        ffn_output = self.dropout2(ffn_output, training=training)

        out3 = self.layernorm3(out1 + ffn_output)  # (batch_size, input_seq_len, d_model)

        return out3, attn_weights_block1, attn_weights_block2
- Attention
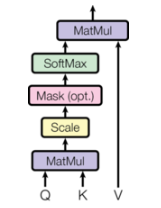
点积attention
\]
def Attention(query,key,value,mask=None):

    qk = tf.matmul(query,key,transpose_b=True)#对key进行转置

    dk = tf.cast(tf.shape(key)[-1],tf.float32)

    scale = qk / tf.math.sqrt(dk)

    if mask is not None:

        scale = scale + (mask*1e-9)#le-9接近于负无穷,对应softmax输出就为0

    score = tf.nn.softmax(scale,axis=-1)

    output = tf.matmul(score,value)

    return output,score
- Multihead attention
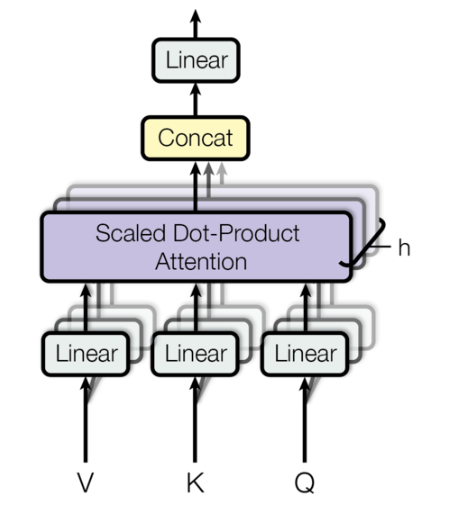
将输入划分为多个head,对应维度变化\((batch\_size,seq\_len,dim\_model) \rightarrow (batch\_size,head,seq\_len,d_k)\), 每个head操作不变,将多个head结果拼接经过权重矩阵\(W^O\)输出
where ~~~~~~ head_i=Attention(QW^Q_i,KW^K_i,VW^V_i)
\]
class MultiHeadAttention(tf.keras.layers.Layer):

    '''

    Multihead attention

    '''

    def __init__(self,dim_model,num_heads):

        super(MultiHeadAttention,self).__init__()

        self.num_heads = num_heads

        self.dim_model = dim_model

        assert dim_model%self.num_heads == 0

        self.d_k = dim_model//num_heads

        self.wq = tf.keras.layers.Dense(dim_model)

        self.wk = tf.keras.layers.Dense(dim_model)

        self.wv = tf.keras.layers.Dense(dim_model)

        self.wo = tf.keras.layers.Dense(dim_model)

    def split_heads(self,x,batch_size):

        #split 输入到多个head,(batch_size,seq_len,dim_model)->(batch_size,head,seq_len,self.d_k)

        x = tf.reshape(x,(batch_size, -1, self.num_heads, self.d_k))

        return tf.transpose(x,perm=[0,2,1,3])#重排输出维度

    def call(self,q,k,v,mask):

        batch_size = tf.shape(q)[0]

        q = self.wq(q)  # (batch_size, seq_len, dim_model)

        k = self.wk(k)

        v = self.wv(v)

        q = self.split_heads(q, batch_size)  # (batch_size, num_heads, seq_len_q, d_k)

        k = self.split_heads(k, batch_size)

        v = self.split_heads(v, batch_size)

        attention,attention_weights = Attention(q,k,v,mask)

        attention = tf.transpose(attention,perm=[0,2,1,3])

        concat_attention = tf.reshape(attention,(batch_size,-1,self.dim_model))

        return self.wo(concat_attention),attention_weights
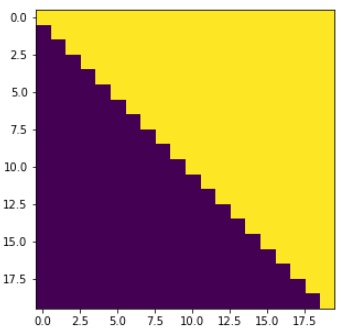
- Masking
在解码时,为了保证预测当前词不会看到后面的词,需要将后面的词掩码掉。如下图所示,上三角元素为1,表示该位置需要被mask
#mask掉后面的词,保证预测前面词时看不到后面的

def look_ahead_mask(size):

    "Mask out subsequent positions."

    mask = tf.linalg.band_part(tf.ones((size, size)), 0, -1)#保留上三角,1表示需要被mask

    return mask
plt.figure(figsize=(5,5))

plt.imshow(look_ahead_mask(20))

None
#序列填充mask,对padding位置输出1表示被填充

def padding_mask(seq):

  seq = tf.cast(tf.math.equal(seq, 0), tf.float32)

  # add extra dimensions so that we can add the padding

  # to the attention logits.

  return seq[:, tf.newaxis, tf.newaxis, :]  # (batch_size, 1, 1, seq_len)
- Feed-Forward network
接在attention子层后面,用于增强非线性表示能力
\]
def point_wise_feed_forward_network(dim_model, dim_ff):

    model = tf.keras.Sequential()

    model.add(tf.keras.layers.Dense(dim_ff, activation='relu'))

    model.add(tf.keras.layers.Dense(dim_model))

    return model
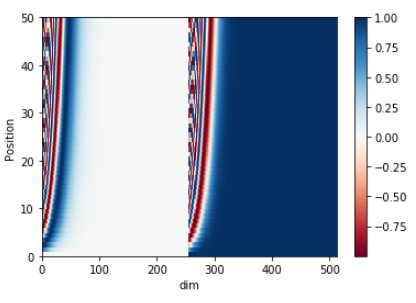
- position encoding
位置编码是影响Transformer长文本建模的主要因素,由于input embedding 中不包含词的位置信息,需要加入位置编码表示词在句子中的位置信息。
为了表示词的绝对位置信息和相对位置信息,本文中使用了正余弦函数
\]
其中 \(pos\) 表示位置,\(i\) 表示维度,关于为什么使用正余弦作为位置编码,可以参考这里。
def positional_encoding(maxlen,dim_model):

    position = np.arange(0, maxlen)[:,np.newaxis]

    div = np.array([1/np.power(10000.0,((2*i)/dim_model)) for i in range(dim_model)])[np.newaxis,:]

#     div = np.exp(np.arange(0, dim_model, 2) * -(np.log(10000.0) / dim_model))

    sine = np.sin(position*div[:,0::2])

    cons = np.cos(position*div[:,1::2])

    pos_encoding = np.concatenate([sine,cons], axis=-1)[np.newaxis, :]

    return tf.cast(pos_encoding, dtype=tf.float32)
pos_encoding = positional_encoding(50, 512)

print (pos_encoding.shape)

plt.pcolormesh(pos_encoding[0], cmap='RdBu')

plt.xlabel('dim')

plt.xlim((0, 512))

plt.ylabel('Position')

plt.colorbar()

plt.show()
transformer的基本概念就先学到这里了
reference:
Illustrated-transformer. https://jalammar.github.io/illustrated-transformer/
Transformer_implementation_and_application. https://github.com/yuanxiaosc/Transformer_implementation_and_application
The Annotated Transformer. http://nlp.seas.harvard.edu/2018/04/03/attention.html#full-model
动手学Transformer的更多相关文章
- 对比《动手学深度学习》 PDF代码+《神经网络与深度学习 》PDF
随着AlphaGo与李世石大战的落幕,人工智能成为话题焦点.AlphaGo背后的工作原理"深度学习"也跳入大众的视野.什么是深度学习,什么是神经网络,为何一段程序在精密的围棋大赛中 ...
- 【动手学深度学习】Jupyter notebook中 import mxnet出错
问题描述 打开d2l-zh目录,使用jupyter notebook打开文件运行,import mxnet 出现无法导入mxnet模块的问题, 但是命令行运行是可以导入mxnet模块的. 原因: 激活 ...
- 小白学习之pytorch框架(2)-动手学深度学习(begin-random.shuffle()、torch.index_select()、nn.Module、nn.Sequential())
在这向大家推荐一本书-花书-动手学深度学习pytorch版,原书用的深度学习框架是MXNet,这个框架经过Gluon重新再封装,使用风格非常接近pytorch,但是由于pytorch越来越火,个人又比 ...
- 动手学TCP——CS144实验感想
在Stanford CS144的课程实验Lab0~Lab4中,我们动手实现了一个自己的TCP协议,并且能够真的与互联网通信!此外,感谢Stanford开源本实验并提供了大量的优质测试用例,使得我们仅仅 ...
- 动手学深度学习17-kaggle竞赛实践小项目房价预测
kaggle竞赛 获取和读取数据集 数据预处理 找出所有数值型的特征,然后标准化 处理离散值特征 转化为DNArray后续训练 训练模型 k折交叉验证 预测样本,并提交结果 kaggle竞赛 本节将动 ...
- 动手学深度学习4-线性回归的pytorch简洁实现
导入同样导入之前的包或者模块 生成数据集 通过pytorch读取数据 定义模型 初始化模型 定义损失函数 定义优化算法 训练模型 小结 本节利用pytorch中的模块,生成一个更加简洁的代码来实现同样 ...
- 动手学servlet(六) 过滤器和监听器
过滤器(Filter) 过滤器是在客户端和请求资源之间,起一个过滤的作用,举个例子,比如我们要请求admin文件夹下的index.jsp这个页面,那么我们可以用一个过滤器,判断登录用户是不是管理员 ...
- 动手学servlet(五) 共享变量
1. 无论对象的作用域如何,设置和读取共享变量的方法是一致的 -setAttribute("varName",obj); -getAttribute("varName&q ...
- 动手学servlet(四) cookie和session
Cookie cookie是保存在客户端的一个“键值对”,用来存储用户的一些信息 cookie的应用: -在电子商务会话中标识用户 -对网站进行定制,比如你经常浏览哪些内容,就展示哪些页面给你 - ...
随机推荐
- 【简介】OpenOCD 由jtag操作到parport driver流程
1. 定义 jtag_command_type 在 OpenOCD 中,JTag 命令在枚举 jtag_command_type 中定义,定义如下: /** * The type of the @c ...
- Django redis的使用
一 简介 redis是一个key-value存储系统.和Memcached类似,它支持存储的value类型相对更多,包括string(字符串).list(链表).set(集合).zset(sorted ...
- R之Shiny学习笔记
官方教程:https://shiny.rstudio.com/tutorial/ 中文教程:http://yanping.me/shiny-tutorial/ 英文教程:https://deanatt ...
- 更新statsmodels出现的一系列问题
在statsmodels的开发12版本文档上正好看到使用三因子模型进行rolling regression,但是代码来自最新版本,而我的是老版本,运行下列代码会出现这个问题: No module na ...
- 推荐 | 7个你最应该知道的机器学习相关github项目
欢迎大家关注我们的网站和系列教程:http://www.tensorflownews.com/,学习更多的机器学习.深度学习的知识! 磐石 目录: 介绍 Person Blocker(人体自动遮挡) ...
- spring源码阅读笔记06:bean加载之准备创建bean
上文中我们学习了bean加载的整个过程,我们知道从spring容器中获取单例bean时会先从缓存尝试获取,如果缓存中不存在已经加载的单例bean就需要从头开始bean的创建,而bean的创建过程是非常 ...
- html-css:浮动_清除浮动
1.浮动 清除浮动之前我们首先需要了解为什么要清除浮动 1. 假设我们有一个父盒子,不设置高度,其高度有内部子盒子的大小自动撑开,这样是完全可行的,因为有时候我们并不想直接固定死父盒子的大小,而是根据 ...
- coding++:Spring中的@Transactional(rollbackFor = Exception.class)属性详解
异常: 如下图所示,我们都知道 Exception 分为 运行时异常 RuntimeException 和 非运行时异常. error 是一定会回滚的. 如果不对运行时异常进行处理,那么出现运行时异常 ...
- centos7中提升用户权限
提升用户权限我看网上资源有两种方法,一种是修改/etc/sudoers/文件将新增的用户权限提升为和root一样的权限,这种方法不知道怎么回事我没用应用成功,这里我介绍第二种方法,第二种方法是更改/e ...
- Babel快速入门
作者:姜瑞涛 Github仓库:https://github.com/jruit/babel-tutorial 博客:姜瑞涛的官方网站 原文链接:https://www.jiangruitao.com ...