【python实现卷积神经网络】开始训练
代码来源:https://github.com/eriklindernoren/ML-From-Scratch
卷积神经网络中卷积层Conv2D(带stride、padding)的具体实现:https://www.cnblogs.com/xiximayou/p/12706576.html
激活函数的实现(sigmoid、softmax、tanh、relu、leakyrelu、elu、selu、softplus):https://www.cnblogs.com/xiximayou/p/12713081.html
损失函数定义(均方误差、交叉熵损失):https://www.cnblogs.com/xiximayou/p/12713198.html
优化器的实现(SGD、Nesterov、Adagrad、Adadelta、RMSprop、Adam):https://www.cnblogs.com/xiximayou/p/12713594.html
卷积层反向传播过程:https://www.cnblogs.com/xiximayou/p/12713930.html
全连接层实现:https://www.cnblogs.com/xiximayou/p/12720017.html
批量归一化层实现:https://www.cnblogs.com/xiximayou/p/12720211.html
池化层实现:https://www.cnblogs.com/xiximayou/p/12720324.html
padding2D实现:https://www.cnblogs.com/xiximayou/p/12720454.html
Flatten层实现:https://www.cnblogs.com/xiximayou/p/12720518.html
上采样层UpSampling2D实现:https://www.cnblogs.com/xiximayou/p/12720558.html
Dropout层实现:https://www.cnblogs.com/xiximayou/p/12720589.html
激活层实现:https://www.cnblogs.com/xiximayou/p/12720622.html
定义训练和测试过程:https://www.cnblogs.com/xiximayou/p/12725873.html
代码在mlfromscratch/examples/convolutional_neural_network.py 中:
from __future__ import print_function
from sklearn import datasets
import matplotlib.pyplot as plt
import math
import numpy as np # Import helper functions
from mlfromscratch.deep_learning import NeuralNetwork
from mlfromscratch.utils import train_test_split, to_categorical, normalize
from mlfromscratch.utils import get_random_subsets, shuffle_data, Plot
from mlfromscratch.utils.data_operation import accuracy_score
from mlfromscratch.deep_learning.optimizers import StochasticGradientDescent, Adam, RMSprop, Adagrad, Adadelta
from mlfromscratch.deep_learning.loss_functions import CrossEntropy
from mlfromscratch.utils.misc import bar_widgets
from mlfromscratch.deep_learning.layers import Dense, Dropout, Conv2D, Flatten, Activation, MaxPooling2D
from mlfromscratch.deep_learning.layers import AveragePooling2D, ZeroPadding2D, BatchNormalization, RNN def main(): #----------
# Conv Net
#---------- optimizer = Adam() data = datasets.load_digits()
X = data.data
y = data.target # Convert to one-hot encoding
y = to_categorical(y.astype("int")) X_train, X_test, y_train, y_test = train_test_split(X, y, test_size=0.4, seed=1) # Reshape X to (n_samples, channels, height, width)
X_train = X_train.reshape((-1,1,8,8))
X_test = X_test.reshape((-1,1,8,8)) clf = NeuralNetwork(optimizer=optimizer,
loss=CrossEntropy,
validation_data=(X_test, y_test)) clf.add(Conv2D(n_filters=16, filter_shape=(3,3), stride=1, input_shape=(1,8,8), padding='same'))
clf.add(Activation('relu'))
clf.add(Dropout(0.25))
clf.add(BatchNormalization())
clf.add(Conv2D(n_filters=32, filter_shape=(3,3), stride=1, padding='same'))
clf.add(Activation('relu'))
clf.add(Dropout(0.25))
clf.add(BatchNormalization())
clf.add(Flatten())
clf.add(Dense(256))
clf.add(Activation('relu'))
clf.add(Dropout(0.4))
clf.add(BatchNormalization())
clf.add(Dense(10))
clf.add(Activation('softmax')) print ()
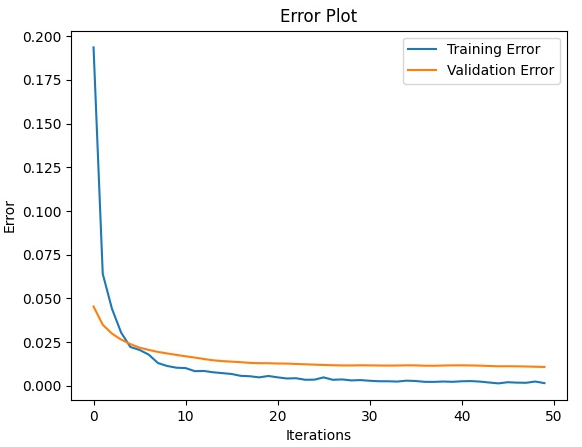
clf.summary(name="ConvNet") train_err, val_err = clf.fit(X_train, y_train, n_epochs=50, batch_size=256) # Training and validation error plot
n = len(train_err)
training, = plt.plot(range(n), train_err, label="Training Error")
validation, = plt.plot(range(n), val_err, label="Validation Error")
plt.legend(handles=[training, validation])
plt.title("Error Plot")
plt.ylabel('Error')
plt.xlabel('Iterations')
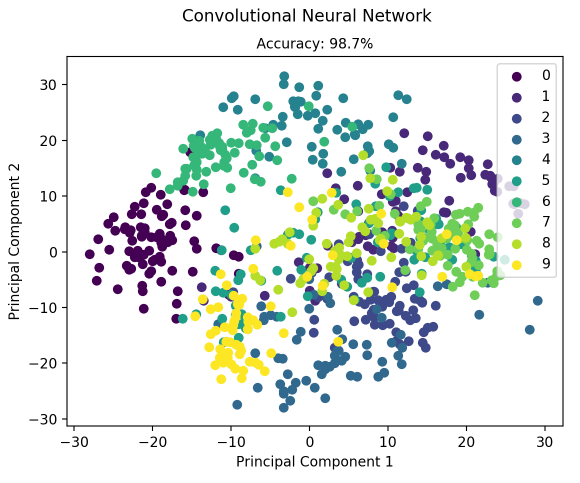
plt.show() _, accuracy = clf.test_on_batch(X_test, y_test)
print ("Accuracy:", accuracy) y_pred = np.argmax(clf.predict(X_test), axis=1)
X_test = X_test.reshape(-1, 8*8)
# Reduce dimension to 2D using PCA and plot the results
Plot().plot_in_2d(X_test, y_pred, title="Convolutional Neural Network", accuracy=accuracy, legend_labels=range(10)) if __name__ == "__main__":
main()
我们还是一步步进行分析:
1、优化器使用Adam()
2、数据集使用的是sklearn.datasets中的手写数字,其部分数据如下:
(1797, 64)

(1797,)

[[ 0.  0.  5. 13.  9.  1.  0.  0.  0.  0. 13. 15. 10. 15.  5.  0.  0.  3.

  15.  2.  0. 11.  8.  0.  0.  4. 12.  0.  0.  8.  8.  0.  0.  5.  8.  0.

   0.  9.  8.  0.  0.  4. 11.  0.  1. 12.  7.  0.  0.  2. 14.  5. 10. 12.

   0.  0.  0.  0.  6. 13. 10.  0.  0.  0.]

 [ 0.  0.  0. 12. 13.  5.  0.  0.  0.  0.  0. 11. 16.  9.  0.  0.  0.  0.

   3. 15. 16.  6.  0.  0.  0.  7. 15. 16. 16.  2.  0.  0.  0.  0.  1. 16.

  16.  3.  0.  0.  0.  0.  1. 16. 16.  6.  0.  0.  0.  0.  1. 16. 16.  6.

   0.  0.  0.  0.  0. 11. 16. 10.  0.  0.]

 [ 0.  0.  0.  4. 15. 12.  0.  0.  0.  0.  3. 16. 15. 14.  0.  0.  0.  0.

   8. 13.  8. 16.  0.  0.  0.  0.  1.  6. 15. 11.  0.  0.  0.  1.  8. 13.

  15.  1.  0.  0.  0.  9. 16. 16.  5.  0.  0.  0.  0.  3. 13. 16. 16. 11.

   5.  0.  0.  0.  0.  3. 11. 16.  9.  0.]

 [ 0.  0.  7. 15. 13.  1.  0.  0.  0.  8. 13.  6. 15.  4.  0.  0.  0.  2.

   1. 13. 13.  0.  0.  0.  0.  0.  2. 15. 11.  1.  0.  0.  0.  0.  0.  1.

  12. 12.  1.  0.  0.  0.  0.  0.  1. 10.  8.  0.  0.  0.  8.  4.  5. 14.

   9.  0.  0.  0.  7. 13. 13.  9.  0.  0.]

 [ 0.  0.  0.  1. 11.  0.  0.  0.  0.  0.  0.  7.  8.  0.  0.  0.  0.  0.

   1. 13.  6.  2.  2.  0.  0.  0.  7. 15.  0.  9.  8.  0.  0.  5. 16. 10.

   0. 16.  6.  0.  0.  4. 15. 16. 13. 16.  1.  0.  0.  0.  0.  3. 15. 10.

   0.  0.  0.  0.  0.  2. 16.  4.  0.  0.]

 [ 0.  0. 12. 10.  0.  0.  0.  0.  0.  0. 14. 16. 16. 14.  0.  0.  0.  0.

  13. 16. 15. 10.  1.  0.  0.  0. 11. 16. 16.  7.  0.  0.  0.  0.  0.  4.

   7. 16.  7.  0.  0.  0.  0.  0.  4. 16.  9.  0.  0.  0.  5.  4. 12. 16.

   4.  0.  0.  0.  9. 16. 16. 10.  0.  0.]

 [ 0.  0.  0. 12. 13.  0.  0.  0.  0.  0.  5. 16.  8.  0.  0.  0.  0.  0.

  13. 16.  3.  0.  0.  0.  0.  0. 14. 13.  0.  0.  0.  0.  0.  0. 15. 12.

   7.  2.  0.  0.  0.  0. 13. 16. 13. 16.  3.  0.  0.  0.  7. 16. 11. 15.

   8.  0.  0.  0.  1.  9. 15. 11.  3.  0.]

 [ 0.  0.  7.  8. 13. 16. 15.  1.  0.  0.  7.  7.  4. 11. 12.  0.  0.  0.

   0.  0.  8. 13.  1.  0.  0.  4.  8.  8. 15. 15.  6.  0.  0.  2. 11. 15.

  15.  4.  0.  0.  0.  0.  0. 16.  5.  0.  0.  0.  0.  0.  9. 15.  1.  0.

   0.  0.  0.  0. 13.  5.  0.  0.  0.  0.]

 [ 0.  0.  9. 14.  8.  1.  0.  0.  0.  0. 12. 14. 14. 12.  0.  0.  0.  0.

   9. 10.  0. 15.  4.  0.  0.  0.  3. 16. 12. 14.  2.  0.  0.  0.  4. 16.

  16.  2.  0.  0.  0.  3. 16.  8. 10. 13.  2.  0.  0.  1. 15.  1.  3. 16.

   8.  0.  0.  0. 11. 16. 15. 11.  1.  0.]

 [ 0.  0. 11. 12.  0.  0.  0.  0.  0.  2. 16. 16. 16. 13.  0.  0.  0.  3.

  16. 12. 10. 14.  0.  0.  0.  1. 16.  1. 12. 15.  0.  0.  0.  0. 13. 16.

   9. 15.  2.  0.  0.  0.  0.  3.  0.  9. 11.  0.  0.  0.  0.  0.  9. 15.

   4.  0.  0.  0.  9. 12. 13.  3.  0.  0.]]

[0 1 2 3 4 5 6 7 8 9]
3、接着有一个to_categorical()函数,在mlfromscratch.utils下的data_manipulation.py中:
def to_categorical(x, n_col=None):

    """ One-hot encoding of nominal values """

    if not n_col:

        n_col = np.amax(x) + 1

    one_hot = np.zeros((x.shape[0], n_col))

    one_hot[np.arange(x.shape[0]), x] = 1

    return one_hot
用于将标签转换为one-hot编码。
4、划分训练集和测试集:train_test_split(),在mlfromscratch.utils下的data_manipulation.py中:
def train_test_split(X, y, test_size=0.5, shuffle=True, seed=None):

    """ Split the data into train and test sets """

    if shuffle:

        X, y = shuffle_data(X, y, seed)

    # Split the training data from test data in the ratio specified in

    # test_size

    split_i = len(y) - int(len(y) // (1 / test_size))

    X_train, X_test = X[:split_i], X[split_i:]

    y_train, y_test = y[:split_i], y[split_i:]

    return X_train, X_test, y_train, y_test
5、由于卷积神经网络的输入是[batchsize,channel,wheight,width]的维度,因此要将原始数据进行转换,即将(1797,64)转换为(1797,1,8,8)格式的数据。这里batchsize就是样本的数量。
6、定义卷积神经网络的训练和测试过程:包括优化器、损失函数、测试数据
7、定义模型结构
8、输出模型每层的类型、参数数量以及输出大小
9、将数据输入到模型中,设置epochs的大小以及batch_size的大小
10、计算训练和测试的错误,并绘制成图
11、计算准确率
12、绘制测试集中每一类预测的结果,这里有一个plot_in_2d()函数,位于mlfromscratch.utils下的misc.py中
 # Plot the dataset X and the corresponding labels y in 2D using PCA.

    def plot_in_2d(self, X, y=None, title=None, accuracy=None, legend_labels=None):

        X_transformed = self._transform(X, dim=2)

        x1 = X_transformed[:, 0]

        x2 = X_transformed[:, 1]

        class_distr = []

        y = np.array(y).astype(int)

        colors = [self.cmap(i) for i in np.linspace(0, 1, len(np.unique(y)))]

        # Plot the different class distributions

        for i, l in enumerate(np.unique(y)):

            _x1 = x1[y == l]

            _x2 = x2[y == l]

            _y = y[y == l]

            class_distr.append(plt.scatter(_x1, _x2, color=colors[i]))

        # Plot legend

        if not legend_labels is None:

            plt.legend(class_distr, legend_labels, loc=1)

        # Plot title

        if title:

            if accuracy:

                perc = 100 * accuracy

                plt.suptitle(title)

                plt.title("Accuracy: %.1f%%" % perc, fontsize=10)

            else:

                plt.title(title)

        # Axis labels

        plt.xlabel('Principal Component 1')

        plt.ylabel('Principal Component 2')

        plt.show()
接下来就可以实际进行操作了,我是在谷歌colab中,首先使用:
!git clone https://github.com/eriklindernoren/ML-From-Scratch.git
将相关代码复制下来。
然后进行安装:在ML-From-Scratch目录下输入:
!python setup.py install
最后输入:
!python mlfromscratch/examples/convolutional_neural_network.py
最终结果:
+---------+

| ConvNet |

+---------+

Input Shape: (1, 8, 8)

+----------------------+------------+--------------+

| Layer Type           | Parameters | Output Shape |

+----------------------+------------+--------------+

| Conv2D               | 160        | (16, 8, 8)   |

| Activation (ReLU)    | 0          | (16, 8, 8)   |

| Dropout              | 0          | (16, 8, 8)   |

| BatchNormalization   | 2048       | (16, 8, 8)   |

| Conv2D               | 4640       | (32, 8, 8)   |

| Activation (ReLU)    | 0          | (32, 8, 8)   |

| Dropout              | 0          | (32, 8, 8)   |

| BatchNormalization   | 4096       | (32, 8, 8)   |

| Flatten              | 0          | (2048,)      |

| Dense                | 524544     | (256,)       |

| Activation (ReLU)    | 0          | (256,)       |

| Dropout              | 0          | (256,)       |

| BatchNormalization   | 512        | (256,)       |

| Dense                | 2570       | (10,)        |

| Activation (Softmax) | 0          | (10,)        |

+----------------------+------------+--------------+

Total Parameters: 538570

Training: 100% [------------------------------------------------] Time:  0:01:32

<Figure size 640x480 with 1 Axes>

Accuracy: 0.9846796657381616

<Figure size 640x480 with 1 Axes>
至此,结合代码一步一步看卷积神经网络的整个实现过程就完成了。通过结合代码的形式,可以加深对深度学习中卷积神经网络相关知识的理解。
【python实现卷积神经网络】开始训练的更多相关文章
- 基于Python的卷积神经网络和特征提取
基于Python的卷积神经网络和特征提取 用户1737318发表于人工智能头条订阅 224 在这篇文章中: Lasagne 和 nolearn 加载MNIST数据集 ConvNet体系结构与训练 预测 ...
- 《TensorFlow实战》中AlexNet卷积神经网络的训练中
TensorFlow实战中AlexNet卷积神经网络的训练 01 出错 TypeError: as_default() missing 1 required positional argument: ...
- python机器学习卷积神经网络(CNN)
卷积神经网络(CNN) 关注公众号"轻松学编程"了解更多. 一.简介 卷积神经网络(Convolutional Neural Network,CNN)是一种前馈神经网络,它的人 ...
- 【python实现卷积神经网络】定义训练和测试过程
代码来源:https://github.com/eriklindernoren/ML-From-Scratch 卷积神经网络中卷积层Conv2D(带stride.padding)的具体实现:https ...
- Python CNN卷积神经网络代码实现
# -*- coding: utf-8 -*- """ Created on Wed Nov 21 17:32:28 2018 @author: zhen "& ...
- 使用卷积神经网络CNN训练识别mnist
算的的上是自己搭建的第一个卷积神经网络.网络结构比较简单. 输入为单通道的mnist数据集.它是一张28*28,包含784个特征值的图片 我们第一层输入,使用5*5的卷积核进行卷积,输出32张特征图, ...
- 【python实现卷积神经网络】卷积层Conv2D反向传播过程
代码来源:https://github.com/eriklindernoren/ML-From-Scratch 卷积神经网络中卷积层Conv2D(带stride.padding)的具体实现:https ...
- 【python实现卷积神经网络】激活函数的实现(sigmoid、softmax、tanh、relu、leakyrelu、elu、selu、softplus)
代码来源:https://github.com/eriklindernoren/ML-From-Scratch 卷积神经网络中卷积层Conv2D(带stride.padding)的具体实现:https ...
- 【python实现卷积神经网络】损失函数的定义(均方误差损失、交叉熵损失)
代码来源:https://github.com/eriklindernoren/ML-From-Scratch 卷积神经网络中卷积层Conv2D(带stride.padding)的具体实现:https ...
随机推荐
- 【原创】面试官:谈谈你对mysql联合索引的认识?
引言 本文预计分为两个部分: (1)联合索引部分的基础知识 在这个部分,我们温习一下联合索引的基础 (2)联合索引部分的实战题 在这个部分,列举几个我认为算是实战中的代表题,挑出来说说. 正文 基础 ...
- Java 中,如何对日期进行加减操作
今天在做项目时,遇到了对时间的加减进行操作的需求,根据传入的日期字符串,操作参数("+","-"),加数(要操作的天数),对日期进行加减操作,经查询资料,自己写 ...
- 学习vue前的准备工作
起步 1.扎实的HTML/CSS/Javascript基本功,这是前置条件. 2.不要用任何的构建项目工具,只用最简单的<script>,把教程里的例子模仿一遍,理解用法.不推荐上来就直接 ...
- Hook集合----SSDTHook(x86 Win7)
最近在学习Ring0层Hook的一些知识点,很久就写完SSDTHook的代码了,但是一直没有整理成笔记,最近有时间也就整理整理. 介绍: SSDTHook 实质是利用Ntoskrnl.exe 中全局导 ...
- 【转】Standardization(标准化)和Normalization(归一化)的区别
Standardization(标准化)和Normalization(归一化)的区别 https://blog.csdn.net/Dhuang159/article/details/83627146 ...
- OpenCV-Python ORB(面向快速和旋转的BRIEF) | 四十三
目标 在本章中,我们将了解ORB的基础知识 理论 作为OpenCV的狂热者,关于ORB的最重要的事情是它来自" OpenCV Labs".该算法由Ethan Rublee,Vinc ...
- GitHub标星2.6万!Python算法新手入门大全
今天推荐一个Python学习的干货. 几个印度小哥,在GitHub上建了一个各种Python算法的新手入门大全,现在标星已经超过2.6万.这个项目主要包括两部分内容:一是各种算法的基本原理讲解,二是各 ...
- 2020 | 可替代Selenium的测试框架Top15
本文首发于 微信公众号: 软测小生 Selenium是一种开源自动测试工具.它可以跨不同的浏览器和平台在Web应用程序上执行功能,回归,负载测试.Slenium是最好的工具之一,但确实有一些缺点. 业 ...
- ADO.NET 的使用(二)
一.本篇主要讲ADO.NET的核心DataSet DataSet里面有个DataTable,DataTable还有个对应的DataView 首先呢,假设数据库的数据 id name mob 100 张 ...
- iOS pch
Xcode6 之前会在 Supporting Files 文件夹下自动生成一个"工程名-PrefixHeader.pch"的预编译头文件,pch 头文件的内容能被项目中的其他所有源 ...