MVPR下的PHP分页教程
这个PHP分页其实不难,现在就开始看看核心思路吧。
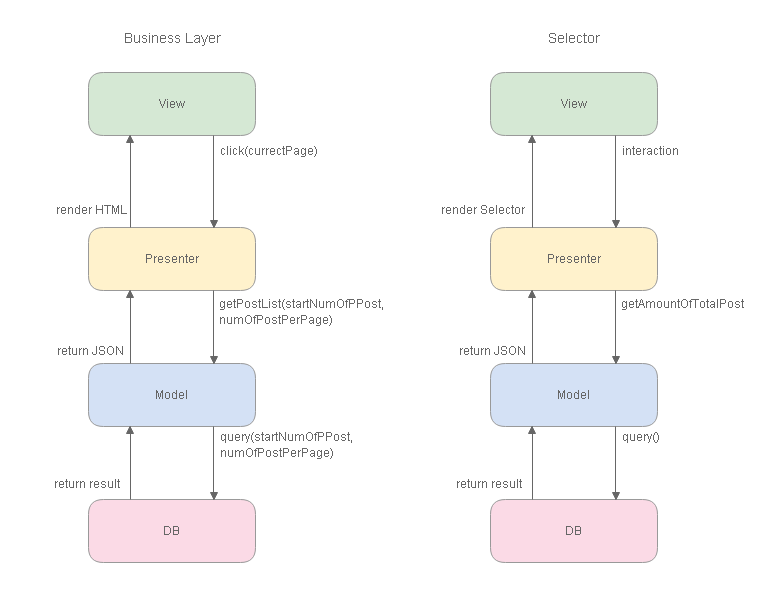
我习惯从最底层开始看起。
1. 首先用LIMIT偏移QUERY的指针
    /*

    *    get hot post by current page

    *    @param [int]startNumOfPPost, [int]numOfPostPerPage

    *    @return [array]post

    */

    function getHotPostByCurrectPage($startNumOfPPost, $numOfPostPerPage)

    {

        consoleLog('CPost func getHotPostByCurrectPage');

        $sql = " SELECT id, category, date, authorId, editorId, title, abstract, abstractImg

                    FROM post

                        WHERE visitable = '1' AND isTop = '1'

                                ORDER BY date DESC, id DESC

                                    LIMIT ".$startNumOfPPost.", ".$numOfPostPerPage;

        $result = mysql_query($sql);

        while ($post = mysql_fetch_array($result))

        {

            $post['authorName'] = $this->getNameByUserId($post['authorId']);

            $post['editorName'] = $this->getNameByUserId($post['editorId']);

            $post['categoryName'] = $this->getCategoryNameById($post['category']);

            $arrPost[] = $post;

        }

        return $arrPost;

    }
2. Presenter渲染HTML
function showHotPostList($currentPage)
{
consoleLogWithTitle('PostPresenter func showHotPostList var currentPage', $currentPage);
$postModel = $this->postModel; // get the first post id of current page
$numOfPostPerPage = $this->numOfPostPerPage;
$startNumOfPPost = ($currentPage-1)*$numOfPostPerPage; // get post from db
$arrPost = $postModel->getHotPostByCurrectPage($startNumOfPPost, $numOfPostPerPage); foreach ($arrPost AS $post)
{
echo '
<div class="gobalPost">
<div class="gobalPostImg">
<a href="#"> <div class="gobalPostImgHeaderCentered" style="background-image: url(\''.$post['abstractImg'].'\');" ></div> </a>
<div class="gobalPostImgTag"> <a href="#">'.$post['categoryName'].'</a> </div>
</div> <!-- gobalPostImg --> <div class="gobalPostContext">
<div class="fontSize20 color111">
<a href="../post/post.php?postId='.$post['id'].'">'.$post['title'].'</a>
</div>
<div class="mTop2 fontSize12 color666">
'.$post['date'].'
  作者:<a href="#">'.$post['authorName'].'</a>
  编辑:<a href="#">'.$post['editorName'].'</a>
</div>
<div class="mTop8 fontSize13 color333">
'.$post['abstract'].'
</div>
</div> <!-- gobalPostContext -->
</div> <!-- gobalPost -->
';
}
}
3. View,视图层
<?php

    $postPresenter->showHotPostList($currentPage);

?>
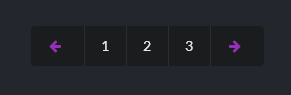
有了核心的Business层,那就是创建PageSelector。
1. get amoumt of total post in db
2. prensenter render page selector
    function getPageSelectorCellHTML($numOfPage)

    {

        $selectorCellHTML = "";

        for ( $x = 1; $x <= $numOfPage; $x++)

        {

            $selectorCellHTML .= ' <a class="item" href="../../view/home/index.php?currentPage='.$x.'">'.$x.'</a> ';

        }

        return $selectorCellHTML;

    }
    function renderPageSelector($currentPage)

    {

        consoleLogWithTitle('PostPresenter func renderPageSelector var currentPage', $currentPage);

        $postModel = $this->postModel;

        $totalPost = count($postModel->getHotPostOrderById());

        $numOfPage = ceil($totalPost / $this->numOfPostPerPage);

        echo '

        <div class="ui basic very padded center aligned segment container">

            <div class="ui inverted pagination menu">

                <a class="item"><i class="icon purple left arrow"></i></a>

                '.$this->getPageSelectorCellHTML($numOfPage).'

                <a class="item"><i class="icon purple right arrow"></i></a>

            </div>

        </div>

        ';

    }
这里要有良好的命名。renderPageSelector是渲染,getPageSelectorCellHTML是构造HTML。
而renderPageSelector是调用getPageSelectorCellHTML,因此要把构造HTML方法,放在主体之前,这是C++的开发概念。
3. View
<?php $postPresenter->renderPageSelector($currentPage); ?>
那PHP分页功能就完成了。
MVPR下的PHP分页教程的更多相关文章
- PHP 框架: CodeIgniter 分页教程
PHP 框架: CodeIgniter 分页教程 分类: PHP2009-04-23 11:09 3209人阅读 评论(0) 收藏 举报 框架phpbooksdatabaseurl数据库 目录(?)[ ...
- 10个优秀的 HTML5 & CSS3 下拉菜单制作教程
下拉菜单是一个很常见的效果,在网站设计中被广泛使用.通过使用下拉菜单,设计者不仅可以在网站设计中营造出色的视觉吸引力,但也可以为网站提供了一个有效的导航方案.使用 HTML5 和 CSS3 可以更容易 ...
- linux 下安装apache 快速教程
最近自学linux,看鸟哥的文章.提到了apache,所以在虚拟机redhat 5下安装了一把, 结合国内外文章写下快速可行的教程: --------------------------------- ...
- Windows 下安装 Oracle 12c 教程
原文 Windows 下安装 Oracle 12c 教程 申明:本文原作者:Jmq 本文给大家带来的是 Oracle 12C 的安装教程. 1.准备 1.1 下载 Oracle 12c 安装程序 ...
- CentOS下Eclipse的安装教程
CentOS下Eclipse的安装教程 据了解,在Linux下的Java开发很多时候都比较喜欢使用vim + 插件,反而很少使用Eclipse,但是我是第一次使用Linux来进行Java编程,就什么都 ...
- 简单说下 Winform 的分页快速开发框架必须要实现的几个功能之一
简单说下 Winform 的分页快速开发框架必须要实现的几个功能之一 分页非为前端分页 和 后端分页,前端分页只有适用于B/S,B/S的呈现速度远远不如C/S,而C/S则没有这个问题,所以分页必然是 ...
- 分布式进阶(二)Ubuntu 14.04下安装Dockr图文教程(一)
当前,完全硬件虚拟化技术(KVM.Xen.Hyper-V 等)能在一个物理主机上很好地运行多个互相独立的操作系统,但这也带来一些问题:性能不佳,资源浪费,系统反应迟缓等.有时候对用户来说,完全的硬件虚 ...
- Ubuntu下搜狗输入法的安装教程
前面写过一篇centos7下搜狗输入法的安装教程,现在把搜狗输入法在Ubuntu下的安装方法也记录一下,相比之下Ubuntu下安装搜狗输入法要简便得多 安装fcitx以支持搜狗输入法 ...
- Ubuntu下安装JDK详细教程
Ubuntu下安装JDK详细教程 作者:凯鲁嘎吉 - 博客园http://www.cnblogs.com/kailugaji/ Ubuntu版本:Ubuntu-12.04.5-desktop-i386 ...
随机推荐
- 048-PHP定义常量
<?php define('NUM',123); //定义常量NUM echo NUM; //输出NUM的值 define('STR','ABC',TRUE); //定义常量STR并设置大小写不 ...
- ES6 之 Object 的方法总结
阅读:Object 1.obj的"." 或 "[]"方法 读取对象的属性或方法 对象属性的读取:ES6中被Proxy的get(target, propKey, ...
- office组件导入导出常见异常记录
异常:未能加载文件或程序集"Microsoft.Office.Interop.Excel, Version=11.0.0.0, Culture=neutral, PublicKeyToken ...
- 留学萌新Essay写作须知
Essay是留学生们接触比较多的一项留学生作业,但尽管如此,依旧有部分同学对于essay写作是没有足够的把握的.随着开学季的到来,很多萌新初次接触Essay写作,难免会有很多不懂得地方.所以今天小编就 ...
- POJ 1408:Fishnet
Fishnet Time Limit: 1000MS Memory Limit: 10000K Total Submissions: 1921 Accepted: 1234 Descripti ...
- TX2-刷机完成后安装程序ubuntu_linux命令&TX2学习总结
Linux教程|菜鸟教程:http://www.runoob.com/linux/linux-tutorial.html 认识linux:ping命令:ping命令是常用的网络命令ping网关:pin ...
- apt-get install oracle-java8-installer时Err:7 http://ppa.launchpad.net/webupd8team/java/ubuntu xenial/main amd64 Packages 404 not found
所有其他网址都有效,而不是amd64端点. 然后,当运行apt-get install oracle-java8-installer时,出现以下错误: Package oracle-java8-ins ...
- C++基础--智能指针
智能指针其实也不是完全的指针,应该说是像指针一样的类对象,智能指针通常有指针的功能,当然同时也包含了一些额外的功能.目前比较常见的智能指针有auto_ptr.unique_ptr和shared_ptr ...
- Pickle incompatibility of numpy arrays between Python 2 and 3
Traceback (most recent call last): File "mnist.py", line 7, in <module> train_set, v ...
- dfs第二遍重学
---恢复内容开始--- 1.先上个基础的全排列 #include<iostream> #include<cstring> using namespace std; const ...