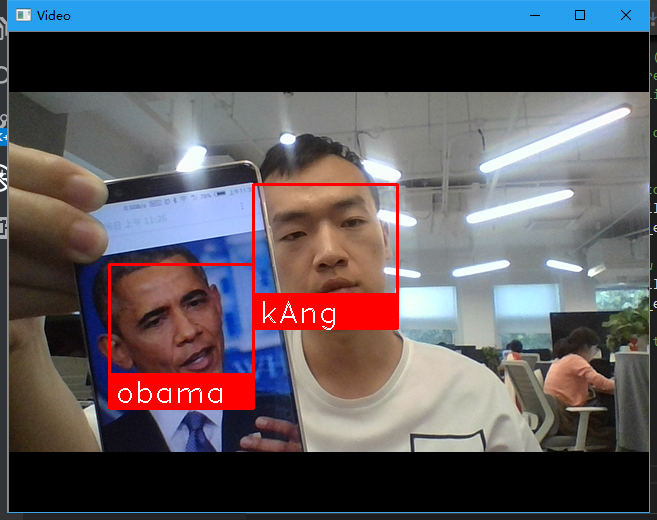
face_recognition实时人脸识别
具体安装移步:https://www.cnblogs.com/ckAng/p/10981025.html
更多操作移步:https://github.com/ageitgey/face_recognition
#!/usr/bin/env python3

# -*- coding: utf-8 -*-

import face_recognition

import cv2

import numpy as np

# This is a demo of running face recognition on live video from your webcam. It's a little more complicated than the

# other example, but it includes some basic performance tweaks to make things run a lot faster:

#   1. Process each video frame at 1/4 resolution (though still display it at full resolution)

#   2. Only detect faces in every other frame of video.

# PLEASE NOTE: This example requires OpenCV (the `cv2` library) to be installed only to read from your webcam.

# OpenCV is *not* required to use the face_recognition library. It's only required if you want to run this

# specific demo. If you have trouble installing it, try any of the other demos that don't require it instead.

# Get a reference to webcam #0 (the default one)

video_capture = cv2.VideoCapture(0)

# Load a sample picture and learn how to recognize it.

obama_image = face_recognition.load_image_file("img/kAng.jpg")

obama_face_encoding = face_recognition.face_encodings(obama_image)[0]

# Load a second sample picture and learn how to recognize it.

biden_image = face_recognition.load_image_file("img/test10.jpg")

biden_face_encoding = face_recognition.face_encodings(biden_image)[0]

# Create arrays of known face encodings and their names

known_face_encodings = [

    obama_face_encoding,

    biden_face_encoding

]

known_face_names = [

    "kAng",

    "obama"

]

# Initialize some variables

face_locations = []

face_encodings = []

face_names = []

process_this_frame = True

while True:

    # Grab a single frame of video

    ret, frame = video_capture.read()

    # Resize frame of video to 1/4 size for faster face recognition processing

    small_frame = cv2.resize(frame, (0, 0), fx=0.25, fy=0.25)

    # Convert the image from BGR color (which OpenCV uses) to RGB color (which face_recognition uses)

    rgb_small_frame = small_frame[:, :, ::-1]

    # Only process every other frame of video to save time

    if process_this_frame:

        # Find all the faces and face encodings in the current frame of video

        face_locations = face_recognition.face_locations(rgb_small_frame)

        face_encodings = face_recognition.face_encodings(rgb_small_frame, face_locations)

        face_names = []

        for face_encoding in face_encodings:

            # See if the face is a match for the known face(s)

            matches = face_recognition.compare_faces(known_face_encodings, face_encoding)

            name = "Unknown"

            # # If a match was found in known_face_encodings, just use the first one.

            # if True in matches:

            #     first_match_index = matches.index(True)

            #     name = known_face_names[first_match_index]

            # Or instead, use the known face with the smallest distance to the new face

            face_distances = face_recognition.face_distance(known_face_encodings, face_encoding)

            best_match_index = np.argmin(face_distances)

            if matches[best_match_index]:

                name = known_face_names[best_match_index]

            face_names.append(name)

    process_this_frame = not process_this_frame

    # Display the results

    for (top, right, bottom, left), name in zip(face_locations, face_names):

        # Scale back up face locations since the frame we detected in was scaled to 1/4 size

        top *= 4

        right *= 4

        bottom *= 4

        left *= 4

        # Draw a box around the face

        cv2.rectangle(frame, (left, top), (right, bottom), (0, 0, 255), 2)

        # Draw a label with a name below the face

        cv2.rectangle(frame, (left, bottom - 35), (right, bottom), (0, 0, 255), cv2.FILLED)

        font = cv2.FONT_HERSHEY_DUPLEX

        cv2.putText(frame, name, (left + 6, bottom - 6), font, 1.0, (255, 255, 255), 1)

    # Display the resulting image

    cv2.imshow('Video', frame)

    # Hit 'q' on the keyboard to quit!

    if cv2.waitKey(1) & 0xFF == ord('q'):

        break

# Release handle to the webcam

video_capture.release()

cv2.destroyAllWindows()
face_recognition实时人脸识别的更多相关文章
- 使用dlib中的深度残差网络(ResNet)实现实时人脸识别
opencv中提供的基于haar特征级联进行人脸检测的方法效果非常不好,本文使用dlib中提供的人脸检测方法(使用HOG特征或卷积神经网方法),并使用提供的深度残差网络(ResNet)实现实时人脸识别 ...
- Asp.net+WebSocket+Emgucv实时人脸识别
上个月在网上看到一个用web实现简单AR效果的文章,然后自己一路折腾,最后折腾出来一个 Asp.net+WebSocket+Emgucv实时人脸识别的东西,网上也有不少相关资料,有用winform的也 ...
- face_recognition开源人脸识别库:离线识别率高达99.38%
基于Python的开源人脸识别库:离线识别率高达99.38%——新开源的用了一下感受一下 原创 2017年07月28日 21:25:28 标签: 人脸识别 / 人脸自动定位 / 人脸识别开源库 / f ...
- Opencv摄像头实时人脸识别
Introduction 网上存在很多人脸识别的文章,这篇文章是我的一个作业,重在通过摄像头实时采集人脸信息,进行人脸检测和人脸识别,并将识别结果显示在左上角. 利用 OpenCV 实现一个实时的人脸 ...
- Ubuntu下使用face_recognition进行人脸识别
Face Recognition是一个基于Python的人脸识别库,在github上地址如下:https://github.com/ageitgey/face_recognition. 看着挺好玩,本 ...
- c# 利用AForge和百度AI开发实时人脸识别
baiduAIFaceIdentify项目是C#语言,集成百度AI的SDK利用AForge开发的实时人脸识别的小demo,里边包含了人脸检测识别,人脸注册,人脸登录等功能 人脸实时检测识别功能 思路是 ...
- AI人工智能之基于OpenCV+face_recognition实现人脸识别
因近期公司项目需求,需要从监控视频里识别出人脸信息.OpenCV非常庞大,其中官方提供的人脸模型分类器也可以满足基本的人脸识别,当然我们也可以训练自己的人脸模型数据,但是从精确度和专业程度上讲Open ...
- 在win10上安装face_recognition(人脸识别)
github上有个项目face_recognition,是用于人脸识别的 主要是window上安装这个项目会繁琐些,linux上据项目文档上介绍是妥妥的. 项目地址: https://github. ...
- Python 人工智能之人脸识别 face_recognition 模块安装
Python人工智能之人脸识别face_recognition安装 face_recognition 模块使用系统环境搭建 系统环境 Ubuntu / deepin操作系统 Python 3.6 py ...
随机推荐
- git 删除分支和回退到以前某个提交版本
1.git 创建和删除分支: 创建:git branch 分支名字 本地删除:git branch -D 分支名字 远程删除:git push origin :分支名字 2.git 回退到以前提交的版 ...
- Android开发之显示分辨率及单位
Android 各种屏幕分辨率: VGA: Video Graphics Array,即:显示绘图矩阵,相当于640×480 像素: HVGA: Half-size VGA ...
- 夯实Java基础系列目录
自进入大学以来,学习的编程语言从最初的C语言.C++,到后来的Java,. NET.而在学习编程语言的同时也逐渐决定了以后自己要学习的是哪一门语言(Java).到现在为止,学习Java语言也有很长一段 ...
- 学习Java的书籍资料
对于程序员来说,编程技术至关重要,然而技术的提高不是一蹴而就的,它需要时间的积累和经验的沉淀.因此本文为大家推荐Java学习的书籍,学虽容易,学好不易,且学且珍惜. 基础类.<Java从入门到精 ...
- Python 面试问答基础篇
1. Python是如何进行内存管理的? 答:从三个方面来说,一对象的引用计数机制,二垃圾回收机制,三内存池机制 一.对象的引用计数机制 Python内部使用引用计数,来保持追踪内存中的对 ...
- 「SDOI2013」森林
「SDOI2013」森林 传送门 树上主席树 + 启发式合并 锻炼码力,没什么好说的. 细节见代码. 参考代码: #include <algorithm> #include <cst ...
- 吴裕雄 Bootstrap 前端框架开发——Bootstrap 按钮:块级按钮(拉伸至父元素100%的宽度)
<!DOCTYPE html> <html> <head> <meta charset="utf-8"> <title> ...
- netsh命令获取wifi历史连接密码
首先[win+r]快捷键打开运行,输入cmd.或点击左下角win-运行-cmd 1.netsh wlan show profiles //列出所有的ap名称 2.netsh wlan show pro ...
- 为何以及如何学Linux系统?
在当今的社会中,linux用处实在是太过广泛了.现在用在服务器和嵌入式上的Linux发行版本数不胜数,桌面上linux只占1%的比例,但这不代表linux比windows和mac 做得差,实际上桌面系 ...
- 图解Mybatis框架原理及使用
1.前言 努力学习完ssm框架之后,终于也成功的把三大框架的使用以及配置文件细节忘得一干二净.为了努力捡起来以及方便今后的复习,决定写一篇博客记录一下. 本博客的所有分析都是在持久层接口以及接口中的方 ...