学习Redis你必须了解的数据结构——HashMap实现
本文版权归博客园和作者吴双本人共同所有,转载和爬虫请注明原文链接博客园蜗牛 cnblogs.com\tdws .
首先提供一种获取hashCode的方法,是一种比较受欢迎的方式,该方法参照了一位园友的文章,链接在尾部给出:
 var djb2Code = function (str) {

        var hash = 5381;

        for (i = 0; i < str.length; i++) {

            char = str.charCodeAt(i);

            hash = ((hash << 5) + hash) + char; /* hash * 33 + c */

        }

        return hash;

   }
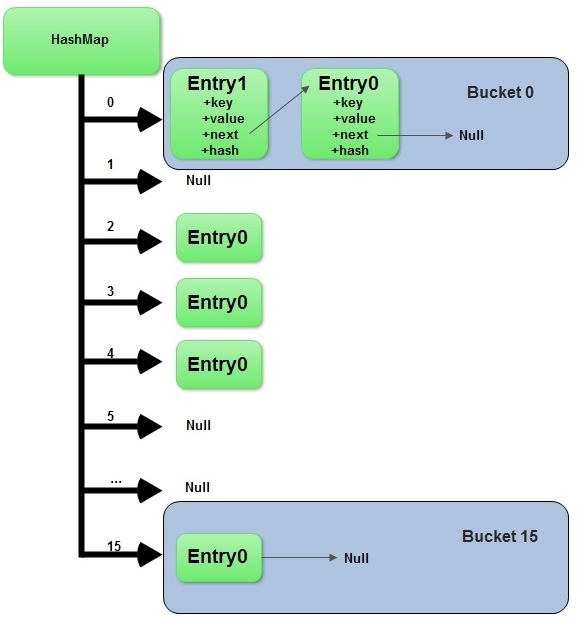
接下来我们用js实现hashmap, hashmap是一种键值对的数据结构。意味着你可以通过key快速找到你所需要查找的值。我使用数组加上LinkedList来实现hashmap,这种方式也被称为解决hashcode冲突的分离链接法。hashmap通常具备以下几种方法:put,get,remove。put是写入和修改数据,在put数据时,首先获取key的hashcode,作为数组的索引。而数组索引对应的值则是一个linkedlist,并且linkedlist所存储的节点值,同时包含着所需存储的key和value。这样以便解决当hashcode重复冲突时,在链表中根据key名称来get查找值。 关于hashmap更多的原理,我推荐这篇文章 http://www.admin10000.com/document/3322.html
下面直接给出实现,其中使用到LinkedList数据结构的源码,在我的这篇分享当中:http://www.cnblogs.com/tdws/p/6033209.html
   var djb2Code = function (str) {

         var hash = 5381;

         for (i = 0; i < str.length; i++) {

             char = str.charCodeAt(i);

             hash = ((hash << 5) + hash) + char; /* hash * 33 + c */

         }

         return hash;

     }

     function HashMap() {

         var map = [];

         var keyValPair = function (key, value) {

             this.key = key;

             this.value = value;

         }

         this.put = function (key, value) {

             var position = djb2Code(key);

             if (map[position] == undefined) {

                 map[position] = new LinkedList();

             }

             map[position].append(new keyValPair(key, value));

         },

         this.get = function (key) {

             var position = djb2Code(key);

             if (map[position] != undefined) {

                 var current = map[position].getHead();

                 while (current.next) {

                     if (current.element.key === key) {  //严格判断

                         return current.element.value;

                     }

                     current = current.next;

                 }

                 if (current.element.key === key) {//如果只有head节点,则不会进while.  还有尾节点,不会进while,这个判断必不可少

                     return current.element.value;

                 }

             }

             return undefined;

         },

         this.remove = function (key) {

             var position = djb2Code(key);

             if (map[position] != undefined) {

                 var current = map[position].getHead();

                 while (current.next) {

                     if (current.element.key === key) {

                         map[position].remove(current.element);

                         if (map[position].isEmpty()) {

                             map[position] == undefined;

                         }

                         return true;

                     }

                     current = current.next;

                 }

                 if (current.element.key === key) {

                     map[position].remove(current.element);

                     if (map[position].isEmpty()) {

                         map[position] == undefined;

                     }

                     return true;

                 }

             }

         }

     }

     //链表

     function LinkedList() {

         var Node = function (element) {        //新元素构造

             this.element = element;

             this.next = null;

         };

         var length = 0;

         var head = null;

         this.append = function (element) {

             var node = new Node(element);        //构造新的元素节点

             var current;

             if (head === null) {             //头节点为空时  当前结点作为头节点

                 head = node;

             } else {

                 current = head;

                 while (current.next) {          //遍历,直到节点的next为null时停止循环,当前节点为尾节点

                     current = current.next;

                 }

                 current.next = node;            //将尾节点指向新的元素,新元素作为尾节点

             }

             length++;                    //更新链表长度

         };

         this.removeAt = function (position) {

             if (position > -1 && position < length) {

                 var current = head;

                 var index = 0;

                 var previous;

                 if (position == 0) {

                     head = current.next;

                 } else {

                     while (index++ < position) {

                         previous = current;

                         current = current.next;

                     }

                     previous.next = current.next;

                 }

                 length--;

                 return current.element;

             } else {

                 return null;

             }

         };

         this.insert = function (position, element) {

             if (position > -1 && position <= length) {        //校验边界

                 var node = new Node(element);

                 current = head;

                 var index = 0;

                 var previous;

                 if (position == 0) {                    //作为头节点,将新节点的next指向原有的头节点。

                     node.next = current;

                     head = node;                        //新节点赋值给头节点

                 } else {

                     while (index++ < position) {

                         previous = current;

                         current = current.next;

                     }                                //遍历结束得到当前position所在的current节点,和上一个节点

                     previous.next = node;                    //上一个节点的next指向新节点  新节点指向当前结点,可以参照上图来看

                     node.next = current;

                 }

                 length++;

                 return true;

             } else {

                 return false;

             }

         };

         this.toString = function () {

             var current = head;

             var string = '';

             while (current) {

                 string += ',' + current.element;

                 current = current.next;

             }

             return string;

         };

         this.indexOf = function (element) {

             var current = head;

             var index = -1;

             while (current) {

                 if (element === current.element) {            //从头节点开始遍历

                     return index;

                 }

                 index++;

                 current = current.next;

             }

             return -1;

         };

         this.getLength = function () {

             return length;

         };

         this.getHead = function () {

             return head;

         };

         this.isEmpty = function () {

             return length == 0;

         }

     }
参考文章:js获取hashcode : http://www.cnblogs.com/pigtail/p/3342977.html
如果我的点滴分享对你有点滴帮助,欢迎点击下方红色按钮,我将长期输出分享。
学习Redis你必须了解的数据结构——HashMap实现的更多相关文章
- 学习Redis你必须了解的数据结构——JS实现集合和ECMA6集合
集合类似于数组,但是集合中的元素是唯一的,没有重复值的.就像你学高中数学的概念一样,集合还可以做很多比如,并集,交集,差集的计算.在ECMA6之前,JavaScript没有提供原生的Set类,所以只能 ...
- 学习Redis你必须了解的数据结构——双向链表(JavaScript实现)
本文版权归博客园和作者吴双本人共同所有,转载和爬虫请注明原文链接 http://www.cnblogs.com/tdws/ 下午分享了JavaScript实现单向链表,晚上就来补充下双向链表吧.对链表 ...
- 在微博微信场景下学习Redis数据结构
Redis安装 下载地址:http://redis.io/download 安装步骤: 1.yum install gcc 2.wget http://download.redis.io/releas ...
- Redis源码分析-底层数据结构盘点
前段时间翻看了Redis的源代码(C语言版本,Git地址:https://github.com/antirez/redis), 过了一遍Redis数据结构,包括SDS.ADList.dict.ints ...
- 聊聊Mysql索引和redis跳表 ---redis的有序集合zset数据结构底层采用了跳表原理 时间复杂度O(logn)(阿里)
redis使用跳表不用B+数的原因是:redis是内存数据库,而B+树纯粹是为了mysql这种IO数据库准备的.B+树的每个节点的数量都是一个mysql分区页的大小(阿里面试) 还有个几个姊妹篇:介绍 ...
- Redis(1)——5种基本数据结构
一.Redis 简介 "Redis is an open source (BSD licensed), in-memory data structure store, used as a d ...
- 学习Redis好一阵了,我对它有了一些新的看法
前言 本篇文章不是一篇具体的教程,我打算记录一下自己对Redis的一些思考.说来惭愧,我刚接触Redis的时候只是简单地使用了一下,背了一些面试题,就在简历上写下了Redis这个技能点. 我们能在网络 ...
- 你真的懂Redis的5种基本数据结构吗?
摘要: 你真的懂Redis的5种基本数据结构吗?这些知识点或许你还需要看看. 本文分享自华为云社区<你真的懂Redis的5种基本数据结构吗?这些知识点或许你还需要看看>,作者:李子捌. 一 ...
- 学习Redis从这里开始
本文主要内容 Redis与其他软件的相同之处和不同之处 Redis的用法 使用Python示例代码与Redis进行简单的互动 使用Redis解决实际问题 Redis是一个远程内存数据库,它不仅性能强劲 ...
随机推荐
- android_m2repository_rxx.zip下载地址以及MD5
地址 MD5 https://dl-ssl.google.com/android/repository/android_m2repository_r08.zip 8C8EC4C731B7F55E646 ...
- Android—简单的仿QQ聊天界面
最近仿照QQ聊天做了一个类似界面,先看下界面组成(画面不太美凑合凑合呗,,,,):
- nginx启动报错:/usr/local/nginx/sbin/nginx: error while loading shared libraries: libcrypto.so.1.1: cannot open shared object file: No such file or directory
查看依赖库:
- 拥抱.NET Core,如何开发一个跨平台类库 (1)
在此前的文章中详细介绍了使用.NET Core的基本知识,如果还没有看,可以先去了解“拥抱.NET Core,学习.NET Core的基础知识补遗”,以便接下来的阅读. 在本文将介绍如何配置类库项目支 ...
- 【转】ofbiz数据库表结构设计
真心不错的文章,可以加深对企业信息化的设计理解:) http://blog.sina.com.cn/s/blog_a2ca5d8c01017fa0.html http://blog.sina.com. ...
- Lesson 15 Good news
Text The secretary told me that Mr. Harmsworth would see me. I felt very nervous when I went into hi ...
- MVVM大比拼之vue.js源码精析
VUE 源码分析 简介 Vue 是 MVVM 框架中的新贵,如果我没记错的话作者应该毕业不久,现在在google.vue 如作者自己所说,在api设计上受到了很多来自knockout.angularj ...
- ASP.NET Web API 过滤器创建、执行过程(一)
ASP.NET Web API 过滤器创建.执行过程(一) 前言 在上一篇中我们讲到控制器的执行过程系列,这个系列要搁置一段时间了,因为在控制器执行的过程中包含的信息都是要单独的用一个系列来描述的,就 ...
- 适合WebApi的简单的C#状态机实现
目标 采用了Restful WebApi的架构,再把业务逻辑状态转移放到后端就有点违背初衷了.实际上只要后端Api的权限设置的好,把状态转移放到前端也未尝不可.我考虑的结果是,一般如果变更这个状态本身 ...
- C++ std::priority_queue
std::priority_queue template <class T, class Container = vector<T>, class Compare = less< ...