caffe2--Install
Install
Welcome to Caffe2! Get started with deep learning today by following the step by step guide on how to download and install Caffe2.
Select your preferred platform and install type.
| Platform: | MacOS X Ubuntu CentOS Windows iOS Android Raspbian Tegra |
| Install Type: | Build From Source Pre-Built Binaries Docker Images Cloud |

This build is confirmed for:
- Ubuntu 14.04
- Ubuntu 16.04
Required Dependencies#
1 |
sudo apt-get update |
Optional GPU Support#
If you plan to use GPU instead of CPU only, then you should install NVIDIA CUDA 8 and cuDNN v5.1 or v6.0, a GPU-accelerated library of primitives for deep neural networks. NVIDIA’s detailed instructions or if you’re feeling lucky try the quick install set of commands below.
Update your graphics card drivers first! Otherwise you may suffer from a wide range of difficult to diagnose errors.
For Ubuntu 14.04
1 |
sudo apt-get update && sudo apt-get install wget -y --no-install-recommends |
For Ubuntu 16.04
1 |
sudo apt-get update && sudo apt-get install wget -y --no-install-recommends |
Install cuDNN (all Ubuntu versions)#
Version 5.1
1 |
CUDNN_URL="http://developer.download.nvidia.com/compute/redist/cudnn/v5.1/cudnn-8.0-linux-x64-v5.1.tgz" |
Version 6.0 Visit NVIDIA’s cuDNN download to register and download the archive. Follow the same instructions above switching out for the updated library.
Optional Dependencies#
Note
libgflags2is for Ubuntu 14.04.libgflags-devis for Ubuntu 16.04.
1 |
# for Ubuntu 14.04 |
1 |
# for Ubuntu 16.04 |
1 |
# for both Ubuntu 14.04 and 16.04 |
Clone & Build#
1 |
git clone --recursive https://github.com/caffe2/caffe2.git && cd caffe2 |
Run this command below to test if your GPU build was a success. You will get a test output either way, but it will warn you at the top of the output if CPU was used instead along with other errors like missing libraries.
1 |
python -m caffe2.python.operator_test.relu_op_test |
Environment Variables#
These environment variables may assist you depending on your current configuration. When using the install instructions above on the AWS Deep Learning AMI you don’t need to set these variables. However, our Docker scripts built on Ubuntu-14.04 or NVIDIA’s CUDA images seem to benefit from having these set. If you ran into problems with the build tests above then these are good things to check. Echo them first and see what you have and possibly append or replace with these directories. Also visit the Troubleshooting section.
1 |
echo $PYTHONPATH |
Setting Up Tutorials & Jupyter Server#
If you’re running this all on a cloud computer, you probably won’t have a UI or way to view the IPython notebooks by default. Typically, you would launch them locally with ipython notebook and you would see a localhost:8888 webpage pop up with the directory of notebooks running. The following example will show you how to launch the Jupyter server and connect to remotely via an SSH tunnel.
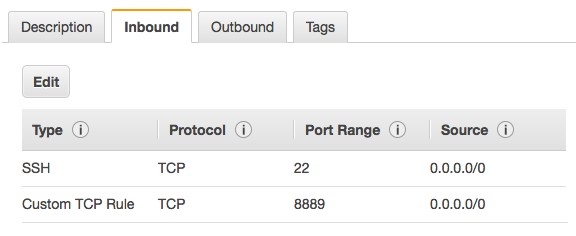
First configure your cloud server to accept port 8889, or whatever you want, but change the port in the following commands. On AWS you accomplish this by adding a rule to your server’s security group allowing a TCP inbound on port 8889. Otherwise you would adjust iptables for this.
Next you launch the Juypter server.
1 |
jupyter notebook --no-browser --port=8889 |
Then create the SSH tunnel. This will pass the cloud server’s Jupyter instance to your localhost 8888 port for you to use locally. The example below is templated after how you would connect AWS, where your-public-cert.pem is your own public certificate and ubuntu@super-rad-GPU-instance.compute-1.amazonaws.com is your login to your cloud server. You can easily grab this on AWS by going to Instances > Connect and copy the part after ssh and swap that out in the command below.
1 |
ssh -N -f -L localhost:8888:localhost:8889 -i "your-public-cert.pem" ubuntu@super-rad-GPU-instance.compute-1.amazonaws.com |
Troubleshooting#
| Python errors | |
|---|---|
| Python version | Python is core to run Caffe2. We currently require Python2.7. Ubuntu 14.04 and greater have Python built in by default, and that can be used to run Caffe2. To check your version: python --version |
| Solution | If you want the developer version of python, you could install the dev package for Python: sudo apt-get install python-dev |
| Python environment | You may have another version of Python installed or need to support Python version 3 for other projects. |
| Solution | Try virtualenv or Anaconda. The Anaconda platform provides a single script to install many of the necessary packages for Caffe2, including Python. Using Anaconda is outside the scope of these instructions, but if you are interested, it may work well for you. |
| pip version | If you plan to use Python with Caffe2 then you need pip. |
| Solution | sudo apt-get install python-pip and also try using pip2 instead of pip. |
| Building from source | |
|---|---|
| OS version | Caffe2 requires Ubuntu 14.04 or greater. |
| git | While you can download the Caffe2 source code and submodules directly from GitHub as a zip, using git makes it much easier. |
| Solution | sudo apt-get install git |
| protobuf | You may experience an error related to protobuf during the make step. |
| Solution | Make sure you’ve installed protobuf in both of these two ways: sudo apt-get install libprotobuf-dev protobuf-compiler && sudo pip install protobuf |
| libgflags2 error | This optional dependency is for Ubuntu 14.04. |
| Solution | Use apt-get install libgflags-dev for Ubuntu 16.04. |
| GPU Support | |
|---|---|
| GPU errors | Unsupported GPU or wrong version |
| Solution | You need to know the specific deb for your version of Linux. sudo dpkg -i cuda-repo-<distro>_<version>_<architecture>.deb Refer to NVIDIA’s installation guide. |
| Build issues | Be warned that installing CUDA and cuDNN will increase the size of your build by about 4GB, so plan to have at least 12GB for your Ubuntu disk size. |
| Caffe2 Python | |
|---|---|
| Module not found | Verify that Caffe2 was installed correctly |
| Solution | Run the following: python -c 'from caffe2.python import core' 2>/dev/null && echo "Success" || echo "Failure" An output of Success means you are ready to with Caffe2 - congratulations! An output of Failure usually means you have not installed one of the dependencies correctly. |
| Dependencies missing | It’s possible you’re trying to run something that was using an optional dependency. |
| Solution | sudo pip install setuptools flask jupyter matplotlib scipy pydot tornado python-nvd3 scikit-image pyyaml |
| matplotlib error | Sometimes you need setuptools first: sudo pip install -U pip setuptools && sudo pip install matplotlib |
| model downloader error | If you need to run it as sudo (because it’s trying to install the model in /usr/local/caffe2…), then PYTHONPATH might not be visible in that context. |
| Solution | sudo visudo then add this line: Defaults env_keep += "PYTHONPATH" |
| “AttributeError: ‘module’ object has no attribute ‘MakeArgument’” | Occurs when calling core.CreateOperator |
| Solution | Check your install directory (/usr/local/), and remove the folder /caffe2/python/utils |
| Other Errors | |
|---|---|
| libdc1394 error | for some reason once opencv is installed you may get errors with libdc1394 |
| Solution | ln /dev/null /dev/raw1394 but that’s not persistent so try sh -c 'ln -s /dev/null /dev/raw1394' or when instantiating the container use: --device /dev/null:/dev/raw1394 |
| caffe2_pybind11_state_gpu | WARNING:root:Debug message: No module named caffe2_pybind11_state_gpu |
| Solution | ignore if you’re using CPU-only |
| Python kernel crashing | This happens when you try to call Jupyter server directly (like in a Docker container). |
| Solution | Use sh -c "jupyter notebook ..." to get around this problem. |
| Exception: “dot” not found in path | This happens in some of the tutorials when graphing. |
| Solution | Make sure you have graphviz and pydot. sudo apt-get install python-pydot and sudo pip install graphviz or brew install these to fix the problem. |
Dependencies#
Try to keep the system and python dependencies at the same version. We’ve encountered issues when the python version is more updated than the system version or vice versa.
| System Dependencies | |
|---|---|
| cmake | |
| git | |
| gflags | |
| glog: Google Logging Module | |
| NumPy | |
| protobuf: Google Protocol Buffers | version 3.2.0 |
| Build tools for C++ 11 | Xcode CLTs & automake (mac/iOS), build-essential (linux), Visual Studio (win), Android Studio (droid) |
| Python Dependencies | |
|---|---|
| gflags | |
| glog: Google Logging Module | |
| NumPy | |
| protobuf: Google Protocol Buffers | version 3.2.0 |
Strictly speaking, the core dependencies above are all you need to run the core Caffe2 successfully. However, for real-world deep learning (e.g., image processing, mathematical operations, etc), there are other dependencies that you will want to install in order to experience the full features of Caffe2.
| Optional System Dependencies | |
|---|---|
| cuDNN | if using GPU, this is needed for Caffe2’s cuDNN operators |
| Eigen 3 | |
| LevelDB | |
| Nvidia CUDA | v6.5 or greater |
| OpenCV | for image-related operations; requires leveldb <= v1.19 |
| OpenMPI | for MPI-related Caffe2 operators |
| RocksdB | for Caffe2’s RocksDB IO backend |
| ZeroMQ | needed for Caffe2’s ZmqDB IO backend (serving data through a socket) |
| Python Optional Dependencies | |
|---|---|
| There are also various Python libraries that will be valuable in your experience with Caffe2. Many of these are required to run the tutorials. | |
| Flask | |
| Graphviz | |
| Hypothesis | |
| Jupyter | for the Jupyter Notebook |
| LevelDB | |
| lmdb | |
| Matplotlib | |
| Pydot | |
| Python-nvd3 | |
| pyyaml | |
| requests | |
| Scikit-Image | |
| SciPy | |
| setuptools | |
| Tornado | |
| ZeroMQ |
| What’s in Third Party? | |
|---|---|
| Whether building from source or installing from the Python wheel, you also get complimentary tools installed as well. | |
| Android cmake | |
| benchmark | |
| cnmem | |
| cub | |
| eigen | |
| googletest | |
| ios-cmake | |
| nccl | |
| nervanagpu | |
| NNPACK | requires ninja and confu to build |
| Google Protocol Buffers (protobuf) | |
| pybind11 |
caffe2--Install的更多相关文章
- Cuda 9.2 CuDnn7.0 官方文档解读
目录 Cuda 9.2 CuDnn7.0 官方文档解读 准备工作(下载) 显卡驱动重装 CUDA安装 系统要求 处理之前安装的cuda文件 下载的deb安装过程 下载的runfile的安装过程 安装完 ...
- ubuntu 16.04 安装caffe2的方法及问题解决
工作需要安装caffe2,从用户体验上来讲,caffe2的安装绝对是体验比较差的那种,花费了我那么多时间去倒腾,这样的用户体验的产品,估计后面是比较危险的. 废话少说,直接上步骤: 官网上有安装目录, ...
- Win10上使用VS2015编译Caffe2
Caffe2的官网:https://caffe2.ai/ 1.下载.安装及相关准备 在Caffe2的官网点击"Get Started",即进入安装说明页面.官方还未提供编译好的bi ...
- Caffe2的安装
源码下载 首先下载caffe2的源码:https://github.com/caffe2/caffe2 网上都建议使用git命令下载,因为caffe2依赖了很多第三方模块,git会根据依赖自动下载第三 ...
- Caffe2 Detectron安装错误记录
caffe2 caffe2的安装方法有几种.其中最方便的是conda install.但是要求必须安装Anaconda. conda install -c caffe2 caffe2-cuda8.0- ...
- caffe, caffe2, paddlepaddle, tensorflow对于cuda,cudnn,protobuf依赖的纠葛
由于在学习神经网络,为了尝试各种深度学习框架,电脑上目前安装了caffe, caffe2, paddlepaddle, tensorflow三款主流框架,但是安装过程中真是痛不欲生. 且不说单单安装一 ...
- Caffe2(3)----下载现成的模型并使用
Caffe2训练好的模型可在Model Zoo下载,下载的命令很简单,接下来以下载和使用squeezenet为例,进行简单说明. 1.浏览可下载的模型 已有模型都放在github上,地址:https: ...
- Caffe2(1)----Ubantu14.04安装
英文好的请直接参考官方安装文档:Ubantu14.04下的源码编译. Caffe2的安装相比以前Caffe一代的安装,简直有点一键装机的感觉,下面简单总结下Caffe2的安装. 环境:Ubantu14 ...
- (译)综合指南:通过Ubuntu 16.04上从Source构建来安装支持GPU的Caffe2
(译)综合指南:通过Ubuntu 16.04上从Source构建来安装支持GPU的Caffe2 译者注: 原文来自:https://tech.amikelive.com/node-706/compre ...
- caffe2 环境的搭建以及detectron的配置
caffe2 环境的搭建以及detectron的配置 建议大家看一下这篇博客https://tech.amikelive.com/node-706/comprehensive-guide-instal ...
随机推荐
- 二进制<2>
位运算简介及实用技巧(二):进阶篇(1) ===== 真正强的东西来了! ===== 二进制中的1有奇数个还是偶数个 我们可以用下面的代码来计算一个32位整数的二进制中1的个数的奇偶性, ...
- CSS编码规范(转)
1 前言 CSS作为网页样式的描述语言,在百度一直有着广泛的应用.本文档的目标是使CSS代码风格保持一致,容易被理解和被维护. 虽然本文档是针对CSS设计的,但是在使用各种CSS的预编译器(如less ...
- CentOS7 修改时区、charset
1. 修改时区 ln -sf /usr/share/zoneinfo/Asia/Shanghai /etc/localtime 经过这番修改后,JAVA启动后自动使用了Shanghai作为时区. 2. ...
- 【前端学习笔记】2015-09-10~~~~ css层叠样式表~~格式
关于颜色的定义: 有几种方式:1.直接接英文单词 2.#16进制 3.rgb(100%:0%:0%)或者里面写像素,此处百分号不能省略. 加多个属性时,用“;”分开 前面如果是定义标签的样式时, ...
- hdu 6021 MG loves string
MG loves string Time Limit: 2000/1000 MS (Java/Others) Memory Limit: 262144/262144 K (Java/Others ...
- 转 使用putty从linux主机上面往windows主机下面拷贝文件
更新一下,把putty的包解压以后,想要在dos窗口中直接使用,必须把putty解压的文件的路径添加到环境变量中,这样使用起来就会非常简单了. 郁闷了好久,终于搞定了putty的上传下载文件命令psc ...
- du 查看 資料夾 佔用空間
查看 目前目錄使用的空間大小 du -h --max-depth=0 -h, --human-readable 查看 目前及下一屠的目錄 使用的空間大小 du -h --max-depth=1
- ARCGIS SDK For DotNet 路径
ARCGIS SDK For DotNet 路径 驱动器 C 中的卷是 WIN7 卷的序列号是 06AC-BD3E C:\Program Files (x86)\ArcGIS\DeveloperKit ...
- LeetCode OJ--Merge Sorted Array *
http://oj.leetcode.com/problems/merge-sorted-array/ 两个有序数组A和B的归并排序,将结果存到A中.因为已知两数组长度且A的数组足够大,所以倒着处理, ...
- js-页面需展示大量图片时,采用lyz.delayLoading.min.js,图片在屏幕时加载显示
本文本内容拷贝至:https://blog.csdn.net/xuanwuziyou/article/details/48199123 当一个网页中有大量图片时,浏览器会逐个去下载这些图片,等全部下载 ...