Onenote代码高亮的实现方法
- 最终效果图
- 最终的效果图如下:
- VBA的编写参考
- 主要参考的是这篇博客中的思路:如何在Word中排出漂亮的代码
- 将VBA脚本复制到Word中并设置快捷键
- Alt+F11 打开Word中的 VBS,将下列的VB代码复制 Normal 模板下的 Microsoft 对象下的 ThisDocument中
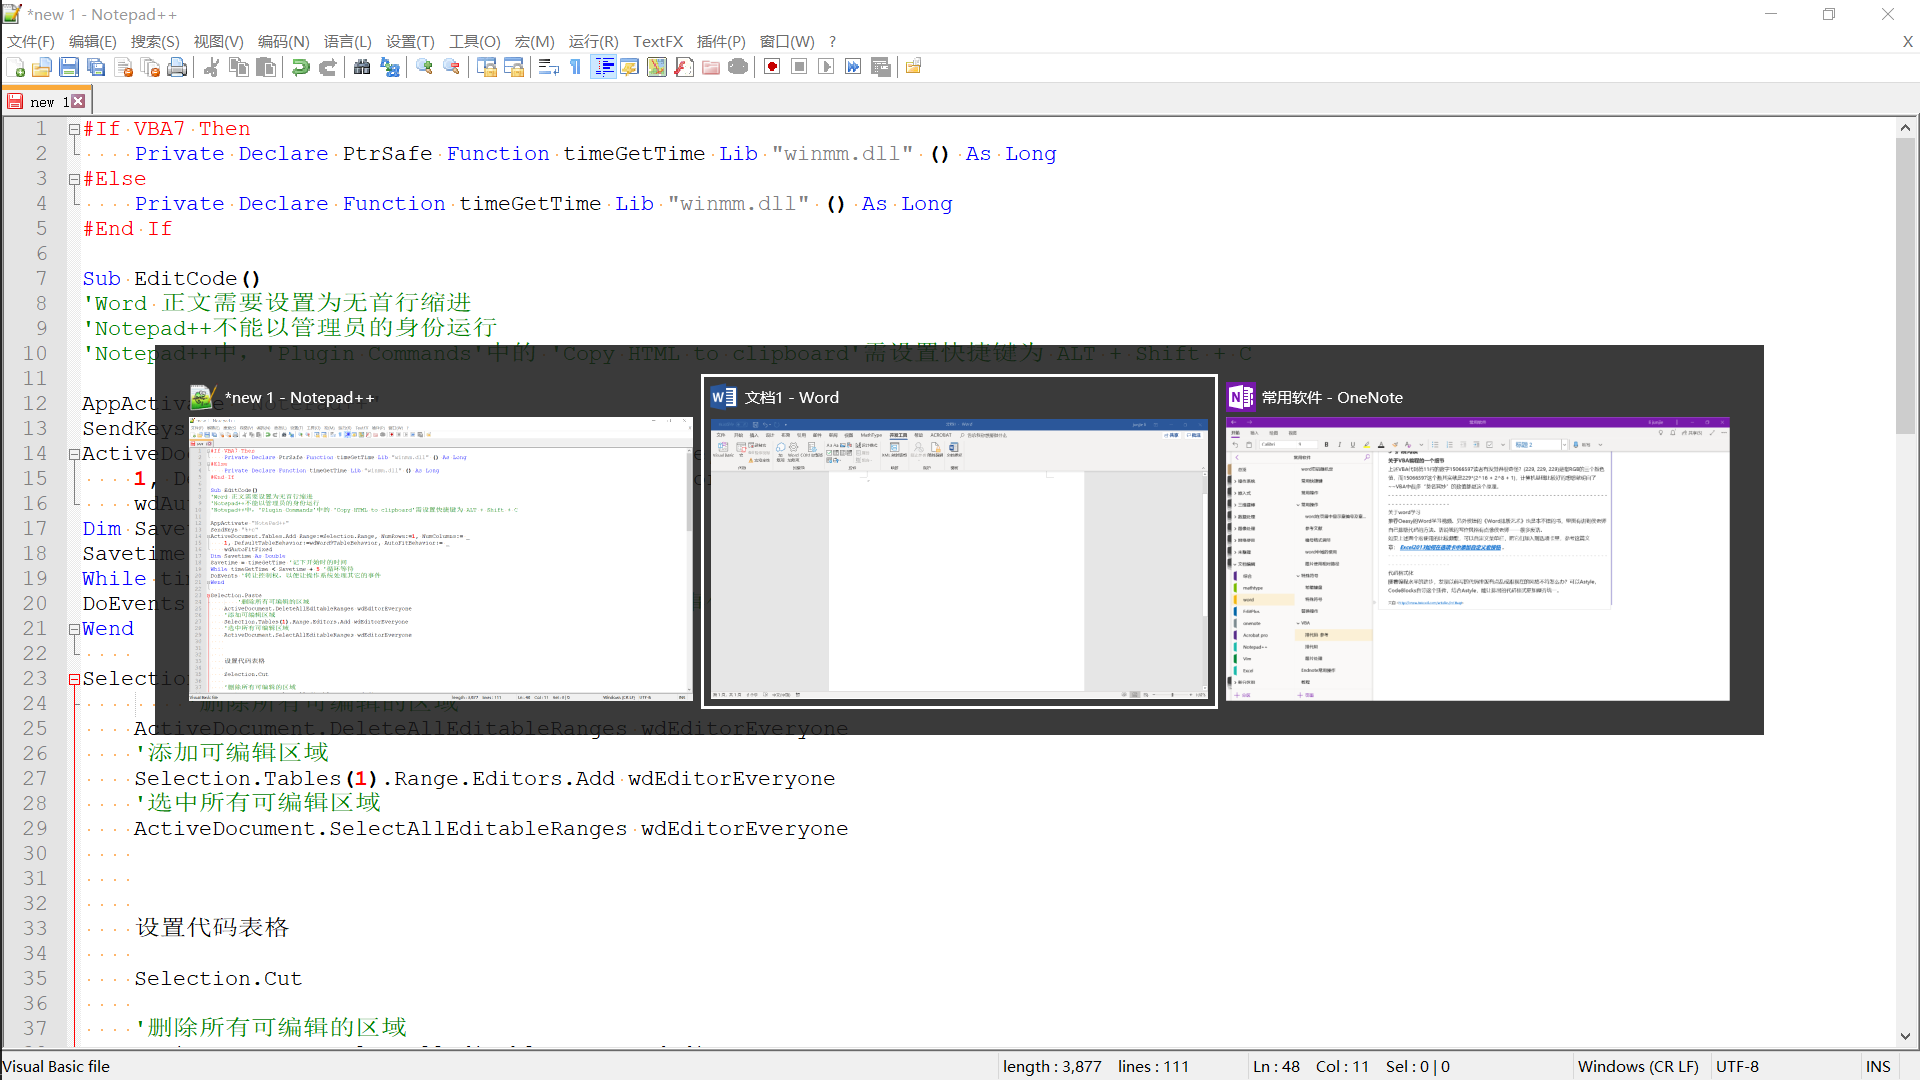
- 复制位置
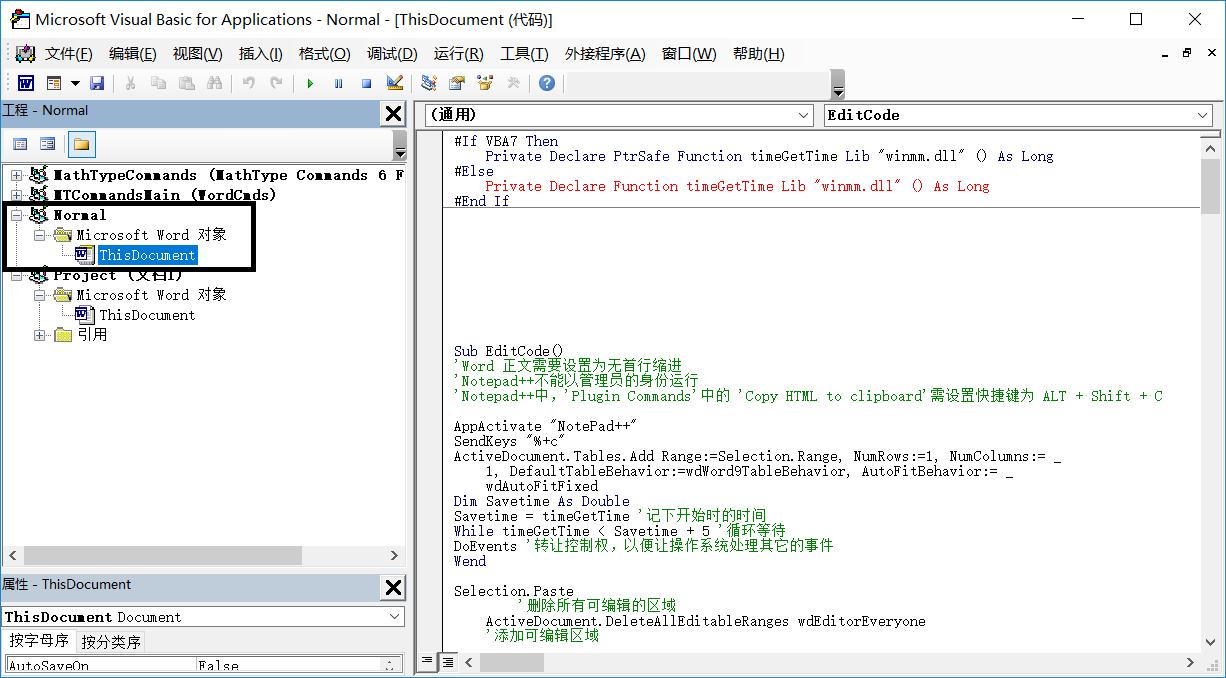
- VB代码
#If VBA7 Then
Private Declare PtrSafe Function timeGetTime Lib "winmm.dll" () As Long
#Else
Private Declare Function timeGetTime Lib "winmm.dll" () As Long
#End If
Sub EditCode()
'Word 正文需要设置为无首行缩进
'Notepad++不能以管理员的身份运行
'Notepad++中,'Plugin Commands'中的 'Copy HTML to clipboard'需设置快捷键为 ALT + Shift + C
AppActivate "NotePad++"
SendKeys "%+c"
, NumColumns:= _
, DefaultTableBehavior:=wdWord9TableBehavior, AutoFitBehavior:= _
wdAutoFitFixed
Dim Savetime As Double
Savetime = timeGetTime '记下开始时的时间
While timeGetTime < Savetime + 5 '循环等待
DoEvents '转让控制权,以便让操作系统处理其它的事件
Wend
Selection.Paste
'删除所有可编辑的区域
ActiveDocument.DeleteAllEditableRanges wdEditorEveryone
'添加可编辑区域
).Range.Editors.Add wdEditorEveryone
'选中所有可编辑区域
ActiveDocument.SelectAllEditableRanges wdEditorEveryone
设置代码表格
Selection.Cut
'删除所有可编辑的区域
ActiveDocument.DeleteAllEditableRanges wdEditorEveryone
SendKeys ("^%({TAB})")
End Sub
Sub 设置代码表格()
' author: code4101
' 设置代码表格 宏
'
'
' 背景色为morning的配色方案,RGB为(229,229,229)
With Selection.Tables(1)
With .Shading
.Texture = wdTextureNone
.ForegroundPatternColor = wdColorAutomatic
.BackgroundPatternColor = 15066597
End With
.Borders(wdBorderLeft).LineStyle = wdLineStyleNone
.Borders(wdBorderRight).LineStyle = wdLineStyleNone
.Borders(wdBorderTop).LineStyle = wdLineStyleNone
.Borders(wdBorderBottom).LineStyle = wdLineStyleNone
.Borders(wdBorderVertical).LineStyle = wdLineStyleNone
.Borders(wdBorderDiagonalDown).LineStyle = wdLineStyleNone
.Borders(wdBorderDiagonalUp).LineStyle = wdLineStyleNone
.Borders.Shadow = False
.AutoFitBehavior (wdAutoFitContent) '自动调整大小
End With
With Options
.DefaultBorderLineStyle = wdLineStyleSingle
.DefaultBorderLineWidth = wdLineWidth050pt
.DefaultBorderColor = wdColorAutomatic
End With
磅
With Selection.ParagraphFormat
)
)
.SpaceBefore = 0
.SpaceBeforeAuto = False
.SpaceAfter = 0
.SpaceAfterAuto = False
.LineSpacingRule = wdLineSpaceExactly
.LineSpacing = 12
.KeepWithNext = False
.KeepTogether = False
.PageBreakBefore = False
.NoLineNumber = False
.Hyphenation = True
)
.OutlineLevel = wdOutlineLevelBodyText
.CharacterUnitLeftIndent = 0
.CharacterUnitRightIndent = 0
.CharacterUnitFirstLineIndent = 0
.LineUnitBefore = 0
.LineUnitAfter = 0
.MirrorIndents = False
.TextboxTightWrap = wdTightNone
.AutoAdjustRightIndent = True
.DisableLineHeightGrid = False
.FarEastLineBreakControl = True
.WordWrap = True
.HangingPunctuation = True
.HalfWidthPunctuationOnTopOfLine = False
.AddSpaceBetweenFarEastAndAlpha = True
.AddSpaceBetweenFarEastAndDigit = True
.BaseLineAlignment = wdBaselineAlignAuto
End With
' 清除原有的段落底纹
Selection.ParagraphFormat.Shading.BackgroundPatternColor = wdColorAutomatic
Selection.Font.Name = "Consolas"
End Sub
- 设置宏 EditCode的快捷键
- 在Word选项的自定义功能区,选项自定义键盘快捷键
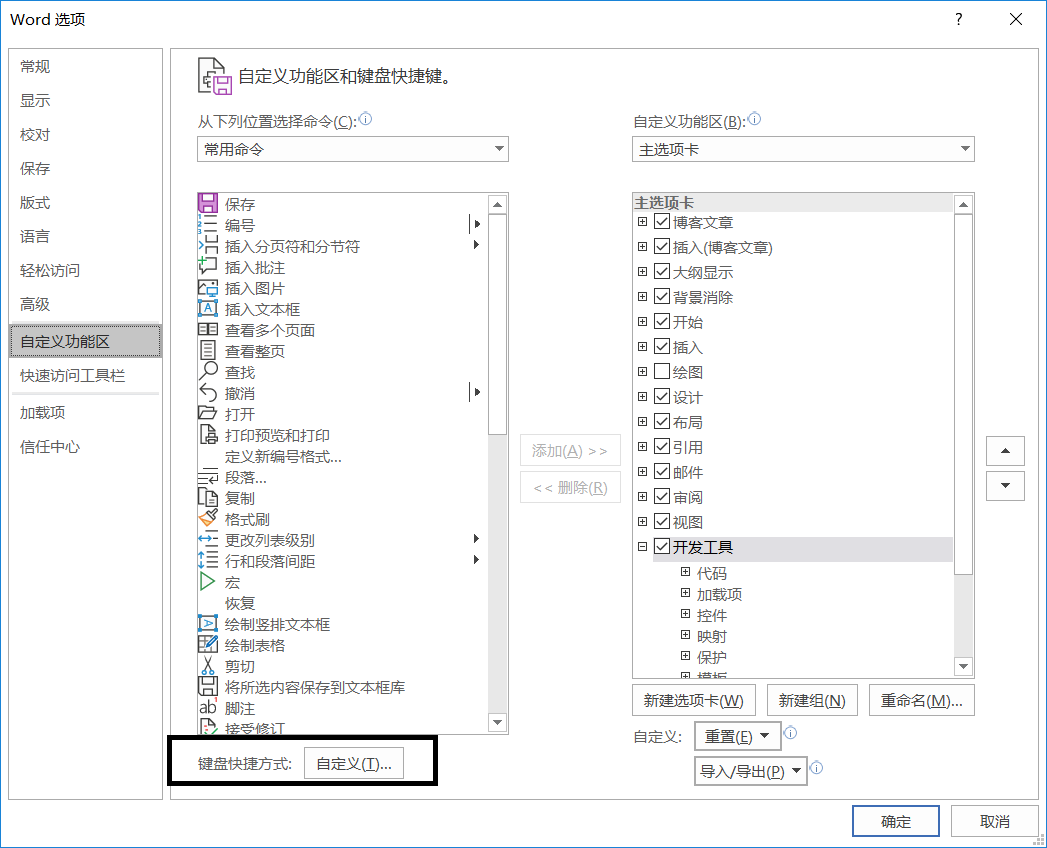
- 将EditCode设置为自己想要的快捷键,我设置的是 Alt + 1,注意不要与现存的快捷键冲突

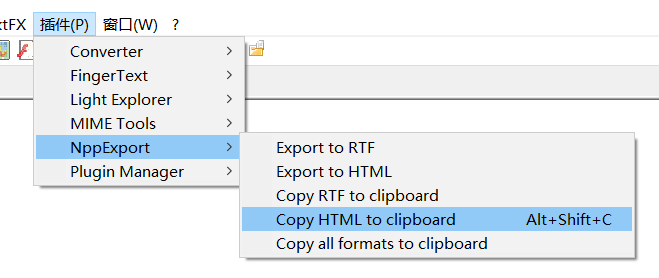
- NotePad++设置
- 确保NotePad++安装了NppExport插件,并设置 Copy HTML to clipboard 的快捷键为 Alt + Shift + C
- 宏的使用
- 首先确保只打开一个NotePad++窗口,并且把当前的文件设置为要复制的文件,而且要确保NotePad++ 中的代码是高亮状态。
- ,等到出现Alt + Tab 页面时,就说明复制完成。
- 此时,直接在Onenote中按 Ctrl + V 即可完成复制
- 使用注意事项
- Word 正文需要设置为无首行缩进
- 'Notepad++不能以管理员的身份运行
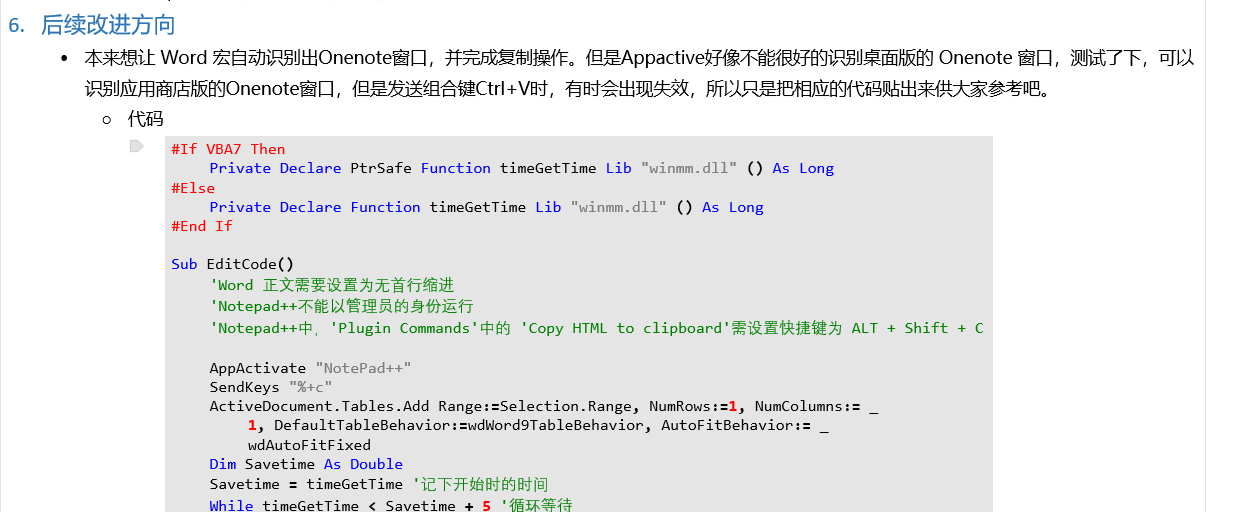
- 后续改进方向
- 本来想让Word宏自动识别出Onenote窗口,并完成复制操作。但是Appactive好像不能很好的识别桌面版的 Onenote 窗口,测试了下,可以识别应用商店版的Onenote窗口,但是发送组合键Ctrl+V时,有时会出现失效,所以只是把相应的代码贴出来供大家参考吧。
- 代码
#If VBA7 Then
Private Declare PtrSafe Function timeGetTime Lib "winmm.dll" () As Long
#Else
Private Declare Function timeGetTime Lib "winmm.dll" () As Long
#End If
Sub EditCode()
'Word 正文需要设置为无首行缩进
'Notepad++不能以管理员的身份运行
'Notepad++中,'Plugin Commands'中的 'Copy HTML to clipboard'需设置快捷键为 ALT + Shift + C
AppActivate "NotePad++"
SendKeys "%+c"
, NumColumns:= _
, DefaultTableBehavior:=wdWord9TableBehavior, AutoFitBehavior:= _
wdAutoFitFixed
Dim Savetime As Double
Savetime = timeGetTime '记下开始时的时间
While timeGetTime < Savetime + 5 '循环等待
DoEvents '转让控制权,以便让操作系统处理其它的事件
Wend
Selection.Paste
'删除所有可编辑的区域
ActiveDocument.DeleteAllEditableRanges wdEditorEveryone
'添加可编辑区域
).Range.Editors.Add wdEditorEveryone
'选中所有可编辑区域
ActiveDocument.SelectAllEditableRanges wdEditorEveryone
设置代码表格
Selection.Cut
'删除所有可编辑的区域
ActiveDocument.DeleteAllEditableRanges wdEditorEveryone
'SendKeys ("^%({TAB})")
AppActivate "OneNote"
SendKeys ("{ESC}{ESC}^v")
End Sub
Sub 设置代码表格()
' author: code4101
' 设置代码表格 宏
'
'
' 背景色为morning的配色方案,RGB为(229,229,229)
With Selection.Tables(1)
With .Shading
.Texture = wdTextureNone
.ForegroundPatternColor = wdColorAutomatic
.BackgroundPatternColor = 15066597
End With
.Borders(wdBorderLeft).LineStyle = wdLineStyleNone
.Borders(wdBorderRight).LineStyle = wdLineStyleNone
.Borders(wdBorderTop).LineStyle = wdLineStyleNone
.Borders(wdBorderBottom).LineStyle = wdLineStyleNone
.Borders(wdBorderVertical).LineStyle = wdLineStyleNone
.Borders(wdBorderDiagonalDown).LineStyle = wdLineStyleNone
.Borders(wdBorderDiagonalUp).LineStyle = wdLineStyleNone
.Borders.Shadow = False
.AutoFitBehavior (wdAutoFitContent) '自动调整大小
End With
With Options
.DefaultBorderLineStyle = wdLineStyleSingle
.DefaultBorderLineWidth = wdLineWidth050pt
.DefaultBorderColor = wdColorAutomatic
End With
磅
With Selection.ParagraphFormat
)
)
.SpaceBefore = 0
.SpaceBeforeAuto = False
.SpaceAfter = 0
.SpaceAfterAuto = False
.LineSpacingRule = wdLineSpaceExactly
.LineSpacing = 12
.KeepWithNext = False
.KeepTogether = False
.PageBreakBefore = False
.NoLineNumber = False
.Hyphenation = True
)
.OutlineLevel = wdOutlineLevelBodyText
.CharacterUnitLeftIndent = 0
.CharacterUnitRightIndent = 0
.CharacterUnitFirstLineIndent = 0
.LineUnitBefore = 0
.LineUnitAfter = 0
.MirrorIndents = False
.TextboxTightWrap = wdTightNone
.AutoAdjustRightIndent = True
.DisableLineHeightGrid = False
.FarEastLineBreakControl = True
.WordWrap = True
.HangingPunctuation = True
.HalfWidthPunctuationOnTopOfLine = False
.AddSpaceBetweenFarEastAndAlpha = True
.AddSpaceBetweenFarEastAndDigit = True
.BaseLineAlignment = wdBaselineAlignAuto
End With
' 清除原有的段落底纹
Selection.ParagraphFormat.Shading.BackgroundPatternColor = wdColorAutomatic
Selection.Font.Name = "Consolas"
End Sub
- 使用时,要先将Onenote中的光标放在要插入代码的位置,运行宏后可以实现自动插入。
Onenote代码高亮的实现方法的更多相关文章
- OneNote代码高亮完美解决方案(全网最全)
0. 引子 OneNote作为一款记笔记的软件,免费实用,有助于自己形成树状结构知识框架.但是它有一个令人头疼的问题就是:无法代码高亮.而NoteHightlight2016正是解决这个问题的完美利器 ...
- google code-prettify 代码高亮插件使用方法
找代码高亮插件选了好久,还是这个使用起来比较方便. 先上链接:插件下载地址 官方使用方法地址 建议看官方的资料,我这里仅仅简要描述一下使用方法: 引入方法: 测试引入是否成功:herf 换成 自己放置 ...
- OneNote代码高亮
向OneNote 2016安装NoteHighlight 下载.msi 文件,下载链接 下载之前查看自己的电脑上安装的OneNote版本以及位数(32-64) 查看方法:文件->选项->关 ...
- Python IDLE 代码高亮主题
Python IDLE 代码高亮主题 使用方法: 打开C盘我的 C:\Documents and Settings\你的用户名.idlerc文件夹 里面会有一个 config-highlight.cf ...
- Xcode解决代码高亮、语法提示、错误警告等功能失效的解决方法
在编写xcode的项目的时候出现过代码不高亮的症状,而且所有的warning都不再提示,include的内容也显示symbol not found,非常奇怪,解决方案如下: 方法一: 1.把.pch里 ...
- 代码高亮插件Codemirror使用方法及下载
代码高亮插件Codemirror使用方法及下载 - 老男孩的日志 - 网易博客 代码高亮插件Codemirror使用方法及下载 2013-10-31 16:51:29| 分类: 默认分类 | ...
- ueditor使用代码高亮的方法
最近发现ueditor支持代码高亮,但是页面上并没有起效果,于是网上找了下,发现还需做如下修改: 1.页面引用以下资源文件(均位于ueditor目录中): <script type=" ...
- OLW (Open Live Writer)安装代码高亮插件方法(简明)
1.首先下载OLW代码高亮插件,请点击--->OLW代码高亮插件 2.在你安装OLW的目录下(顺便说一下默认的安装目录为C:\Users\你的用户名\AppData\Local\OpenLive ...
- 如何在博客中使用SublimeText风格的代码高亮样式
因为觉得博客园自带的代码高亮样式很单一,不符合作为前端的我的审美习惯,于是下定决心要想办法折腾出一个方法来应用上另外一套代码高亮样式. 虽然探索的过程是很痛苦的,但最后还是成功了,但也不枉付出的那些努 ...
随机推荐
- python异常之EOFError: Ran out of input
出现该问题一般是由于你在以写模式打开文件后未关闭的情况下又去以读模式操作该文件时报的错误 # coding = utf-8 import pickle #定义一个boy类 class boy(): d ...
- Django quick tutorial
--第一部分,快速开始-- 01. Django简介
- Python type class metaclass
'type' 是 python built-in metaclass 其他继承自 ‘type’的class都可以是 Metaclass 子类可以继承父类的metaclass 然而 __metaclas ...
- 学习typescript(二)
学习typescript(二) ts 与 js 交互 ts 调用 js module使用 分为两种情况: ts 调用自己写的 js ts 调用别人写的 js 也就通过 npm 安装的 第一种情况处理如 ...
- JBOSS连接池默认连接数是多少?在哪个配置文件有这个默认的连接数?
如果你用的是是4.x的Jboss的话,请参考:docs/dtd/jboss-ds_1_0.dtd,相信你很容易就能找到控制最大/最小连接数的选项,应该是诸如:max-pool-size/min-poo ...
- [Q&A]VS 2012 MVC4专案与网站的差异?「ASP.NET组态」的Login账号出现在「新旧两组」会员数据库里面?
原文出處 http://www.dotblogs.com.tw/mis2000lab/archive/2013/08/30/mvc4_vs2012_login_member_db.aspx [Q&a ...
- npm scripts的生命周期管理
我们平时阅读一些开源项目,可能会发现有些项目的package.json里的scripts区域定义的脚本很复杂,令人眼花缭乱. 其实这些脚本是有规律可循的.让我们从最简单的一个例子开始学习. 新建一个空 ...
- Gym - 101291C (很有意思的最短路)
题意: 给出一张地图和机器人还有出口的位置,地图上面有障碍.然后给出UDLR上下左右四种指令,遇到障碍物或者越界的指令会忽略,剩下的继续执行. 只要到达出口就算找到出口,然后给你一串指令,让你修改指令 ...
- STL:string类中size()与length()的区别
结论是:两者没有任何区别 解释: C++Reference中对于两者的解释: 两者的具体解释都一模一样: 理解: length是因为C语言的习惯而保留下来的,string类最初只有length,引进S ...
- 讲课笔记3——CSS
背景常见样式: width:600px; height:800px; background: url(bg.jpg) no-repeat 40px 20px fixed gray ; * ...