SpringBoot优雅的全局异常处理
前言
本篇文章主要介绍的是SpringBoot项目进行全局异常的处理。
SpringBoot全局异常准备
说明:如果想直接获取工程那么可以直接跳到底部,通过链接下载工程代码。
开发准备
环境要求
JDK:1.8
SpringBoot:1.5.17.RELEASE
首先还是Maven的相关依赖:
  <properties>

        <project.build.sourceEncoding>UTF-8</project.build.sourceEncoding>

        <java.version>1.8</java.version>

        <maven.compiler.source>1.8</maven.compiler.source>

        <maven.compiler.target>1.8</maven.compiler.target>

    </properties>

    <parent>

        <groupId>org.springframework.boot</groupId>

        <artifactId>spring-boot-starter-parent</artifactId>

        <version>1.5.17.RELEASE</version>

        <relativePath />

    </parent>

    <dependencies>

        <!-- Spring Boot Web 依赖 核心 -->

        <dependency>

            <groupId>org.springframework.boot</groupId>

            <artifactId>spring-boot-starter-web</artifactId>

        </dependency>

        <!-- Spring Boot Test 依赖 -->

        <dependency>

            <groupId>org.springframework.boot</groupId>

            <artifactId>spring-boot-starter-test</artifactId>

            <scope>test</scope>

        </dependency>

        <dependency>

            <groupId>com.alibaba</groupId>

            <artifactId>fastjson</artifactId>

            <version>1.2.41</version>

        </dependency>

    </dependencies>
配置文件这块基本不需要更改,全局异常的处理只需在代码中实现即可。
代码编写
SpringBoot的项目已经对有一定的异常处理了,但是对于我们开发者而言可能就不太合适了,因此我们需要对这些异常进行统一的捕获并处理。SpringBoot中有一个ControllerAdvice的注解,使用该注解表示开启了全局异常的捕获,我们只需在自定义一个方法使用ExceptionHandler注解然后定义捕获异常的类型即可对这些捕获的异常进行统一的处理。
我们根据下面的这个示例来看该注解是如何使用吧。
示例代码:
@ControllerAdvice

public class MyExceptionHandler {

    @ExceptionHandler(value =Exception.class)

	public String exceptionHandler(Exception e){

		System.out.println("未知异常!原因是:"+e);

       	return e.getMessage();

    }

}
上述的示例中,我们对捕获的异常进行简单的二次处理,返回异常的信息,虽然这种能够让我们知道异常的原因,但是在很多的情况下来说,可能还是不够人性化,不符合我们的要求。
那么我们这里可以通过自定义的异常类以及枚举类来实现我们想要的那种数据吧。
自定义基础接口类
首先定义一个基础的接口类,自定义的错误描述枚举类需实现该接口。
代码如下:
public interface BaseErrorInfoInterface {

    /** 错误码*/

	 String getResultCode();

	/** 错误描述*/

	 String getResultMsg();

}
自定义枚举类
然后我们这里在自定义一个枚举类,并实现该接口。
代码如下:
public enum CommonEnum implements BaseErrorInfoInterface {

	// 数据操作错误定义

	SUCCESS("200", "成功!"),

	BODY_NOT_MATCH("400","请求的数据格式不符!"),

	SIGNATURE_NOT_MATCH("401","请求的数字签名不匹配!"),

	NOT_FOUND("404", "未找到该资源!"),

	INTERNAL_SERVER_ERROR("500", "服务器内部错误!"),

	SERVER_BUSY("503","服务器正忙,请稍后再试!")

	;

	/** 错误码 */

	private String resultCode;

	/** 错误描述 */

	private String resultMsg;

	CommonEnum(String resultCode, String resultMsg) {

		this.resultCode = resultCode;

		this.resultMsg = resultMsg;

	}

	@Override

	public String getResultCode() {

		return resultCode;

	}

	@Override

	public String getResultMsg() {

		return resultMsg;

	}

}
自定义异常类
然后我们在来自定义一个异常类,用于处理我们发生的业务异常。
代码如下:
public class BizException extends RuntimeException {

	private static final long serialVersionUID = 1L;

	/**

	 * 错误码

	 */

	protected String errorCode;

	/**

	 * 错误信息

	 */

	protected String errorMsg;

	public BizException() {

		super();

	}

	public BizException(BaseErrorInfoInterface errorInfoInterface) {

		super(errorInfoInterface.getResultCode());

		this.errorCode = errorInfoInterface.getResultCode();

		this.errorMsg = errorInfoInterface.getResultMsg();

	}

	public BizException(BaseErrorInfoInterface errorInfoInterface, Throwable cause) {

		super(errorInfoInterface.getResultCode(), cause);

		this.errorCode = errorInfoInterface.getResultCode();

		this.errorMsg = errorInfoInterface.getResultMsg();

	}

	public BizException(String errorMsg) {

		super(errorMsg);

		this.errorMsg = errorMsg;

	}

	public BizException(String errorCode, String errorMsg) {

		super(errorCode);

		this.errorCode = errorCode;

		this.errorMsg = errorMsg;

	}

	public BizException(String errorCode, String errorMsg, Throwable cause) {

		super(errorCode, cause);

		this.errorCode = errorCode;

		this.errorMsg = errorMsg;

	}

	public String getErrorCode() {

		return errorCode;

	}

	public void setErrorCode(String errorCode) {

		this.errorCode = errorCode;

	}

	public String getErrorMsg() {

		return errorMsg;

	}

	public void setErrorMsg(String errorMsg) {

		this.errorMsg = errorMsg;

	}

	public String getMessage() {

		return errorMsg;

	}

	@Override

	public Throwable fillInStackTrace() {

		return this;

	}

}
自定义数据格式
顺便这里我们定义一下数据的传输格式。
代码如下:
public class ResultBody {

	/**

	 * 响应代码

	 */

	private String code;

	/**

	 * 响应消息

	 */

	private String message;

	/**

	 * 响应结果

	 */

	private Object result;

	public ResultBody() {

	}

	public ResultBody(BaseErrorInfoInterface errorInfo) {

		this.code = errorInfo.getResultCode();

		this.message = errorInfo.getResultMsg();

	}

	public String getCode() {

		return code;

	}

	public void setCode(String code) {

		this.code = code;

	}

	public String getMessage() {

		return message;

	}

	public void setMessage(String message) {

		this.message = message;

	}

	public Object getResult() {

		return result;

	}

	public void setResult(Object result) {

		this.result = result;

	}

	/**

	 * 成功

	 *

	 * @return

	 */

	public static ResultBody success() {

		return success(null);

	}

	/**

	 * 成功

	 * @param data

	 * @return

	 */

	public static ResultBody success(Object data) {

		ResultBody rb = new ResultBody();

		rb.setCode(CommonEnum.SUCCESS.getResultCode());

		rb.setMessage(CommonEnum.SUCCESS.getResultMsg());

		rb.setResult(data);

		return rb;

	}

	/**

	 * 失败

	 */

	public static ResultBody error(BaseErrorInfoInterface errorInfo) {

		ResultBody rb = new ResultBody();

		rb.setCode(errorInfo.getResultCode());

		rb.setMessage(errorInfo.getResultMsg());

		rb.setResult(null);

		return rb;

	}

	/**

	 * 失败

	 */

	public static ResultBody error(String code, String message) {

		ResultBody rb = new ResultBody();

		rb.setCode(code);

		rb.setMessage(message);

		rb.setResult(null);

		return rb;

	}

	/**

	 * 失败

	 */

	public static ResultBody error( String message) {

		ResultBody rb = new ResultBody();

		rb.setCode("-1");

		rb.setMessage(message);

		rb.setResult(null);

		return rb;

	}

	@Override

	public String toString() {

		return JSONObject.toJSONString(this);

	}

}
自定义全局异常处理类
最后我们在来编写一个自定义全局异常处理的类。
代码如下:
@ControllerAdvice

public class GlobalExceptionHandler {

	private static final Logger logger = LoggerFactory.getLogger(GlobalExceptionHandler.class);

	/**

	 * 处理自定义的业务异常

	 * @param req

	 * @param e

	 * @return

	 */

    @ExceptionHandler(value = BizException.class)

    @ResponseBody

	public  ResultBody bizExceptionHandler(HttpServletRequest req, BizException e){

    	logger.error("发生业务异常!原因是:{}",e.getErrorMsg());

    	return ResultBody.error(e.getErrorCode(),e.getErrorMsg());

    }

	/**

	 * 处理空指针的异常

	 * @param req

	 * @param e

	 * @return

	 */

	@ExceptionHandler(value =NullPointerException.class)

	@ResponseBody

	public ResultBody exceptionHandler(HttpServletRequest req, NullPointerException e){

		logger.error("发生空指针异常!原因是:",e);

		return ResultBody.error(CommonEnum.BODY_NOT_MATCH);

	}

    /**

        * 处理其他异常

     * @param req

     * @param e

     * @return

     */

    @ExceptionHandler(value =Exception.class)

	@ResponseBody

	public ResultBody exceptionHandler(HttpServletRequest req, Exception e){

    	logger.error("未知异常!原因是:",e);

       	return ResultBody.error(CommonEnum.INTERNAL_SERVER_ERROR);

    }

}
因为这里我们只是用于做全局异常处理的功能实现以及测试,所以这里我们只需在添加一个实体类和一个控制层类即可。
实体类
又是万能的用户表 (▽)
代码如下:
public class User implements Serializable{

	private static final long serialVersionUID = 1L;

	/** 编号 */

	 private int id;

	 /** 姓名 */

	 private String name;

	 /** 年龄 */

	 private int age;

	 public User(){

	 }

	public int getId() {

		return id;

	}

	public void setId(int id) {

		this.id = id;

	}

	public String getName() {

		return name;

	}

	public void setName(String name) {

		this.name = name;

	}

	public int getAge() {

		return age;

	}

	public void setAge(int age) {

		this.age = age;

	}

	public String toString() {

		return JSONObject.toJSONString(this);

	}

}
Controller 控制层
控制层这边也比较简单,使用Restful风格实现的CRUD功能,不同的是这里我故意弄出了一些异常,好让这些异常被捕获到然后处理。这些异常中,有自定义的异常抛出,也有空指针的异常抛出,当然也有不可预知的异常抛出(这里我用类型转换异常代替),那么我们在完成代码编写之后,看看这些异常是否能够被捕获处理成功吧!
代码如下:
@RestController

@RequestMapping(value = "/api")

public class UserRestController {

	@PostMapping("/user")

    public boolean insert(@RequestBody User user) {

    	System.out.println("开始新增...");

    	//如果姓名为空就手动抛出一个自定义的异常!

        if(user.getName()==null){

            throw  new BizException("-1","用户姓名不能为空!");

        }

        return true;

    }

    @PutMapping("/user")

    public boolean update(@RequestBody User user) {

    	System.out.println("开始更新...");

       //这里故意造成一个空指针的异常,并且不进行处理

        String str=null;

        str.equals("111");

        return true;

    }

    @DeleteMapping("/user")

    public boolean delete(@RequestBody User user)  {

        System.out.println("开始删除...");

        //这里故意造成一个异常,并且不进行处理

        Integer.parseInt("abc123");

        return true;

    }

    @GetMapping("/user")

    public List<User> findByUser(User user) {

    	System.out.println("开始查询...");

        List<User> userList =new ArrayList<>();

        User user2=new User();

        user2.setId(1L);

        user2.setName("xuwujing");

        user2.setAge(18);

        userList.add(user2);

        return userList;

    }

}
App 入口
和普通的SpringBoot项目基本一样。
代码如下:
@SpringBootApplication

public class App

{

    public static void main( String[] args )

    {

		SpringApplication.run(App.class, args);

		System.out.println("程序正在运行...");

    }

}
功能测试
我们成功启动该程序之后,使用Postman工具来进行接口测试。
首先进行查询,查看程序正常运行是否ok,使用GET 方式进行请求。
返回参数为:
{"id":1,"name":"xuwujing","age":18}
示例图:
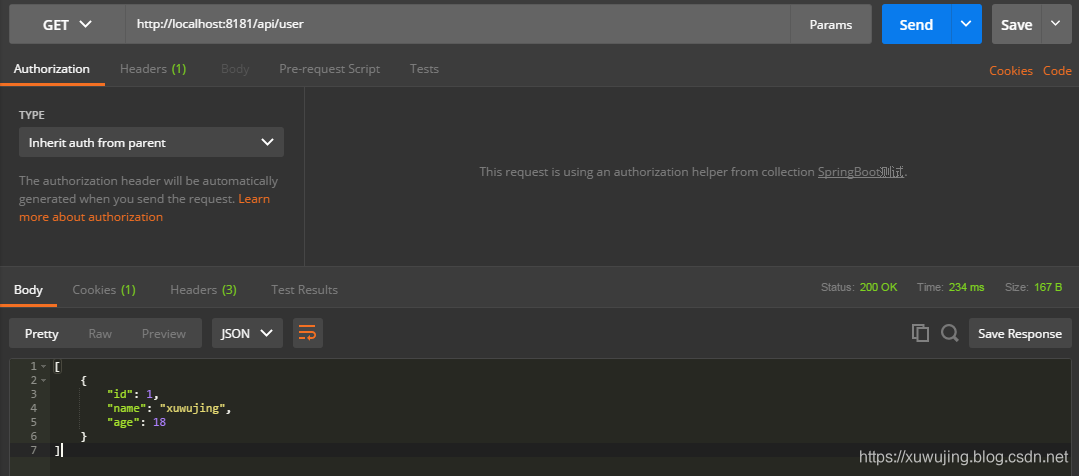
可以看到程序正常返回,并没有因自定义的全局异常而影响。
然后我们再来测试下自定义的异常是否能够被正确的捕获并处理。
使用POST方式进行请求
Body参数为:
{"id":1,"age":18}
返回参数为:
{"code":"-1","message":"用户姓名不能为空!","result":null}
示例图:
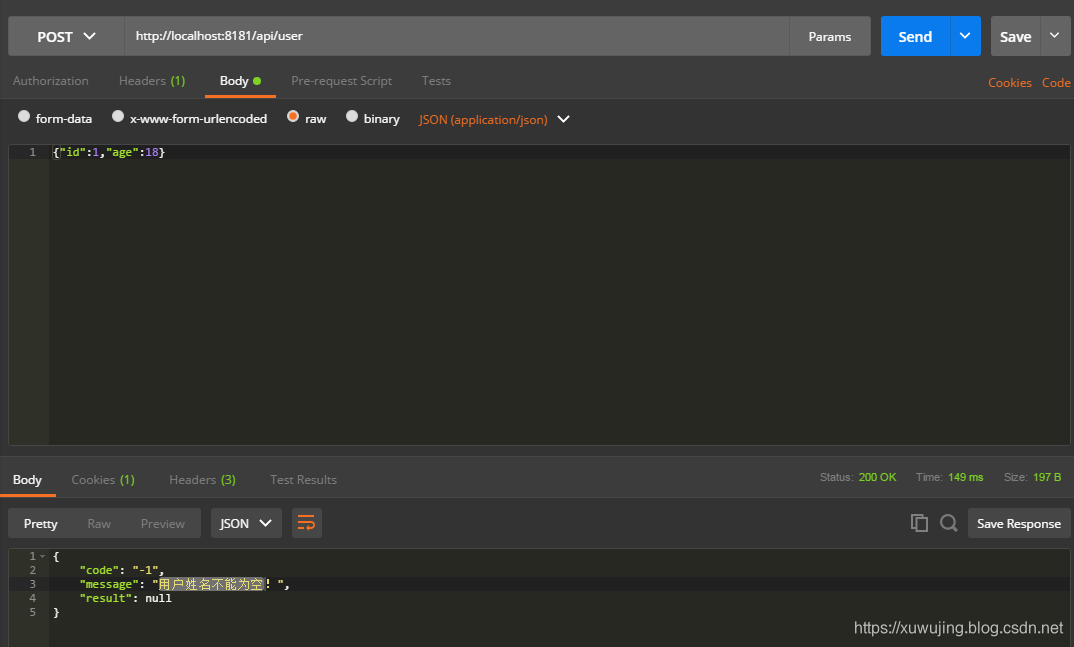
可以看出将我们抛出的异常进行数据封装,然后将异常返回出来。
然后我们再来测试下空指针异常是否能够被正确的捕获并处理。在自定义全局异常中,我们除了定义空指针的异常处理,也定义最高级别之一的Exception异常,那么这里发生了空指针异常之后,它是回优先使用哪一个呢?这里我们来测试下。
使用PUT方式进行请求。
Body参数为:
{"id":1,"age":18}
返回参数为:
{"code":"400","message":"请求的数据格式不符!","result":null}
示例图:
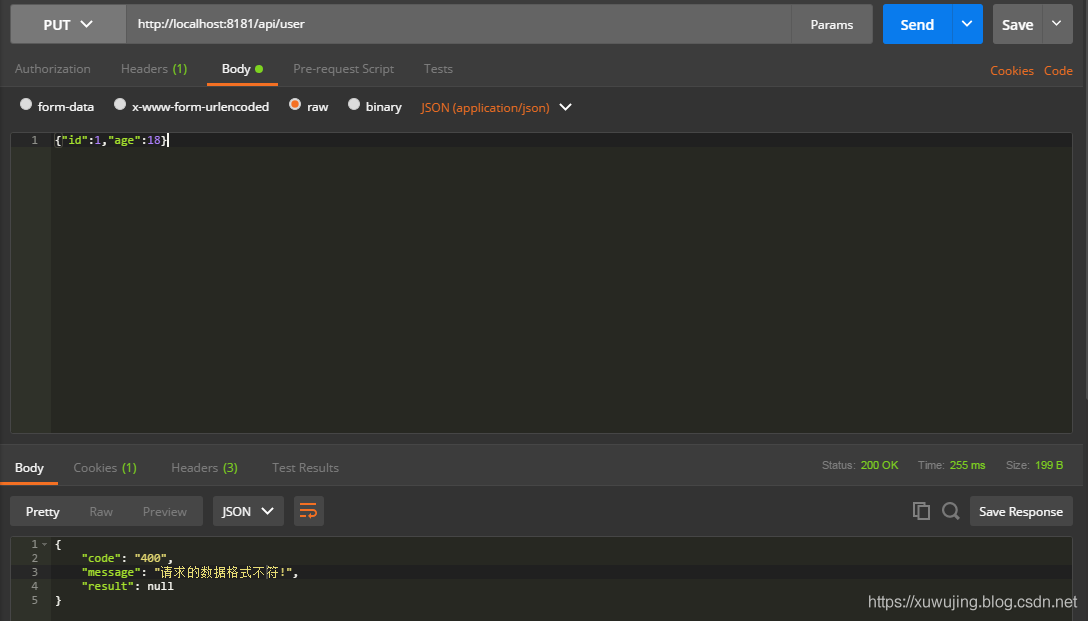
我们可以看到这里的的确是返回空指针的异常护理,可以得出全局异常处理优先处理子类的异常。
那么我们在来试试未指定其异常的处理,看该异常是否能够被捕获。
使用DELETE方式进行请求。
Body参数为:
{"id":1}
返回参数为:
{"code":"500","message":"服务器内部错误!","result":null}
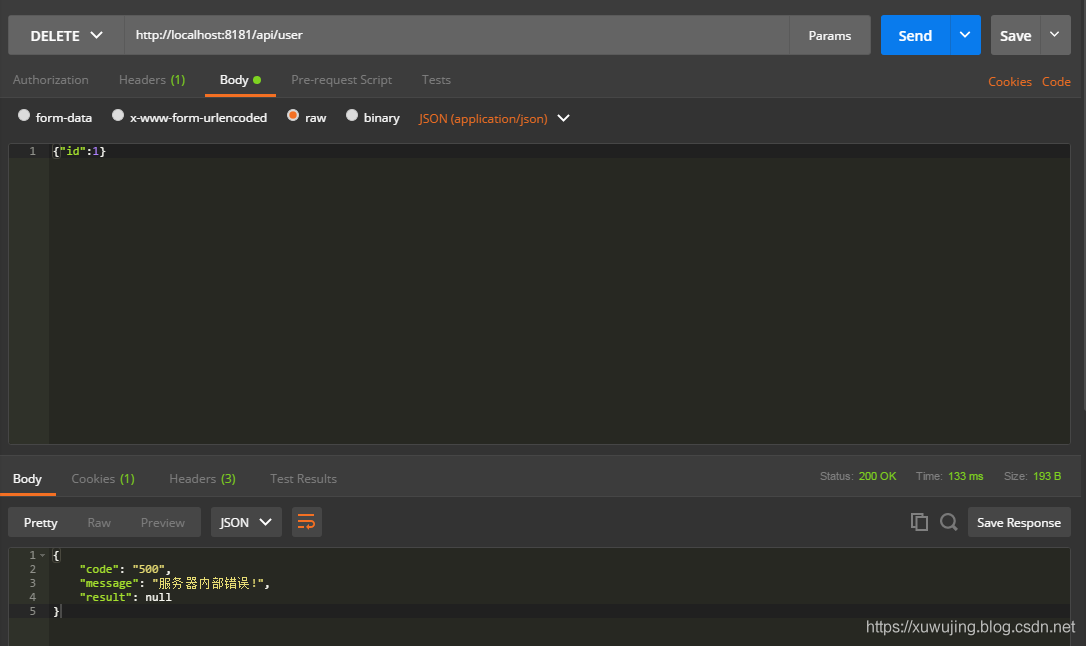
这里可以看到它使用了我们在自定义全局异常处理类中的Exception异常处理的方法。
到这里,测试就结束了。顺便再说一下,自义定全局异常处理除了可以处理上述的数据格式之外,也可以处理页面的跳转,只需在新增的异常方法的返回处理上填写该跳转的路径并不使用ResponseBody 注解即可。 细心的同学也许发现了在GlobalExceptionHandler类中使用的是ControllerAdvice注解,而非RestControllerAdvice注解,如果是用的RestControllerAdvice注解,它会将数据自动转换成JSON格式,这种于Controller和RestController类似,所以我们在使用全局异常处理的之后可以进行灵活的选择处理。
其它
关于SpringBoot优雅的全局异常处理的文章就讲解到这里了,如有不妥,欢迎指正!
项目地址
SpringBoot全局异常的处理项目工程地址:
https://github.com/xuwujing/springBoot-study/tree/master/springboot-exceptionHandler
SpringBoot整个集合的地址:
https://github.com/xuwujing/springBoot-study
SpringBoot整合系列的文章
音乐推荐
原创不易,如果感觉不错,希望给个推荐!您的支持是我写作的最大动力!
版权声明:
作者:虚无境
博客园出处:http://www.cnblogs.com/xuwujing
CSDN出处:http://blog.csdn.net/qazwsxpcm
个人博客出处:http://www.panchengming.com
SpringBoot优雅的全局异常处理的更多相关文章
- SpringBoot中的全局异常处理
SpringBoot中的全局异常处理 本篇要点 介绍SpringBoot默认的异常处理机制. 如何定义错误页面. 如何自定义异常数据. 如何自定义视图解析. 介绍@ControllerAdvice注解 ...
- SpringBoot Validation优雅的全局参数校验
前言 我们都知道在平时写controller时候,都需要对请求参数进行后端校验,一般我们可能会这样写 public String add(UserVO userVO) { if(userVO.getA ...
- SpringBoot系列教程web篇之全局异常处理
当我们的后端应用出现异常时,通常会将异常状况包装之后再返回给调用方或者前端,在实际的项目中,不可能对每一个地方都做好异常处理,再优雅的代码也可能抛出异常,那么在 Spring 项目中,可以怎样优雅的处 ...
- 全局异常处理及参数校验-SpringBoot 2.7 实战基础 (建议收藏)
优雅哥 SpringBoot 2.7 实战基础 - 08 - 全局异常处理及参数校验 前后端分离开发非常普遍,后端处理业务,为前端提供接口.服务中总会出现很多运行时异常和业务异常,本文主要讲解在 Sp ...
- SpringBoot整合全局异常处理&SpringBoot整合定时任务Task&SpringBoot整合异步任务
============整合全局异常=========== 1.整合web访问的全局异常 如果不做全局异常处理直接访问如果报错,页面会报错500错误,对于界面的显示非常不友好,因此需要做处理. 全局异 ...
- 【第二十三章】 springboot + 全局异常处理
一.单个controller范围的异常处理 package com.xxx.secondboot.web; import org.springframework.web.bind.annotation ...
- 第二十三章 springboot + 全局异常处理
一.单个controller范围的异常处理 package com.xxx.secondboot.web; import org.springframework.web.bind.annotation ...
- springboot中 简单的SpringMvc全局异常处理
1.全局异常处理类:GlobalExceptionHandler.java package com.lf.exception; import java.util.HashMap; import jav ...
- springboot 全局异常处理
springboot 全局异常处理 研究了半天springboot的全局异常处理,虽然还是需要再多整理一下,但是对于常见的404和500足以可以区分开,能够根据这两个异常分别处理 首先配置视图解析路径 ...
随机推荐
- VBA连接到SQL2008需要加上端口号
VBA连接到SQL2008需要加上端口号1433,比如 conn = "server=XXXX.XXXX.XXXX.XXXX,1433;provider=SQLOLEDB.1;databas ...
- JSP自定义tld方法标签
卧槽 我们可以通过tld文件,自定义一个方法标签,以便在页面中使用,目录通常放在WEB-INF下面的tlds文件夹: 引入方式示例,直接在jsp上引入tld标签文件: <%@ taglib pr ...
- System.AccessViolationException”类型的第一次机会异常在 System.Data.dll 中发生 其他信息: 尝试读取或写入受保护的内存。这通常指示其他内存已损坏。
管理员cmd中运行 netsh winsock reset
- Windows Server 2012 R2:细节信息汇总
Windows Server 2012 R2:细节信息汇总 2013年08月09日00:10 it168网站原创 作者:核子可乐编译 编辑:王晓东 我要评论(0) 标签: 操作系统 , Windows ...
- IOS开发---菜鸟学习之路--(十三)-利用MBProgressHUD进行异步获取数据
本章将介绍如何利用MBProgressHUD实现异步处理数据. 其实我本来只是像实现一个加载数据时提示框的效果,然后问了学长知道了这个类,然后就使用了 接着就发现了一个“BUG” 再然后就发现原来MB ...
- 【Linked List Cycle II】cpp
题目: Given a linked list, return the node where the cycle begins. If there is no cycle, return null. ...
- Python-S9-Day125-Web微信&爬虫框架之scrapy
01 今日内容概要 02 内容回顾:爬虫 03 内容回顾:网络和并发编程 04 Web微信之获取联系人列表 05 Web微信之发送消息 06 为什么request.POST拿不到数据 07 到底使用j ...
- docker镜像与docker容器的区别
镜像的一个实例称为容器. 你有一个镜像,这是你描述的一组图层. 如果你开始这个镜像,你有一个运行这个镜像的容器. 您可以拥有许多相同镜像的正在运行的容器. docker images 查看所有镜像 d ...
- Android简单的BaseExpandableList使用
1.Activity package com.example.administrator.mystudent.ExpandableListView; import android.app.Expand ...
- [POJ3352]Road Construction
[POJ3352]Road Construction 试题描述 It's almost summer time, and that means that it's almost summer cons ...