
SpringBoot项目整合微信登录
一.开通微信登录
- 去微信开发者平台
1.注册
2.邮箱激活
3.完善开发者资料
4.开发者资质认证
准备营业执照,1-2个工作日审批、300元
5.创建网站应用
6.提交审核,7个工作日审批
7.熟悉微信登录流程
参考文档:https://open.weixin.qq.com/cgi-bin/showdocument?action=dir_list&t=resource/res_list&verify=1&id=open1419316505&token=e547653f995d8f402704d5cb2945177dc8aa4e7e&lang=zh_CN
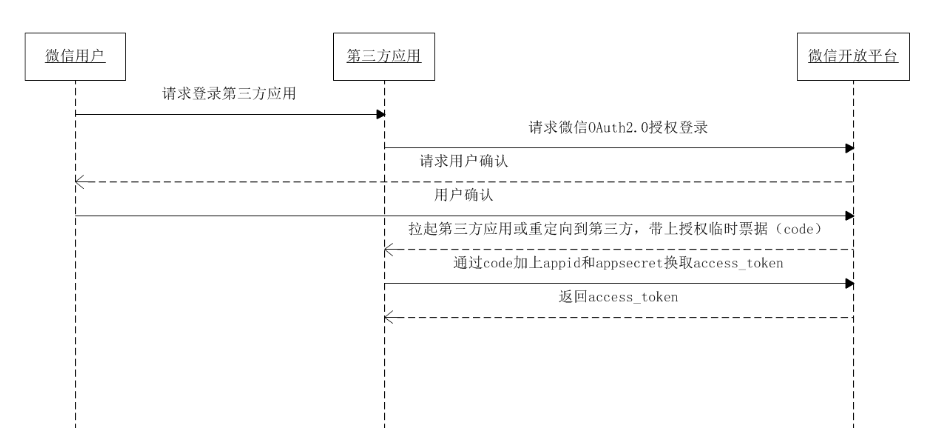
请求示例
登录一号店网站应用 https://passport.yhd.com/wechat/login.do 打开后,一号店会生成state参数,跳转到 https://open.weixin.qq.com/connect/qrconnect?appid=wxbdc5610cc59c1631&redirect_uri=https%3A%2F%2Fpassport.yhd.com%2Fwechat%2Fcallback.do&response_type=code&scope=snsapi_login&state=3d6be0a4035d839573b04816624a415e#wechat_redirect 微信用户使用微信扫描二维码并且确认登录后,PC端会跳转到 https://passport.yhd.com/wechat/callback.do?code=CODE&state=3d6be0a4035d839573b04816624a415e 为了满足网站更定制化的需求,我们还提供了第二种获取code的方式,支持网站将微信登录二维码内嵌到自己页面中,用户使用微信扫码授权后通过JS将code返回给网站。 JS微信登录主要用途:网站希望用户在网站内就能完成登录,无需跳转到微信域下登录后再返回,提升微信登录的流畅性与成功率。 网站内嵌二维码微信登录JS实现办法:
二.整合步骤
1.在页面中先引入如下JS文件(支持https):
http://res.wx.qq.com/connect/zh_CN/htmledition/js/wxLogin.js
2.在需要使用微信登录的地方实例以下JS对象:生成二维码
 var obj = new WxLogin({

	 self_redirect:true,

	 id:"login_container",

	 appid: "",

	 scope: "",

	 redirect_uri: "",

	 state: "",

	 style: "",

 	 href: ""

 });
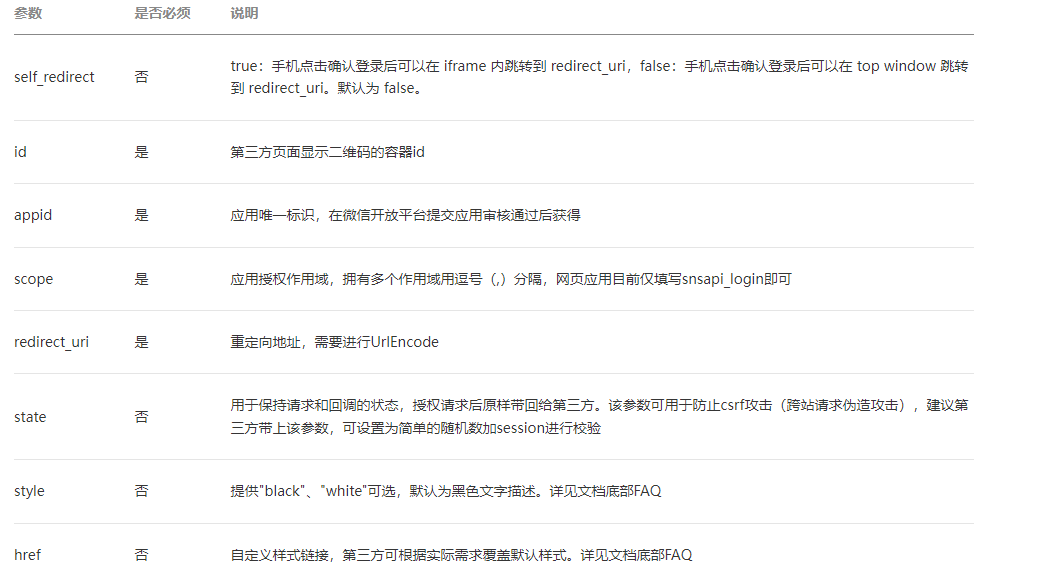
参数说明
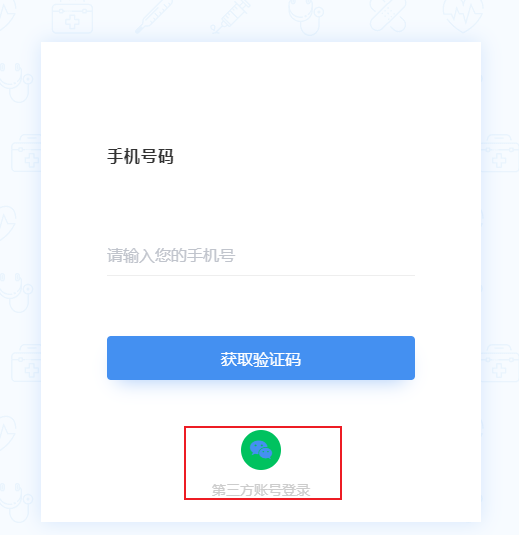
3.前端页面整合微信登录按钮(项目源码后续我会上传到github上)
<!-- 微信登录 #start -->
<div class="operate-view" v-if="dialogAtrr.showLoginType === 'weixin'" >
<div class="wrapper wechat" style="height: 400px">
<div>
<div id="weixinLogin"></div>
</div>
<div class="bottom wechat" style="margin-top: -80px;">
<div class="phone-container">
<div class="phone-wrapper" @click="phoneLogin()"><span
class="iconfont icon"></span></div>
<span class="third-text"> 手机短信验证码登录 </span></div>
</div>
</div>
</div>
<!-- 微信登录 #end -->
4.创建一个SpringBoot项目导入依赖,在配置文件中倒入相关微信的秘钥信息
<dependencies>

    <dependency>

        <groupId>org.apache.httpcomponents</groupId>

        <artifactId>httpclient</artifactId>

    </dependency>

</dependencies>
wx:

  open:

    app_id: 你的appid

    app_secret: 你的appsecret

    redirect_url: 你的回调地址
5.创建一个配置类,绑定yml中的配置信息
package com.qbb.yygh.user.properties;

import lombok.Data;

import org.springframework.boot.context.properties.ConfigurationProperties;

import org.springframework.stereotype.Component;

/**

 * @author QiuQiu&LL (个人博客:https://www.cnblogs.com/qbbit)

 * @version 1.0

 * @date 2022-04-24  21:25

 * @Description:

 */

@ConfigurationProperties(prefix = "wx.open")

@Component

@Data

public class WXProperties {

    private String appid;

    private String appsecret;

    private String redirecturl;

}
三.核心业务流程
1.点击微信登录时向微信服务器发送一个请求,获取一个微信登录的二维码
package com.qbb.yygh.user.controller;

import com.qbb.yygh.result.R;

import com.qbb.yygh.user.properties.WXProperties;

import io.swagger.annotations.ApiOperation;

import org.springframework.beans.factory.annotation.Autowired;

import org.springframework.stereotype.Controller;

import org.springframework.web.bind.annotation.GetMapping;

import org.springframework.web.bind.annotation.RequestMapping;

import java.util.HashMap;

import java.util.Map;

/**

 * @author QiuQiu&LL (个人博客:https://www.cnblogs.com/qbbit)

 * @version 1.0

 * @date 2022-04-24  21:43

 * @Description:

 */

@Controller

@RequestMapping("/api/userInfo/wx")

public class WXApiController {

    @Autowired

    private WXProperties wxProperties;

    @ApiOperation("微信登录生成二维码需要的参数")

    @GetMapping("/params")

    public R getParams() {

        Map<String, Object> map = new HashMap<>();

        /**

         * self_redirect:true,

         *  id:"login_container", 第三方页面显示二维码的容器id

         *  appid: "", 应用唯一标识,在微信开放平台提交应用审核通过后获得

         *  scope: "", 应用授权作用域,拥有多个作用域用逗号(,)分隔,网页应用目前仅填写snsapi_login即可

         *  redirect_uri: "", 重定向地址,需要进行UrlEncode

         *   state: "",

         *  style: "",

         *  href: ""

         */

        map.put("id", "weixinLogin");

        map.put("appid", wxProperties.getAppid());

        map.put("scope", "snsapi_login");

        map.put("redirect_uri", wxProperties.getRedirecturl());

        map.put("state", System.currentTimeMillis()+"");

        return R.ok().data(map);

    }

}
//1、引入微信js

// 注册全局登录事件对象

window.loginEvent = new Vue();

// 监听登录事件

loginEvent.$on('loginDialogEvent', function () {

	document.getElementById("loginDialog").click();

})

// 触发事件,显示登录层:loginEvent.$emit('loginDialogEvent')

//初始化微信js

const script = document.createElement('script')

script.type = 'text/javascript'

script.src = 'https://res.wx.qq.com/connect/zh_CN/htmledition/js/wxLogin.js'

document.body.appendChild(script)

//2、撞见WxLogin对象,并请求后盾接口为参数赋值(参数也可以在前段写死,但是那样不太安全)

weixinApi.getLoginParam().then(response => {

    var obj = new WxLogin({

      self_redirect:true,

      id: 'weixinLogin', // 需要显示的容器id

      appid: response.data.appid, // 公众号appid wx*******

      scope: response.data.scope, // 网页默认即可

      redirect_uri: response.data.redirectUri, // 授权成功后回调的url

      state: response.data.state, // 可设置为简单的随机数加session用来校验

      style: 'black', // 提供"black"、"white"可选。二维码的样式

      href: '' // 外部css文件url,需要https

    })

  })
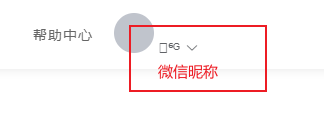
效果如下:
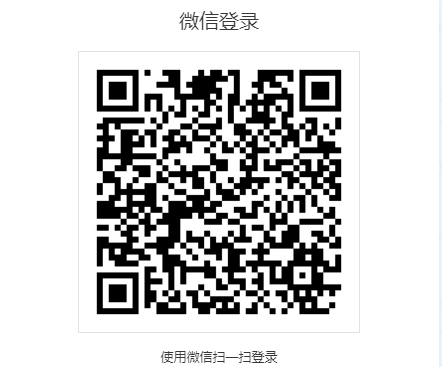
2.微信用户使用微信扫描二维码并且确认登录后,PC端会跳转到 https://passport.yhd.com/wechat/callback.do?code=CODE&state=3d6be0a4035d839573b04816624a415e
3.所以我们需要提供一个callback回调接口(注意:如果没有配置内网穿透,则此为服务的端口号必须是8160,微信官方官方提供的)
# 端口号

server:

  port: 8160
HttpClientUtils工具类
package com.qbb.yygh.user.utils;

import org.apache.commons.io.IOUtils;

import org.apache.commons.lang.StringUtils;

import org.apache.http.Consts;

import org.apache.http.HttpEntity;

import org.apache.http.HttpResponse;

import org.apache.http.NameValuePair;

import org.apache.http.client.HttpClient;

import org.apache.http.client.config.RequestConfig;

import org.apache.http.client.config.RequestConfig.Builder;

import org.apache.http.client.entity.UrlEncodedFormEntity;

import org.apache.http.client.methods.HttpGet;

import org.apache.http.client.methods.HttpPost;

import org.apache.http.conn.ConnectTimeoutException;

import org.apache.http.conn.ssl.SSLConnectionSocketFactory;

import org.apache.http.conn.ssl.SSLContextBuilder;

import org.apache.http.conn.ssl.TrustStrategy;

import org.apache.http.conn.ssl.X509HostnameVerifier;

import org.apache.http.entity.ContentType;

import org.apache.http.entity.StringEntity;

import org.apache.http.impl.client.CloseableHttpClient;

import org.apache.http.impl.client.HttpClients;

import org.apache.http.impl.conn.PoolingHttpClientConnectionManager;

import org.apache.http.message.BasicNameValuePair;

import javax.net.ssl.SSLContext;

import javax.net.ssl.SSLException;

import javax.net.ssl.SSLSession;

import javax.net.ssl.SSLSocket;

import java.io.IOException;

import java.net.SocketTimeoutException;

import java.security.GeneralSecurityException;

import java.security.cert.CertificateException;

import java.security.cert.X509Certificate;

import java.util.ArrayList;

import java.util.List;

import java.util.Map;

import java.util.Map.Entry;

import java.util.Set;

/**

 * @author QiuQiu&LL (个人博客:https://www.cnblogs.com/qbbit)

 * @version 1.0

 * @date 2022-04-25  11:25

 * @Description:

 * 依赖的jar包有:commons-lang-2.6.jar、httpclient-4.3.2.jar、httpcore-4.3.1.jar、commons-io-2.4.jar

 */

public class HttpClientUtils {

    public static final int connTimeout=10000;

    public static final int readTimeout=10000;

    public static final String charset="UTF-8";

    private static HttpClient client = null;

    static {

        PoolingHttpClientConnectionManager cm = new PoolingHttpClientConnectionManager();

        cm.setMaxTotal(128);

        cm.setDefaultMaxPerRoute(128);

        client = HttpClients.custom().setConnectionManager(cm).build();

    }

    public static String postParameters(String url, String parameterStr) throws ConnectTimeoutException, SocketTimeoutException, Exception{

        return post(url,parameterStr,"application/x-www-form-urlencoded",charset,connTimeout,readTimeout);

    }

    public static String postParameters(String url, String parameterStr,String charset, Integer connTimeout, Integer readTimeout) throws ConnectTimeoutException, SocketTimeoutException, Exception{

        return post(url,parameterStr,"application/x-www-form-urlencoded",charset,connTimeout,readTimeout);

    }

    public static String postParameters(String url, Map<String, String> params) throws ConnectTimeoutException,

            SocketTimeoutException, Exception {

        return postForm(url, params, null, connTimeout, readTimeout);

    }

    public static String postParameters(String url, Map<String, String> params, Integer connTimeout,Integer readTimeout) throws ConnectTimeoutException,

            SocketTimeoutException, Exception {

        return postForm(url, params, null, connTimeout, readTimeout);

    }

    public static String get(String url) throws Exception {

        return get(url, charset, null, null);

    }

    public static String get(String url, String charset) throws Exception {

        return get(url, charset, connTimeout, readTimeout);

    }

    /**

     * 发送一个 Post 请求, 使用指定的字符集编码.

     *

     * @param url

     * @param body RequestBody

     * @param mimeType 例如 application/xml "application/x-www-form-urlencoded" a=1&b=2&c=3

     * @param charset 编码

     * @param connTimeout 建立链接超时时间,毫秒.

     * @param readTimeout 响应超时时间,毫秒.

     * @return ResponseBody, 使用指定的字符集编码.

     * @throws ConnectTimeoutException 建立链接超时异常

     * @throws SocketTimeoutException  响应超时

     * @throws Exception

     */

    public static String post(String url, String body, String mimeType,String charset, Integer connTimeout, Integer readTimeout)

            throws ConnectTimeoutException, SocketTimeoutException, Exception {

        HttpClient client = null;

        HttpPost post = new HttpPost(url);

        String result = "";

        try {

            if (StringUtils.isNotBlank(body)) {

                HttpEntity entity = new StringEntity(body, ContentType.create(mimeType, charset));

                post.setEntity(entity);

            }

            // 设置参数

            RequestConfig.Builder customReqConf = RequestConfig.custom();

            if (connTimeout != null) {

                customReqConf.setConnectTimeout(connTimeout);

            }

            if (readTimeout != null) {

                customReqConf.setSocketTimeout(readTimeout);

            }

            post.setConfig(customReqConf.build());

            HttpResponse res;

            if (url.startsWith("https")) {

                // 执行 Https 请求.

                client = createSSLInsecureClient();

                res = client.execute(post);

            } else {

                // 执行 Http 请求.

                client = HttpClientUtils.client;

                res = client.execute(post);

            }

            result = IOUtils.toString(res.getEntity().getContent(), charset);

        } finally {

            post.releaseConnection();

            if (url.startsWith("https") && client != null&& client instanceof CloseableHttpClient) {

                ((CloseableHttpClient) client).close();

            }

        }

        return result;

    }

    /**

     * 提交form表单

     *

     * @param url

     * @param params

     * @param connTimeout

     * @param readTimeout

     * @return

     * @throws ConnectTimeoutException

     * @throws SocketTimeoutException

     * @throws Exception

     */

    public static String postForm(String url, Map<String, String> params, Map<String, String> headers, Integer connTimeout,Integer readTimeout) throws ConnectTimeoutException,

            SocketTimeoutException, Exception {

        HttpClient client = null;

        HttpPost post = new HttpPost(url);

        try {

            if (params != null && !params.isEmpty()) {

                List<NameValuePair> formParams = new ArrayList<NameValuePair>();

                Set<Entry<String, String>> entrySet = params.entrySet();

                for (Entry<String, String> entry : entrySet) {

                    formParams.add(new BasicNameValuePair(entry.getKey(), entry.getValue()));

                }

                UrlEncodedFormEntity entity = new UrlEncodedFormEntity(formParams, Consts.UTF_8);

                post.setEntity(entity);

            }

            if (headers != null && !headers.isEmpty()) {

                for (Entry<String, String> entry : headers.entrySet()) {

                    post.addHeader(entry.getKey(), entry.getValue());

                }

            }

            // 设置参数

            Builder customReqConf = RequestConfig.custom();

            if (connTimeout != null) {

                customReqConf.setConnectTimeout(connTimeout);

            }

            if (readTimeout != null) {

                customReqConf.setSocketTimeout(readTimeout);

            }

            post.setConfig(customReqConf.build());

            HttpResponse res = null;

            if (url.startsWith("https")) {

                // 执行 Https 请求.

                client = createSSLInsecureClient();

                res = client.execute(post);

            } else {

                // 执行 Http 请求.

                client = HttpClientUtils.client;

                res = client.execute(post);

            }

            return IOUtils.toString(res.getEntity().getContent(), "UTF-8");

        } finally {

            post.releaseConnection();

            if (url.startsWith("https") && client != null

                    && client instanceof CloseableHttpClient) {

                ((CloseableHttpClient) client).close();

            }

        }

    }

    /**

     * 发送一个 GET 请求

     *

     * @param url

     * @param charset

     * @param connTimeout  建立链接超时时间,毫秒.

     * @param readTimeout  响应超时时间,毫秒.

     * @return

     * @throws ConnectTimeoutException   建立链接超时

     * @throws SocketTimeoutException   响应超时

     * @throws Exception

     */

    public static String get(String url, String charset, Integer connTimeout,Integer readTimeout)

            throws ConnectTimeoutException,SocketTimeoutException, Exception {

        HttpClient client = null;

        HttpGet get = new HttpGet(url);

        String result = "";

        try {

            // 设置参数

            Builder customReqConf = RequestConfig.custom();

            if (connTimeout != null) {

                customReqConf.setConnectTimeout(connTimeout);

            }

            if (readTimeout != null) {

                customReqConf.setSocketTimeout(readTimeout);

            }

            get.setConfig(customReqConf.build());

            HttpResponse res = null;

            if (url.startsWith("https")) {

                // 执行 Https 请求.

                client = createSSLInsecureClient();

                res = client.execute(get);

            } else {

                // 执行 Http 请求.

                client = HttpClientUtils.client;

                res = client.execute(get);

            }

            result = IOUtils.toString(res.getEntity().getContent(), charset);

        } finally {

            get.releaseConnection();

            if (url.startsWith("https") && client != null && client instanceof CloseableHttpClient) {

                ((CloseableHttpClient) client).close();

            }

        }

        return result;

    }

    /**

     * 从 response 里获取 charset

     *

     * @param ressponse

     * @return

     */

    @SuppressWarnings("unused")

    private static String getCharsetFromResponse(HttpResponse ressponse) {

        // Content-Type:text/html; charset=GBK

        if (ressponse.getEntity() != null  && ressponse.getEntity().getContentType() != null && ressponse.getEntity().getContentType().getValue() != null) {

            String contentType = ressponse.getEntity().getContentType().getValue();

            if (contentType.contains("charset=")) {

                return contentType.substring(contentType.indexOf("charset=") + 8);

            }

        }

        return null;

    }

    /**

     * 创建 SSL连接

     * @return

     * @throws GeneralSecurityException

     */

    private static CloseableHttpClient createSSLInsecureClient() throws GeneralSecurityException {

        try {

            SSLContext sslContext = new SSLContextBuilder().loadTrustMaterial(null, new TrustStrategy() {

                public boolean isTrusted(X509Certificate[] chain,String authType) throws CertificateException {

                    return true;

                }

            }).build();

            SSLConnectionSocketFactory sslsf = new SSLConnectionSocketFactory(sslContext, new X509HostnameVerifier() {

                @Override

                public boolean verify(String arg0, SSLSession arg1) {

                    return true;

                }

                @Override

                public void verify(String host, SSLSocket ssl)

                        throws IOException {

                }

                @Override

                public void verify(String host, X509Certificate cert)

                        throws SSLException {

                }

                @Override

                public void verify(String host, String[] cns,

                                   String[] subjectAlts) throws SSLException {

                }

            });

            return HttpClients.custom().setSSLSocketFactory(sslsf).build();

        } catch (GeneralSecurityException e) {

            throw e;

        }

    }

    public static void main(String[] args) {

        try {

            String str= post("https://localhost:443/ssl/test.shtml","name=12&page=34","application/x-www-form-urlencoded", "UTF-8", 10000, 10000);

            //String str= get("https://localhost:443/ssl/test.shtml?name=12&page=34","GBK");

            /*Map<String,String> map = new HashMap<String,String>();

            map.put("name", "111");

            map.put("page", "222");

            String str= postForm("https://localhost:443/ssl/test.shtml",map,null, 10000, 10000);*/

            System.out.println(str);

        } catch (ConnectTimeoutException e) {

            // TODO Auto-generated catch block

            e.printStackTrace();

        } catch (SocketTimeoutException e) {

            // TODO Auto-generated catch block

            e.printStackTrace();

        } catch (Exception e) {

            // TODO Auto-generated catch block

            e.printStackTrace();

        }

    }

}
controller
@GetMapping("/callback")

    public String callback(String code, String state) {

        String result = wxApiService.callback(code,state);

        return result;

    }
service
@Override

    public String callback(String code, String state) {

        StringBuilder sb = new StringBuilder();

        sb.append("https://api.weixin.qq.com/sns/oauth2/access_token?")

                .append("appid=%s")

                .append("&secret=%s")

                .append("&code=%s")

                .append("&grant_type=%s");

        String authUrl = String.format(sb.toString(), wxProperties.getAppid(), wxProperties.getAppsecret(), code, "authorization_code");

        // https://api.weixin.qq.com/sns/oauth2/access_token?appid=APPID&secret=SECRET&code=CODE&grant_type=authorization_code

        try {

            String resultJson = HttpClientUtils.get(authUrl);

            JSONObject jsonObject = JSONObject.parseObject(resultJson);

            /**

             * 微信给的标准正确返回信息

             * {

             * "access_token":"ACCESS_TOKEN",

             * "expires_in":7200,

             * "refresh_token":"REFRESH_TOKEN",

             * "openid":"OPENID",

             * "scope":"SCOPE",

             * "unionid": "o6_bmasdasdsad6_2sgVt7hMZOPfL"

             * }

             */

            // 获取accessToken和openid

            String accessToken = (String) jsonObject.get("access_token");

            String openid = (String) jsonObject.get("openid");

            log.info("accessToken={}", accessToken);

            log.info("openid={}", openid);

            // 通过openid查询用户信息

            LambdaQueryWrapper<UserInfo> wrapper = Wrappers.<UserInfo>lambdaQuery();

            wrapper.eq(UserInfo::getOpenid, openid);

            UserInfo userInfo = userInfoMapper.selectOne(wrapper);

            String avatar = null;

            if (userInfo == null) {

                // 首次登录

                // 请求微信服务端,获取用户基本信息

                String getWxUserInfoString = "https://api.weixin.qq.com/sns/userinfo?access_token=%s&openid=%s";

                String getWxUserInfoUrl = String.format(getWxUserInfoString, accessToken, openid);

                String jsonStr = HttpClientUtils.get(getWxUserInfoUrl);

                /**

                 * 正确的Json返回结果:

                 *

                 * {

                 * "openid":"OPENID",

                 * "nickname":"NICKNAME",

                 * "sex":1,

                 * "province":"PROVINCE",

                 * "city":"CITY",

                 * "country":"COUNTRY",

                 * "headimgurl": "https://thirdwx.qlogo.cn/mmopen/g3MonUZtNHkdmzicIlibx6iaFqAc56vxLSUfpb6n5WKSYVY0ChQKkiaJSgQ1dZuTOgvLLrhJbERQQ4eMsv84eavHiaiceqxibJxCfHe/0",

                 * "privilege":[

                 * "PRIVILEGE1",

                 * "PRIVILEGE2"

                 * ],

                 * "unionid": " o6_bmasdasdsad6_2sgVt7hMZOPfL"

                 *

                 * }

                 *

                 * 参数	说明

                 * openid	普通用户的标识,对当前开发者帐号唯一

                 * nickname	普通用户昵称

                 * sex	普通用户性别,1为男性,2为女性

                 * province	普通用户个人资料填写的省份

                 * city	普通用户个人资料填写的城市

                 * country	国家,如中国为CN

                 * headimgurl	用户头像,最后一个数值代表正方形头像大小(有0、46、64、96、132数值可选,0代表640*640正方形头像),用户没有头像时该项为空

                 * privilege	用户特权信息,json数组,如微信沃卡用户为(chinaunicom)

                 * unionid	用户统一标识。针对一个微信开放平台帐号下的应用,同一用户的unionid是唯一的。

                 */

                JSONObject obj = JSONObject.parseObject(jsonStr);

                // 获取用户的nickName

                String nickname = (String) obj.get("nickname");

                avatar = (String) obj.get("headimgurl");

                userInfo = new UserInfo();

                userInfo.setOpenid(openid);

                userInfo.setStatus(1);

                userInfo.setNickName(nickname);

                userInfo.setAvatar(avatar);

                userInfoMapper.insert(userInfo);

            }

            // 返回页面显示名称

            Map<String, String> map = new HashMap<>();

            // 判断用户状态

            if (userInfo.getStatus() == 0) {

                throw new YyghException("用户已锁定", -1);

            }

            // 判断用户是否一定绑定了手机号

            if (StringUtils.isEmpty(userInfo.getPhone())) {

                // 未绑定,设置openid

                map.put("openid", openid);

            } else {

                // 已绑定,设置opneid为空

                map.put("openid", "");

            }

            String name = userInfo.getName();

            if (StringUtils.isEmpty(name)) {

                name = userInfo.getNickName();

            }

            if (StringUtils.isEmpty(name)) {

                name = userInfo.getPhone();

            }

            // 生成token

            String token = JwtUtils.createToken(userInfo.getId(), userInfo.getName());

            map.put("name", name);

            map.put("token", token);

            map.put("avatar", avatar);

            //跳转到前端页面,携带openid是为了在页面强制绑定手机号

            return "redirect:http://localhost:3000/weixin/callback?token=" + map.get("token") + "&openid=" + map.get("openid") + "&name=" + URLEncoder.encode(map.get("name"), "utf-8");

        } catch (Exception e) {

            throw new YyghException(ResponseEnum.WX_LOGIN_ERROR);

        }

    }
测试扫码登录
SpringBoot项目整合微信登录的更多相关文章
- springboot项目整合druid数据库连接池
Druid连接池是阿里巴巴开源的数据库连接池项目,后来贡献给Apache开源: Druid的作用是负责分配.管理和释放数据库连接,它允许应用程序重复使用一个现有的数据库连接,而不是再重新建立一个: D ...
- Flowable与springBoot项目整合及出现的问题
Flowable与springBoot项目整合及出现的问题 单纯地将Flowable和springBoot整合,使用mysql作为数据库,整合中踩了两个坑,见文末. 在pom中添加依赖 <?xm ...
- Vue-cli3与springboot项目整合打包
一.需求 使用前后端分离编写了个小程序,前端使用的是vue-cli3创建的项目,后端使用的是springboot创建的项目,部署的时候一起打包部署,本文对一些细节部分进行了说明. 二 ...
- SpringBoot项目整合Retrofit最佳实践,这才是最优雅的HTTP客户端工具!
大家都知道okhttp是一款由square公司开源的java版本http客户端工具.实际上,square公司还开源了基于okhttp进一步封装的retrofit工具,用来支持通过接口的方式发起http ...
- spring-boot 项目整合logback
使用spring-boot项目中添加日志输出,java的日志输出一共有两个大的方案log4j/log4j2 ,logback.log4j2算是对log4j的一个升级版本. 常规做法是引入slf4j作为 ...
- springboot如何实现微信登录,前期准备
现在网站用微信登录真的是很多,那么具体是怎么实现的呢? 首先介绍的是微信开放平台,我们如果需要微信登录或者支付都需要在上面注册一个账号,用这个账号去为我们的网站申请的话,需要用到企业资料(家里有营业执 ...
- springboot项目整合mybatis
记录创建springboot项目并配置mybatis中间件: 资源准备及版本说明 编程工具:IDEA JDK版本:1.8 Maven版本:Apache Maven 3.6.3 springboot版本 ...
- SpringBoot项目搭建 + Jwt登录
临时接了一个小项目,有需要搭一个小项目,简单记录一下项目搭建过程以及整合登录功能. 1.首先拿到的是一个码云地址,里面是一个空的文件夹,只有一个 2. 拿到HTTPS码云项目地址链接,在IDEA中cl ...
- Idea创建SpringBoot项目整合Hibernate
然后next 依赖包选择,Web必须 pom.xml: <?xml version="1.0" encoding="UTF-8"?> <pro ...
- Springboot项目整合Swagger2报错
SpringBoot2.2.6整合swagger2.2.2版本的问题,启动SpringBoot报如下错: Error starting ApplicationContext. To display t ...
随机推荐
- Record -「Tricks」记录
曼哈顿距离 \(\text{dist}(A,B)=|x_{A}-x_{B}|+|y_{A}-y_{B}|\) 可以拆成 \(\max\{x_{A}-x_{B}+y_{A}-y_{B},x_{A}-x_ ...
- Record - Dec. 1st, 2020 - Exam. REC
Prob. 1 Desc. & Link. 行走的形式是比较自由的,因为只要走到了最优答案处就可以不管了,所以不需要考虑游戏的结束. 考虑二分答案. 然后预处理出每个节点到 \(s\)(另一棵 ...
- MySQL运维1-日志
一.错误日志 错误日志是MySQL中最重要的日志之一,它记录了当MySQL启动和停止时,以及服务器在运行过程中发生的任何严重错误时的相关信息,当数据库出现任何故障导致无法正常使用时,建议首先查看此日志 ...
- 【稳定性】关于缩短MTTR的探索
一.什么是 MTTR ? 当系统出现系统故障时,我们需要通过一些指标来衡量故障的严重程度和影响范围.其中MTTR(Mean Time To Repair 名为_平均修复时间_)是一个非常重要的指标,它 ...
- 高可用mongodb集群(分片+副本):用户权限配置
目录 ■ 创建副本集认证的key文件 ■ 修改配置文件指定keyfile ■ 重新启动节点 ■ 创建帐号和认证 ■ 用管理员帐号可查看整体的分片情况 ■ 用普通帐号访问数据 ■ 客户端连接多个mong ...
- math库常用函数+产生随机数总结
math库常用函数+产生随机数总结 1.对x开平方 double sqrt(x)://返回值为double类型,输入的x类型随意,只要是数的类型 2.求常数e的x次方 double exp(x);// ...
- MSFvenom恶意程序生成与利用
MSFvenom 1.1 MSFvenom介绍 MSFvenom是Msfpayload和Msfencode的组合,可以生成各种攻击载荷,并且可以对载荷进行编码.做渗透测试时往往需要将有效负载部署在目标 ...
- 由mysql转为oracle注意事项
1. text类型->nclob 2. 表名是关键字 引号 3. 字段名是关键字 引号 4. 日期型和mysql不同,hh24:mi:ss 就是HH:mm:ss,库里存日期型也可以(查询时 ...
- 人均瑞数系列,瑞数 6 代 JS 逆向分析
声明 本文章中所有内容仅供学习交流使用,不用于其他任何目的,不提供完整代码,抓包内容.敏感网址.数据接口等均已做脱敏处理,严禁用于商业用途和非法用途,否则由此产生的一切后果均与作者无关! 本文章未经许 ...
- AtCoder Beginner Contest 328 (ABC328)
A. Not Too Hard 模拟. Code B. 11/11 模拟. Code C. Consecutive Description 给你一个字符串 \(S\),有 \(Q\) 次询问,每次输入 ...