Ubuntu环境下C++使用onnxruntime和Opencv进行YOLOv8模型部署
目录
环境配置
系统环境
Ubuntu18.04
onnxruntime-linux-x64 1.12.1:https://github.com/microsoft/onnxruntime/releases
opencv 3.4.3
cmake 3.10.2
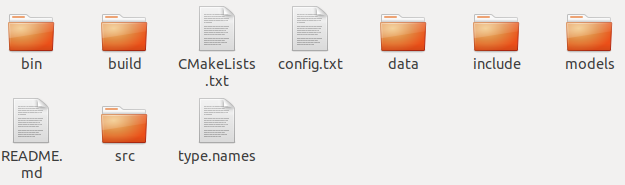
项目文件路径
1. bin:存放可执行程序和识别结果
2. data:存放数据集
3. src:存放源程序
4. include:存放头文件
5. config.txt:配置文件,内容分别是模型相对路径、图片相对路径、缺陷标识文件相对路径、缺陷识别阈值、缺陷重叠阈值
6. type.names:缺陷标识文件,内容和模型识别的缺陷标识顺序需要一致
文件环境
config.txt
分别表示模型相对路径、图片相对路径、缺陷标识文件相对路径、缺陷识别阈值、缺陷重叠阈值
../models/best.onnx
../data/2.bmp
../type.names
0.4
0.4
CMakeLists.txt
需要更改的地方已经在里面标注好了
# 项目名称,随便写

PROJECT(image_onnx)

# cmake版本,根据自己的写

cmake_minimum_required(VERSION 3.10)

# 编译好的可执行文件放置的位置

set(CMAKE_RUNTIME_OUTPUT_DIRECTORY ${image_onnx_SOURCE_DIR}/bin)

# find required opencv

find_package(OpenCV REQUIRED)

# directory of opencv headers

include_directories(${OpenCV_INCLUDE_DIRS})

# 根据自己的onnxruntime存放路径编写

set(ONNXRUNTIME_ROOT_PATH /home/ebaina/onnxruntime-linux-x64-1.12.1/)

set(ONNXRUNTIME_INCLUDE_DIRS ${ONNXRUNTIME_ROOT_PATH}/include/)

set(ONNXRUNTIME_LIB ${ONNXRUNTIME_ROOT_PATH}lib/libonnxruntime.so)

# 需要编译的cpp文件所在路径,前面是编译好的可执行文件名

add_executable(image_onnx src/main_image.cpp

src/change_image.cpp

src/adjust_result.cpp)

# directory of opencv library

link_directories(${OpenCV_LIBRARY_DIRS})

# opencv libraries

target_link_libraries(image_onnx ${OpenCV_LIBS})

include_directories(${ONNXRUNTIME_INCLUDE_DIRS})

target_link_libraries(image_onnx ${ONNXRUNTIME_LIB})

# include

target_include_directories(image_onnx

    PRIVATE

        ${PROJECT_SOURCE_DIR}/include

)
type.names
缺陷标志文件,内容和模型识别的缺陷标识顺序需要一致,模型识别网站:Netron
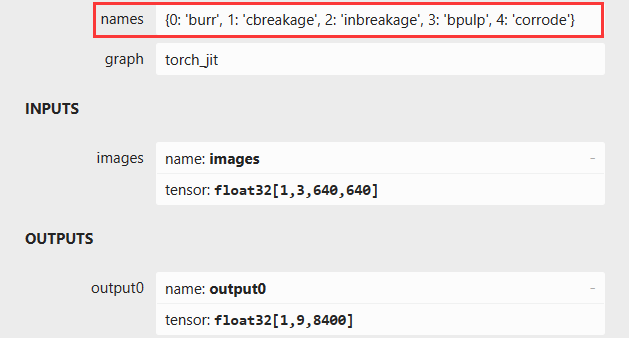
burr
cbreakage
inbreakage
bpulp
corrode
读取config.txt配置文件
    // 自动读取模型路径,图片路径,缺陷阈值,重叠阈值

    std::string model_path_;

    std::string imgPath;

    std::string namesPath;

    float threshold;

    float nms_threshold;

        // 打开配置文件并读取配置

    std::ifstream configFile("../config.txt");

    if (configFile.is_open()) {

        configFile >> model_path_ >> imgPath >> namesPath >> threshold >> nms_threshold;

        configFile.close();

        std::cout << "Model Path: " << model_path_ << std::endl;

        std::cout << "Image Path: " << imgPath << std::endl;

        std::cout << "Names Path: " << namesPath << std::endl;

        std::cout << "Threshold: " << threshold << std::endl;

        std::cout << "NMS Threshold: " << nms_threshold << std::endl;

    } else

        std::cerr << "Failed to open config file." << std::endl;

    const char* model_path = model_path_.c_str();
修改图片尺寸格式
    // 图片变换

    cv::Mat inputImage = cv::imread(imgPath);

    if (inputImage.empty()) {

        std::cerr << "Failed to load image." << std::endl;

        return 1;

    }

        // 获取图片尺寸

    int y = inputImage.rows;

    int x = inputImage.cols;

        // 图片尺寸变换

    cv::Mat image0 = resizeImage(inputImage, y, x);

        // 图像归一化

    std::vector<float> input_image_ = nchwImage(image0);
读取缺陷标志文件
    // 读取缺陷标志文件

    std::ifstream inputFile(namesPath);

    if (!inputFile.is_open()) {

        std::cerr << "Failed to open the file." << std::endl;

        return 1;

    }

    std::vector<std::string> typeNames;

    std::string line;

    while (std::getline(inputFile, line))

        typeNames.push_back(line);

    inputFile.close();
生成缺陷随机颜色标识
    // 缺陷颜色标识随机

    int numColors = typeNames.size();

    std::vector<std::vector<int>> colors;

    for (int i = 0; i < numColors; ++i)

        colors.push_back(generateRandomColor());

    //     // 打印颜色种类

    // for (const auto &color : colors)

    //     std::cout << "R: " << color[0] << ", G: " << color[1] << ", B: " << color[2] << std::endl;
模型推理
    // 模型设置和推理结果

    Ort::Env env(ORT_LOGGING_LEVEL_WARNING, "Default");

        // CPU

    Ort::Session session_{env, model_path, Ort::SessionOptions{nullptr}};

        // 模型输入尺寸

    static constexpr const int height_ = 640; //model input height

    static constexpr const int width_ = 640; //model input width

    Ort::Value input_tensor_{nullptr};

    std::array<int64_t, 4> input_shape_{1, 3, height_, width_}; //mode input shape NCHW = 1x3xHxW

        // 模型输出尺寸

    Ort::Value output_tensor_{nullptr};

    std::array<int64_t, 3> output_shape_{1, 9, 8400}; //model output shape,

    std::array<_Float32, 9*8400> results_{};

        // 模型输入输出张量设置

    auto memory_info = Ort::MemoryInfo::CreateCpu(OrtDeviceAllocator, OrtMemTypeDefault);

    input_tensor_ = Ort::Value::CreateTensor<float>(memory_info, input_image_.data(), input_image_.size(), input_shape_.data(), input_shape_.size());

    output_tensor_ = Ort::Value::CreateTensor<float>(memory_info, results_.data(), results_.size(), output_shape_.data(), output_shape_.size());

        // 查看模型输入输出的名称

    const char* input_names[] = {"images"};

    const char* output_names[] = {"output0"};

        // 推理

    session_.Run(Ort::RunOptions{nullptr}, input_names, &input_tensor_, 1, output_names, &output_tensor_, 1);

    float* out = output_tensor_.GetTensorMutableData<float>();
推理结果获取
        // 推理结果获取

    int rows = 9;      // 第二维度大小,即行数

    int cols = 8400;   // 第三维度大小,即列数

    std::vector<std::vector<float>> matrix(rows, std::vector<float>(cols));

    for (int row = 0; row < rows; ++row)

        for (int col = 0; col < cols; ++col)

            matrix[row][col] = out[row * cols + col];

        // 9,8400数组转置为8400,9

    std::vector<std::vector<float>> tran_matrix = transpose(matrix);

    //     // 显示缺陷筛选结果

    // std::vector<std::vector<float>> num = tran_matrix;

    // for (size_t n = 0; n < num.size(); ++n) {

    //     bool aboveThreshold = false;

    //     for (size_t col = 4; col <= 8; ++col)

    //         if (num[n][col] > threshold) {

    //             aboveThreshold = true;

    //             break;

    //         }

    //     if (aboveThreshold) {

    //         std::cout << "Row " << n << ": ";

    //         for (const auto& val : num[n])

    //             std::cout << val << " ";

    //         std::cout << std::endl;

    //     }

    // }
缺陷信息还原并显示
    // 缺陷还原

    std::vector<std::vector<double>> select_matrix;

    select_matrix = select(tran_matrix, threshold, cols,rows);

        // 缺陷位置信息还原

    select_matrix = return_(select_matrix, y, x);

        // 缺陷位置信息筛选

    select_matrix = nms_(select_matrix, nms_threshold);

    //     // 打印数组的内容

    // for (const auto& row : select_matrix){

    //     for (const auto& value : row) {

    //         std::cout << value << " ";

    //     }

    //     std::cout << std::endl;

    // }

        // 绘制识别框

    cv::Mat outputImage = draw_image(select_matrix, inputImage, typeNames, colors);

    // 自定义窗口大小

    int windowWidth = 1200;

    int windowHeight = 900;

    // 调整窗口大小

    cv::namedWindow("Image with Bounding Boxes", cv::WINDOW_NORMAL);

    cv::resizeWindow("Image with Bounding Boxes", windowWidth, windowHeight);

    cv::imshow("Image with Bounding Boxes", outputImage);

    cv::imwrite("marked_image.jpg", outputImage);

    cv::waitKey(0);
main代码(关注取源码!)
#include <assert.h>

#include <random>

#include <onnxruntime_cxx_api.h>

#include "cpu_provider_factory.h"

#include <adjust_result.h>

// 随机生成颜色

std::vector<int> generateRandomColor() {

    std::random_device rd;

    std::mt19937 gen(rd());

    std::uniform_real_distribution<double> dis(0.0, 1.0);

    std::vector<int> color(3);

    for (int i = 0; i < 3; ++i) {

        color[i] = static_cast<int>(dis(gen) * 255);

    }

    return color;

}

int main(int argc, char* argv[]) {

    // // 模型路径,图片路径,缺陷阈值,重叠阈值

    // const char* model_path = "../models/best.onnx";

    // std::string imgPath = "../data/3.bmp";

    // std::string namesPath = "../type.names";

    // float threshold = 0.4;

    // float nms_threshold = 0.4;

    // 自动读取模型路径,图片路径,缺陷阈值,重叠阈值

    std::string model_path_;

    std::string imgPath;

    std::string namesPath;

    float threshold;

    float nms_threshold;

        // 打开配置文件并读取配置

    std::ifstream configFile("../config.txt");

    if (configFile.is_open()) {

        configFile >> model_path_ >> imgPath >> namesPath >> threshold >> nms_threshold;

        configFile.close();

        std::cout << "Model Path: " << model_path_ << std::endl;

        std::cout << "Image Path: " << imgPath << std::endl;

        std::cout << "Names Path: " << namesPath << std::endl;

        std::cout << "Threshold: " << threshold << std::endl;

        std::cout << "NMS Threshold: " << nms_threshold << std::endl;

    } else

        std::cerr << "Failed to open config file." << std::endl;

    const char* model_path = model_path_.c_str();

    // 图片变换

    cv::Mat inputImage = cv::imread(imgPath);

    if (inputImage.empty()) {

        std::cerr << "Failed to load image." << std::endl;

        return 1;

    }

        // 获取图片尺寸

    int y = inputImage.rows;

    int x = inputImage.cols;

        // 图片尺寸变换

    cv::Mat image0 = resizeImage(inputImage, y, x);

        // 图像归一化

    std::vector<float> input_image_ = nchwImage(image0);

    // 读取缺陷标志文件

    std::ifstream inputFile(namesPath);

    if (!inputFile.is_open()) {

        std::cerr << "Failed to open the file." << std::endl;

        return 1;

    }

    std::vector<std::string> typeNames;

    std::string line;

    while (std::getline(inputFile, line))

        typeNames.push_back(line);

    inputFile.close();

    //     // 打印缺陷标志文件内容

    // std::cout << "Number of elements: " << typeNames.size() << std::endl;

    // for (const std::string &typeName : typeNames)

    //     std::cout << typeName << std::endl;

    // 缺陷颜色标识随机

    int numColors = typeNames.size();

    std::vector<std::vector<int>> colors;

    for (int i = 0; i < numColors; ++i)

        colors.push_back(generateRandomColor());

    //     // 打印颜色种类

    // for (const auto &color : colors)

    //     std::cout << "R: " << color[0] << ", G: " << color[1] << ", B: " << color[2] << std::endl;

    // 模型设置和推理结果

    Ort::Env env(ORT_LOGGING_LEVEL_WARNING, "Default");

        // CPU

    Ort::Session session_{env, model_path, Ort::SessionOptions{nullptr}};

        // 模型输入尺寸

    static constexpr const int height_ = 640; //model input height

    static constexpr const int width_ = 640; //model input width

    Ort::Value input_tensor_{nullptr};

    std::array<int64_t, 4> input_shape_{1, 3, height_, width_}; //mode input shape NCHW = 1x3xHxW

        // 模型输出尺寸

    Ort::Value output_tensor_{nullptr};

    std::array<int64_t, 3> output_shape_{1, 9, 8400}; //model output shape,

    std::array<_Float32, 9*8400> results_{};

        // 模型输入输出张量设置

    auto memory_info = Ort::MemoryInfo::CreateCpu(OrtDeviceAllocator, OrtMemTypeDefault);

    input_tensor_ = Ort::Value::CreateTensor<float>(memory_info, input_image_.data(), input_image_.size(), input_shape_.data(), input_shape_.size());

    output_tensor_ = Ort::Value::CreateTensor<float>(memory_info, results_.data(), results_.size(), output_shape_.data(), output_shape_.size());

        // 查看模型输入输出的名称

    const char* input_names[] = {"images"};

    const char* output_names[] = {"output0"};

        // 推理

    session_.Run(Ort::RunOptions{nullptr}, input_names, &input_tensor_, 1, output_names, &output_tensor_, 1);

    float* out = output_tensor_.GetTensorMutableData<float>();

        // 推理结果获取

    int rows = 9;      // 第二维度大小,即行数

    int cols = 8400;   // 第三维度大小,即列数

    std::vector<std::vector<float>> matrix(rows, std::vector<float>(cols));

    for (int row = 0; row < rows; ++row)

        for (int col = 0; col < cols; ++col)

            matrix[row][col] = out[row * cols + col];

        // 9,8400数组转置为8400,9

    std::vector<std::vector<float>> tran_matrix = transpose(matrix);

    //     // 显示缺陷筛选结果

    // std::vector<std::vector<float>> num = tran_matrix;

    // for (size_t n = 0; n < num.size(); ++n) {

    //     bool aboveThreshold = false;

    //     for (size_t col = 4; col <= 8; ++col)

    //         if (num[n][col] > threshold) {

    //             aboveThreshold = true;

    //             break;

    //         }

    //     if (aboveThreshold) {

    //         std::cout << "Row " << n << ": ";

    //         for (const auto& val : num[n])

    //             std::cout << val << " ";

    //         std::cout << std::endl;

    //     }

    // }

    // 缺陷还原

    std::vector<std::vector<double>> select_matrix;

    select_matrix = select(tran_matrix, threshold, cols,rows);

        // 缺陷位置信息还原

    select_matrix = return_(select_matrix, y, x);

        // 缺陷位置信息筛选

    select_matrix = nms_(select_matrix, nms_threshold);

    //     // 打印数组的内容

    // for (const auto& row : select_matrix){

    //     for (const auto& value : row) {

    //         std::cout << value << " ";

    //     }

    //     std::cout << std::endl;

    // }

        // 绘制识别框

    cv::Mat outputImage = draw_image(select_matrix, inputImage, typeNames, colors);

    // 自定义窗口大小

    int windowWidth = 1200;

    int windowHeight = 900;

    // 调整窗口大小

    cv::namedWindow("Image with Bounding Boxes", cv::WINDOW_NORMAL);

    cv::resizeWindow("Image with Bounding Boxes", windowWidth, windowHeight);

    cv::imshow("Image with Bounding Boxes", outputImage);

    cv::imwrite("marked_image.jpg", outputImage);

    cv::waitKey(0);

    return 0;

}
Ubuntu环境下C++使用onnxruntime和Opencv进行YOLOv8模型部署的更多相关文章
- Linux(Ubuntu)环境下使用Fiddler
自己的开发环境是Ubuntu, 对于很多优秀的软件但是又没有Linux版本这件事,还是有点遗憾的.比如最近遇到一个问题,在分析某个网站的请求路径和cookie时就遇到了问题.本来Chome浏览器自带的 ...
- Go学习笔记(一):Ubuntu 环境下Go的安装
本文是根据<Go Web 编程>,逐步学习 Ubuntu 环境下go的安装的笔记. <Go Web 编程>的URL地址如下: https://github.com/astaxi ...
- Ubuntu环境下SSH的安装及使用
Ubuntu环境下SSH的安装及使用 SSH是指Secure Shell,是一种安全的传输协议,Ubuntu客户端可以通过SSH访问远程服务器 .SSH的简介和工作机制可参看上篇文章SSH简介及工作机 ...
- Ubuntu环境下的Redis 配置与C++使用入门
Redis是一个高性能的key-value数据库. Redisedis的出现,非常大程度补偿了memcached这类key/value存储的不足,在部分场合能够对关系数据库起到非常好的补充作用.它 ...
- ubuntu环境下docker安装步骤
本文是根据docker官方文档翻译,原文:https://docs.docker.com/engine/installation/linux/ubuntulinux/ Docker 支持以下 Ubun ...
- ubuntu 环境下的QT程序打包
很多的时候 需要将自己写的QT 程序发布一下 所以今天教一下 怎么在ubuntu 环境下将自己的写的Qt 程序打包打包是为了不依赖 开发环境 和开发的库. 1. QtCreate使用Release版 ...
- ubuntu环境下eclipse的安装以及hadoop插件的配置
ubuntu环境下eclipse的安装以及hadoop插件的配置 一.eclipse的安装 在ubuntu桌面模式下,点击任务栏中的ubuntu软件中心,在搜索栏搜索eclipse 注意:安装过程需要 ...
- Ubuntu环境下No module named '_tkinter'错误的解决
在Ubuntu环境下运行下面代码: import matplotlib as plt 出现以下错误: No module named '_tkinter' 解决方法: sudo apt-get ins ...
- Ubuntu环境下配置GCC
Ubuntu网络环境下安装GCC及其头文件步骤: 1.Ubuntu环境下配置GCC 刚装好的GCC什么都不能编译,因为没有一些必须的头文件,所以要安装build-essential,安装了这个包会安装 ...
- 在Ubuntu环境下配置NIMH MEG Core Facility之CTF Tools
在Ubuntu环境下配置NIMH MEG Core Facility之CTF Tools 网站有提示: The install script won't work, but you can copy ...
随机推荐
- [golang]jwt生成与解析
前言 golang-jwt是go语言中用来生成和解析jwt的一个第三方库,早先版本也叫jwt-go.本文中使用目前最新的v5版本. 安装 go get -u github.com/golang-jwt ...
- WPF实现跳动的字符效果
本文将介绍一个好玩但实际作用可能不太大的动画效果:跳动的字符.为了提高动画效果的可重用性以及调用的灵活性,通过Behavior实现跳动的字符动画.先看下效果: 技术要点与实现 通过TextEffect ...
- 抢先体验!超强的 Anchor Positioning 锚点定位
本文,将向大家介绍 CSS 规范中,最新的 Anchor Positioning,翻译为锚点定位. Anchor Position 的出现,极大的丰富了 CSS 的能力,虽然语法稍显复杂,但是有了它, ...
- SpringBoot项目统一处理返回值和异常
目录 简介 前期准备 统一封装报文 统一异常处理 自定义异常信息 简介 当使用SpringBoot开发Web项目的API时,为了与前端更好地通信,通常会约定好接口的响应格式.例如,以下是一个JSON格 ...
- SpringBoot - 自定义starter
目录 一.什么是SpringBoot starter机制 二.为什么要自定义starter 三.什么时候需要创建自定义starter 四.自动加载核心注解说明 五.自定义starter的开发流程 案例 ...
- 基于opencv-pyhton与opencv-c++的结合理解与学习
2023年上半年,一直在学习opencv-c++版本,学习了其中的多个库函数 笔记链接:https://www.cnblogs.com/Tan-code/category/2339311.html o ...
- AI测试,给出的答案还挺那么回事儿的~
今天文心一言全民开放了,所有人都可以正常下载使用了,不用像之前一样排队等号了.之前内测阶段倒也体验过,技术人员总是喜欢尝鲜,第一时间拿到邀请码后就各种调戏了TA一番,那时觉得给出的答案总有些差强人意, ...
- iFiles浏览iphone文件
我们希望能在iphone中浏览文件系统的目录
- 详细解释一下Spring是如何解决循环依赖问题的
Spring是如何解决循环依赖问题的? 我们都知道,如果在代码中,将两个或多个Bean互相之间持有对方的引用就会发生循环依赖.循环的依赖将会导致注入死循环,这是Spring发生循环依赖的原因 循环依赖 ...
- PYQT5学习(13):QMidArea同时显示多个窗口,创建多个独立的窗口
QMidArea 参考文章:https://blog.csdn.net/jia666666/article/details/81670569 一种同时显示多个窗口的方法,创建多个独立的窗口,这些独立 ...