Ubuntu环境下C++使用onnxruntime和Opencv进行YOLOv8模型部署
目录
环境配置
系统环境
Ubuntu18.04
onnxruntime-linux-x64 1.12.1:https://github.com/microsoft/onnxruntime/releases
opencv 3.4.3
cmake 3.10.2
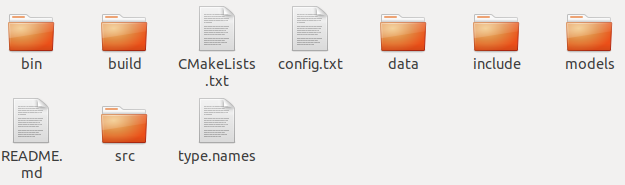
项目文件路径
1. bin:存放可执行程序和识别结果
2. data:存放数据集
3. src:存放源程序
4. include:存放头文件
5. config.txt:配置文件,内容分别是模型相对路径、图片相对路径、缺陷标识文件相对路径、缺陷识别阈值、缺陷重叠阈值
6. type.names:缺陷标识文件,内容和模型识别的缺陷标识顺序需要一致
文件环境
config.txt
分别表示模型相对路径、图片相对路径、缺陷标识文件相对路径、缺陷识别阈值、缺陷重叠阈值
../models/best.onnx
../data/2.bmp
../type.names
0.4
0.4
CMakeLists.txt
需要更改的地方已经在里面标注好了
# 项目名称,随便写

PROJECT(image_onnx)

# cmake版本,根据自己的写

cmake_minimum_required(VERSION 3.10)

# 编译好的可执行文件放置的位置

set(CMAKE_RUNTIME_OUTPUT_DIRECTORY ${image_onnx_SOURCE_DIR}/bin)

# find required opencv

find_package(OpenCV REQUIRED)

# directory of opencv headers

include_directories(${OpenCV_INCLUDE_DIRS})

# 根据自己的onnxruntime存放路径编写

set(ONNXRUNTIME_ROOT_PATH /home/ebaina/onnxruntime-linux-x64-1.12.1/)

set(ONNXRUNTIME_INCLUDE_DIRS ${ONNXRUNTIME_ROOT_PATH}/include/)

set(ONNXRUNTIME_LIB ${ONNXRUNTIME_ROOT_PATH}lib/libonnxruntime.so)

# 需要编译的cpp文件所在路径,前面是编译好的可执行文件名

add_executable(image_onnx src/main_image.cpp

src/change_image.cpp

src/adjust_result.cpp)

# directory of opencv library

link_directories(${OpenCV_LIBRARY_DIRS})

# opencv libraries

target_link_libraries(image_onnx ${OpenCV_LIBS})

include_directories(${ONNXRUNTIME_INCLUDE_DIRS})

target_link_libraries(image_onnx ${ONNXRUNTIME_LIB})

# include

target_include_directories(image_onnx

    PRIVATE

        ${PROJECT_SOURCE_DIR}/include

)
type.names
缺陷标志文件,内容和模型识别的缺陷标识顺序需要一致,模型识别网站:Netron
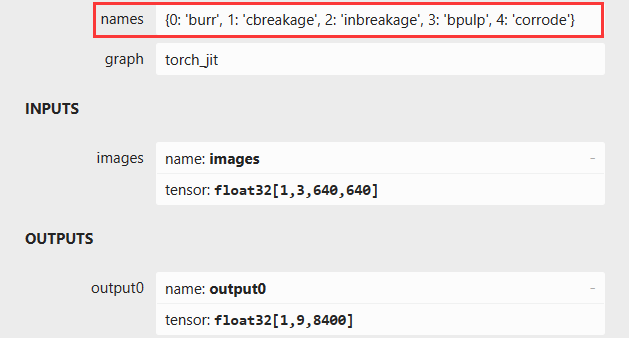
burr
cbreakage
inbreakage
bpulp
corrode
读取config.txt配置文件
    // 自动读取模型路径,图片路径,缺陷阈值,重叠阈值

    std::string model_path_;

    std::string imgPath;

    std::string namesPath;

    float threshold;

    float nms_threshold;

        // 打开配置文件并读取配置

    std::ifstream configFile("../config.txt");

    if (configFile.is_open()) {

        configFile >> model_path_ >> imgPath >> namesPath >> threshold >> nms_threshold;

        configFile.close();

        std::cout << "Model Path: " << model_path_ << std::endl;

        std::cout << "Image Path: " << imgPath << std::endl;

        std::cout << "Names Path: " << namesPath << std::endl;

        std::cout << "Threshold: " << threshold << std::endl;

        std::cout << "NMS Threshold: " << nms_threshold << std::endl;

    } else

        std::cerr << "Failed to open config file." << std::endl;

    const char* model_path = model_path_.c_str();
修改图片尺寸格式
    // 图片变换

    cv::Mat inputImage = cv::imread(imgPath);

    if (inputImage.empty()) {

        std::cerr << "Failed to load image." << std::endl;

        return 1;

    }

        // 获取图片尺寸

    int y = inputImage.rows;

    int x = inputImage.cols;

        // 图片尺寸变换

    cv::Mat image0 = resizeImage(inputImage, y, x);

        // 图像归一化

    std::vector<float> input_image_ = nchwImage(image0);
读取缺陷标志文件
    // 读取缺陷标志文件

    std::ifstream inputFile(namesPath);

    if (!inputFile.is_open()) {

        std::cerr << "Failed to open the file." << std::endl;

        return 1;

    }

    std::vector<std::string> typeNames;

    std::string line;

    while (std::getline(inputFile, line))

        typeNames.push_back(line);

    inputFile.close();
生成缺陷随机颜色标识
    // 缺陷颜色标识随机

    int numColors = typeNames.size();

    std::vector<std::vector<int>> colors;

    for (int i = 0; i < numColors; ++i)

        colors.push_back(generateRandomColor());

    //     // 打印颜色种类

    // for (const auto &color : colors)

    //     std::cout << "R: " << color[0] << ", G: " << color[1] << ", B: " << color[2] << std::endl;
模型推理
    // 模型设置和推理结果

    Ort::Env env(ORT_LOGGING_LEVEL_WARNING, "Default");

        // CPU

    Ort::Session session_{env, model_path, Ort::SessionOptions{nullptr}};

        // 模型输入尺寸

    static constexpr const int height_ = 640; //model input height

    static constexpr const int width_ = 640; //model input width

    Ort::Value input_tensor_{nullptr};

    std::array<int64_t, 4> input_shape_{1, 3, height_, width_}; //mode input shape NCHW = 1x3xHxW

        // 模型输出尺寸

    Ort::Value output_tensor_{nullptr};

    std::array<int64_t, 3> output_shape_{1, 9, 8400}; //model output shape,

    std::array<_Float32, 9*8400> results_{};

        // 模型输入输出张量设置

    auto memory_info = Ort::MemoryInfo::CreateCpu(OrtDeviceAllocator, OrtMemTypeDefault);

    input_tensor_ = Ort::Value::CreateTensor<float>(memory_info, input_image_.data(), input_image_.size(), input_shape_.data(), input_shape_.size());

    output_tensor_ = Ort::Value::CreateTensor<float>(memory_info, results_.data(), results_.size(), output_shape_.data(), output_shape_.size());

        // 查看模型输入输出的名称

    const char* input_names[] = {"images"};

    const char* output_names[] = {"output0"};

        // 推理

    session_.Run(Ort::RunOptions{nullptr}, input_names, &input_tensor_, 1, output_names, &output_tensor_, 1);

    float* out = output_tensor_.GetTensorMutableData<float>();
推理结果获取
        // 推理结果获取

    int rows = 9;      // 第二维度大小,即行数

    int cols = 8400;   // 第三维度大小,即列数

    std::vector<std::vector<float>> matrix(rows, std::vector<float>(cols));

    for (int row = 0; row < rows; ++row)

        for (int col = 0; col < cols; ++col)

            matrix[row][col] = out[row * cols + col];

        // 9,8400数组转置为8400,9

    std::vector<std::vector<float>> tran_matrix = transpose(matrix);

    //     // 显示缺陷筛选结果

    // std::vector<std::vector<float>> num = tran_matrix;

    // for (size_t n = 0; n < num.size(); ++n) {

    //     bool aboveThreshold = false;

    //     for (size_t col = 4; col <= 8; ++col)

    //         if (num[n][col] > threshold) {

    //             aboveThreshold = true;

    //             break;

    //         }

    //     if (aboveThreshold) {

    //         std::cout << "Row " << n << ": ";

    //         for (const auto& val : num[n])

    //             std::cout << val << " ";

    //         std::cout << std::endl;

    //     }

    // }
缺陷信息还原并显示
    // 缺陷还原

    std::vector<std::vector<double>> select_matrix;

    select_matrix = select(tran_matrix, threshold, cols,rows);

        // 缺陷位置信息还原

    select_matrix = return_(select_matrix, y, x);

        // 缺陷位置信息筛选

    select_matrix = nms_(select_matrix, nms_threshold);

    //     // 打印数组的内容

    // for (const auto& row : select_matrix){

    //     for (const auto& value : row) {

    //         std::cout << value << " ";

    //     }

    //     std::cout << std::endl;

    // }

        // 绘制识别框

    cv::Mat outputImage = draw_image(select_matrix, inputImage, typeNames, colors);

    // 自定义窗口大小

    int windowWidth = 1200;

    int windowHeight = 900;

    // 调整窗口大小

    cv::namedWindow("Image with Bounding Boxes", cv::WINDOW_NORMAL);

    cv::resizeWindow("Image with Bounding Boxes", windowWidth, windowHeight);

    cv::imshow("Image with Bounding Boxes", outputImage);

    cv::imwrite("marked_image.jpg", outputImage);

    cv::waitKey(0);
main代码(关注取源码!)
#include <assert.h>

#include <random>

#include <onnxruntime_cxx_api.h>

#include "cpu_provider_factory.h"

#include <adjust_result.h>

// 随机生成颜色

std::vector<int> generateRandomColor() {

    std::random_device rd;

    std::mt19937 gen(rd());

    std::uniform_real_distribution<double> dis(0.0, 1.0);

    std::vector<int> color(3);

    for (int i = 0; i < 3; ++i) {

        color[i] = static_cast<int>(dis(gen) * 255);

    }

    return color;

}

int main(int argc, char* argv[]) {

    // // 模型路径,图片路径,缺陷阈值,重叠阈值

    // const char* model_path = "../models/best.onnx";

    // std::string imgPath = "../data/3.bmp";

    // std::string namesPath = "../type.names";

    // float threshold = 0.4;

    // float nms_threshold = 0.4;

    // 自动读取模型路径,图片路径,缺陷阈值,重叠阈值

    std::string model_path_;

    std::string imgPath;

    std::string namesPath;

    float threshold;

    float nms_threshold;

        // 打开配置文件并读取配置

    std::ifstream configFile("../config.txt");

    if (configFile.is_open()) {

        configFile >> model_path_ >> imgPath >> namesPath >> threshold >> nms_threshold;

        configFile.close();

        std::cout << "Model Path: " << model_path_ << std::endl;

        std::cout << "Image Path: " << imgPath << std::endl;

        std::cout << "Names Path: " << namesPath << std::endl;

        std::cout << "Threshold: " << threshold << std::endl;

        std::cout << "NMS Threshold: " << nms_threshold << std::endl;

    } else

        std::cerr << "Failed to open config file." << std::endl;

    const char* model_path = model_path_.c_str();

    // 图片变换

    cv::Mat inputImage = cv::imread(imgPath);

    if (inputImage.empty()) {

        std::cerr << "Failed to load image." << std::endl;

        return 1;

    }

        // 获取图片尺寸

    int y = inputImage.rows;

    int x = inputImage.cols;

        // 图片尺寸变换

    cv::Mat image0 = resizeImage(inputImage, y, x);

        // 图像归一化

    std::vector<float> input_image_ = nchwImage(image0);

    // 读取缺陷标志文件

    std::ifstream inputFile(namesPath);

    if (!inputFile.is_open()) {

        std::cerr << "Failed to open the file." << std::endl;

        return 1;

    }

    std::vector<std::string> typeNames;

    std::string line;

    while (std::getline(inputFile, line))

        typeNames.push_back(line);

    inputFile.close();

    //     // 打印缺陷标志文件内容

    // std::cout << "Number of elements: " << typeNames.size() << std::endl;

    // for (const std::string &typeName : typeNames)

    //     std::cout << typeName << std::endl;

    // 缺陷颜色标识随机

    int numColors = typeNames.size();

    std::vector<std::vector<int>> colors;

    for (int i = 0; i < numColors; ++i)

        colors.push_back(generateRandomColor());

    //     // 打印颜色种类

    // for (const auto &color : colors)

    //     std::cout << "R: " << color[0] << ", G: " << color[1] << ", B: " << color[2] << std::endl;

    // 模型设置和推理结果

    Ort::Env env(ORT_LOGGING_LEVEL_WARNING, "Default");

        // CPU

    Ort::Session session_{env, model_path, Ort::SessionOptions{nullptr}};

        // 模型输入尺寸

    static constexpr const int height_ = 640; //model input height

    static constexpr const int width_ = 640; //model input width

    Ort::Value input_tensor_{nullptr};

    std::array<int64_t, 4> input_shape_{1, 3, height_, width_}; //mode input shape NCHW = 1x3xHxW

        // 模型输出尺寸

    Ort::Value output_tensor_{nullptr};

    std::array<int64_t, 3> output_shape_{1, 9, 8400}; //model output shape,

    std::array<_Float32, 9*8400> results_{};

        // 模型输入输出张量设置

    auto memory_info = Ort::MemoryInfo::CreateCpu(OrtDeviceAllocator, OrtMemTypeDefault);

    input_tensor_ = Ort::Value::CreateTensor<float>(memory_info, input_image_.data(), input_image_.size(), input_shape_.data(), input_shape_.size());

    output_tensor_ = Ort::Value::CreateTensor<float>(memory_info, results_.data(), results_.size(), output_shape_.data(), output_shape_.size());

        // 查看模型输入输出的名称

    const char* input_names[] = {"images"};

    const char* output_names[] = {"output0"};

        // 推理

    session_.Run(Ort::RunOptions{nullptr}, input_names, &input_tensor_, 1, output_names, &output_tensor_, 1);

    float* out = output_tensor_.GetTensorMutableData<float>();

        // 推理结果获取

    int rows = 9;      // 第二维度大小,即行数

    int cols = 8400;   // 第三维度大小,即列数

    std::vector<std::vector<float>> matrix(rows, std::vector<float>(cols));

    for (int row = 0; row < rows; ++row)

        for (int col = 0; col < cols; ++col)

            matrix[row][col] = out[row * cols + col];

        // 9,8400数组转置为8400,9

    std::vector<std::vector<float>> tran_matrix = transpose(matrix);

    //     // 显示缺陷筛选结果

    // std::vector<std::vector<float>> num = tran_matrix;

    // for (size_t n = 0; n < num.size(); ++n) {

    //     bool aboveThreshold = false;

    //     for (size_t col = 4; col <= 8; ++col)

    //         if (num[n][col] > threshold) {

    //             aboveThreshold = true;

    //             break;

    //         }

    //     if (aboveThreshold) {

    //         std::cout << "Row " << n << ": ";

    //         for (const auto& val : num[n])

    //             std::cout << val << " ";

    //         std::cout << std::endl;

    //     }

    // }

    // 缺陷还原

    std::vector<std::vector<double>> select_matrix;

    select_matrix = select(tran_matrix, threshold, cols,rows);

        // 缺陷位置信息还原

    select_matrix = return_(select_matrix, y, x);

        // 缺陷位置信息筛选

    select_matrix = nms_(select_matrix, nms_threshold);

    //     // 打印数组的内容

    // for (const auto& row : select_matrix){

    //     for (const auto& value : row) {

    //         std::cout << value << " ";

    //     }

    //     std::cout << std::endl;

    // }

        // 绘制识别框

    cv::Mat outputImage = draw_image(select_matrix, inputImage, typeNames, colors);

    // 自定义窗口大小

    int windowWidth = 1200;

    int windowHeight = 900;

    // 调整窗口大小

    cv::namedWindow("Image with Bounding Boxes", cv::WINDOW_NORMAL);

    cv::resizeWindow("Image with Bounding Boxes", windowWidth, windowHeight);

    cv::imshow("Image with Bounding Boxes", outputImage);

    cv::imwrite("marked_image.jpg", outputImage);

    cv::waitKey(0);

    return 0;

}
Ubuntu环境下C++使用onnxruntime和Opencv进行YOLOv8模型部署的更多相关文章
- Linux(Ubuntu)环境下使用Fiddler
自己的开发环境是Ubuntu, 对于很多优秀的软件但是又没有Linux版本这件事,还是有点遗憾的.比如最近遇到一个问题,在分析某个网站的请求路径和cookie时就遇到了问题.本来Chome浏览器自带的 ...
- Go学习笔记(一):Ubuntu 环境下Go的安装
本文是根据<Go Web 编程>,逐步学习 Ubuntu 环境下go的安装的笔记. <Go Web 编程>的URL地址如下: https://github.com/astaxi ...
- Ubuntu环境下SSH的安装及使用
Ubuntu环境下SSH的安装及使用 SSH是指Secure Shell,是一种安全的传输协议,Ubuntu客户端可以通过SSH访问远程服务器 .SSH的简介和工作机制可参看上篇文章SSH简介及工作机 ...
- Ubuntu环境下的Redis 配置与C++使用入门
Redis是一个高性能的key-value数据库. Redisedis的出现,非常大程度补偿了memcached这类key/value存储的不足,在部分场合能够对关系数据库起到非常好的补充作用.它 ...
- ubuntu环境下docker安装步骤
本文是根据docker官方文档翻译,原文:https://docs.docker.com/engine/installation/linux/ubuntulinux/ Docker 支持以下 Ubun ...
- ubuntu 环境下的QT程序打包
很多的时候 需要将自己写的QT 程序发布一下 所以今天教一下 怎么在ubuntu 环境下将自己的写的Qt 程序打包打包是为了不依赖 开发环境 和开发的库. 1. QtCreate使用Release版 ...
- ubuntu环境下eclipse的安装以及hadoop插件的配置
ubuntu环境下eclipse的安装以及hadoop插件的配置 一.eclipse的安装 在ubuntu桌面模式下,点击任务栏中的ubuntu软件中心,在搜索栏搜索eclipse 注意:安装过程需要 ...
- Ubuntu环境下No module named '_tkinter'错误的解决
在Ubuntu环境下运行下面代码: import matplotlib as plt 出现以下错误: No module named '_tkinter' 解决方法: sudo apt-get ins ...
- Ubuntu环境下配置GCC
Ubuntu网络环境下安装GCC及其头文件步骤: 1.Ubuntu环境下配置GCC 刚装好的GCC什么都不能编译,因为没有一些必须的头文件,所以要安装build-essential,安装了这个包会安装 ...
- 在Ubuntu环境下配置NIMH MEG Core Facility之CTF Tools
在Ubuntu环境下配置NIMH MEG Core Facility之CTF Tools 网站有提示: The install script won't work, but you can copy ...
随机推荐
- 下一代MES系统架构分析与选型参考
本文分享自华为云社区<工业互联网系列(十一):下一代MES系统架构分析与选型参考>,作者:云起MAE . 目前国内制造执行系统MES市场尚处于"功能机"混战年代,市场集 ...
- 从浅入深了解.NET Core MVC 2.x全面教程
一.基础 1.默认配置 使用Kestrel Web Server ASP.NET Core内置--跨平台 IIS集成 UseIIS() UseIISIntergration() Log IConfig ...
- spring-mvc 系列:视图(ThymeleafView、InternalResourceView、RedirectView)
目录 一.ThymeleafView 二.转发视图 三.重定向视图 四.视图控制器view-controller 五.配置jsp解析 SpringMVC中的视图是View接口,视图的作用渲染数据,将模 ...
- Vue3 路由优化,使页面初次渲染效率翻倍
3996 条路由? addRoute函数用了大约1s才执行完毕.通过观察,发现居然有3996条路由记录. 可是项目并没有这么多的页面啊~ 重复路由 let routes: Array<Route ...
- 一文了解Gin对Cookie的支持
1. 引言 本文将从Web应用程序处理请求时需要用户信息,同时HTTP又是无状态协议这个矛盾点出发.从该问题出发,简单描述了解决该问题的Token 机制,进而引出Cookie的实现方案. 基于此我们将 ...
- 【io_uring】简介和使用
文章目录 简介 使用 系统调用 liburing 样例 代码流程 编译 参考资料 简介 io_uring 是 Linux 在 5.1 版本引入的一套新的异步 IO 实现.相比 Linux 在 2.6 ...
- PhotoShop Beta(爱国版)安装教程-内置AI绘画功能
PS beta版安装教程 Window和Mac版都有,里面内置AI绘画功能 ps Beta版真的太爽了,今天来和大家分享下安装教程. 很多人拿这资料卖5块 9.9 19.9,球友们直接用,建议赶紧装, ...
- VINS中旋转外参初始化
VINS 中的旋转外参初始化 为了使这个两个传感器融合,我们首先需要做的事情是将两个传感器的数据对齐,除了时间上的对齐,还有空间上的对齐.空间上的对齐通俗的讲就是将一个传感器获取的数据统一到另一个 ...
- 如何将现有的`Blazor`项目的主题切换写的更好看?
如何将现有的Blazor项目的主题切换写的更好看? 在现有的系统当中,我们的主题切换会比较生硬,下面我们将基于Masa Blazor实现好看的扩散主题切换的样式效果. 安装MASA.Template ...
- 【项目源码】JSP超市积分管理系统源码下载
会员积分管理系统的目标是为中小规模的会员积分管理系统的目标是为中小规模的超市提供会员信息管理.会员积分管理以及积分兑换管理的具体解决方案. 网站和积分管理系统采用B/S结构,使用J2EE的技术开发完成 ...