如何设置 QEMU 输出到控制台并使用 Shell 脚本自动化
如何设置 QEMU 输出到控制台并使用 Shell 脚本自动化
原文:How to Setup QEMU Output to Console and Automate Using Shell Script
Preface
While struggling to automate QEMU guest (communicate and control with the shell scripts), I faced with a lot of incomplete, partially working solutions around the internet. Now I've got a pretty decent collection of working recipes to tune up a QEMU guest, so I decided to organize all that stuff here, and it could be definitely useful for anyone else. Each scenario has been tested on the binaries, links on which I put below in the annex: Binaries used in examples, so you could check it out on your own.
Contents
- Input/output to the host terminal
- Early boot messages in the host terminal
- Input/output through a
named pipe(file) - Automate QEMU guest using
expecttool - Automate QEMU guest using
ssh - Binaries used in examples
1. Input/output to the host terminal
-serial stdio
qemu-system-x86_64 -serial stdio wheezy.qcow2
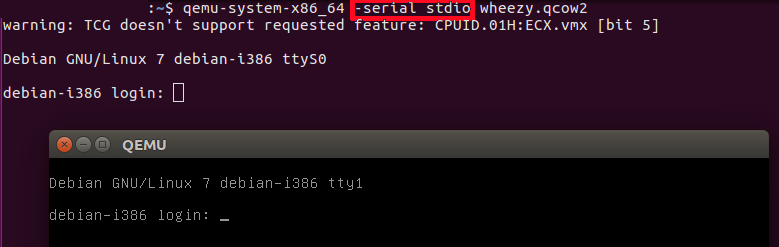
-serial stdio redirects the virtual serial port to the host's terminal input/output. You will see a welcome string after a successful boot.
-nographic
qemu-system-x86_64 -nographic wheezy.qcow2
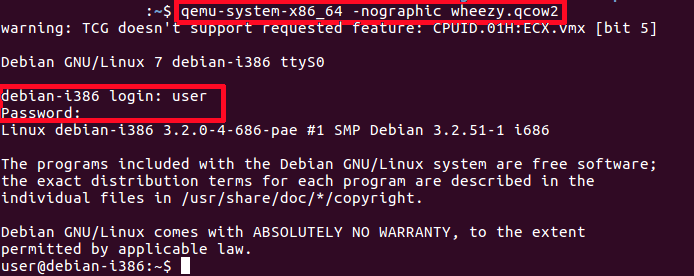
-nographic does the same as "-serial stdio" and also hides a QEMU's graphical window.
Cautions:
You will not see any early boot logs in the host's console. To get them, see Early boot messages in the host terminal below.
To exit the guest system without GUI, using stdio redirected to the terminal, login as a root (user:
root
, password:
root
) and shutdown the system (wait after that for a while):
# Guest

shutdown -h now
2. Early boot messages in the host terminal
console=ttyS0
If you want to see early boot logs, you should pass console=ttyS0 parameter to a Linux kernel command line:
qemu-system-x86_64 -nographic -kernel vmlinuz -hda wheezy.img -append "root=/dev/sda console=ttyS0"
or
qemu-system-x86_64 -serial stdio -kernel vmlinuz -hda wheezy.img -append "root=/dev/sda console=ttyS0"
or
qemu-system-x86_64 -serial stdio wheezy.qcow2

 # 1. Wait for a GRUB menu to show.

 # 2. Press `e`.

 # 3. Find the line starting with "linux".

 # 4. Add "console=ttyS0".
*qemu-system-x86_64 -serial stdio -kernel vmlinuz -hda wheezy.img -append "root=/dev/sda console=ttyS0"*:
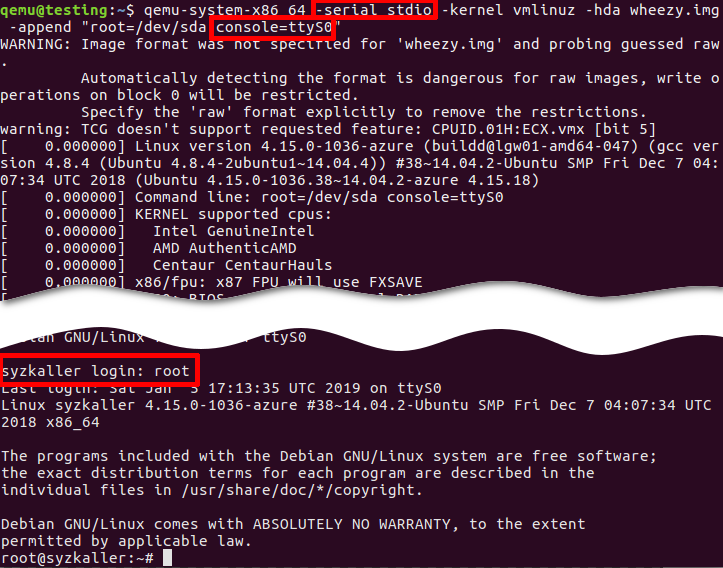
- -serial stdio or -nographic redirects input/output to the current terminal.
- -append "root=/dev/sda console=ttyS0":
console=ttyS0forces the guest kernel to send output to the first UART serial port ttyS0, which is redirected to the host by the-serial stdiooption, androot=/dev/sdapoints the kernel to use a /dev/sda device to load the wheezy.img.
Other options:
- -kernel vmlinuz loads the kernel from the local "./vmlinuz" file.
- -hda wheezy.img is a raw image which is suitable for booting with vmlinuz binary (wheezy.qcow2 won't be recognized in the block device).
3. Input/output through a named pipe (file)
Create a named pipe
mkfifo /tmp/guest.in /tmp/guest.out
Start QEMU
qemu-system-x86_64 -serial pipe:/tmp/guest -kernel vmlinuz -hda wheezy.img -append "root=/dev/sda console=ttyS0"
-serial pipe:/tmp/guest redirects a guest's output to a /tmp/guest.out and allows to send input from host to guest via /tmp/guest.in.
Take an output from the guest
cat /tmp/guest.out
Send a command to the guest
When login screen appears, send a login string:
printf "root\n" > /tmp/guest.in
Wait until some string
Wait until SSH Daemon starts.
while read line; do

  echo "${line}"

  if [[ ${line} == *"Secure Shell server: sshd"* ]]; then

    break;

  fi

done < /tmp/quest.out
4. Automate QEMU guest using expect tool
Install "expect" tool
sudo apt install expect
Create an expect script
example.exp:
#!/usr/bin/expect -f

# Wait enough (forever) until a long-time boot

set timeout -1

# Start the guest VM

spawn qemu-system-x86_64 -serial stdio wheezy.qcow2

expect "login: "

send "root\n"

expect "Password: "

send "root\n"

expect "# "

send "shutdown -h now"
Original script is found there: https://stacoverflow.com/questions/314613/qemu-guest-automation, but be careful, symbol of quotes “ (which is not a ") in the original stackoverflow answer cannot be recognized by the expect utility (send "root\n").
Execute "expect" script
chmod +x example.exp

./example.exp
5. Automate QEMU guest using ssh
Set up port forwarding
qemu-system-x86_64 -netdev user,id=net0,hostfwd=tcp::10022-:22 -device e1000,netdev=net0 wheezy.qcow2
Connect via ssh
ssh root@localhost -p 10022 'uptime; ls; echo Test;'
To apply server's public key automatically use
-o "StrictHostKeyChecking no"
:
ssh root@localhost -p 10022 -o "StrictHostKeyChecking no" 'uptime; ls; echo Test;'
Troubleshooting
QEMU guest has to be able to recognize a network card device (NIC, Network Interface Card):
-netdev user,id=net0 -device e1000,netdev=net0
.
# Without port forwarding

qemu-system-x86_64 -netdev user,id=net0 -device e1000,netdev=net0 wheezy.qcow2
Boot and check that the new interface has appeared on the guest system:
# Guest

ifconfig -a
Linux kernel on the guest must support a network card emulated by QEMU. In the opposite case the guest won't get a new Ethernet interface. After booting you should find "eth0" (running broadcast device, not loopback) on the guest. It depends solely on the guest Linux kernel and on the kernel modules.
Check the
10022
port on the host:
# Host

netstat -tanp | grep 10022

   tcp  0  0 0.0.0.0:10022   0.0.0.0:*  LISTEN  16589/qemu-system-x
Check the
22
port on the guest:
# Guest

netstat -tanp | grep 22

    tcp  0  0 0.0.0.0:22      0.0.0.0:*  LISTEN  2430/sshd
You can forward
telnet
port
23
and verify the connection:
qemu-system-x86_64 -netdev user,id=net0,hostfwd=tcp::10023-:23 -device e1000,netdev=net0 wheezy.qcow2
Guest (server):
# Guest

nc -v -l -p 23

    Listening on [0.0.0.0] (family 0, port 23)
Host (client):
# Host

echo asdf | nc localhost 10023
Establish passwordless login via ssh
Generate host SSH keys:
# Host

ssh-keygen -b 2048 -t rsa -q -N "" -f ./qemukey
Set up a public key to the guest as a trusted (authorized) key.
Via
ssh-copy-id
You need a root with password. You the guest root is passwordless, go to the guest system and set up the password:
# Guest

sudo passwd
Send the generated public key:
# Host

ssh-copy-id -p 10022 -i ~/.ssh/qemukey root@localhost
Reset the password in the guest system:
# Guest

sudo passwd -l root
Manually
Send a public key via
scp
:
# Host

scp -P 10022 ./qemukey.pub root@localhost:/root/.ssh/
Login to the guest and set up new authorized key:
# Guest

cat /root/.ssh/qemukey.pub >> /root/.ssh/authorized_keys

/etc/init.d/ssh restart
Or mount device locally, put the public key to the .ssh directory, and concatenate to authorized_keys.
Fix the
/etc/ssh/sshd_config
on the guest:
PasswordAuthentication no

PermitRootLogin without-password
Restart SSH daemon on the guest:
# Guest

/etc/init.d/ssh restart
Connect via ssh:
# Host

ssh root@localhost -p 10022 -i ./qemukey
Viola! You don't need the password and you can automate the remote QEMU guest.
Binaries used in the examples
- wheezy.qcow2 (i386)
- bootable Debian "Wheezy" image a QEMU copy-on-write format. Login/password: "root"/"root", and "user"/"user".
wget https://people.debian.org/~aurel32/qemu/i386/debian_wheezy_i386_standard.qcow2 -O wheezy.qcow2
- wheezy.img (i386)
- non-bootable Debian "Wheezy" image (without kernel) to use with own kernel (
-kernel vmlinuz
).
wget https://storage.googleapis.com/syzkaller/wheezy.img
- vmlinuz (i386)
- compressed bootable Linux kernel. Options:
Build from the scratch: Build Android Kernel and Run on QEMU with Minimal Environment: Step by Step.
Download from Ubuntu repository (
WARNING!
Port forwarding will NOT work):
wget http://security.ubuntu.com/ubuntu/pool/main/l/linux-signed-azure/linux-image-4.15.0-1036-azure_4.15.0-1036.38~14.04.2_amd64.deb

ar x linux-image-4.15.0-1036-azure_4.15.0-1036.38~14.04.2_amd64.deb

tar xf data.tar.xz ./boot/vmlinuz-4.15.0-1036-azure

cp ./boot/vmlinuz-4.15.0-1036-azure ./vmlinuz
You can try your host's linux kernel passing one to the QEMU guest (
WARNING!
You could have problems either with port forwarding, or with a block device):
sudo cp /boot/vmlinuz-$(uname -r) ./
WARNING!
Ubuntu's
vmlinuz
doesn't contain drivers for QEMU emulated network card devices (NIC). Debian's
vmlinuz
doesn't have prebuilt drivers to load a raw image from
/dev/sda
device.
如何设置 QEMU 输出到控制台并使用 Shell 脚本自动化的更多相关文章
- .NET Core的日志[2]:将日志输出到控制台
对于一个控制台应用,比如采用控制台应用作为宿主的ASP.NET Core应用,我们可以将记录的日志直接输出到控制台上.针对控制台的Logger是一个类型为ConsoleLogger的对象,Consol ...
- 问题:C#控制台程序参数;结果:设置与读取C#控制台应用程序Main函数中的参数args
设置与读取C#控制台应用程序Main函数中的参数args 在项目属性面版->调试->命令行参数设置.空格分隔.读取:string[] str = Environment.GetComman ...
- slf4j日志只输出到控制台,没输出到日志文件
最近使用SLF4J遇到了一个比较头疼的坑,日志输出到控制台没有问题,但是始终没有输出到日志文件.无论怎麽修改日志配置,始终是老样子. 有一种绝望,是各种百度.google却还是解决不了问题..直到我在 ...
- Spark日志,及设置日志输出级别
Spark日志,及设置日志输出级别 1.全局应用设置 2.局部应用设置日志输出级别 3.Spark log4j.properties配置详解与实例(摘录于铭霏的记事本) 文章内容来源: 作者:大葱拌豆 ...
- Eclipse对printf()不能输出到控制台的解决方法
方案1: 在main 语句中加一条 setbuf(stdout,NULL); 这个即可. 在ecplise下使用cdt开发c程序,发现运行后终端没有输出,停止后会输出,通过在main中添加 setbu ...
- Java基础知识强化之集合框架笔记49:键盘录入5个学生信息(姓名,语文成绩,数学成绩,英语成绩)按照总分从高到低输出到控制台
1. 键盘录入5个学生信息(姓名,语文成绩,数学成绩,英语成绩)按照总分从高到低输出到控制台: 分析: A: 定义学生类 B: 创建一个TreeSet集合 C: 总分从高到底如何实现 ...
- 安卓调试工具adb返回的png截图,直接输出到控制台的修复问题
原始出处:www.cnblogs.com/Charltsing/p/adbpngfix.html QQ:564955427 adb由于兼容性问题,会把0a替换成0d0a输出到控制台,这会造成png图片 ...
- 终于解决 xUnit.net 测试中无法输出到控制台的问题
2018-8-2 更新:今天发现在 git bash 中用 dotnet test 运行 xunit 测试可以正常输出到控制台,只是在 PowerShell 与 Windows 命令行中有这个问题. ...
- 重定向、feed输出:控制台输出的内容存放到文件
重定向.feed输出:控制台输出的内容存放到文件 1.重定向 os.system('wget -r -p -np -k http://www.baidu.com/ -o wget.log' ) 2.f ...
- java fastjson 设置全局输出name最小化
1.通过自定义Filter实现 https://github.com/alibaba/fastjson/wiki/SerializeFilter public class JackJsonLowCas ...
随机推荐
- Pinely Round 3 (Div. 1 + Div. 2)
A 构造题,分两种情况考虑 上下都行,左右选一个 左右都行,上下选一个 void solve() { int n; cin >> n; vector<pair<int, int ...
- 手把手搭建WebSocket多人在线聊天室(SpringBoot+WebSocket)
前言 本文中搭建了一个简易的多人聊天室,使用了WebSocket的基础特性. 源代码来自老外的一篇好文: https://www.callicoder.com/spring-boot-websocke ...
- 文件上传--php user.ini详解
文件上传 参考文档:https://www.php.net/manual/zh/configuration.file.per-user.php 如果你的 PHP 以模块化运行在 Apache 里,则用 ...
- WEB服务与NGINX(4)-NGINX实现虚拟主机
目录 1 http基础配置参数详解 2 搭建虚拟主机 2.1 基于ip的虚拟主机 2.2 基于端口的虚拟主机 2.3 基于域名的虚拟主机 1 http基础配置参数详解 [root@nginx01 ~] ...
- leaflet 在地图上创建marker标记
<!DOCTYPE html> <html> <head> <title>Layers Control Tutorial - Leaflet</t ...
- NODEJS通过发送json数据查询目标服务,实现服务器状态监控,发现异常发送到微信群提醒
root@aea87fa6e6a2:/home/node# cat login2.js const request = require('request-promise'); const moment ...
- Windows10 在Hyper-V安装lnmp环境docker方式
1.启用win10虚拟化hyper-v 2.安装docker win10 https://hub.docker.com/editions/community/docker-ce-desktop-win ...
- Vue 3指令与事件处理
title: Vue 3指令与事件处理 date: 2024/5/25 18:53:37 updated: 2024/5/25 18:53:37 categories: 前端开发 tags: Vue3 ...
- Redis内存容量评估
业务侧申请redis服务器资源时,需要事先对redis容量做一个大致评估,之前的容量评估公式基本只是简单的 (key长度 value长度)* key个数,误差较大,后期经常需要进行缩扩容调整,因此提出 ...
- Gitea 代码仓库平台
引言 Gitea 是一个自己托管的 Git 服务程序.他和 GitHub,Bitbucket or Gitlab 等比较类似.它是从 Gogs 发展而来,不过它已经 Fork 并且命名为 Gitea. ...