OpenCV笔记(7) 轮廓
1. 查找轮廓 FindContours
public static void FindContours(InputOutputArray image, //输入8-bit单通道的图片
                    out Mat[] contours, //一组数组,contours[i]是一条轮廓,而contours[i][j]是点
                    OutputArray hierarchy, //输出一个数组,表示轮廓的树结构,每个值都是四元数组
                    RetrievalModes mode, //轮廓提取方式
                    ContourApproximationModes method, //轮廓如何被表达
                    Point? offset = null);

public static void FindContours(InputOutputArray image,
                    out Point[][] contours,
                    out HierarchyIndex[] hierarchy,
                    RetrievalModes mode,
                    ContourApproximationModes method,
                    Point? offset = null);
2. 绘制轮廓 DrawContours
public static void DrawContours(InputOutputArray image,
                    IEnumerable<Mat> contours,
                    int contourIdx, //需要绘制的轮廓索引,若为负,绘制所有轮廓
                    Scalar color, //颜色
                    int thickness = 1, //线粗
                    LineTypes lineType = LineTypes.Link8, //四联通、八联通、AA线
                    Mat hierarchy = null,
                    int maxLevel = int.MaxValue,
                    Point? offset = null);

public static void DrawContours(InputOutputArray image,
                    IEnumerable<IEnumerable<Point>> contours,
                    int contourIdx,
                    Scalar color,
                    int thickness = 1,
                    LineTypes lineType = LineTypes.Link8,
                    IEnumerable<HierarchyIndex> hierarchy = null,
                    int maxLevel = int.MaxValue, Point? offset = null);
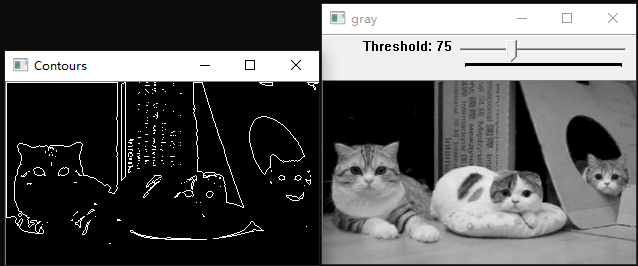
示例:滑动条和找轮廓
代码:
using System;

using OpenCvSharp;

namespace ConsoleApp2

{

    class Program

    {

        static void Main(string[] args)

        {

            Mat g_gray = new Mat();

            Mat g_binary = new Mat();

            int g_thresh = 100;

            void on_trackbar(int pos, object userdata)

            {

                Cv2.Threshold((Mat)userdata, g_binary, pos, 255, ThresholdTypes.BinaryInv);

                Point[][] contours; HierarchyIndex[] hierarchy;

                Cv2.FindContours(g_binary, out contours, out hierarchy, RetrievalModes.List, ContourApproximationModes.ApproxSimple);

                Mat mask = new Mat(g_binary.Rows, g_binary.Cols, MatType.CV_8UC1, new Scalar(0));

                Cv2.DrawContours(mask, contours, -1, new Scalar(255));

                Cv2.ImShow("Contours", mask);

            }

            g_gray = Cv2.ImRead("C:\\Users\\ATWER\\Desktop\\b.png",ImreadModes.Grayscale);

            Cv2.ImShow("gray", g_gray);

            CvTrackbar cvTrackbar = new CvTrackbar("Threshold", "gray", g_thresh, 255, on_trackbar,g_gray);

            Cv2.ImShow("gray", g_gray);

            Cv2.WaitKey(0);

        }

    }

}
3. 查找连通区域 ConnectedComponentsWithStats
示例:连通区域

using System;

using OpenCvSharp;

namespace ConsoleApp2

{

    class Program

    {

        static void Main(string[] args)

        {

            Mat img = Cv2.ImRead("C:\\Users\\ATWER\\Desktop\\c.png");

            Mat labelMat = new Mat(); Mat stats = new Mat();

            Mat centroids = new Mat();

            Cv2.CvtColor(img, img, ColorConversionCodes.BGR2GRAY);
        Cv2.NamedWindow("img",WindowMode.Normal);

       Cv2.ImShow("img", img);

            int num = Cv2.ConnectedComponentsWithStats(img, labelMat, stats, centroids, PixelConnectivity.Connectivity4);

            Console.WriteLine(num.ToString());

            for (int i = 0; i < num; i++)

            {

                double a = centroids.At<double>(i, 0);

                double b = centroids.At<double>(i, 1);

                Point point = new OpenCvSharp.Point(a, b);

                Cv2.Circle(img, point, 2, new Scalar(0, 0, 255));

                int x = stats.At<int>(i, 0);

                int y = stats.At<int>(i, 1);

                int width = stats.At<int>(i, 2);

                int height = stats.At<int>(i, 3);

                Rect rect = new Rect(x, y, width, height);

                Cv2.Rectangle(img, rect, new Scalar(255));

            }

            Cv2.NamedWindow("绘制质心", WindowMode.Normal);

            Cv2.ImShow("绘制质心", img);

            Cv2.WaitKey(0);

        }

    }

}
4. 多边形逼近轮廓 ApproxPolyDP()
public static void ApproxPolyDP(InputArray curve,
                    OutputArray approxCurve,
                    double epsilon,
                    bool closed);
示例:多边形逼近一个圆的外轮廓
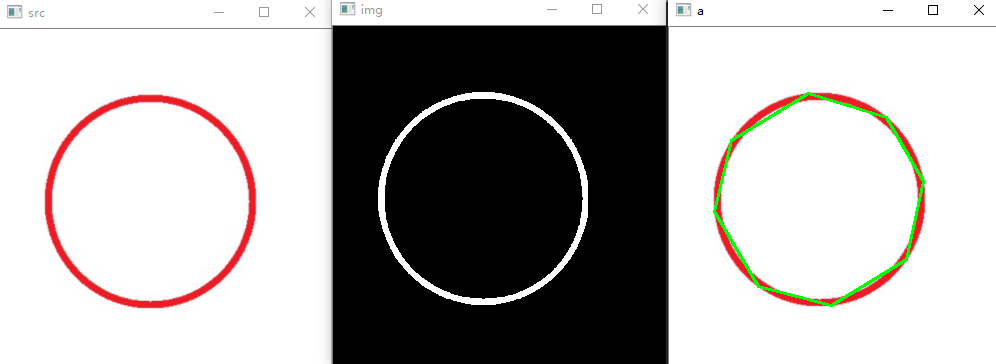
代码:
using System;

using System.Numerics;

using OpenCvSharp;

namespace ConsoleApp10

{

    class Program

    {

        static void Main(string[] args)

        {

            Mat img = new Mat();

            Mat src = Cv2.ImRead("D:\\Backup\\桌面\\c.png");
        //预处理

            Cv2.CvtColor(src, img, ColorConversionCodes.BGR2GRAY);

            Cv2.BitwiseNot(img, img);

            Cv2.Threshold(img, img, 128, 255, ThresholdTypes.Binary);

            Cv2.ImShow("img", img);
        //查找轮廓

            Mat[] contours;

            Mat hierarchy = new Mat();

            Cv2.FindContours(img,out contours, hierarchy, RetrievalModes.External, ContourApproximationModes.ApproxSimple);

            Mat[] contours_poly = (Mat[])contours.Clone();

            //Cv2.DrawContours(img, contours, -1, new Scalar(255),5);

            for (int i = 0; i < contours.Length; i++)

            {

                Cv2.ApproxPolyDP(contours[i], contours_poly[i], 10, true);//多边形逼近

            }
        //绘制轮廓

            Cv2.DrawContours(src, contours_poly, -1, new Scalar(0,255, 0),2);

            Cv2.ImShow("a", src);

            Cv2.WaitKey(0);

        }

    }

}
5. 获得矩形包围框 BoundingRect
public static Rect BoundingRect(InputArray curve);

public static RotatedRect MinAreaRect(InputArray points);
示例:矩形包围框
代码:
using System;

using System.Numerics;

using OpenCvSharp;

namespace ConsoleApp10

{

    class Program

    {

        static void Main(string[] args)

        {

            Mat img = new Mat();

            Mat src = Cv2.ImRead("D:\\Backup\\桌面\\c.png");

            Cv2.ImShow("src", src);

            Cv2.CvtColor(src, img, ColorConversionCodes.BGR2GRAY);

            Cv2.BitwiseNot(img, img);

            Cv2.Threshold(img, img, 128, 255, ThresholdTypes.Binary);

            Cv2.ImShow("img", img);

            //查找轮廓
        Mat[] contours;

            Mat hierarchy = new Mat();

            Cv2.FindContours(img,out contours, hierarchy, RetrievalModes.List, ContourApproximationModes.ApproxSimple);

            Mat[] contours_poly = (Mat[])contours.Clone();

            for (int i = 0; i < contours.Length; i++)

            {

                Cv2.ApproxPolyDP(contours[i], contours_poly[i], 10, true);

                //获得轮廓长度

                double len = Cv2.ArcLength(contours_poly[i], true);

                Console.WriteLine(len.ToString());

                //获得矩形包围框

                Rect rect = Cv2.BoundingRect(contours_poly[i]);

                Cv2.Rectangle(src, rect, new Scalar(0),5);

                //获得最小矩形框

                RotatedRect rect_rotate = Cv2.MinAreaRect(contours_poly[i]);

                Console.WriteLine(rect_rotate.Angle.ToString());

            }
        //绘制轮廓

            Cv2.DrawContours(src, contours_poly, -1, new Scalar(0,255, 0),2);

            Cv2.ImShow("a", src);

            Cv2.WaitKey(0);

        }

    }

}
6. 获得轮廓凸包 ConvexHull
public static void ConvexHull(InputArray points,
                  OutputArray hull,
                  bool clockwise = false,
                  bool returnPoints = true);
示例:轮廓凸包
 代码:
代码:
using System;

using System.Numerics;

using OpenCvSharp;

namespace ConsoleApp10

{

    class Program

    {

        static void Main(string[] args)

        {

            Mat img = new Mat();

            Mat src = Cv2.ImRead("D:\\Backup\\桌面\\d.png");

            Cv2.ImShow("src", src);

            Cv2.CvtColor(src, img, ColorConversionCodes.BGR2GRAY);

            Cv2.BitwiseNot(img, img);

            Cv2.Threshold(img, img, 128, 255, ThresholdTypes.Binary);

            Cv2.ImShow("img", img);
        //查找轮廓

            Mat[] contours;

            Mat hierarchy = new Mat();

            Cv2.FindContours(img,out contours, hierarchy, RetrievalModes.List, ContourApproximationModes.ApproxSimple);
        //凸包  居然想不到第二个方法把hulls画出来

            Mat hulls = new Mat();

            Cv2.ConvexHull(contours[0],hulls,false);

            Mat[] r = new Mat[] { hulls };

        //绘制轮廓

            Cv2.DrawContours(src, r, -1, new Scalar(0, 255, 0), 2);

            Cv2.ImShow("a", src);

            Cv2.WaitKey(0);

        }

    }

}
7. Tips
学到一个新知识点,在二值化和查找轮廓之间,运用开运算,可以去除小的区域干扰。相比于在for循环遍历中再判断大小,要更节约时间。——2021.10.18
源自:蝴蝶书第十四章轮廓
OpenCV笔记(7) 轮廓的更多相关文章
- OpenCV笔记大集锦(转载)
整理了我所了解的有关OpenCV的学习笔记.原理分析.使用例程等相关的博文.排序不分先后,随机整理的.如果有好的资源,也欢迎介绍和分享. 1:OpenCV学习笔记 作者:CSDN数量:55篇博文网址: ...
- opencv笔记6:角点检测
time:2015年10月09日 星期五 23时11分58秒 # opencv笔记6:角点检测 update:从角点检测,学习图像的特征,这是后续图像跟踪.图像匹配的基础. 角点检测是什么鬼?前面一篇 ...
- opencv笔记5:频域和空域的一点理解
time:2015年10月06日 星期二 12时14分51秒 # opencv笔记5:频域和空域的一点理解 空间域和频率域 傅立叶变换是f(t)乘以正弦项的展开,正弦项的频率由u(其实是miu)的值决 ...
- opencv笔记4:模板运算和常见滤波操作
time:2015年10月04日 星期日 00时00分27秒 # opencv笔记4:模板运算和常见滤波操作 这一篇主要是学习模板运算,了解各种模板运算的运算过程和分类,理论方面主要参考<图像工 ...
- opencv笔记3:trackbar简单使用
time:2015年 10月 03日 星期六 13:54:17 CST # opencv笔记3:trackbar简单使用 当需要测试某变量的一系列取值取值会产生什么结果时,适合用trackbar.看起 ...
- opencv笔记2:图像ROI
time:2015年 10月 03日 星期六 12:03:45 CST # opencv笔记2:图像ROI ROI ROI意思是Region Of Interests,感兴趣区域,是一个图中的一个子区 ...
- opencv笔记1:opencv的基本模块,以及环境搭建
opencv笔记1:opencv的基本模块,以及环境搭建 安装系统 使用fedora22-workstation-x86_64 安装opencv sudo dnf install opencv-dev ...
- [OpenCV-Python] 21 OpenCV 中的轮廓
文章目录 OpenCV-Python:IV OpenCV中的图像处理 21 OpenCV 中的轮廓 21.1 初识轮廓 21.1.1 什么是轮廓 21.1.2 怎样绘制轮廓 21.1.3 轮廓的近似方 ...
- 查找并绘制轮廓[OpenCV 笔记XX]
好久没有更新了,原谅自己放了个假最近又在赶进度,所以...更新的内容是很靠后的第八章,因为最近工作要用就先跳了,后面会更新笔记编号...加油加油! 在二值图像中寻找轮廓 void cv::findCo ...
- OpenCV学习笔记(12)——OpenCV中的轮廓
什么是轮廓 找轮廓.绘制轮廓等 1.什么是轮廓 轮廓可看做将连续的点(连着边界)连在一起的曲线,具有相同的颜色和灰度.轮廓在形态分析和物体的检测和识别中很有用. 为了更加准确,要使用二值化图像.在寻找 ...
随机推荐
- mysql 悲观锁和乐观锁(二)
前言 简单介绍一下,在mysql 优化系列中会重新介绍,仅仅是留个印象. 悲观锁和乐观锁其实都是概念性问题. 正文 悲观锁: 悲观锁,正如其名,具有强烈的独占和排他特性. 它指的是对数据被外界(包括本 ...
- ImageJ软件使用教程(二):图像测量
目录 图像比例尺 加载图像 设置比例尺 标注比例尺 测量长度面积 测量长度 测量面积 参考资料 图像比例尺 使用ImageJ软件测量图像中的长度.面积等信息时,需要先设置图像的比例尺,比例尺用于将图像 ...
- pip(国内常用镜像源)安装地址
国内常用镜像源 清华大学:https://pypi.tuna.tsinghua.edu.cn/simple/ 阿里云:http://mirrors.aliyun.com/pypi/simple/ 中国 ...
- Spring 源码阅读(一)环境搭建
注意事项: 使用 2024-03-14 发布的 Spring 5.3.33 版本 IDE 工具使用了 Intellij IDEA,同时为了简化不必要的内容没单独配置 Gradle 环境 JDK 版本采 ...
- 登录chatgpt的时候出现429的解决方法,亲测有效
登录chatgpt的时候出现429的解决方法 PS:在2023年3月14日晚还是可以用的,亲测有效 登录chatgpt的时候出现429的解决方法 很多时候在国内用代理进入chatgpt的时候会出现42 ...
- 力扣602(MySQL)-好友申请Ⅱ:谁有最多的好友(中等)
题目: 在 Facebook 或者 Twitter 这样的社交应用中,人们经常会发好友申请也会收到其他人的好友申请. RequestAccepted 表: (requester_id, accepte ...
- 牛客网-SQL专项训练16
①在book表中,将工具书类型(tool)的书的书架序号都减少2,下列语句正确的是(C) 解析: 题目要求的批量更改,insert 是更改数据,排除B,update与set搭配使用,排除选项D,whe ...
- 阿里云消息队列 RocketMQ 5.0 全新升级:消息、事件、流融合处理平台
简介: RocketMQ5.0 的发布标志着阿里云消息从消息领域正式迈向了"消息.事件.流"场景大融合的新局面.未来阿里云消息产品的演进也将继续围绕消息.事件.流核心场景而开展. ...
- 大模型必备 - 中文最佳向量模型 acge_text_embedding
近期,上海合合信息科技股份有限公司发布的文本向量化模型 acge_text_embedding 在中文文本向量化领域取得了重大突破,荣获 Massive Text Embedding Benchmar ...
- Linux内核之I2C协议
I2C协议标准文档 THE I2C-BUS SPECIFICATION VERSION 2.1 JANUARY 2000: https://www.csd.uoc.gr/~hy428/reading/ ...